


How to start a photography blog
In just 4 simple steps, you can learn how to start a photography blog in under 20 minutes! Using WordPress + reliable & fast hosting, create a custom photo website.
Business Guides | Learn | By Mark Condon | Last Updated: February 7, 2024
Whether you’re a professional or an amateur photographer, it’s important that you learn how to start a photography blog and create your own website.
Community sites like 500px, Flickr and Instagram are great, but learning how to make a photography blog for yourself is the best long term option.
Despite all the website platforms that cater especially for photographers (e.g. Squarespace), I highly recommend you choose WordPress and your own dedicated hosting.
Lightning fast hosting with world-class 24/7 support and free migrations.
WordPress is a free website creation tool, which you can use to quickly set up a photography site featuring a blog, a portfolio, a booking form, sales galleries, and any number of other amazing features.
WordPress is also a flexible option if you’re interested in optimising your website for SEO.
I’m going to show you how to start a photography blog in just 4 simple steps.
(I also give my recommendation as to the best website host for photographers, here in 2024.)
4 Steps to Start a Photography blog
Making your own photography blog or website may seem an overwhelming task, but it’s not complicated if you follow my steps outlined below.
Here’s a quick-start guide for how to create a photography blog:
- 1: Register a Domain Name (Time required: ~5 mins)
- 2: Set up Website Hosting (~10 mins)
- 3: Install WordPress (~5 mins)
- 4: Choose a Theme (~20 mins)
Let me know if you have any specific questions in the comments, but if you follow my guidelines, you should have your blog online in under 1 hours.
So let’s get cracking!
1. Register a Domain Name

A ‘domain name’ is like the ‘address’ for the ‘home’ you’re about to purchase on the Internet :-)
Don’t worry – it’s not nearly as complicated or expensive as it sounds! You see domain names every time you use the Internet, and they’re actually very easy and affordable to buy, or ‘register’ as it’s known.
Learning how to start photography blog actually starts off with something fun and kind of easy: picking the name for your blog!
Brainstorming domain name ideas is a fun part of starting your own photography website! Be sure to put some careful thought into it, as your domain name may be used for all your future branding too.
Most people use their own name plus the word ‘photography’ (e.g. www.sarahsmithphotography.com).
If you’re not keen to use your own name, try and think of something original and special to you. My own site www.goldhatphotography.com is based on a quote from the Great Gatsby novel, which my wife and I chose several years ago.
There are various companies that offer ‘domain name registration’, but I recommend you use the same one as I do: WPX Hosting.
WPX offer various features for free that other companies typically charge for, such as free unlimited SSLs (to make your site more secure), and free WhoIs Privacy (to protect your identity from hackers).
Domain names registered at WPX are also great value, at only $10/yr for a .com; and between $7.00~$8.99 for country specific domains, e.g. a .co.uk is only $8.99/yr.
To start your domain name search, click here and enter your chosen domain name(s) into the search bar:

You can even enter multiple ideas you have for domain names at once.
After clicking ‘Search’, you’ll be able to see which domain names are still available to purchase – now it’s simply a matter of clicking the green ‘Register’ button and paying the fee.
If you see a red ‘Transfer’ button next to the domain name you’d like to register (and you don’t already own it), you’ll have to keep trying for another name, since someone already owns that one.
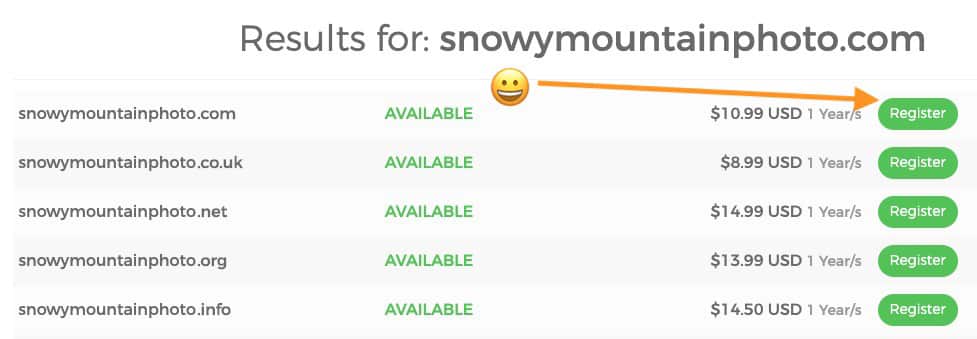
Click the green ‘register’ button to grab your chosen domain name before anyone else ;-)
WPX Hosting makes it easy and fast to register one or multiple domain names, and it’s actually quite addictive!
You may find yourself wanting to buy several domains, just so no one else can snag them :-)
It’s a great feeling to have your own domain name registered! For the price of a couple of takeaway coffees, you’ve just ‘bought’ your very own little spot on the Internet for an entire year.
This is the first important step to starting your own personal photography blog. Hopefully it only took you a few minutes…
Now you’ve got your domain name, let’s move on to the next step.
2. Set up Website Hosting

Choosing a host can be tedious – save some time (and money) by using the same company I use.
If a ‘domain name’ is the ‘address’ of your new home on the Internet, ‘website hosting’ is the ‘plot of land’ on which you’ll build your new house!
There are hundreds of hosting options available here in 2024, and one day if you start getting millions of visitors (fingers crossed!) you may need to change to a more expensive host.
However, for the time being I recommend you take my advice and go with the same company used to register your domain name – WPX Hosting.
(If you’ve already registered a domain name with another company, you can either leave it there, or transfer it to WPX – it doesn’t really matter either way)
Hosting is an essential step when you create a photo blog. Even though it appears very technical, you can accomplish this even if you’re setting up photography blogs for beginners.
Here’s the short process to getting your hosting paid for and set up properly:
-
Choose your Plan
The first thing to do is to choose a hosting ‘plan’.
After clicking the red ‘Start Now’ button on the WPX Hosting homepage here, you’ll be taken to a screen like the one below.
I recommend you start with the ‘Business’ plan which includes everything that 99% of us photographers will ever need.

WPX offers a discounted ‘Business’ plan, which is best value for most photographers.
You’ll also notice it includes up to FIVE websites – this is another reason that WPX is such great value for money.
Most other hosts of this caliber double the monthly fee for 2 sites, triple it for 3, etc etc – it can get pricey really quickly.
Whether you intend to have 1 or 5 websites, the ‘Business’ plan is definitely best.
I also recommend you stick with the ‘Yearly’ option, since you’ll get a sweet 25% discount over paying month by month.
-
Choose a Country
This is a step other hosts don’t tend to offer, and it’s only really beneficial if you live in either USA or UK (and so do the majority of visitors you expect to your website).
e.g. if you’re a UK-based wedding photographer, selecting ‘Host in UK’ at this point can yield a slight speed benefit when your website is displayed to UK visitors.

Don’t let this confuse you – whichever option you choose is largely irrelevant!
If you’re neither based in US nor UK, don’t worry – just choose ‘Host in US’ like I do (I’m based in Australia).
It doesn’t really matter either way, so just click one of the buttons and move on to the next step.
-
Add your Website Domain
If you already purchased a domain in step 1 of this guide, or if you already own a domain from another company, click the option labeled ‘Hosting Only’ and follow the instructions.
You’ll pick up a lot of useful website creating skills when you learn how to make a photo blog.
If you need to both register a new domain and set up hosting for it, choose the second option, as shown below:

If you still need to register a domain name, follow this process. If you already have one, select the ‘Hosting Only’ option.
Then enter your domain name in the ‘Add here the domain(s)’ box, choose the ‘extension’ (i.e. .com, .co.uk etc), and click the red ‘Continue’ button.
At this stage you can get a further discount by paying for 2 or 3 years in advance if you wish, but I recommend you just stick to 1 for the time being. This way you can re-evaluate after a year.
Then click ‘Order Now!’ and follow the instructions on the ‘Domain Configuration’ screen that follows – usually this will mean simply leaving everything untouched and simply clicking ‘Continue’.
-
Choose your Billing Cycle
Here’s another chance to confirm if you’d like to pay month to month, or one year in advance.
I always recommend going for the ‘yearly’ option, since you’ll save 25% (around $60 over 12 months).
(You can still receive a pro-rata refund within the first 30 days – more info on the WPX refund policy here.)
A few photo blogging platforms even offer discounted trials if you want to learn how to create a photo blog without the full financial commitment.
The last step is to simply enter your payment details, and then you’re all done ;-)
3. Install Wordpress

I haven’t spoken yet about WordPress, but the long and short of it is this – if you want the most flexibility, the best value for money (it’s free!), and the most customizability (is that even a word?), choose WordPress over everything else.
It’s quick and easy making it a contender for best photography blog platform.
(If you don’t know anything about WordPress, see the FAQ section below.)
This is where it gets really cool – by registering with WPX Hosting, you can leave the rest of your WordPress website set up to their support team!
With the previous website hosts I recommended in this guide, they either charge you up to $100 for this service (hello WP Engine!), or leave you to get your hands dirty yourself (hello Bluehost, and many others!)
If you’re new to starting a photo blog, then you might as well go with the quicker and easier option for setting up your photo blog platform.
If you’ve had experience with website hosting in the past, you can see the step-by-step guide to adding a new website to your hosting account here.
For all the rest of us, I recommend you open your first WPX support ticket, and leave it to the experts!
Photographers should be out taking photos – not wasting time trying to set up a website! Leave the fiddly initial stages of configuring your new site to your host’s support team.
For most photographers, this is the true value of using a website host such as WPX – whether you’re feeling lazy, too busy, or just not confident, you can leave all the tweaking and fixing of your WordPress site to their support team.
On average, I’ve had any issues resolved via Live Chat in under 5 minutes (often under 1 minute – literally one question and one answer!), or via email in under an hour.
I’ll assume you’ll take the easy option like I did and leave it to the WPX support team, so I won’t even bother taking you through the steps of how to install WordPress here :-)
Once you’ve got WordPress installed, it’s time to make it all look nice and pretty!
This is a really fun step when you start a new blog, and a great way to inject some personality and creativity into your site.
Fortunately it’s really simple too…
4. Choose a Website Theme

Every WordPress site has a theme. Think of WordPress ‘themes’ as the paint and architectural design features of your new house.
A theme makes your site look pretty and displays your awesome photography :-)
By default, your new WordPress site may have the ‘Twenty Twenty’ theme installed. It looks nice, but it probably isn’t suitable for your photography site.
There’s also the newly released ‘Gutenberg’ theme, which offers some powerful features for bloggers, but it’s probably not suited to us photographers.
The best photo blog sites all have stunning themes. How do you get your photoblog looking great?
Here’s a great list of WordPress photography themes that’ll make your site look very professional in a few clicks, or you can check out these inspirational website designs to get some ideas for your own site.
You can also choose a free theme by searching within your Wordpress dashboard.
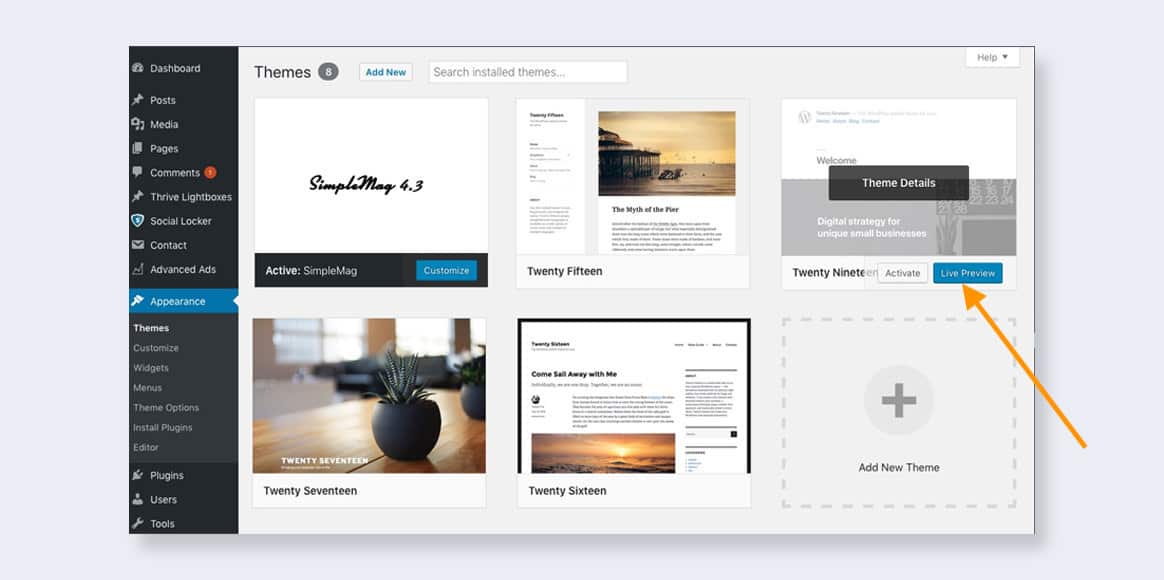
Just go to ‘Appearance’, then ‘Themes’, in the black menu on the left hand side of the Wordpress dashboard. Then click on the ‘Add new theme’ icon.

WordPress comes with various free themes for bloggers.
WordPress offers lots of free themes which you can preview at the click of a button, to see how the theme looks with your current content.
Not quite an entirely free photo blog, but these free themes are a great way to create a photography blog without spending too much money upfront.
As long as you haven’t made any custom edits to your site, the new WordPress theme will simply be like a ‘skin’ to your existing content, adjusting how it looks visually, but not touching the actual words/images/videos that you’ve spent time adding.
Just hover over any of the themes you like the look of and click the ‘Live Preview’ button. If you like how it makes your existing site look, click the ‘Activate’ button to overwrite your existing theme with the new one.
The beauty of themes is that you can preview how they look with your existing website content.
It’s tempting to go for a free Wordpress theme, but I’d recommend spending a few bucks on a Premium Wordpress Theme.
Why? Well apart from the fact you’re less likely to have a similar site to someone else (there are thousands of paid themes), you also open the door to free, unlimited support, and this is extremely useful.
With free themes you’ll usually be left on your own, wasting hours trying to figure out how to make a change, so take my advice – spend a few bucks on a premium one.
In the process of starting a photography blog, you might get the urge to change up your theme. WordPress offers tools that allow to change themes without losing your content, but you might have to moves things around to keep your blog looking great.
One final option is to use one of the many website builders available, to help you create a website without the need to fiddle with any manual code. They can be a good all-in-one solution to getting something online quickly.
You can even add additional sections to your photo blog websites. You can add a contact page, a web store for prints, or even a “write for us photography blog” section if you get the desire to hire freelance photo bloggers!
WordPress also has utilities in place if you need to migrate content from old photography blog websites to your new photo blog.
Here’s a few final WordPress tips to help you create photo blog success. WordPress can help you start a photo blog that is connected to your social media which will help your audience find your new blog.
The most compelling photo blog sites are all linked together with coherent photography blog ideas. Try to develop your niche whether it’s wedding photography blogging or you want to create a rugged nature photography blog.
When you create photography blog, you’re making a space where you can express your style and build an audience. Never forget that even the most popular photography blog sites started small with a few good ideas.
So there you have it! Now you have an infinitely customisable WordPress photography blog!
Frequently Asked Questions
Why choose WordPress to build your Photography Blog?
- Price
At time of writing, Squarespace costs $12/month for its personal package, and $18/month for its Business package. This can quickly add up.
On the other hand, Wordpress is 100% free :-)
- Customization & Flexibility
All-in-one website platforms for photographers like Squarespace do offer some great features, but the problem is that their features are often limited.
If you want your site to do something particular (and trust me, you will!), you may have to hire a web developer to make the changes, or simply it won’t be possible at all.
Wordpress on the other hand is infinitely customizeable. If you don’t feel confident enough to delve into the code, it’s fine. Wordpress offers thousands of ‘plugins’, which allow you to add a feature onto your site quickly and simply.
WordPress plugins are usually free – you usually only pay for ‘PRO’ features, and in my experience, these aren’t necessary.
- Uniqueness
Website builders like Squarespace offer editable templates to make your photo blog look pretty, but at the end of the day, there’s a high chance your site will look identical to every other photographer!
With WordPress on the other hand, there are over 10,000 themes to choose from! There’s a lot of positives that all make WordPress the best photo blog platform.
Building a WordPress site is a lot easier than you imagine, and there’s a lot of very good reasons why over 23% of the Internet is powered by WordPress today.
What is a photo blog?
A photography blog is a website where you share your photography and your writing about photography. You can write about recent shoots, share behind-the-scenes details, or write up photography tips for your audience. It’s a blank canvas for your photographic creativity.
Why Choose WPX to Host your Photography Blog
I’ve used numerous website hosting companies over my 10+ years as a photographer and working online.
One thing I’ve learned is that it’s definitely wise to invest a bit of money into hosting – if you skimp at this stage, it’s like having a Ferrari but putting gokart wheels on it! No matter how much you tune the engine, you’ll always be limited by having cheap wheels…
However, that doesn’t mean you need to buy expensive hosting – fortunately, there are some companies who offer great features for affordable monthly fees.
Previously, I recommended other companies in this article, but as I came across better options, I always updated it. I also think it’s important to actually use who I recommend to you, and at this point in April 2024, I’m still using WPX Hosting for my photography sites.
Aside from being the fastest WordPress host I’ve tested, WPX also offers the absolute best support I’ve ever encoutered – seriously, it’s amazing!
If you’re building a photography blog for the first time, it’s all the more important to have 24/7 live chat support. You need to be able to ask support for advice, or to actually fix things at any time of the day, regardless of your time zone.
Don’t just take my word for it though – you can read more about why so many succesful website owners and photographers use WPX here, or watch some user testimonials from the homepage here.
You now know how to start a photo blog and it took less time than you might have expected!
If anything changes and I find a better host in 2024, I’ll update this guide and let you know via the Shotkit newsletter.
However, something tells me I won’t be needing to do that any time soon ;-)
I hope you enjoyed this guide on how to start a blog for your photography. Leave me a comment below with any questions you have, or a link to your newly created website!
Disclaimer: All recommendations are impartial and based on user experience, with no bias to the products or the brand. The products in this post may contain affiliate links.


Mark Condon is a British wedding photographer and editor of Shotkit. When he’s not taking photos or reviewing the latest camera gear and software, Mark can be found cycling around the northern rivers.


