


Guide to Spot Metering in Photography
What is Spot Metering and when should you use it? Find out how to turn on spot metering + 6 examples of how it can dramatically improve your photos!
With harsh lighting conditions, your default metering mode can lead to dark, murky images – or even create silhouettes when you’re aiming for quite the opposite. So, what do you do in these situations?
This is exactly where spot metering can save the day and help you properly expose your images. Also, spot metering is incredibly versatile: it’s not just used to overcome tricky natural or ambient lighting – you can spot meter to take dreamy, backlit portraits.
Spot metering really is an essential part of photography to master, whether you’re a professional or an enthusiast.
Let’s explore what spot metering is – then we’ll explain how and when to use it.
What Is Spot Metering?
Spot metering gives you a meter reading for the tiny area you’ve selected with your focus point – for example, a small part of a face like the eye, a stamen in a flower, or a faraway building in a landscape.
Spot metering is quite precise – between 1 and 5% of the image.
As a side note, don’t get spot metering confused with ‘spot light meters’ which are separate pieces of equipment – they are a completely different thing! This article is to do with the spot metering mode of a camera.
Modern digital cameras have three modes of exposure metering systems you can use, one being spot metering as we’ve explained above. The other two are:
- Matrix/Evaluative Metering – Matrix Metering (Nikon) or Evaluative Metering (Canon) is the default – and most commonly used – metering mode in most DSLR cameras. It takes multiple readings from across the full frame of the picture and puts the results in an algorithm to arrive at a general reading for the whole image. Matrix metering aims to ensure the best available balance between light and dark areas.
- Center Weighted Metering – Center Weighted Metering takes readings from the central area of the frame only and sets the exposure correctly for this area. It does not read the focus point specifically – just the central area of the frame.
Natural light changes constantly with the time of day and the weather. When shadows and shafts of light occur – or a subject is against a very dark or very light background – your matrix or centre metering modes may get it quite wrong! In these instances, spot metering may be best for getting your photo properly exposed.
One general point to take from the above is that, like most things in photography, metering is not straightforward – though the complexity is what makes photography interesting.
Exposure is the art of balancing dark, light and midtones to get what you perceive or what you want to create.
What Is Spot Metering the Best For?
You may be wondering, is Spot Metering best for portraits? We’d say it’s commonly used for portraits and can be really effective.
It can also be used in a multitude of situations aside from portraits to get a correct exposure, so it’s important to know how and when to utilise spot metering. We’ll discuss this further in our examples below.
Does Spot Metering Work in Manual Mode?
Yes, spot metering does work in manual mode. It also works in ‘aperture priority’ and ‘shutter priority’ modes. However, manual mode will always give you the fullest control over the photograph you’re taking, since you can adjust aperture, ISO and shutter speed independently without impacting the other. See also: how do I master aperture priority mode?
How Do You Use Spot Metering?
When you’re walking through a forest and encounter dappled light, or you’re photographing with harsh sunlight with no shade available, or you have backlighting streaming in through a window creating silhouettes – it’s important to know how to quickly change metering modes.
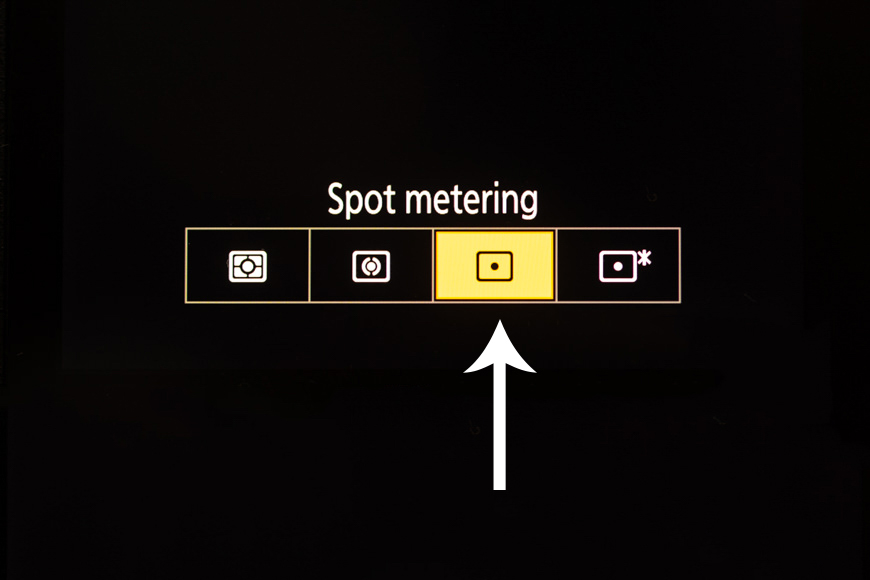
Luckily, selecting spot metering is easy enough. Once you know how to select it, you’ll use it as part of your everyday photography.
Simply navigate to the metering modes menu on your camera and select spot metering – the icon should be as shown above – a small dot in an otherwise blank frame. (Some cameras also have a dedicated metering mode button.)
Once selected, you’re ready to start shooting some spot metered images. We would recommend using manual mode first and foremost while you’re getting used to using spot metering.
As discussed above, this will give you overall control of your exposure settings – and therefore control of the way you want to take your image artistically – and you’ll be able to use spot metering to its optimum while you’re photographing.
Spot Metering Examples
Spot metering is the perfect metering system to use when you have to deal with tricky light, and you don’t have access to flash or any other artificial lighting. Below you’ll find examples of how spot metering can be used in a variety of different scenarios.
How Much Do You REALLY Know About Photography?! 🤔
Test your photography knowledge with this quick quiz!
See how much you really know about photography...

Backlit Image with Spot Metering

Backlighting is probably the primary situation you’ll face where you need to use spot metering. If you use matrix metering with backlighting, you’ll most probably be left with a silhouette, or worse, a very underexposed and muddy looking image.
Now, sometimes you’ll want to go with a silhouette with backlighting – we’ve covered these cases below.
However, in other cases, you’ll want to overcome the backlighting and properly expose for the subjects you’re photographing. In these cases, use spot metering and point the focal point in your camera viewfinder at the subject.
You’ll then take a meter reading – adjust your settings until the exposure is correct and then take the image. Your background/light source may be left overexposed – but you can adjust this in post-production (ensure you set up your camera to shoot in RAW to allow as much image manipulation as possible).
Also, you may wish to use exposure compensation to pull back a little, to leave more highlights in the background – or overexpose even further.
This can be effective with a backlit window if you want to remove all detail in the window panes and be left with just bright white behind your subject.
Perfecting a Silhouette Image with Spot Metering
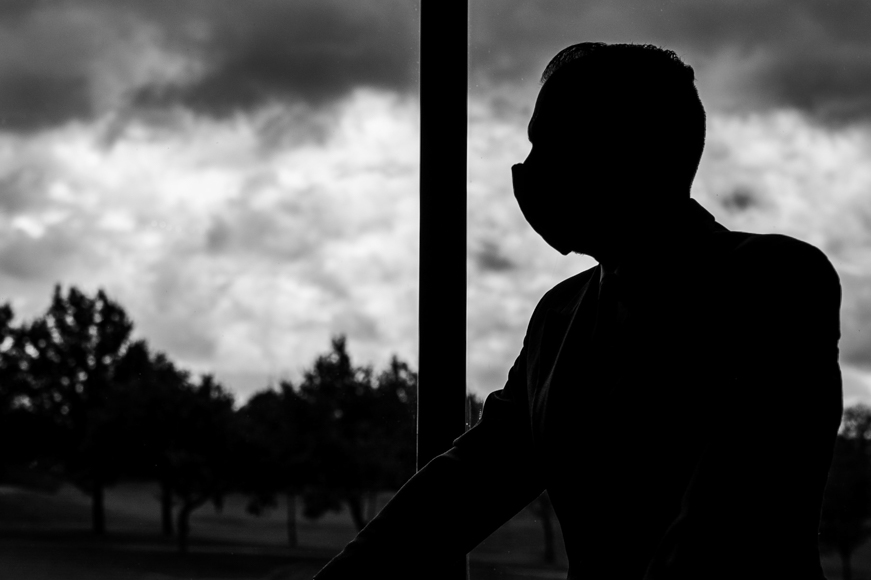
Now sometimes you may be aiming for a silhouette in your photography – in which case, spot metering mode can really assist you.
To create a silhouette with spot metering, rather than exposing for the subject, expose for the background, like in this example.
Set your camera to full manual mode, point your focal point at the sky, and take the spot meter reading.
Then, adjust your ISO, shutter and aperture accordingly – if you’re shooting a wide silhouette you can stop down to f/6.3 or even narrower. However, if you want a less focused sky, go for a shallower aperture like f/2.2.
Then, focus on the subject – but don’t adjust your exposure settings. Hit the shutter, and you’ll have taken a perfectly exposed silhouette using spot metering.
High Contrast Image with Spot Metering
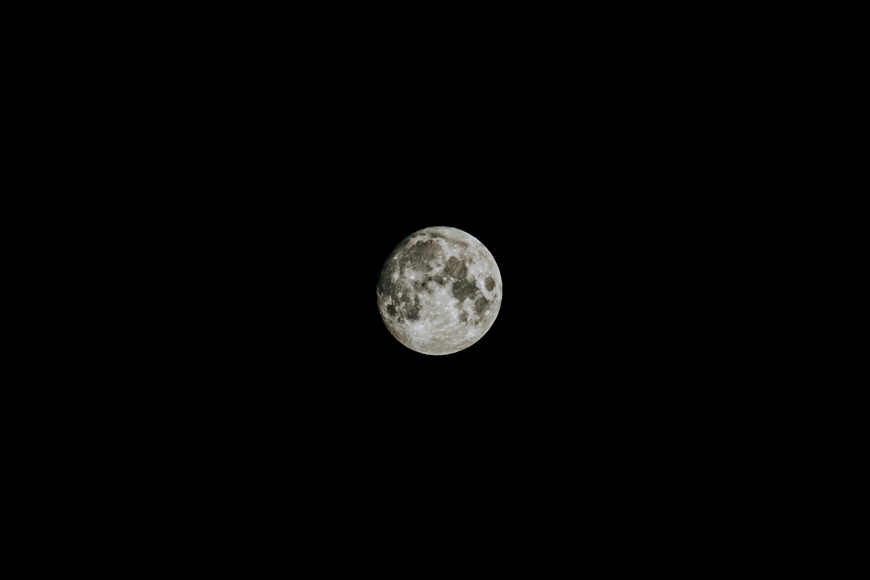
You can create highly effective high contrast images with spot metering. All you need is a bright subject and dark background or surroundings.
By focusing on a light or bright subject – in this example, the moon – you’ll expose for that subject and throw the surroundings into shadow, or in this case, complete darkness.
The moon only takes up a small percentage of the frame, so in matrix metering, the meter would try and expose for the dark background and the moon together. So you’d end up with a vastly overexposed moon, losing all detail!
So put your camera into spot metering to create high contrast images.
Taking Effective Window Light Portraits With Spot Metering

A window used to light a person from the side is a great opportunity to try out spot metering. Everyone has a window and curtains at home – so all you need is your camera and a helpful model and you can try spot metering out for the first time!
In this example, spot metering has been used to throw the curtains into shadow. The strong light coming from the window would overexpose the subject with matrix metering, but setting the metering to spot has meant the subject is well exposed.
The result is a high contrast and striking portrait. Being able to take a really visually interesting portrait on the fly, when you don’t have access to flash or lighting, is a really important skill to have.
Making the Most of Dappled Light with Spot Metering
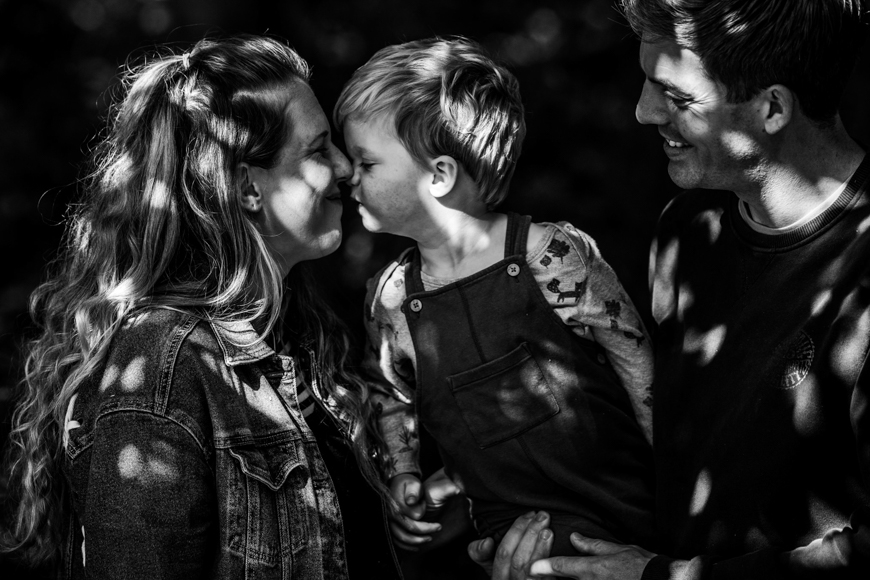
Dappled light – spotted light, usually found filtering through the gaps in trees – can be extremely tricky to properly expose for. This is made even trickier if you have a subject moving through the trees.
If you use matrix metering on your camera with dappled light, you’ll be left with overexposed light patches. This can be really troublesome as the subject interacts with the light – the overexposed areas can cover parts of the body or even faces, completely ruining your shot.
So, use spot metering. If your subject moves into a pool of light, you’ll get the correct exposure for this situation – the dappled light will be perfectly exposed, however, the rest of the image will be left underexposed.
Then you’ll have two choices. First of all, you can keep the image that way, with a dramatic high contrast look (see our guide to chiaroscuro lighting for how effective this can be).
Secondly, you can plan to lift the shadows in post-processing – if you do this you can achieve a more even exposure through digital manipulation.
Use Spot Metering for a Dreamy Looking Portrait

There has been a growing trend over the last ten years or so within photography for people to create dreamy, almost overexposed portraits. To achieve this look, spot metering is key.
You really use backlighting – and spot metering with it – to ‘make’ the image. This is not about overcoming backlighting to find the correct exposure for the subject – it’s more about achieving that sun-soaked, dream-like imagery.
To achieve this, expose for the subject with natural light filtering through trees behind – or, a window works just as well – and when the rest of the frame over exposes a little, go with it!
You’re left with a bright, airy and very contemporary looking portrait. It’s also a useful technique when photographing plants and flowers.
Spot Metering FAQ
What does metering mode do?
The metering modes determine how your camera calculates the exposure. It can ‘meter’ the light from across the entire frame, for example, or from only a specific part of the frame.
Is spot metering best for portraits?
In most cases, yes. When taking a portrait, you want to ensure the subject is correctly exposed. Spot metering ensures the camera prioritises the exposure of a small part of the scene – in this case, your subject’s face.
What is the difference between spot metering and evaluative metering?
Evaluative metering takes multiple readings from across the full frame and uses them to calculate a general reading for the whole image. Spot metering, on the other hand, takes a reading only of a very specific spot.
Final Words
Spot metering, as we’ve shown you, is not just for backlighting. It can be used in so many lighting situations – or you can choose it for artistic reasons, like taking bright ‘dream-like’ portraits or stunning silhouettes.
So next time you’re shooting, try putting the light metering mode of your camera into spot. See what it does to the skies when photographing birds in flight – you can achieve a really striking high contrast photo. Or expose for the sky and create a dark and moody silhouette.
There are so many opportunities for you to utilise this metering mode. And once you’re used to using it, you’ll grow accustomed to quickly switching metering modes whenever you need to.
So, get out there and start experimenting with spot metering photography on your camera! If you have any questions at all, please leave them as a comment below and I’ll get back to you ASAP.

Check out these 8 essential tools to help you succeed as a professional photographer.
Includes limited-time discounts.
 Best Light Meter for Photography (+ How to Use Them)
 Guide to Metering Modes in Photography
 Backlighting in Photography: Best Techniques, Examples & Setups
 How to Use a Light Meter in Photography (+ 3 Pro Tips)
 Best Light Meter App in 2024 for Film Photography & Video
 What is Silhouette Photography? (+ Ideas, Settings, Examples)

Patrick Mateer is an award-winning photographer who lives in Yorkshire, England with his wife (wedding photographer Hollie Mateer) and two children.


