


How & When to Use Aperture Priority in Photography
Discover why aperture priority is the preferred camera mode for so many professional photographers and how it can transform your photography experience.
Learn | Photography Guides | By Ana Mireles
If you want to improve your photography, you need to step out of auto mode to have full control of how your image is going to look.
Aperture priority is a semi-automatic mode that gives you the most amount of control. It’s a great compromise between full auto and full manual.
With it, you’ll get to decide how much of your image is in focus without worrying about turning your image too bright or too dark.
Combined with other features, you can also tell the camera how to decide the automatic decisions it makes, like choosing the ISO or the shutter speed.
Aperture priority mode is one of the best ways to take control over your images’ final result without dealing with an overwhelming amount of settings.
In this article, you’ll learn what aperture is and why it matters, as well as diving deep into an aperture priority tutorial to get you on your way to mastering your camera settings.
Let’s get started!
What is Aperture Priority?
To expose a photograph, you need to control three settings: aperture, shutter speed and ISO. These are known as the exposure triangle (guide).
Most cameras offer different shooting modes to regulate these factors and adjust the exposure. In auto mode, the camera controls all of them – this usually gives acceptable results, but you have no say in the exact outcome.
On the other side of the spectrum, there’s manual mode. Here, you decide all the settings giving you full control over your image. This is ideal but requires a lot of photography knowledge and shooting experience.
Fortunately, there are semi-automatic modes that allow you to control one factor at a time. That’s where aperture priority comes in.
The aperture is the hole that lets light pass through the lens into the camera. You can change the size of the hole with the diaphragm. An f-number represents this size.
Obviously, a small hole lets in less light than a bigger hole. That’s why you need to compensate the size with the other settings.
If you have a small aperture, you need to let the light in for a longer time (with a slower shutter speed) or make the sensor more sensitive to light (with a higher ISO).
When you use aperture priority mode, the camera will automatically make these combinations. You just have to open or close the aperture.
At this point, you’re probably thinking: why would I want to open or close the aperture? Since the camera compensates with the other settings to keep the same amount of light for correct exposure, what’s the point?
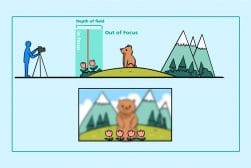
Well, because the size of the aperture changes how much of your image is in focus. This is called depth of field – I’ll go a bit more in-depth about this further on in the article.
So, now that you know what aperture priority is let’s see how you can use it.
Below we’ve included a quick guide that covers how to apply aperture priority mode on the most common camera brands.
(If you’re still having trouble locating the aperture priority mode on your camera, check the user’s manual).
-
Aperture Priority: Canon
Canon calls its aperture priority mode Aperture Value (Av). To use this program, you need to turn the mode dial to Av. Then, use the main dial to change the aperture – the shutter speed will adjust automatically. See here for how to change the aperture on a Canon camera.
How Much Do You REALLY Know About Photography?! 🤔
Test your photography knowledge with this quick quiz!
See how much you really know about photography...

-
Aperture Priority: Nikon
Nikon cameras show it as Aperture Priority – Auto. You can enable it by rotating the mode dial to A. Then, you can adjust the aperture by rotating the command dial – the camera will compensate for the shutter speed as you change the aperture.
-
Aperture Priority: Sony
The Aperture priority Mode in Sony cameras is indicated with the letter A. You can also access it on the Menu, Camera Settings, Shoot Mode, Aperture Priority. Then turn the control wheel to adjust the aperture.
-
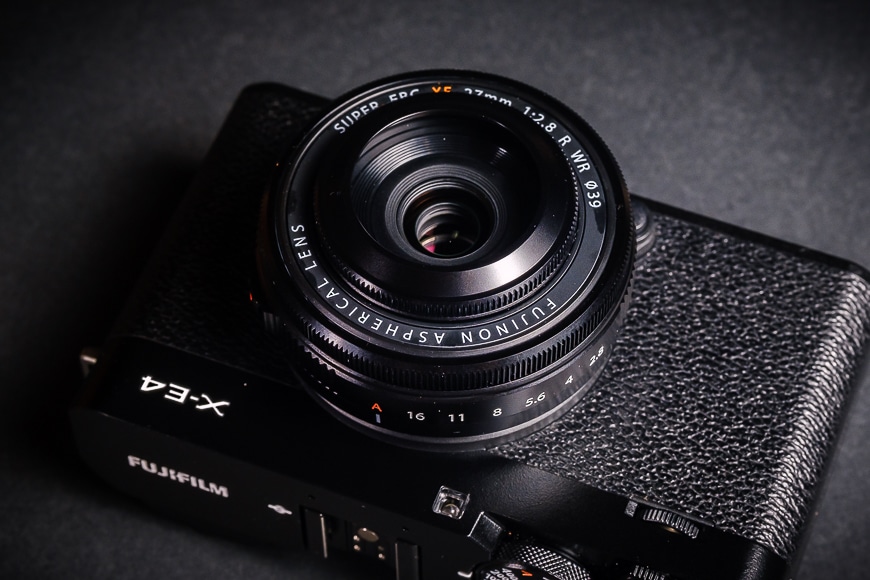
Aperture Priority: Fujifilm
On Fujifilm, you can use the Aperture Priority (AE) Mode to manually adjust the aperture and have the camera compensate for the shutter speed. You need to set the Shutter Speed dial in A and set the Aperture in manual (indicated with an iris diaphragm icon). Then you can change the aperture by turning the lens aperture ring.
-
Aperture Priority: Film Camera
In many film cameras, you’ll find separate controls for the shutter speed and the aperture – just as explained in the previous Fujifilm example. The shutter speed is normally set on a top dial, while the aperture is a ring on the lens. To use the aperture priority mode, you need to leave the shutter speed dial in auto or program (normally highlighted in green) and rotate the aperture on the lens ring.
When Should I Use Aperture Priority?

Aperture priority is particularly useful when photographing children | Credit: Caroline Hernandez
With all the different shooting modes offered in most cameras, how do you know which one to use? It depends on your photographic skills and what you want to achieve.
Here are a couple of situations in which aperture priority is the best way to go:
- When you are learning photography
As a beginner photographer, you need to take control of your camera to decide how the final image will look like. This means that you’ll have to step out of the auto mode and learn how to use it manually.
In manual mode, you need to control the three settings that regulate the exposure: shutter speed, iso and aperture. To ease your way into manual mode, you can use the semi-automatic camera modes – one of which is aperture priority.
When you’re using aperture priority mode, the shutter speed moves automatically. You can also set the ISO to auto and then concentrate on learning just about the aperture – the camera will take care of the rest.
Once you’re comfortable with it, you can combine aperture priority mode with manual ISO and control two out of three exposure settings. After that, you’ll be ready to control all three of them in Manual Mode.
- When you want control over the depth of field
Each setting of the exposure triangle controls different aspects of your image. When you open or close the aperture, you’re changing how much of your photo is in focus – this is called depth of field.
Wide apertures generate a shallow depth of field in photography. In other words, if you use an f/1.4 or f/2.8, you’ll have less in focus than you would have when using f/11 or f/22.
If you don’t want to shoot in manual mode but you still want to have control over the depth of field, you can use aperture priority mode.
This is useful, for example, for portrait photographers. During a portrait session, especially if it’s outdoors, the light conditions might change. So, you need to keep adjusting your settings continuously.
However, if you spend too much time or get too distracted doing that, you risk missing a candid expression or ruin the model’s spontaneity.
Using aperture priority mode allows you to focus only on the aperture size to achieve the desired depth of field and let the camera decide the rest.
Another example is landscape photography. Normally, you’d want to have everything in focus. To achieve this, you need to use a different f stop according to the distance you have to the foreground and how deep the scene is.
The use of aperture priority will help you to try different apertures to find the right one without the fuzz of compensating the other settings each time.
Keep in mind that depth of field is also determined by the focal length and the distance between the camera and the subject.
Aperture Priority vs Shutter Priority
Sometimes the aperture can be controlled via the lens ring | Credit: Greg Cromie
Thankfully, shutter priority and aperture priority mode have self-explanatory names. So, we don’t have to spend a lot of effort remembering which is which – we can just focus on how and when to use them.
As you’ve already read in the first part of this article, aperture priority mode allows you to control the aperture -the camera will then choose the shutter speed to achieve the correct exposure.
Shutter priority mode works in the opposite way. You keep control of the shutter speed, and the camera will set the aperture that is needed.
In both cases, you can choose to have the ISO in auto or manual. The difference is that using aperture priority, you can decide the depth of field of your photo.
On the other hand, with shutter priority mode, you can decide to freeze or blur any motion on your scene.
Deciding which one is best for you depends on the subject (if it’s still or moving) and the lighting conditions.
Aperture priority is better when there’s a bright light – this way, you can close the aperture values and won’t risk having a slow shutter speed that causes camera shake.
On the other hand, shutter speed priority is better when there is dim light – this way, you can slow the shutter speed to capture enough light without having a high ISO that can create noise.
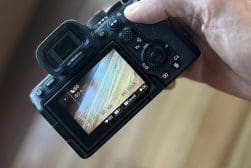
Aperture Priority vs Manual
Manul mode allows you to control all those dials individually… but do you really want to? | Credit: Greg Cromie
As you know, the exposure triangle works by achieving the perfect balance between aperture, shutter speed and ISO. If you move one f stop, it needs to be compensated with one stop on the shutter speed or the ISO.
In aperture priority mode, the camera takes care of compensating the exposure by adjusting the shutter speed to balance any changes you make with the aperture. With manual mode, you have to compensate by yourself.
Manual mode is ideal to have full control of your images. However, it can be difficult if you’re a beginner.
It’s also distracting even if you’re a pro – you wouldn’t want to miss the perfect moment because you were too busy adjusting all the camera settings!
How do I Shoot in Aperture Priority Mode?
These 8 tips can become part of your aperture priority cheat sheet so you can get started shooting right away.
1. Set the ISO
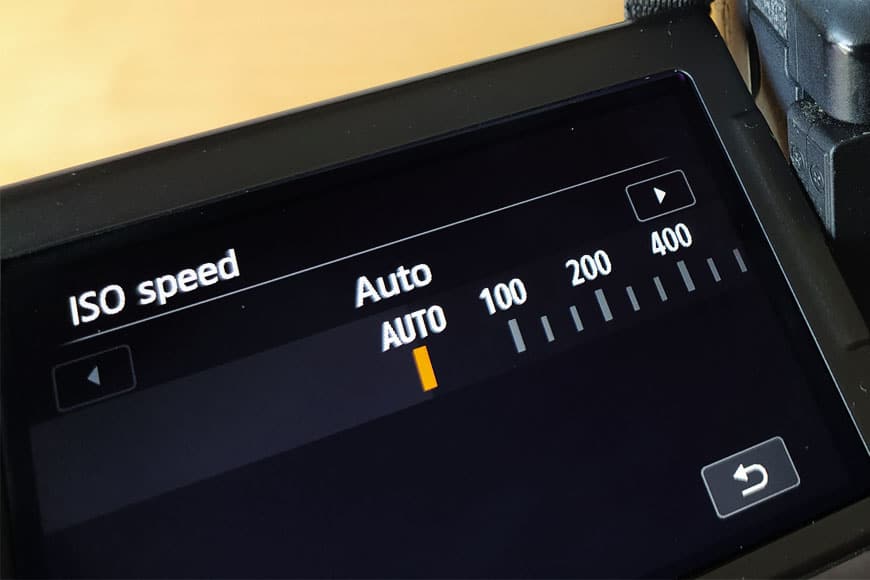
When you’re shooting with aperture priority mode, you can choose to have the ISO in manual or auto. Presumably, if you’re using a semi-automatic mode is because you want to take care of only one thing – so you can choose Auto ISO.
The good thing about Auto ISO is that you can still give the camera some criteria to consider when choosing the ISO for your photos.
For example, if you know that your camera delivers very noisy images after ISO 800, you can tell the camera not to go over this maximum value. In the same way, you can set a minimum ISO.
If you don’t have any particular preference about the range, you can leave the camera full control and set the Auto ISO to Auto, and the camera will use the entire ISO range that it has. These limits will depend on your camera.
You should also read our in-depth guide to using aperture priority with Auto ISO.
2. Set the minimum Shutter Speed
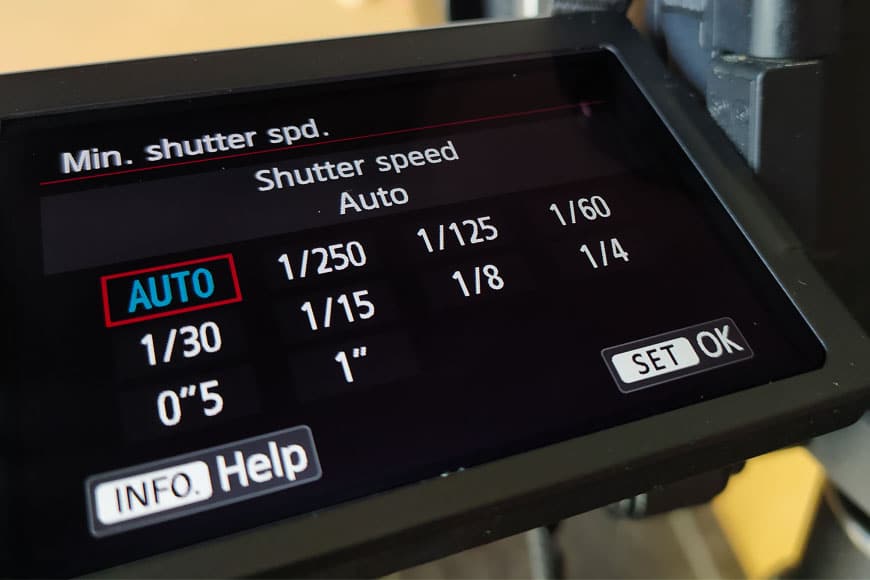
Inside the Auto ISO, there’s a very handy feature where you can set the minimum shutter speed that your camera can use.
This is useful because if there isn’t enough light, the camera can choose a shutter speed so slow that you get camera shake or a blurry subject.
This isn’t a problem if you have an inanimate subject and you’re using a tripod. In any case, it’s better safe than sorry!
Any animate subject moves – even slightly. For example, a posing person will still breathe and blink, so it’s subject to blur with slow shutter speeds.
In addition, you also move and can create camera shake if you’re not using a tripod.
What is the best shutter speed? As a rule of thumb, you shouldn’t use a slower shutter speed than your lens’s focal length.
So, if you’re shooting with a 400mm telephoto, you should set the minimum shutter speed to 1/400. If, instead, you’re using a 50mm, you can slow down to 1/60 and so on.
3. Set your camera to aperture priority

Each camera brand has a different way to reach the aperture priority mode. In most cases (when you’re using a digital camera), you’ll find it on the camera mode dial.
In Canon cameras, it will be indicated as Av – while most of the others have it as A – see above for more information on what the various aperture priority mode labels are on different cameras.
4. Choose the metering mode

For your camera to know which settings are best, it needs to know what are the lighting conditions of your scene.
A correct reading depends on the metering mode that you’re using.
By default, most cameras use a proprietary algorithm that analyses the entire scene and makes an average. This mode can be called Pattern, Matrix, Evaluative, etc., according to the brand. This is good for low contrast situations.
You can use centre-weighted metering mode when you have a subject that covers most of the frame or any centered composition—for example, outdoor portraits, pet photography or still life.
The most accurate way of doing it is using spot metering mode (see guide). This is perfect for highly contrasted photographs. For example, photographing the moon.
5. Set the aperture values

Now you can set the aperture value that you want.
If you’re a beginner and want to experiment with different apertures to understand the relationship with the depth of field, you can start with the widest aperture.
Then, move an f-stop and take a second picture and so on until you reach the smallest one.
Otherwise, you can start with an aperture value you think would work best for your picture. For example, in landscape photography, you know you want a deep depth of field, so you might start with f/8 or f/11.
For portrait photography, you need to have a shallow depth of field because normally, you would want a bokeh (i.e. blurred) background. Then, you can start with something between f/2.8 and f/5.6.
6. Frame and focus
Now that you have all your settings, it’s time to compose your photo, but keep in mind the exposure metering mode that you’re using.
For example, if you set your camera to spot metering mode, some cameras allow you to use the focal point as the spot to measure the light. Other cameras will measure whatever is in the center.
Make sure you have the correct light reading by pressing the shutter release button halfway down – this will also set the focus if you have it in auto.
Then, without letting go of the button, you can reframe and press the button all the way through to take the picture.
7. Check your results

One of the many advantages of digital photography is that we can see immediately how our photo turned out. After you take the first test shot, review the results on the LCD screen.
Make sure you zoom in to see how much of your image is actually sharp. Seeing things on a small screen can be misleading. You might think you have the focus and depth of field as you wanted it, but when you get home and open it on your computer turns out it wasn’t.
Remember to always zoom in and scroll through the photo to make sure things are OK. You should also take more shots and experiment with the aperture value even if you feel satisfied with the first image. You might find that you like another one better.
When you’re checking your photo, make sure the exposure is correct. Sometimes the light reading is not as accurate as we would like. This can happen in highly contrasted shooting situations like when photographing silhouettes or low key.
Fortunately, even in semi-automatic modes, you can overwrite the camera’s settings and get the picture exactly as you want it. If this is your case, see the next tip.
8. Use exposure compensation (if necessary)
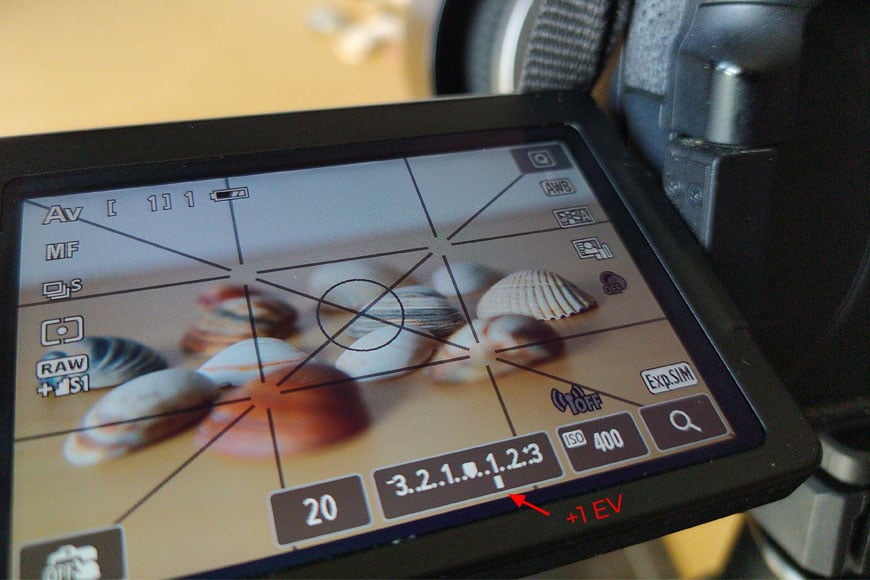
Let’s remember that cameras – as advanced as they might be – don’t have a mind of their own. They take the information available and react according to pre-established parameters.
Because of this, they might get it wrong sometimes. Other times, they may be technically right, but they won’t match your creative vision. Either way, you want to be able to customize their choices, even in a semi-automatic mode.
That’s why exposure compensation exists. This feature is one extra tool to take control over your images’ look without having to use the manual mode.
Exposure compensation can be used with different camera modes. When you’re in aperture priority mode, the exposure compensation will change the shutter speed. This means that it won’t affect the depth of field but the overall exposure.
You can find exposure compensation in different places according to the model of your camera – some will have a +/- button, and others are controlled with a dial or wheel. You can check the user’s manual to find out, or do a quick search online.
Remember that you can either lighten or darken your image using exposure compensation.
To darken it, the camera will make the shutter speed faster and vice-versa. Keep this in mind to avoid any camera shake or unwanted blur.
You can read more in our guide to how do you set exposure compensation.
Final Words
I hope you found this article helpful. If you have any other questions about aperture priority mode, leave them in the comments section.
Above all, I recommend that you use aperture priority mode as much as possible. While Auto and Program mode can be a safety net for beginner photographers, your photos may never look exactly how you envisage they should.
Don’t worry if you can’t remember the range of aperture values, or even if you don’t fully grasp how to create a shallow depth of field – the most important thing is that you have the confidence to experiment with that mode dial!
So, set your camera to aperture priority mode (in conjunction with Auto ISO) today, and you might be pleasantly surprised at how much easier and more satisfying it makes your photography.

Check out these 8 essential tools to help you succeed as a professional photographer.
Includes limited-time discounts.


Ana Mireles is a Mexican researcher that specializes in photography and communications for the arts and culture sector.


