


What Is Chromatic Aberration (And How To Correct It)
What is chromatic aberration, why does it happen and how can you fix it? Improve your photography with this easy-to-follow guide!
Learn | Photography Guides | By Greg Cromie
In this article, we’ll spend some time understanding Chromatic Aberration, and how it can be corrected.
Like most scientific endeavours, the tools, processes and outcomes employed in photography are not always precise.
There are often many forms of distortions, artefacts and aberrations that impact your photos.
While modern cameras and lenses are engineered and coded to combat these effects, they’re not always 100% effective.
Let’s dive first into a quick definition of this photography term.
What is Chromatic Aberration?
 Chromatic aberration is known by a few other terms including colour fringing, purple fringing and even colour dispersion.
It’s one of the most common problems photographers experience for several reasons. The issue is caused by how light travels through the lens and refracts by the glass elements inside.
There are two primary forms of chromatic aberration: Longitudinal Chromatic Aberration and Lateral Chromatic Aberration.
Impacted images will show subjects with blurred edges with ‘fringing’ of various colours. While the most easily identifiable is usually a purple fringe, the fringe can also appear as red, green, blue, yellow, or magenta. You’ll notice this the most when there’s a lot of contrast.
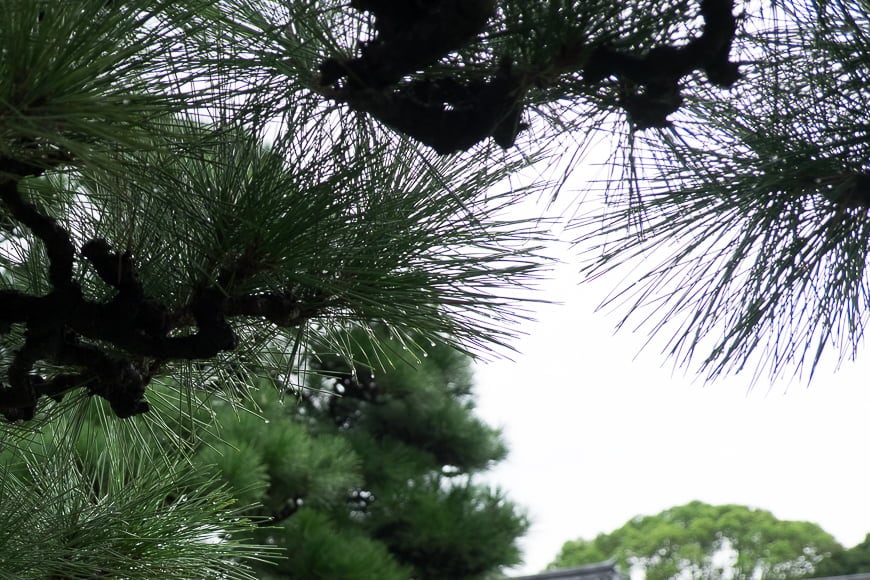
One of the most common types of chromatic aberration appears when you take a photo of a tree. The contrast between the leaves and the bright sky peeking through the gaps will show up with fringing.
Chromatic aberration can impact the look of an image as all too often it is sticks out like a sore thumb and ruins the appeal of the photo.
Fortunately, a lot is going on behind the scenes to manage chromatic aberration, and we’ll cover this in detail.
NB. Often confused, Chromatic and Spherical Aberration are not the same thing. The former deals with colour, while the latter is to do with lens curvature.
Why does Chromatic Aberration occur?
Let’s go into more detail on why chromatic aberration occurs to better understand how to manage it.
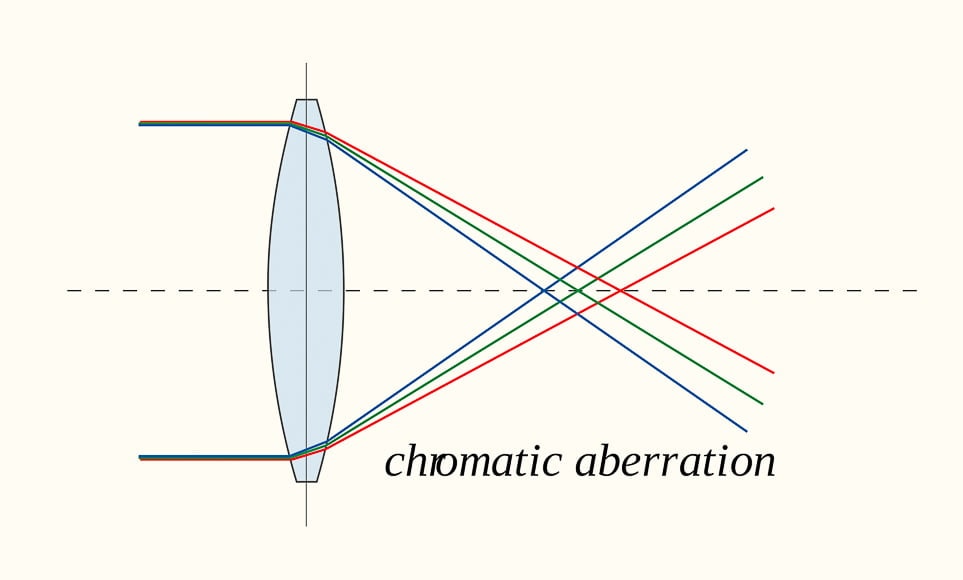
A typical lens allows light to travel from the front element to the sensor. Light travels in colour wavelengths and, in an ideal world, each of those wavelengths should hit the sensor, or focal plane, at the same time.
The term colour dispersion comes from when the lens disperses the light incorrectly.
As light hits a lens and then passes through, it’s a lot like a glass prism. When it hits the lens, the colours or wavelengths are split and then travel at slightly different angles.
The job of the lens is to control and direct the split light to hit the camera’s centre in unison so that the camera can read the colour and light correctly.
But you also need to keep in mind that in most lenses, the light is passing through several glass elements with each impacting how the wavelengths travel.
Camera lens designers and engineers go to extreme effort to ensure that each wavelength hits the sensor correctly. That’s pretty clever when you consider that a zoom lens is continuously realigning those glass elements.
And those glass elements are not just there to deal with chromatic aberration – they serve a whole range of purposes to deliver crisp images without distortion.
How Much Do You REALLY Know About Photography?! 🤔
Test your photography knowledge with this quick quiz!
See how much you really know about photography...

Chromatic aberration occurs when the lens design, or defects in the glass, cause the colour wavelengths to not meet at the same point on the sensor.
While most of the light will meet at a single point, stray wavelengths miss it by a mere fraction. These stray wavelengths are what cause the appearance of fringing.
What Are the Different Types of Chromatic Aberration?

Longitudinal Chromatic Aberration (aka Axial Chromatic Aberration)
For reference, Longitudinal Chromatic Aberration is often referred to as LoCA and bokeh fringing. It occurs mostly as a result of light coming straight at the lens and sensor.
It’s the most common form of chromatic aberration and occurs as the different colour wavelengths fail to meet at the same point on the sensor.
As we touched on earlier, the resulting images will appear with a level of colour fringing around your subjects. In extreme cases, it can even look like an old-school camera glitch. Plus, this kind of aberration can impact any part of your photo.
Your subjects, especially those in contrasting light, will have a telltale fringe or ghost around them usually containing red, purple, blue and green hues.
Longitudinal chromatic aberration is more common in prime lenses with a wide aperture.
It doesn’t necessarily mean that you have a sub-standard lens: this kind of aberration can exist in even the most expensive lenses available.
Lateral Chromatic Aberration (aka Transverse Chromatic Aberration)
The other common form of this distortion is Lateral Chromatic Aberration or transverse chromatic aberration as it’s sometimes known.
It occurs as a result of light and colour wavelengths approaching the lens at an angle. The light moves through the lens differently to when Longitudinal Chromatic Aberrations occurs. As a result, the light strikes the focal plane or sensor at different angles.
In this case, the aberration will mostly appear at the edges and not in the centre. The fringing is more likely to have a blue or purple hue and will usually show up when using a wide-angle lens.
While there are ways to minimise longitudinal aberration, preventing lateral or transverse chromatic aberration is not possible in-camera.
How to Avoid Chromatic Aberration
As I’ve stated, the quality of the lens is not always an indication that it won’t suffer from one, the other, or both forms of chromatic aberration.
The brains-teams that work in camera and lens development are constantly working to manage and prevent these known distortions. Some are successful, and others are not – or they don’t invest heavily in resolving this issue.
Unfortunately, a lot of lenses contribute to chromatic aberration appearing in your images.
Since not all problems with lens chromatic aberrations can be solved, the folk that develop cameras take steps to enable the camera to manage it.
On top of this, there are some steps you can take to better control chromatic aberrations should they arise – plus, there are ways to avoid it where possible. Here’s how.
Shoot in RAW
Most cameras now can shoot in both JPEG and RAW format. JPEG images contain a smaller amount of image data and as a result are less malleable when it comes to editing them later.
RAW images are much larger files as they contain almost 100% of the data from the sensor. As a result, these rich files are far easier to edit with post-processing software such as Lightroom and Photoshop.
With a RAW image, you can manage highlights just as quickly as you can manage details within the shadows.
Plus, shooting in RAW gives you a higher chance of managing chromatic aberration effects both in-camera and via editing software.
Correcting visible chromatic aberration is possible with in-camera editing steps, but it can be a little fiddly and difficult to view the results. However, using a photo editing application is far more accessible and more powerful at dealing with the distortion.
Avoid Scenes With High Contrast
One of the most common triggers of chromatic aberrations occurs when you are intentionally shooting in high contrast conditions.
You’ll notice it especially when you’re photographing a subject and there’s a bright light source behind them.
Remember the example I gave earlier of a tree with the contrasting bright sky appearing between the leaves? That’s a classic example of chromatic aberration impacting an image.
While you cannot necessarily change the lighting conditions, you could choose to change your composition. Sometimes changing the direction and angle from which you are shooting is enough to correct this.
Avoid shooting up into bright light as it will both cause distortion and put your subject in shadow while your highlights blow out.
If you cannot avoid this kind of shot, then you may be able to make amends later in editing software.
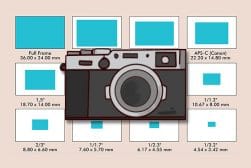
Choose The Right Focal Length Lens

While it’s not always possible to have a lens for every situation, it’s essential to know how your existing lenses are affected by chromatic aberration. We’ll cover a way to test your lenses in just a little bit. But before then, let’s talk about lens types.
Zooms are probably more prone to chromatic aberration than primes. At the same time, primes manage it much better – perhaps due to less moving glass elements.
With a zoom lens, you’re going to experience chromatic aberration more at each extreme of the focal range. For example, imagine a zoom that runs from 18mm – 135mm. The aberration will be more prominent at 18mm and 135mm and less so in the middle.
One way to avoid this is to use an 18mm prime for wide-angle shots and a telephoto prime for your long-range work. But, I know that’s like asking some people to use a Ferrari for weekends and a Range Rover for the weekdays.
It’s not practical and it’s costly – especially when you’ve already invested in a Porsche.
You can check these focal length examples to get a better understanding of how choosing longer/wider lenses can affect your final image.
Stop Down (Reduce) Your Aperture
By far one of the easiest mechanical ways to deal with chromatic aberration is to stop down your aperture.
While you may have to manage ISO and shutter speed a little more while reducing the aperture, it’s far better than having apparent chromatic aberration. This is especially helpful with a lens with a super-fast or wide aperture of say f/1.4. Stopping it down a little to even f/2.8 will make a considerable difference to chromatic aberration.
A side benefit to a narrower aperture is that more of your image will be in focus and any edge softness will disappear.
Keep in mind that this will only affect longitudinal chromatic aberration. It will have no impact on lateral chromatic aberration at all.
Position Your Subject Towards The Centre Of Your Frame
A simple change to your composition can make a huge difference.
We talked earlier about how lateral chromatic aberration occurs mostly at the edge of an image. You can also get more substantial longitudinal chromatic aberration at the edge of a photo compared to any appearing in the centre.
This is both to do with how the wavelengths hit the sensor and the curved nature of the glass elements.
Unfortunately, not all compositions work best with your subjects in the dead-centre. But, by shooting in RAW, you are better equipped to crop your photo to manually reposition your subject within the frame.
Seriously cropping a picture is not always an ideal solution, but it’s much better than trashing a group of images.
How to Correct Chromatic Aberration
Now that we’ve talked about avoiding chromatic aberration, it’s time to look at how to correct it.
By now you may be asking yourself a couple of questions such as “What does ‘remove chromatic aberration mean’?” and “If the geniuses at the camera lab couldn’t fix it what chance do I have?”
If you’re asking yourself whether chromatic aberration can be corrected, the simple answer is yes. So don’t stress, we’ve got you covered with two ways to correct chromatic aberration.
Correcting chromatic aberration comes into play if your efforts to avoid it on a shoot were not as effective as you had hoped. Or, you were out on a shoot and didn’t even notice that your images had fringing. Only once you loaded them into your editing software did it become painfully obvious.
With the help of Adobe Lightroom, one of the more powerful editing apps, you can automatically and manually correct chromatic aberration.
Automatic Correction

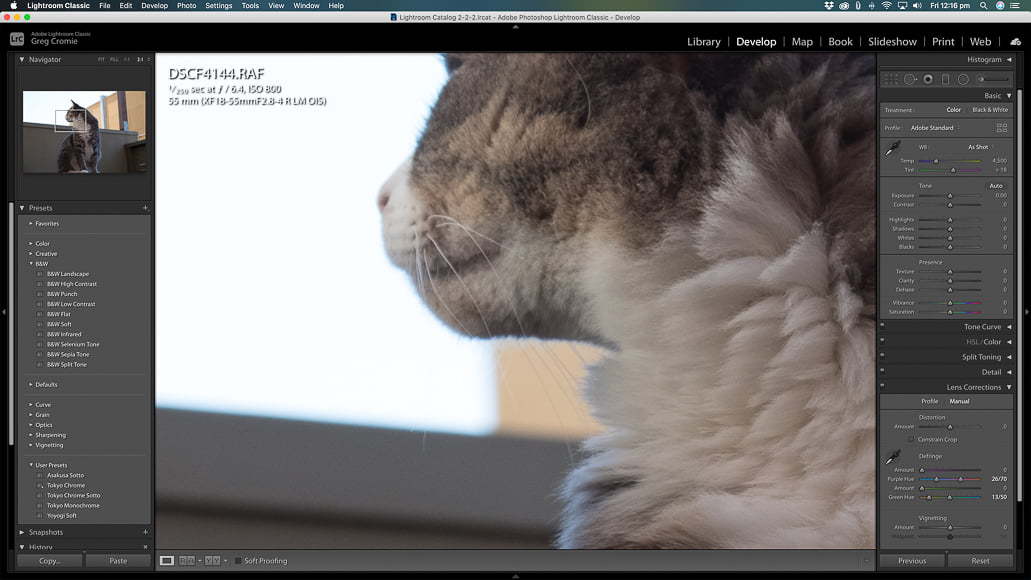
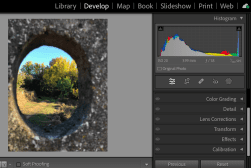
First and foremost, fire-up Lightroom and open a photo in the Develop tab. On the right-hand side are several collapsable fields with each housing numerous editing tools.
If you expand the menu section labelled Lens Correction you’re well on your way to correcting and removing chromatic aberration.
Under the Manual option, you’ll notice several tools that allow you to manage Distortion, Vignetting and of course Lightroom Defringe for controlling chromatic aberration. But in this case, we are going to completely ignore those and click on the Profile option.
Under Profile, there are two tick boxes – Remove Chromatic Aberration and Enable Profile Corrections. The next bit is complicated, so please pay attention – click the Remove Chromatic Aberration button!
Yes, that’s all there is to it as Lightroom applies its years of development and considerable power to detect chromatic aberration and correct it.
What’s more, once done, you can use the limitless editing tools that Adobe provides to further enhance the quality output of your photo.
Manual Correction
Now if you like a challenge and want to take a crack at manually correcting chromatic aberration, here’s how you do it. Or, if you found that the automatic correction was not 100% effective, you can make some further adjustments.
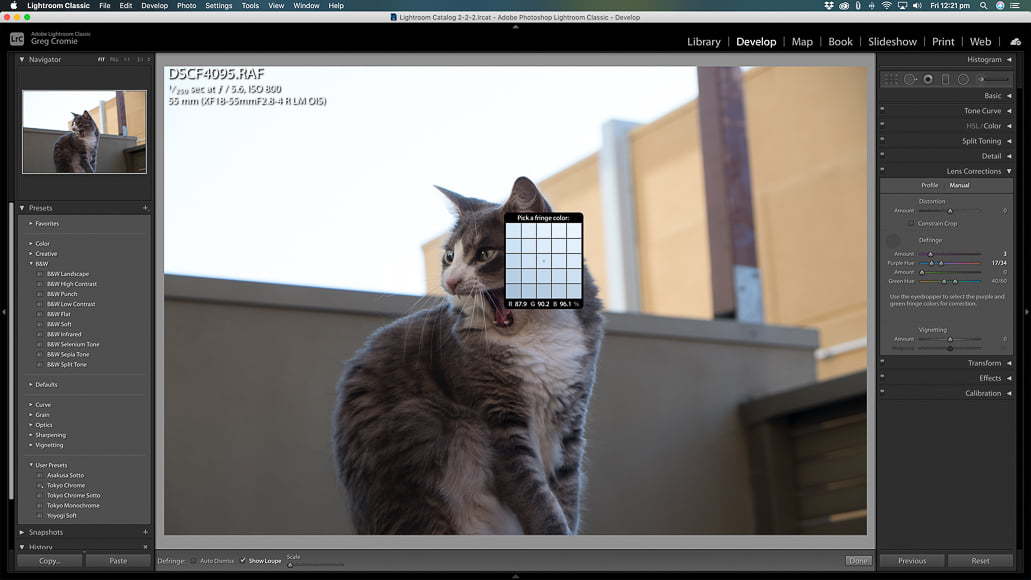
Once again, you want to open an image in the Develop tab and expand the Lens Correction menu of tools. Instead of clicking on the Profile option, you need to click on Manual.
Under the Manual option, you’ll be working with the Defringe tools.
The first solution is to use the eye-dropped or the Fringe Colour Selector tool. All you have to do is use the eye-drop to select an area of the photo impacted by chromatic aberration and Lightroom will target its efforts to correct it.
Alternatively, you can use the manual sliders to control both Purple and Green hues and attack chromatic aberration more holistically.
How to Test Your Lenses for Chromatic Aberration
If you’re concerned about how strongly the chromatic aberration impacts your lens, there are ways to test it.
The most scientific approach is to do a web search for “Chromatic Aberration Test” and find a test chart that you can download. Then you can either print it out or display it full-screen on your computer and take a few shots of the chart with each of your lenses.
Open each photo in Lightroom so you can zoom in on different parts of the picture and see how much chromatic aberration appears on the chart.
If you do your research a little, the same site that you downloaded the chart from will give instructions on how to measure the impacts. A good thing about these kinds of charts is that they can also use them to test things like sharpness and distortion.
Final Thoughts
It’s important to not feel bad when your images feature some level of chromatic aberration. Remember that the highly paid nerds over at Canon, Sony and Fuji couldn’t fix it either.
But with the knowledge gained here, you can understand what it is and why it occurs. And, more importantly, you now know how to avoid and even correct chromatic aberration.

Check out these 8 essential tools to help you succeed as a professional photographer.
Includes limited-time discounts.


I’m a Melbourne-based street photographer and blogger. I love to travel to Japan to photograph and document its dynamic people and culture.


