


How to Fix & Avoid Color Banding
Color banding ruining your photos? Don't worry! We look at why it happens, how to fix it, and how to avoid color banding in the future. Read on!
Learn | Photography Guides | By Ana Mireles
Color banding is a common issue photographers face.
Maybe you’ve experienced this scenario: You choose the best photo from your photoshoot and start editing. You work on it to get it just right, then finally resize to save and share.
But when you’re about to press OK – or worse, once you’ve already sent it – you notice these weird lines. They’re usually in the backdrop if it was a studio setting, or the sky if it was outdoors.
Perhaps you think they were there all along and you just didn’t see them. Or maybe that there’s something wrong with your computer monitor and you start angling it or adjusting the brightness.
Well, let me tell you, you’re not the only one who’s gone through this, you’re not going crazy, and you don’t have to change your monitor.
Those lines are called color banding. The good news is they can be prevented and even fixed most of the time, so there’s no need to worry.
In this article, I’ll go through the most frequently asked questions about color banding issues, color settings, and the best solutions.
(See more common photography terms here.)
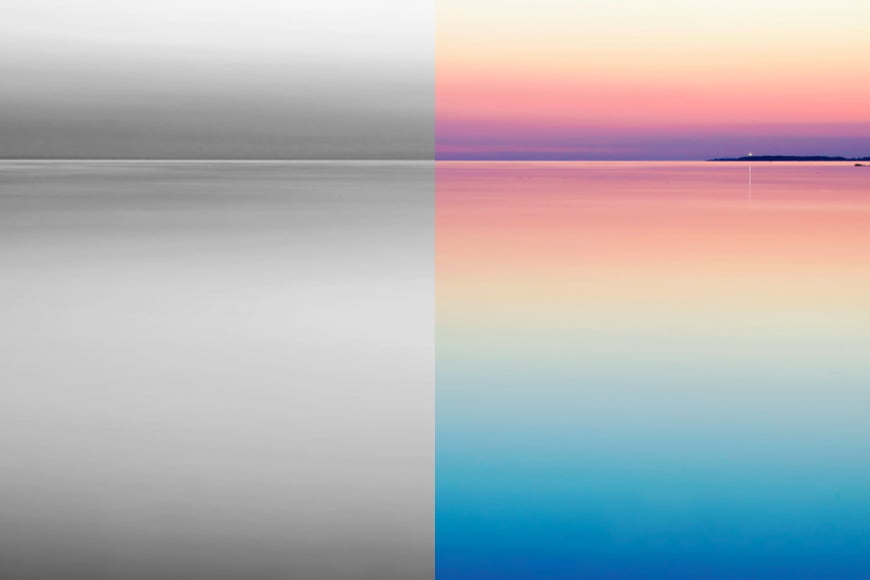
What is Color Banding?
Color banding is what happens when the bit depth is too low to support enough shades of a color to allow a smooth transition.
The name is quite literal because when it happens a series of lines, rings or bands appear, separating shades or tones instead of showing a smooth gradient.
This won’t happen in areas with details or within different colors. It happens when a color should be transitioning smoothly. So this problem normally presents when you’re working with photos with large color areas.
How to Check for Color Banding
Credit: Harli Marten
Sometimes color banding is easy to miss, but that doesn’t mean it isn’t there. Maybe it’s just not that evident on the computer screen but it comes out in print.
To avoid wasting time and money, you should do a color banding test.
There are different ways to do this. The easiest way is to control each channel of the image.
In Photoshop, you can do this from the Channel panel that should be on the right side of your interface. If it’s not active, then go to the Windows menu and enable it.
You’ll notice that there are four different channels. The top one is called RGB which puts together the other three; this allows you to see the image in full color.
Underneath there are three other channels that form the image, one for each color: red, green, and blue. Activate each color individually by clicking on the eye icon next to them and check for banding.
What Causes Color Banding
Credit: Arno Smit
Banding can be created when there isn’t enough tonal range to represent all the different colors between the brightest and the darkest points of a gradient.
The tonal range is given by the number of bits. An 8-bit photograph will have 256 tonal values per color and a 16-bit one has 65,536. As you can see there’s a huge difference.
A lot of the times you’ll find that 256 tones per color is enough. This is because your digital camera and your monitor work with three color channels: red, green, and blue.
How Much Do You REALLY Know About Photography?! 🤔
Test your photography knowledge with this quick quiz!
See how much you really know about photography...

When you multiply 256 tones per 3 colors then you get 16.7 million colors. In fact, you won’t have a problem with detailed areas.
The problem can show up when there’s a big seamless area with too many variations of the same color. That’s when you might need a bigger tonal range to represent the entire transition smoothly.
If there isn’t enough information for each one of those tones, then you’ll get banding in your photographs. This is also the reason why too much editing can make these annoying lines appear.
An image that was well balanced in tone values can reach its maximum when you move the brightness or you adjust the curves or levels creating a bigger range within the gradient.
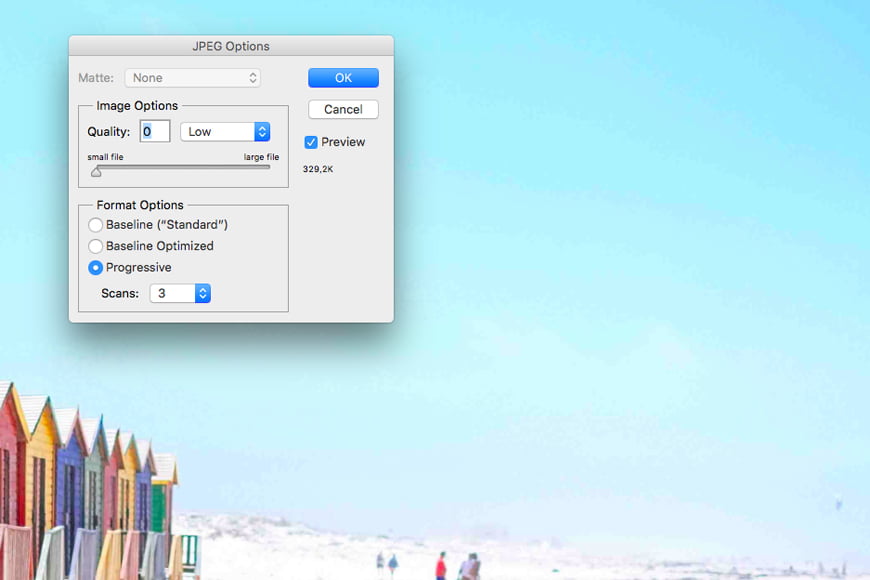
The quality of the picture plays its part as well. If the resolution is too low, or the file has been compressed to the point where some of the tonal values get lost, then you’re still going to have issues with the skies or any gradient.
Sometimes you can actually see the bands appear while you’re saving a .JPG file. Zoom into any area of your photograph that may have this risk. Then save it and start lowering the quality of the file with the Preview option checked. Look at how the banding appears.
I know this part sounds technical and you might think that there’s nothing you can do about it, but there’s actually a lot that you can do to avoid it if it’s still possible, or to fix it if it’s already happened.
How to Avoid Color Banding
There are many things that you can do to prevent color banding. Some of them even start from the photoshoot itself.
During shooting
The first thing to take into consideration is that you should be shooting in uncompressed RAW. This kind of format holds the largest amount of information so that there are enough color values to make a smooth transition.
Then, make sure you get the most accurate exposure right from the start. In digital photography, it’s easy to just think that any problem can be fixed in post.
In many cases, this can be true, but that doesn’t mean you shouldn’t get things right in-camera, especially if you’re trying to avoid color banding.
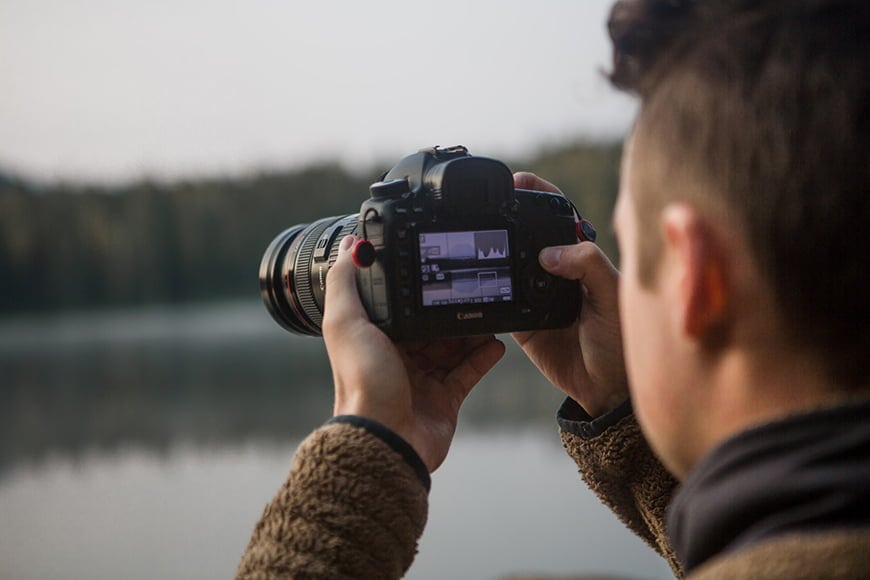
Because it appears when you’re pushing your editing too high, you should avoid having to amp the values too much. To help you with this you can always check the histogram on your camera.
This way, any retouching can be subtle without causing any problems. Also, you’ll save a lot of time in front of the computer.
Another setting for your camera is the color space. If your equipment supports it, you can use sRGB or AdobeRGB to achieve a smoother gradient.
A clear blue sky on your outdoor photoshoot is your most susceptible area for banding later on. So, try to position your subject where the sky behind it is most even.
If you’re working in a studio, make sure that any solid color background that you’re using is lighted correctly to avoid grading that could create banding problems.
In post-processing
In post-production, you can also take a few precautions to avoid banding. First of all, open your images in 16-bit if possible.
You should also do the most amount of editing on your RAW file. Then, whatever needs to be done after that, do it while the photo is still in an uncompressed format.
Only when you’re satisfied with your editing should you go ahead and make any changes that can cause a loss of information. By that I mean to flatten the layers, reduce the size, change into an 8-bit mode, and save in a compression format like JPEG.
Of course, it’s best to not compress the image at all. However, this is not always possible – for example, if you want to share it online.
Now, this is all great for future photoshoots, but what about the photos you’ve already taken? Well don’t worry, there are some things you can do to fix them.
How Do You Fix Color Banding?

Credit: Harli Marten | Texture Credit: Denis Agati
Fixing 8-bit files
As I said before, more color depth means less banding. That’s why the first thing you need to do to fix the color banding is to turn it into a 16-bit.
You can do this in Photoshop by going to the Image menu and then clicking on Mode to select 16 bit. So far you won’t see any change.
With this action, you’ve only introduced the possibility of increasing the colors, not actually added any new ones. So don’t worry if you don’t notice any improvement just yet.
Now that you have it like this, you can follow any of the suggestions from the ‘Fixing 16-bit files’ section you’ll find next.
Then, leave it in 16-bit mode if it’s possible. If not, convert back to 8-bit. With this, Photoshop will introduce some noise because there will be some loss. But it will be much better than the original banding.
If you’re not satisfied with the results, there’s always the possibility of replacing the sky or background in your photo. Just make sure the size and resolution fit the ones from the file you’re working on. If not you’ll be facing the same problem again.
Fixing 16-bit files
Make sure your image is 16-bit. Now, you can add Blur, Noise, or a Texture to your image. Let’s see how to do this in Photoshop.
- Blur
By adding blur into your image you can ‘smooth away’ the banding to make it less noticeable. There are many styles of Blur in Photoshop. Whichever one you choose, it’s best if you make it a Smart Filter so that you can come back and adjust it if you need to.
First, duplicate your original layer by dragging it into the Create New Layer button, or going to the menu Layer, then Duplicate Layer.
Now go to the Filters menu and choose Convert for Smart Filters. This way your duplicated layer becomes a Smart Object and you can work non-destructively.
Then go to Blur in the Filters menu. Choose the type of blur you prefer. If your image contains many details you should go with Surface Blur.
This will open a pop-up window for you to control the Radius. Keep an eye on the threshold as it will determine the level of detail that won’t be affected.
Since you’re working on a second layer, you can still create a Layer Mask to let the blur visible only in the part of your image that had banding.
- Noise
Another possibility is to add some noise. For this, you need to add a new layer. Again, you can do this from the buttons on the layer panel, or by going to the Layer menu, then selecting Duplicate Layer.
Now, change the blending mode to Overlay. Also in this case it’s useful to turn it into a Smart Object so that you can always come back to edit.
Add the amount of noise that you consider necessary before it becomes distracting for your image. If you want you can also add some Gaussian blur to this noise layer to make it smoother.
Add a Layer Mask if you need to spare the subject from the Noise-Blur layer.
- Texture
As a third option, you can add texture to the image. You can create your own or download them online – there are many packages both free and for sale.
Now, to do this you need to go to the menu File and select Place. This will take you to a browser where you can choose the file you want. Keep in mind that the size should be the same.
Now the texture will be added as a new Smart Object layer. You can then change the blending mode accordingly.
Final Words

Digital photography has given us endless possibilities, but it does come with its limitations. The good news is that when you understand what caused a particular issue, you can find a way to prevent it or a way to fix it.
Technology keeps improving and becoming more and more accessible. Cameras have bigger and more powerful sensors, SD memory cards are bigger and cheaper, and cloud storage plans are becoming very affordable.
So, there’s no reason not to ensure the best quality in your photographs.

Check out these 8 essential tools to help you succeed as a professional photographer.
Includes limited-time discounts.


Ana Mireles is a Mexican researcher that specializes in photography and communications for the arts and culture sector.


