


Beginner’s Guide to Depth of Field in Photography
Learn all there is to know about depth of field in photography, including photo examples of shallow & deep DOF, a cheat sheet and a calculator for beginners.
Learn | Photography Guides | By Andy Day
Depth of field is one of the fundamental aspects that every photographer should understand as it has such a large bearing on your images.
Depth of field determines how much of your image is sharp, giving you control — whether for creative or practical reasons — over which elements are in focus.
Do you want to ensure that all of your photograph is crisp, from the foreground to the background, to ensure that there are no blurry parts that distract the viewer?
Or do you want to make your image feel more cinematic, isolating your subject by making it stand out against a blurry background?
This guide will help you to understand how to achieve both of these results, but more importantly, give you a solid foundation for how to use depth of field in every aspect of your photography.
All of the common questions about depth of field asked by photographers will be addressed and although this can be a highly complex subject, we’ll aim to make it as digestible as possible.
So grab a copy of this f-stop chart, find out what a camera f-Stop is, and follow along to improve your photography by mastering DOF.
What is Depth of Field in Photography?
So, you may have found yourself asking “What is the depth of field?”
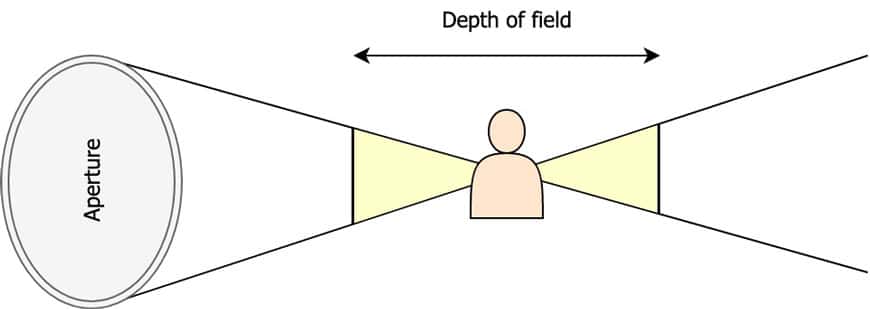
In photography, the term depth of field describes the region of a photograph that is in focus.
“In focus” is a relative term and given how easily how parts of an image can slide from being sharp to being blurry, what you might class as being “in focus” might vary according to how you are viewing an image — i.e., how big it is being displayed, and how close you are to it.
Because of this, the depth of field can be thought of as being a range of acceptable focus.
If you imagine yourself focusing on your subject. Everything that is the same distance away from your lens as your subject is now on the same focal plane.
In addition to this, there will be a region in front of and behind the subject that is acceptably sharp. The full extent of this range is your depth of field.
As will be discussed below, this depth of field can vary according to a number of variables such as how close you are to your subject, the size of your aperture, the focal length of the lens that you are using, and the size of the sensor in the camera which you are shooting on (although these last two quickly get complicated!).
Photographers are often trying to achieve one of two extremes: a shallow (or narrow) depth of field, or a deep (or wide) depth of field.
A shallow depth of field (‘shallow DOF’) produces images where there is very little in focus other than the subject. Anything in front or behind the subject quickly becomes blurry.
A shallow depth of field can be a way of creating images with a cinematic feel where a sharp subject is separated from a blurry background.
This can help to direct a viewer’s attention and prevent other parts of the scene from being distracting.
At the other extreme is a deep depth of field where the photographer maximises the region that is in focus, both in front of and behind the subject. Everything is sharp, whether it is just in front of the lens or on the horizon.
A deep depth of field can be useful where you have a number of subjects that are all different distances from the camera and each of them needs to be in focus.
This avoids making parts of the image out of focus which might undermine the quality of the photo as a whole.
How Much Do You REALLY Know About Photography?! 🤔
Test your photography knowledge with this quick quiz!
See how much you really know about photography...

In short, the shallow vs deep depth of field setting is just a difference of what is in focus.
3 Shallow Depth of Field Examples

Sony a7 III + Sigma 65mm f/2 DG DN | 1/640, f/2, ISO 100
A shallow depth of field was used to separate the subject from a busy background, blurring the trees behind the model so that they don’t take attention away from the subject’s face.
The effect gives the image a three-dimensional feel.

Sony a7 III + 7artisans 35mm f/1.4 | 1/800, f/1.4, ISO 100
Photographing forests can be very chaotic and using a shallow depth of field allows the viewer to see the detail in the nearest tree without the rest of the image competing for the viewer’s attention by being equally sharp.
It also creates a sense of depth and helps to emphasise the slight haze of the morning, both of which add a sense of mystery.

Sony a7 III + 7artisans 35mm f/1.4 | 1/250, f/1.4, ISO 4000
This photograph of a rock climber tackling an overhanging boulder uses an incredibly shallow depth of field to create a loose and abstract feel.
Little of the image is in focus which isn’t of great importance as this image is about capturing a moment. The wide aperture also helped to photograph movement in very dark conditions by letting as much light as possible reach the sensor.
3 Deep Depth of Field Examples
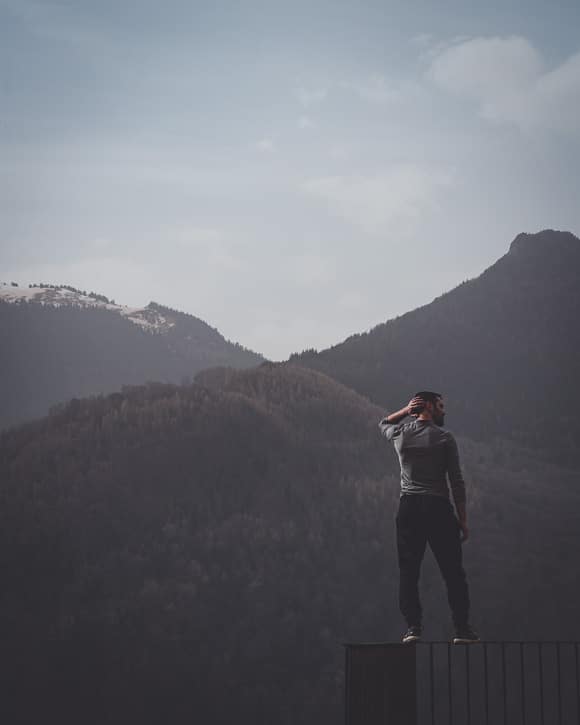
Sony a7 III + Sigma 65mm f/2 DG DN | 1/400, f/10, ISO 100.
Although the subject of this image is the person standing on the railing, this photograph also wanted to convey the context.
Using a deep depth of field brings some sharpness to the mountains in the background in an attempt to convey some of the relationship between the foreground and the background.

Sony a7 III + Canon 16-35mm f/2.8 at 24mm. | 1/1000, f/5.6, ISO 5000.
There are two subjects in this scene and one is much further away from the camera than the other. A deep depth of field ensures that both are in focus.
In addition, this is also an environmental portrait and the location plays a major role in this photograph.
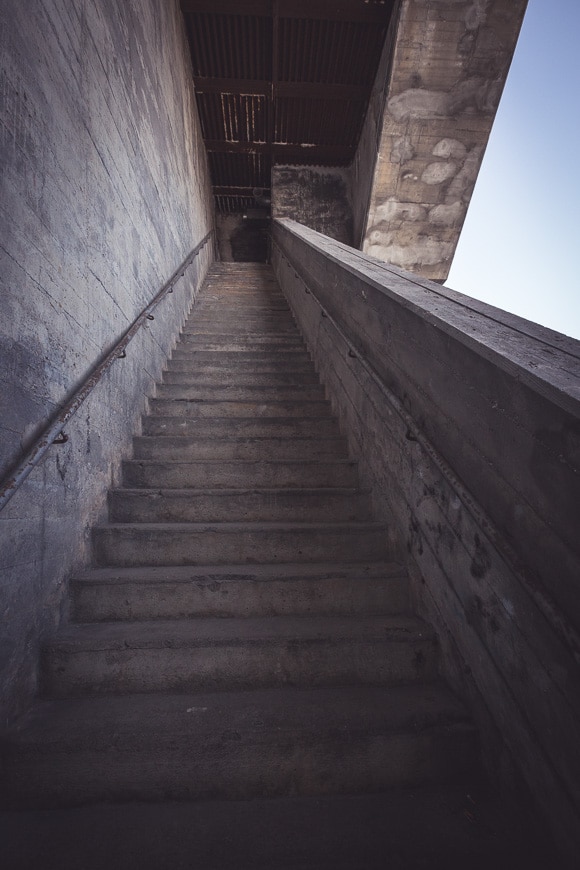
Canon 6D + 16-35mm f/2.8 at 16mm | 1/320, f/8, ISO 1000.
This image wants to communicate the texture of the concrete as well as the sense of perspective. The deep depth of field ensures that the texture of the steps in the foreground is felt but keeps all of the architecture sharp and in focus.
How Do You Calculate Depth of Field?
There are four variables that affect the depth of field.
Two of these variables have a direct impact: the distance between you and your subject (‘subject distance’), and the aperture of your lens.
(Technically, it’s actually the entrance pupil of the lens which is something slightly different, but let’s worry about these finer details another time!)
There are then two other factors that play a role in understanding depth of field: focal length and sensor size.
The Distance Between You and Your Subject
You may have noticed that when you focus your lens on the horizon, almost everything in the frame appears sharp.
Equally, if you focus on something that’s just in front of you, everything behind it goes blurry.
This is because the distance between you and the subject you are focusing upon affects how much of the scene in front of you is in focus.
It’s useful to use a diagram in order to understand the behaviour of light when it enters a lens.
When a lens focuses on a subject, it converges light rays to a point, and it is at this point of convergence — the focal plane mentioned above — where images are sharp.
As you will recall, there is a region on either side of this focal plane where the image is acceptably sharp — our range of acceptable focus — that creates our depth of field.
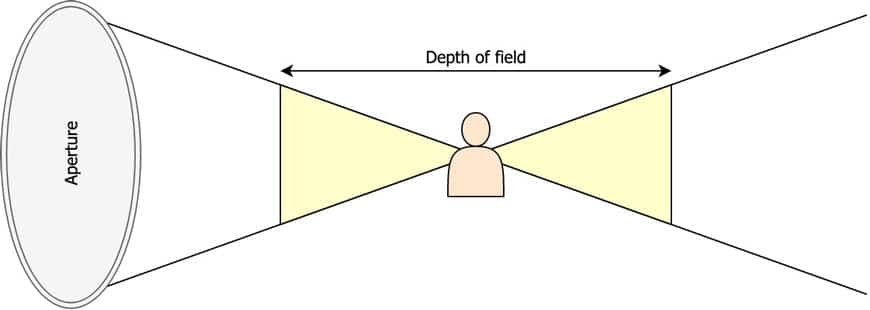
If the subject moves closer to the lens, these beams of light have to converge more sharply in order to be in focus, reducing the region within the image that is acceptably sharp, and giving a shallower depth of field:
In short, the closer you are to your subject, the shallower your depth of field. The further you are from your subject, the deeper your depth of field.
The Size of your Aperture
The aperture is the hole in your lens that let’s light pass through, one of two factors (the other being shutter speed) that determines the amount of light that reaches your sensor. The bigger the hole, the more light you let through.
The size of this hole is described by a number that, thanks to a mathematical formula that we don’t need to worry about right now, gets smaller when the aperture gets larger. The higher the number, the smaller the aperture.
The size of the aperture has a direct impact on the size of your depth of field.
The bigger the aperture (i.e., the smaller the number), the shallower the depth of field. The smaller the aperture (i.e., the bigger the number), the deeper your depth of field.
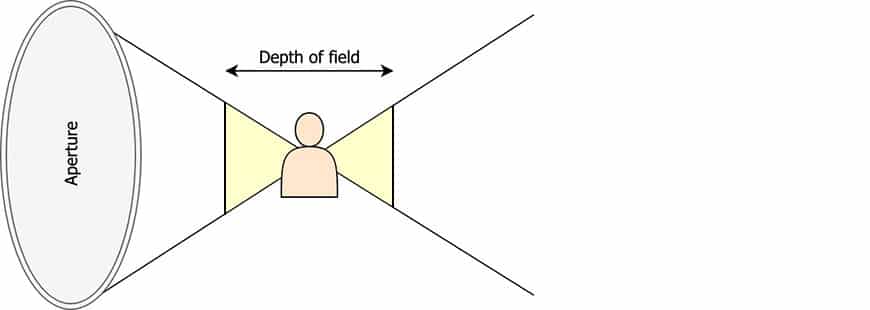
If we use the same diagram, you can see how this works. Here is a large aperture giving a shallow depth of field:

And below is a smaller aperture, giving a deep depth of field:
If you want to get as much of your scene in focus as possible, use a small aperture (high number, e.g., f/11, f/16). If you want a sharp subject against a blurry background, use a large aperture (low number, eg, f/1.4, f/1.8).
The Focal Length of your Lens
Focal length is described in millimetres. The higher the number, the narrower the field of view, and the closer distant subjects appear.
When it comes to separating a subject from the background, a lens with a longer focal length will give a blurrier background and it’s true that they give a shallower depth of field — but not for the reasons that many photographers think.
In the example below, it’s clear that the image on the right shot on an 85mm lens at f/1.8 has a much blurrier background than the image on the left, shot on a 35mm lens, also at f/1.8.
The lens with the longer focal length has a much shallower depth of field.

You can use a Depth of Field calculator (see below) to understand the difference: I was shooting from a distance of 1 m, and at f/1.8, the 35mm lens has a depth of field of 8.2 cm.
By contrast, the 85mm lens at this distance has a depth of field of 1.3 cm. That’s a huge difference.
But there’s another big difference between the two photos: the size of the subject. What happens if the subject is made to appear the same size in each shot?
To create this comparison, I moved further back and took another photograph using the 85mm lens. From 2.4 m away — the distance I need to be to make the subject the same size in both images — my depth of field is 8 cm.
Suddenly, the depth of field with both the 35mm lens and the 85mm lens shooting at f/1.8 is almost identical.

As you can see this has an effect: the difference in blurriness is not as pronounced.
The big difference is that the longer lens brings the background closer due to distance compression, and gives the impression that the background is more blurred because it is being magnified.
So longer lenses do create a shallower depth of field, but the reasons behind it are more complicated than most photographers realise!
Imagine this scenario: you take a portrait of a person but when you review your photograph, you realise that the 35mm lens attached to your camera isn’t giving you the background separation that you want, even at the largest possible aperture of f/1.8.
Instead, you decide to use a longer focal length so you switch to your 85mm lens and recompose. Because of the longer focal length, you need to move back in order to create the same composition.
If you keep the subject the same size in your frame between the two photos, your depth of field will be pretty much identical.
However, the 85mm lens will give a blurrier background — and therefore more separation — because of compression, and not because the longer focal length gives you a shallower depth of field.
Sensor Size
Photographers often assume that using a camera with a smaller sensor automatically means a shallower depth of field but the reality is more complicated than that.
As an example, consider the difference between a full-frame and an APS-C sensor.
The APS-C sensor is physically smaller than the full-frame sensor and introduces crop factor as a result. This means that a lens used on a full-frame camera will give a narrower field of view when used on an APS-C camera.
As a result, if you are photographing a subject and switch from a full-frame camera to an APS-C camera, you will need to move further back in order for your subject to be the same size in your frame.
As explained above, moving further away from your subject creates a deeper depth of field.
Doing the Math
There is a mathematical formula that combines the f-number of the lens, its focal length, the distance to the subject that gives the depth of field of a lens.
This formula also includes something called the circle of confusion which is a figure given to a lens that describes how big a single point of light becomes before it is no longer acceptably sharp.
(Circle of confusion is a confusing topic (!), but we do our best to explain it in this guide.)
The formula above allows us to calculate precisely the depth of field from any given focal length, distance to subject, and aperture.
Notice that sensor size isn’t included in this equation. A 50mm lens is a 50mm lens regardless of whether you use it on a full-frame camera or an APS-C camera.
However, on an APS-C camera, your field of view will be narrower.
Depth of Field Calculator
Here’s a useful way to calculate the depth of field based on your camera and the factors above.
- Hyperfocal distance: the focusing distance that gives your photos the greatest depth of field. When the lens is focused at this distance, all objects at distances from half of the hyperfocal distance through to infinity will be acceptably sharp.
- Hyperfocal near limit: The distance between the camera and the first element that is considered to be acceptably sharp when focusing at the hyperfocal distance.
- Depth of field (DOF): The distance between the furthest and closest points that are in acceptable focus (i.e. the zone of acceptable sharpness in front of and behind the subject to which the lens is focused on.)
- DOF near limit: The distance between the camera and the first element considered to be acceptably sharp.
- DOF far limit: The distance between the camera and the furthest element considered to be acceptably sharp.
- Depth of Field (DOF) In Front: Distance between the DoF Near Limit and the focus plane.
- Depth of Field (DOF) Behind: Distance between the focus plane and the DoF Far Limit.
(Thanks to PhotoPills for the tool and definitions.)
Depth of Field Chart
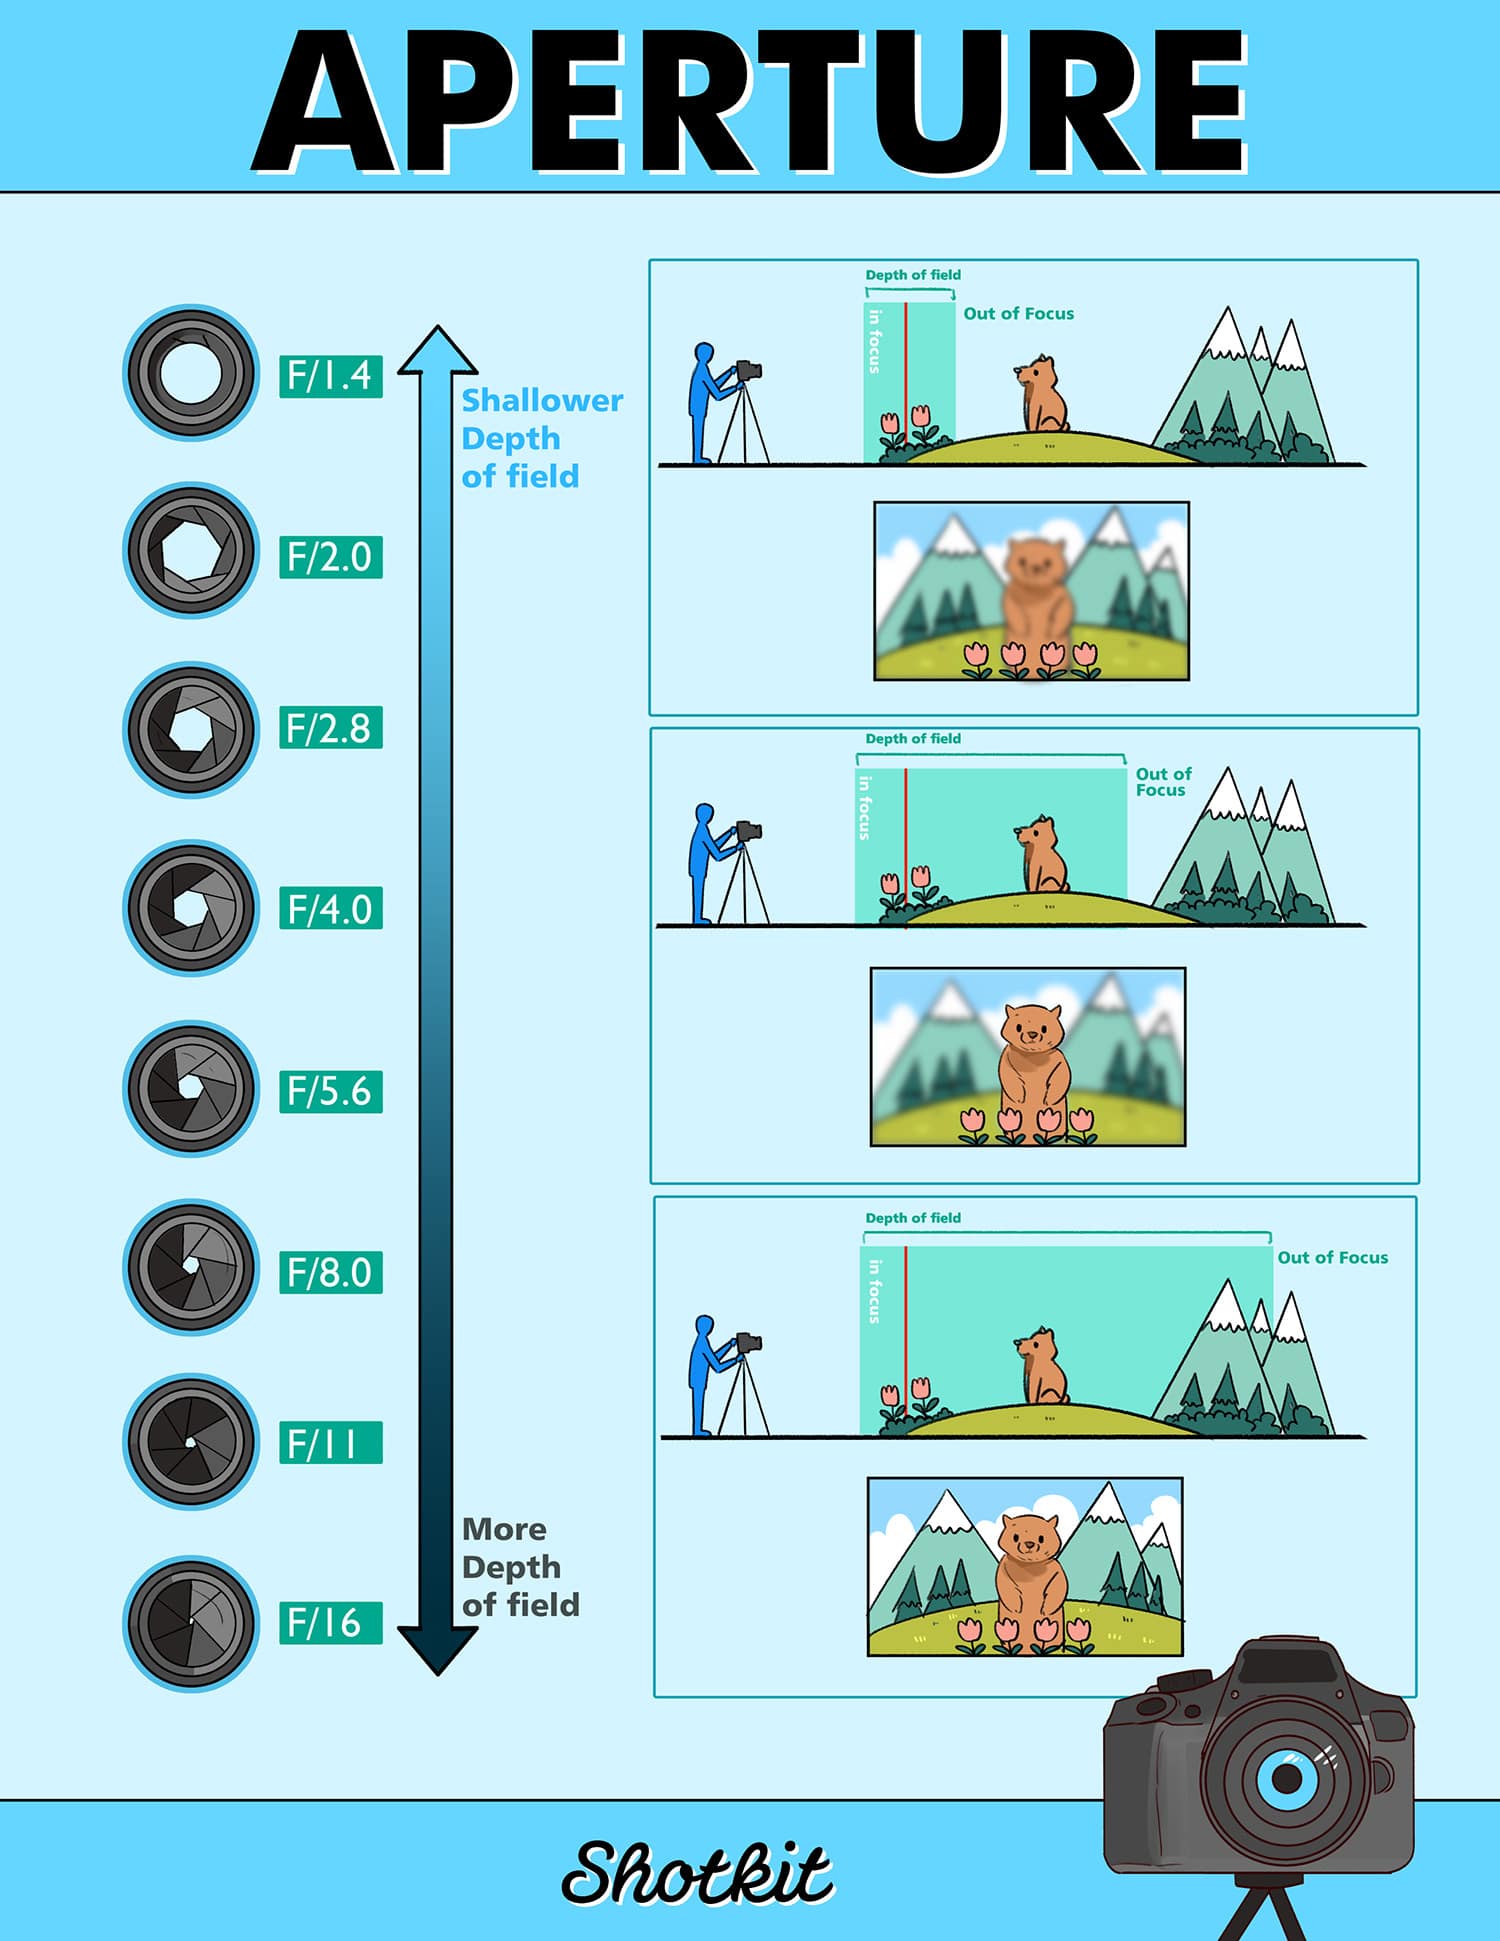
The chart above shows the effects on depth of field that changes in lens aperture produce. As the f-number of the lens increases, the greater the depth of field. As the f-number decreases, the shallower the depth of field.
Click the image to view it larger, then print it out and use it as a depth of field cheat sheet next time you’re out taking photos.
Depth of Field FAQs
What f-stop gives the greatest depth of field?
The f-stop is used to describe the size of the aperture in your lens. The lower the number, the bigger the aperture, and the shallower the depth of field. The higher the number, the smaller the aperture, and the deeper the depth of field.
Does depth of field increase performance?
Lenses tend to be sharpest when they are not used at one extreme or another. Wide open with a shallow depth of field, they can lose sharpness and suffer from other aberrations. At their smallest aperture with a deep depth of field, images can be soft as a result of diffraction.
What is a minimum depth of field?
Minimum depth of field describes the shallowest depth of field that can be produced by a lens. This is achieved by setting the lens to its maximum aperture.
How do you maximize depth of field?
To maximize depth of field, decrease the size of your aperture or move further away from the subject you are focusing upon. Alternatively, without moving, switch to a lens which has a shorter wider focal length.
How does distance affect depth of field?
As you get closer to the subject you are focusing upon, depth of field becomes shallower and out-of-focus areas become more blurry.
Which lens is best for depth of field?
To achieve the shallowest depth of field, choose a lens with a large maximum aperture. A great place to start is a 50mm f/1.8 lens as it is small, lightweight, and very affordable. If you have the money, try a 50mm f/1.4 or even an f/1.2 lens!
What is a high depth of field?
Depth of field can either be shallow (narrow) or deep (wide). A depth of field cannot be high, but you may wish to use an aperture with a high number in order to create a deep depth of field.
When would you use depth of field?
You might use a deep depth of field when photographing a landscape to ensure that the image is as sharp as possible from the front of the image to the back, and no part distracts the viewer by being blurred. Alternatively, you may use a shallow depth of field when photographing a portrait in order to blur the background and direct the viewer’s attention to your subject.
Does shutter speed affect depth of field?
Shutter speed does not affect depth of field. However, if you are trying to create a deep depth of field by using a small aperture, you will need to reduce your shutter speed (and ISO) in order to ensure the correct exposure.
Does ISO affect depth of field?
ISO does not affect depth of field. However, making your aperture smaller to give a deeper depth of field, or larger to create a shallow depth of field will require you to change your ISO (and shutter speed) in order to expose correctly.
Which f-stop is sharpest?
Typically, the sharpest f-stops on a lens are two or three stops smaller than the largest possible aperture. For example, a lens with a maximum aperture of f/2.8 will often be sharpest when used between f/5.6 and f/8.
Understanding Depth of Field | Final Words
Depth of field can be confusing at first but it’s worth gaining a good understanding as it will have a huge impact as you progress with your photography.
Understanding depth of field will help you make sure the focus in your photographs is exactly where you need it, whether it’s complete sharpness from the front to the back of an image, a razor-thin depth of field that separates your subject, or something in between.
The important elements to note are that getting close to your subject and using a larger aperture will give you a shallower depth of field.
Using a longer lens will also create a shallower depth of field unless you also have to move away from your subject in order to accommodate it, in which case it will just give the impression of a shallower depth of field because of distance compression.
It’s quite a lot to take in but if you have any questions, be sure to leave a comment below.

Check out these 8 essential tools to help you succeed as a professional photographer.
Includes limited-time discounts.


Andy Day is a British photographer and writing, living and working in France, specialising in adventure, travel, architectural and landscape photography.


