


DJI Phantom 4 Review for Photographers
Read this honest and helpful DJI Phantom 4 review before purchasing this drone. The images speak for themselves, but you need to check this first.
I’m John, a professional wedding photographer from Orlando Florida. Whilst I was on holiday in Sydney Australia earlier this year, I did something crazy – I bought a two thousand dollar drone just so I could write this DJI Phantom 4 review for my favourite site!
By now you’ve probably seen the odd DJI Phantom 4 review floating around the Internet. You’ve been wowed by incredible 4k video footage taken from hundreds of feet up in the sky, and you’ve probably been tempted to buy your own Phantom 4 drone.
That temptation was too great to resist for me and I bought my first ever drone, the DJI Phantom 4 from Amazon recently.
My intention was to take advantage of Amazon’s 30 day return policy to trial the DJI Phantom 4 and see whether it could find a permanent place in my camera gear collection.
In short, I wanted to know whether the DJI Phantom 4 quadcopter could be a tool for professional photography.
(If you’re looking for a smaller drone for work or pleasure, check out my comparison of the DJI Spark vs Mavic Pro.)
A DJI Phantom 4 Review for Photographers
This review of the DJI Phantom 4 quadcopter will focus on its relevance as a stills photography tool. We already know the Phantom 4 produces mind blowing video, but how relevant is it for a photographer who intends to use aerial drone photography professionally?
Before we start delving into the usage of the DJI Phantom 4 drone for photographers, let’s start with what it’s like to actually fly it.
Flying the Phantom 4

If you’ve never flown a drone before, the DJI Phantom 4 will blow your mind. This thing is freakin’ AMAZING!
For those of you who don’t know, the DJI Phantom 4 is a quadcopter (4 blades) which streams live video to your mobile device (in my case the iPad Mini), which is attached to your controller. It’s basically a drone with a camera attached to it, but offers so much more than that.
This means that not only can you see the drone physically in front of you, but you can also see what the drone’s camera can see on your iPad in real time, with no lag whatsoever, up to 5km away! (You can actually extend the range even further by using these cheap accessories.)
I find it absolutely incredible that something like this is possible at this price. The price tag of the Phantom 4 may be expensive to some, but to others it’s the deal of the century.
For this much technology to be available at this price blows my mind. As photographers, we quite happily spend a lot more on lenses and cameras after all…
The controls of the Phantom4 do take some practice, but it’s the kind of thing that you’ll learn quicker via muscle memory – if I stopped to think which control would pan vs tilt for example, I got confused. However, if I just embraced the controls and corrected as I flew, I found it much easier.

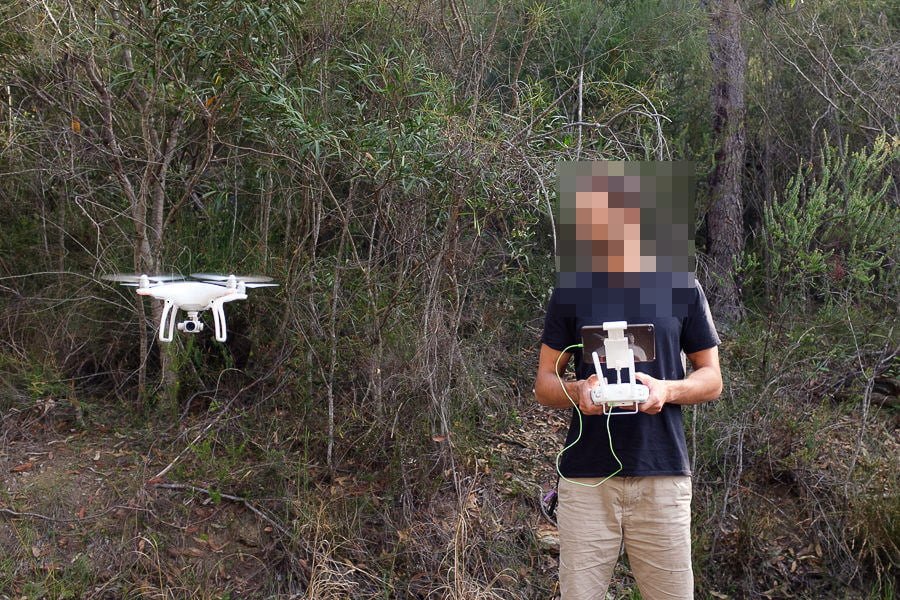
This is about as close as you can get to the Phantom 4 drone with the objct sensors activated. If you move closer to it, the drone will move away to avoid you.
One thing’s for sure – it takes a good few flights before you can really start to enjoy the Phantom 4’s flying experience completely. A drone flight training class can help you master flight maneuvers and build your confidence.”
At first the wow factor is there, and you’ll find yourself smiling uncontrollable, but mostly you’ll feel nervous. I still feel nervous!
I’m nervous that I’m doing something illegal… I’m nervous that I’m annoying people (imagine the sound of a flying hedge trimmer)… I’m nervous that I’m going to fly it into something… but most of all, I’m nervous that I’m gonna lose it!!
Thanks goodness for the ‘Return to Home’ button, which brings your Phantom 4 back to where it started like an obedient dog. Just make sure you have enough battery power left before you press it!
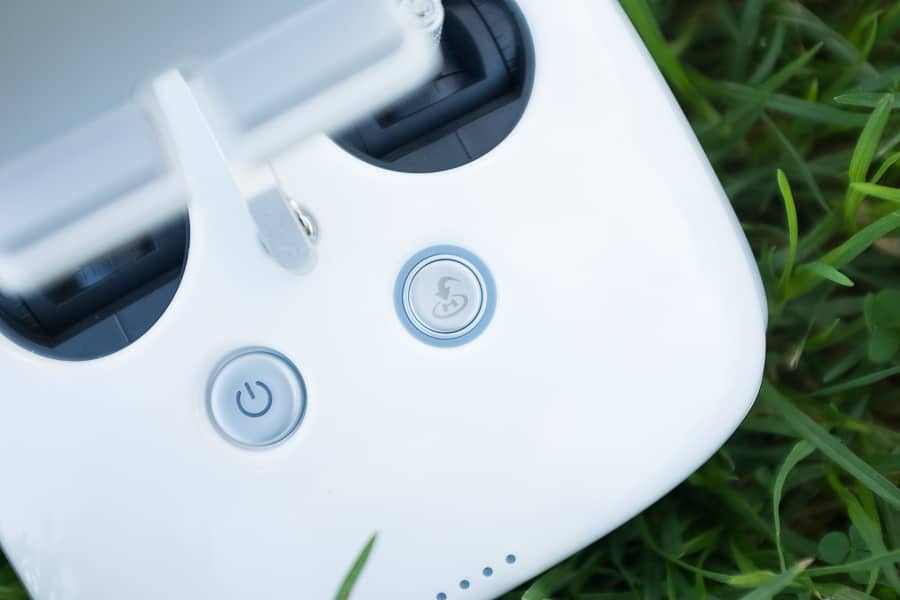
The Power button and Return to Home button. Underneath, the 4 LED lights show remaining battery power of the Controller.
The Phantom 4 drone
The drone itself is smaller than I expected, and fits rather neatly in its included polystyrene box. The box features a latch to keep it closed, and is intended to safely house and transport the drone.
I’d be inclined to take advantage of the Phantom 4’s compactness and transport it in one of the many drone backpacks which are on the market.
It’s also easy to customize the Phantom 4 box to neatly house your iPad Mini.
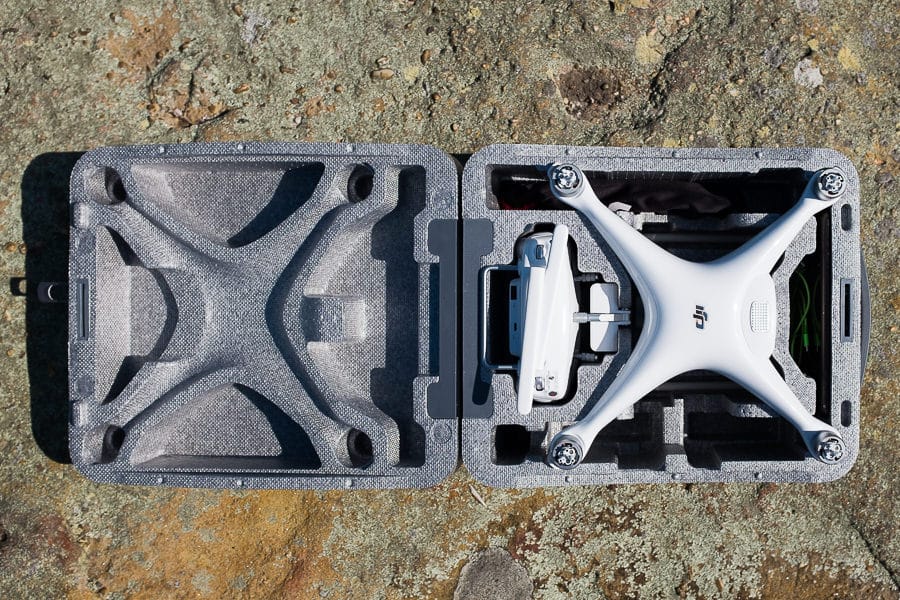
The included box for the Phantom 4 fits everything you need to fly the drone.
The Phantom 4 drone itself looks and feels like a high quality product. The blades attach quickly and easily, and the drone body feels like it could take a bump or two and remain unscathed.
The camera and gimble are obviously more fragile, and require a protective guard to be used when transporting the drone.
The DJI Phantom 4 Controller
The controller features buttons that are mapped to tap functionality on your mobile device. This means that you can take a photo by tapping the shutter button on your screen, or by pressing a button located on the controller, which is far more practical since you don’t need to release your grip on the controller.
There are also 2 customisable buttons on the base of the controller within easy reach.

The Phantom 4 Controller with an iPad Mini 4. You can use a range of tablets, but I found the Mini to be the best in terms of size/weight.
Regarding the controller itself, I found it lightweight, comfortable and robust. Samll things I didn’t like included the rubber battery port cover, which I found too fiddly, and the choice of rubber used for the grip elements, which I can see getting dirty very quickly.
Another minor niggle was the lack of any iPad connecting cable. Without a USB to Lightning cable, you can’t use your iPad, which renders the Phantom 4 useless. I find it odd that DJI doesn’t include the cable, when it includes everything else, especially considering how hard Apple is pushing this thing in its retail outlets.
I’d definitely recommend purchasing one of these shorter lightning to USB cables, rather than using a regular length one which will be left dangling off the controller.
Battery Life
This deserves its own section since it’s so damn important! The advertised battery life of the Phantom 4 is 28 minutes per flight. For a first time drone user, this probably sounds short, but for those upgrading from other models, it really is quite impressive.
In practice, I was averaging around 20-25 minutes of flight. One important thing to remember though is that even with 20-ish minutes of flight time, you’ll always want to return with at least 5 minutes worth of battery power ‘in the tank’. This is just to ensure any unforeseen circumstances, such as a strong head wind, getting lost, or whatever else.
Thankfully, the DJI Go app does a great job at showing you an estimate of remaining battery time, both as a percentage and remaining flight time.
When the battery power drops below a certain level, the controller will alert you with a visible and audible warning – when it happens first time, you’ll jump out your pants!
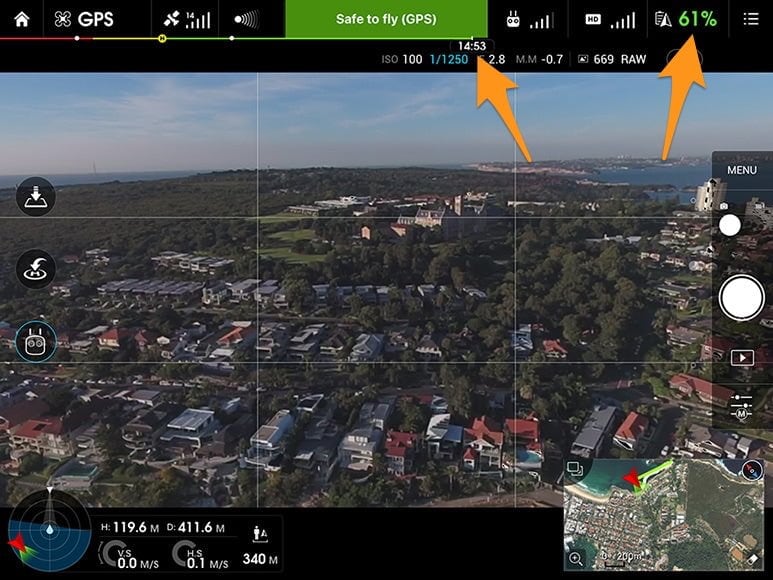
Remaining battery as shown as a percentage and approximate remaining flight time.
The batteries on the controller and the Phantom 4 take around 90 minutes to charge. If you’re planning any extended drone usage, I’d definitely advise investing in a couple of extra ‘Intelligent Flight’ batteries.
The battery charger can charge both the controller and the drone’s battery at the same time, which is a convenient feature.
It took a few flights for me to realise that whilst the battery life was limiting, you really need to slow your actions down whilst flying the Phantom 4.
The beauty of a quadcopter of this calibre is that it hovers in place without any user input. In fact, the first time you see how stable it can hover is a rather spooky experience. See the review video below for the video footage of this.
The Phantom 4 can hover perfectly still. In high wind, the drone will do its best to keep adjusting to maintain stability.
So when you’ve flown the Phantom 4 to the right spot, your mind can take a break from flying to concentrate on getting the shot. Speaking of which, let’s look at the Phantom 4 for photographers like ourselves.
The DJI Phantom 4 for Photography
Now it’s time to look at the relevance of the Phantom 4 for aerial drone photography, or photographers who are keen to shoot high quality stills, perhaps as a value-add to their current photography services.
I’ve broken this section down into:
1. Shooting Modes
2. Camera
3. Lens
4. Sensor
5. Images
6. Video Stills
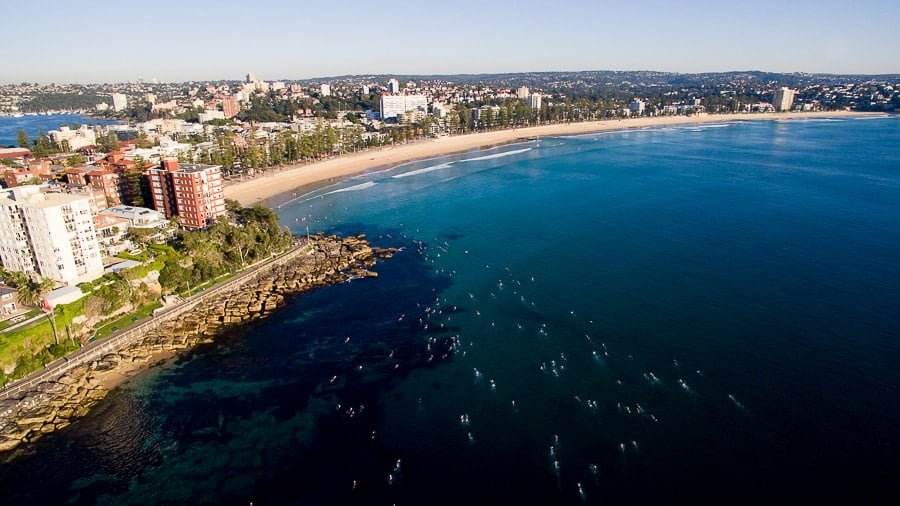
One thing’s for sure – no matter what the quality of the image from a drone, you’re always going to get a photo from an angle most other photographers can’t replicate. The picture below was taken right above the sea, 20 metres out from the beach, whilst the DJI Phantom 4 was hovering about 3 metres above the water.
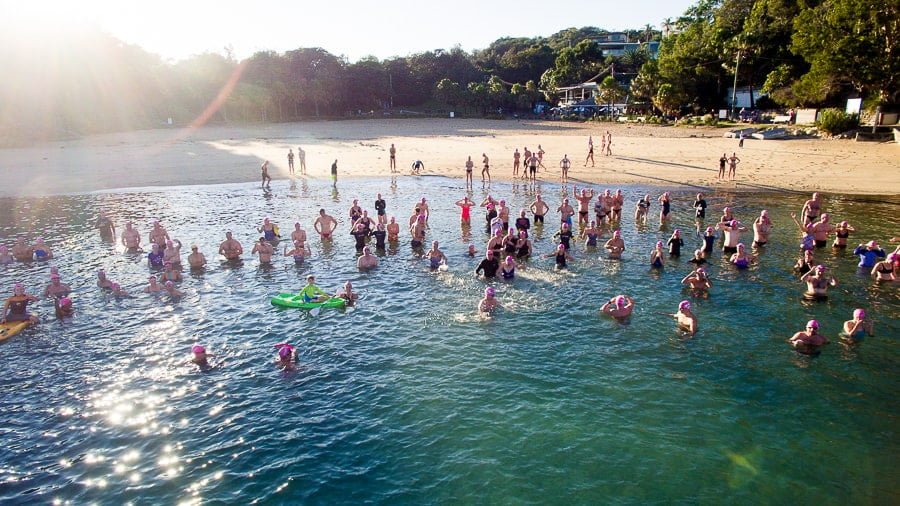
1/700th at f/2.8 ISO100 | The Bold & Beautiful Manly swim squad
1. Shooting Modes
There are several shooting modes to choose from on the Phantom 4, including most of those found on your dSLR – burst mode, time lapse, HDR and exposure bracketing. Controls are Auto or Manual, and you can control everything down to applying a custom white balance.
[Fan of HDR? Learn how to do HDR photography.]It’s clear that the camera on the Phantom 4 is intended for professional use, whether for stills or video.
The Auto setting does a great job, but tends to expose more for the shadows. Since the shadow detail retains more information in the Phantom 4 RAW files, I preferred to use Manual mode to expose for the highlights, then bring back some shadow detail in Lightroom.
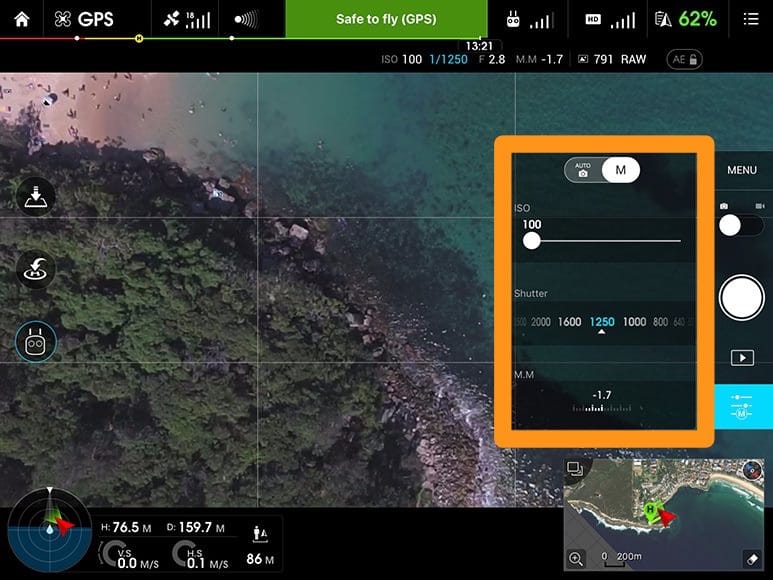
In Manual mode you can control the ISO and Shutter Speed independently.
As the Phantom 4’s lens is a fixed f/2.8 aperture, Manual mode basically consists of altering ISO and shutter speed to adjust exposure.
In daylight flying, as you won’t need to be fiddling around with the ISO, all you need to adjust is the shutter speed to affect your exposure.
With so many other variables to think about whilst flying the drone, I was happy for this simplicity in photo capture!
The iPad shows highlight clipping via zebra lines which I found very useful, especially when the iPad screen was hard to see properly in bright sunlight. I’d definitely advise purchasing one of these hoods which fix onto the controller and provide some shade over the iPad’s screen.
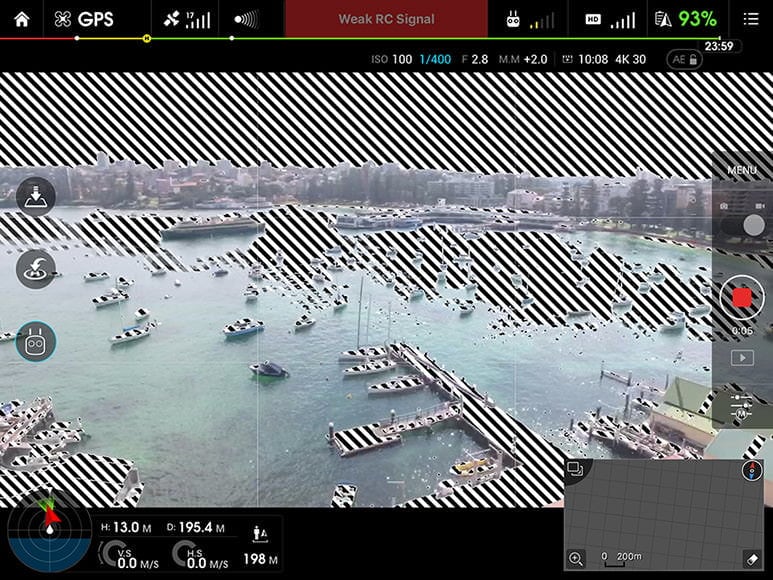
Zebra lines clearly show overexposed areas of your image in real time.
For those who don’t know, the zebra lines provide a live visual cue as to any area of your photo that is ‘blown out’ – i.e. retaining little to no visual data.
I found the best method to fly the Phantom 4 was with the camera in Auto mode to be able to see the monitor’s display most clearly, then after I positioned the drone in place, I switched to Manual mode and adjusted my exposure via the shutter speed until there were no zebra lines (i.e. exposing for the highlights).
2. The Camera
Whilst some previous iterations of the Phantom drone required the user to purchase a separate GoPro, the Phantom 4 comes with an attached camera.
The camera housing is suspended from the drone body via a gimble which serves to counteract the movement of the drone, providing incredibly smooth footage. In still photo mode, I was able to shoot at 1/80th and still get an adequately sharp image.

The gimble is motorized, allowing full wireless control via the controller. This allows the camera to be moved 90 degrees (i.e. a full range from directly in front to directly below).
To turn the camera 360 degrees horizontally, you need to pan the drone body using the controller. If you’re shooting video, achieving a smooth pan with the sensitive controller sticks is quite tricky as you’ll see in my review video below.

1/900th at f/2.8 ISO 100 – Shelly Beach from 20m up!
The camera sends a live video feed to the controller, allowing the user to see a first person perspective of what the drone is seeing on your monitor. I found an iPad Mini to be the best size screen for this.
The video feed is responsive and great quality – it really is amazing that all this takes place in real time, often with the drone hundreds of feet away.
The Lens
The Phantom 4 features a fixed 20mm f/2.8 lens. This field of view isn’t quite as wide as a GoPro, but provides a good balance between an immersive perspective with little distortion.
Personally, I’m not a fan of the GoPro ’s field of view which is verging on fish-eye. The 20mm field of view of the Phantom 4 strikes me as just right for its usage.
1/900th at f/2.8 ISO100 – Sydney Harbour
Photographers to shooting at 20mm will know how close you need to be to your subject for it to come anywhere near being dominant within the frame.
With the Phantom 4, this would mean flying no more than 2 metres away from your subject, which would introduce all kinds of safety issues, not to mention the wind/noise generated form the Phantom 4’s propellers.

1/500th at f/2.8 ISO100 | Hovering at around 3 metres above sea level
In this way, photographers who wish to use the Phantom 4 to take portrait photos of their subjects from interesting angles may find it difficult to bring visual attention to the subject.
However, the appeal of aerial photography is more about taking photos from high above, and in this respect, the 20mm field of view of the Phantom 4’s camera is perfect.
3. The Sensor
The Phantom 4 features a 1/2.3″ CMOS sensor, allowing it to capture 4k video at 30fps (1080p at 120fps for smooth slow-mo), and 12 mega pixel stills.
The photos can be saved as Adobe DNG RAW, and video footage can be saved in flat profiles such as D-Log and Cine-D.
The sensor offers an ISO range from 100 to 1600 for stills and 3200 for video. However in practice, I found the useable ISO range rather limited, especially for photos.
The Phantom 4 offers 4:3 and 16:9 image formats. 4:3 offers 4000 x 3000 resolution, whilst 16:9 crops the top and bottom, leaving you with 4000 x 2250.

1/150th at f/2.8 ISO100 | 4:3 aspect ratio
I’m not a fan 4:3 images, and in my opinion this aspect ratio looks especially strange shot from a wide angle lens.
I’d really like to see the next generation Phantom offering a 3:2 aspect ratio, and with it, a bigger, better quality sensor. If DJI can partner with one fo the big camera manufacturers to help with their sensor design,you’d get a lot of photographers reaching for their wallets.
4. The Images
As for the Phantom 4’s still image files themselves, I have to say I was a little disappointed. Whilst the 4k video footage is nothing short of mind blowing, the RAW image files from the Phantom 4 aren’t as impressive.
It’s worth remembering at this point that we are talking about images coming from a tiny camera housed beneath a quadcopter which is capable of hovering hundreds of metres above the ground.
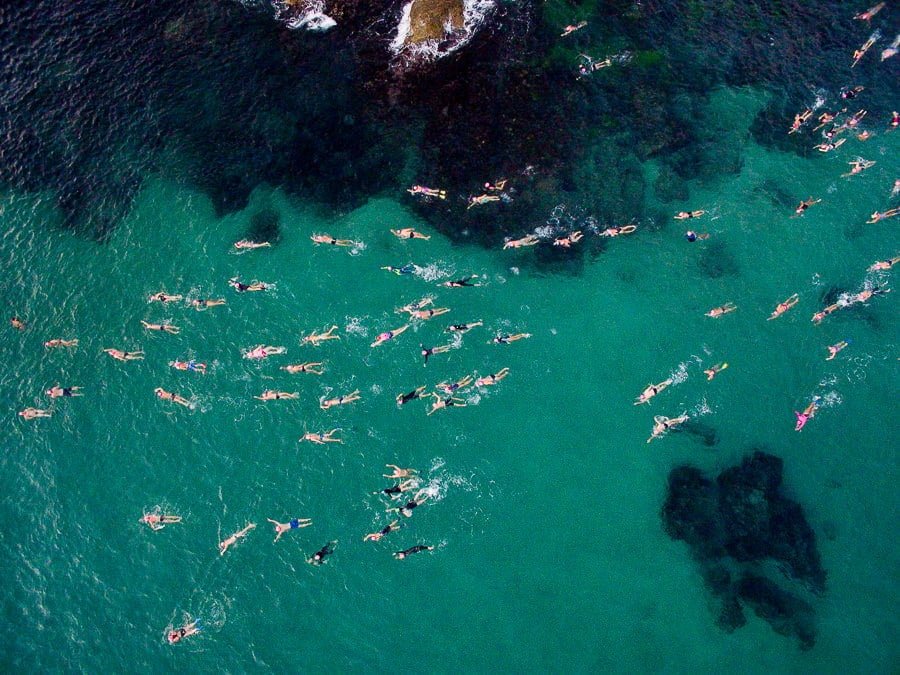
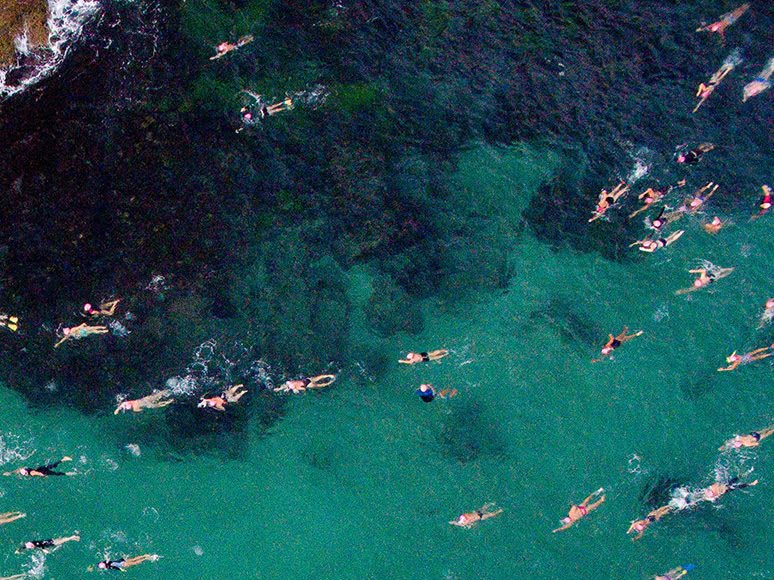
1/1250th at f/2.8 ISO 100 | Those tiny specs are swimmers!
The ability to take sharp photos under these conditions is certainly impressive, but despite this, I was expecting a little more of the RAW files.
At ISO 100, the files can be pushed and pulled a little. Details remain clean and the RAW retains an adequate amount of shadow detail which you can recover if necessary. The highlights seemed to contain much less information.

Underexposed – 1/400th at f/2.8 ISO 100

Exposure corrected in post
Anything higher than ISO 100 and the quality quickly degrades, and this is especially apparent when you start zooming in.
The photo below was taken just after sunrise. I wouldn’t consider it particularly lowlight, but due to the motion of the swimmers, I required more than 1/80th to get a sharp shot. However, I wasn’t willing to use anything over ISO 400, so this was the outcome:
1/80th at f/2.8 ISO 400
Zooming in to 100% reveals some nasty artefacts:
100% Magnification
Due to safety issues, drone flight should be limited to day time usage. However, you’ll probably want to experiment with the odd sunrise/sunset flight like I did, and in these conditions, the small sensor is really pushed to its limits for still photography. As for video footage, check out the review video below.
When flying in lower light, it’s necessary to keep the ISO as low as possible and purposely underexpose the photo using the Manual settings. Then you can try and bring the exposure back up a little in Lightroom.
Even at the lowest ISO setting of 100, I couldn’t help feeling a little disappointed with the image quality. In the future, I’d love to see DJI collaborating with other camera companies to get the most out of the APS-C sensor size.
5. Video Stills
Whilst still photo quality is acceptable, it’s clear that the Phantom 4’s strengths are as a video recording tool.
The video footage at 4k is nothing short of mind blowing. You can see the Phantom 4’s video footage downsized to 1080p in my short review below.
My jaw was on the floor every time I reviewed the raw 4k video footage on my 27″ Apple Thunderbolt Display – the quality and detail is mind blowing. I can only imagine how it’d look on a 27″ 5k Retina iMac!
Since it’s 4k, you can not only crop into the video footage quite comfortably, but also grab video stills to be saved as JPEG photo files too.
The Phantom 4 Software
To be able to pilot your Phantom 4, you need to install the DJI Go app on your mobile device.
I have to say that it’s not the best designed app, and does require some guess work as to which buttons to press initially. You’re also likely to need a 20 minute firmware update before using your Phantom 4 for the first time, which requires a computer and an Internet connection.
That said, the photo/video integration of the DJI Go app is really good. Any footage you take with the Phantom 4 drone is stored on a Micro SD card inside the drone in full 4k glory (12mp RAW files for photo).
In addition, all footage is also transferred immediately to your iPad, which I find absolutely incredible, not to mention very useful as a quick way to review your photos/footage. Those who know what a pain in the a** it is transferring content to your iPad will love this feature.

Immediately after landing the Phantom 4, you’re able to review photos and videos on your iPad.
The DJI Go app also includes a simple way to piece together a movie on your iPad, along with free background music for you to use. It’s clear that DJI wants you to share as much footage as possible (alike GoPro, this is great for viral marketing), and has made the process very simple.
I particularly liked the ability within the software to trim your video clip to a more mobile friendly size, ready to email to friends.
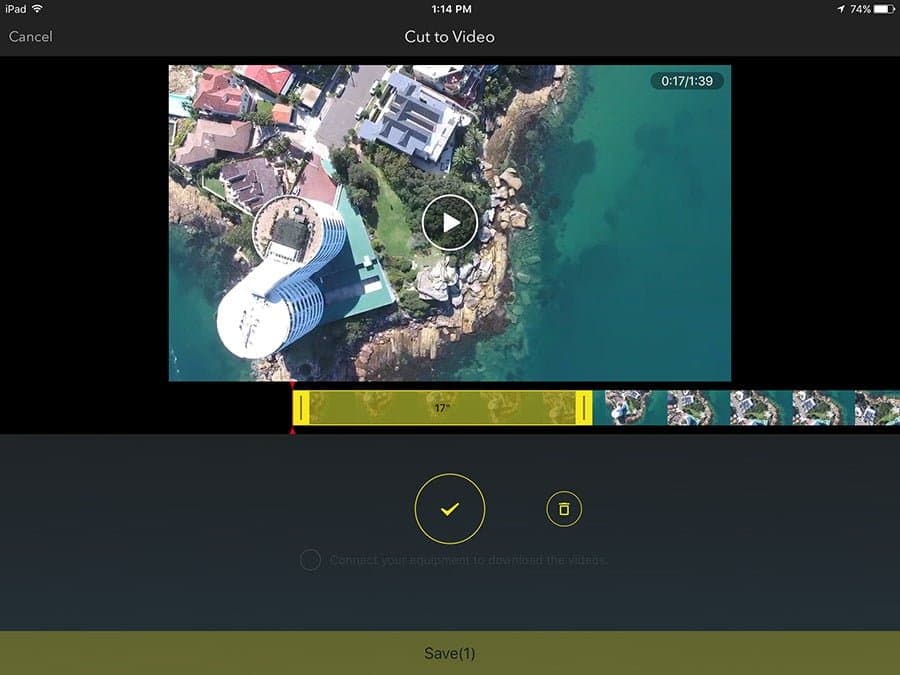
Selecting a section of your video footage using the DJI Go app is simple and fast.
One function I didn’t explore was the Youtube Live feed. My iPad is the Wifi model, but I assume that if yours has 3G, you can be streaming live to YouTube while you fly – again, absolutely mind blowing technology!
The mapping functionality of the Phantom 4 quadcopter is also amazing. I loved the ability to see on a Google map (in the corner of your iPad display) exactly where the drone was located.
The Phantom 4 also records its flight path and all GPS data associated with any footage you take This brings an entirely new level of functionality to Lightroom’s useul Map feature.

Lightroom’s Map feature uses GPS data from the Phantom 4 to show exactly where your photos were taken.
Whilst you’re flying, the DJI Go app puts the Phantom 4’s main functionality only a tap away. It’s not the most user friendly set up, with several buttons taking you to the same menu, but I soon got used to it.
I also appreciated the fact that the most important features in the Go app are also accessible via the controller’s hardware buttons.
The Law
An added layer of confusion for many would-be drone enthusiasts is where you can fly your drone legally. Each country has its own set of rules which seem to be in a state of constant evolution, with authorities figuring out just how to handle this accessible new technology.
In addition, any commercial drone use (making money from your Phantom 4) brings further complications, with licenses, training and other big expenses coming into play. This is also dependant on where you plan to use the drone.

Whilst no-fly zones are tightly regulated, I found that in Australia at least, areas for recreational drone flying were rather vague, with the laws constantly changing.
I know in my home town in Orlando I wouldn’t be able to fly a drone over the top of people on the beach, but in Sydney, the laws seem to be a bit more vague at the time of writing.
It seems to be a grey area, but obviously caution is advised wherever you choose to fly a Phantom 4.
There are several apps available which give you a broad idea of where you can and cannot fly, but judging by others’ experiences, many local authorities are still not aware of the flight restrictions.
Final Thoughts
I bought my Phantom 4 drone from Amazon to trial for 30 days. I knew that I didn’t want to use the drone commercially (in my wedding photography business), as I prefer to make my workflow simpler, rather than adding unnecessary complication.
However, I’m having a tough time trying to decide whether to let go of my new ‘toy’. Yes, it is expensive if it’s not going to be making me any money, but this level of technology available to a consumer is way too tempting for me!
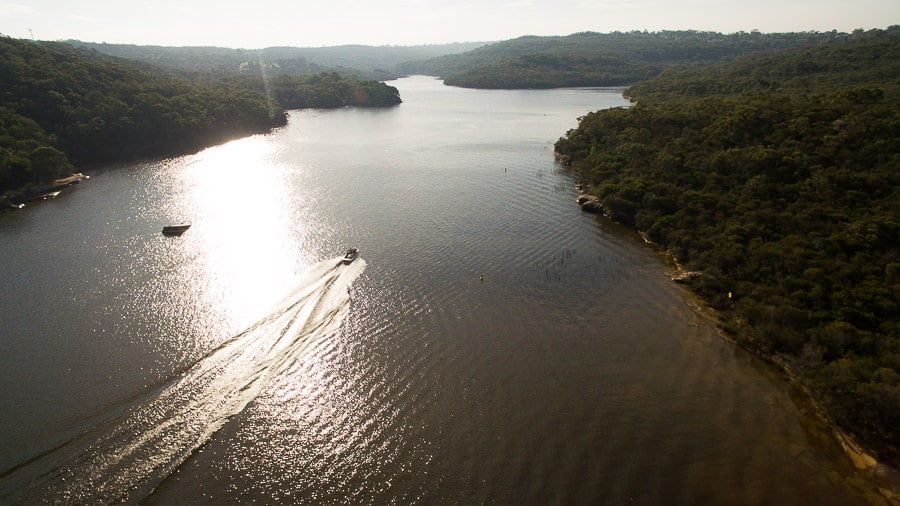
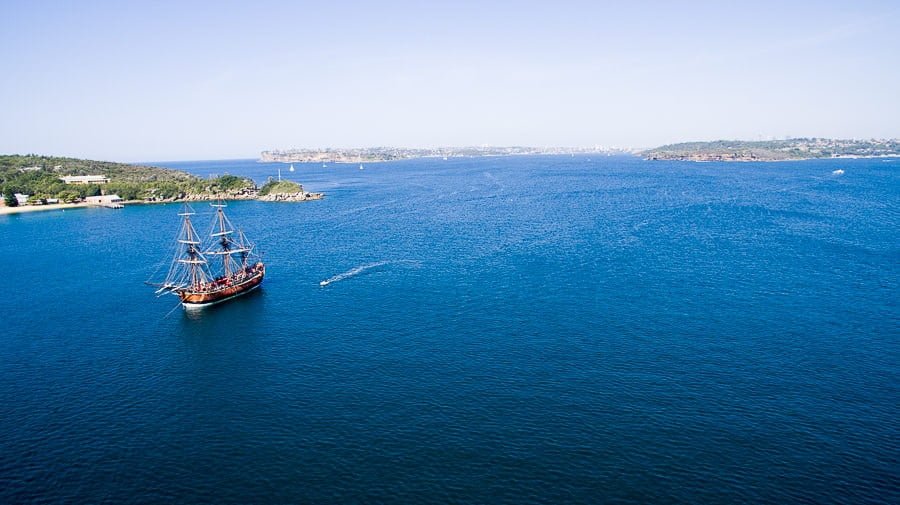
1/2300th at f/2.8 ISO100 – The Hawkesbury River in Sydney
As for commercial use, the quality of the still image isn’t quite there yet in my opinion. The inclusion of RAW format for a sensor of this size and quality doesn’t appear to mean much with the Phantom 4. You are still very limited as to what you can achieve with the files in post, and even without any editing, the dynamic range of the image is certainly lacking.
That being said, the Phantom 4 is great fun to fly and the video footage is just so jaw-droppingly beautiful that you’ll never tire of looking at it. Even if you don’t use it as a still photography tool, being able to explore a location from a first-person perspective without leaving your seat is simply incredible.
In fact, I’m considering purchasing an cheaper model Phantom 3 quadcopter for this reason alone.
I’ll be doing some overseas travel later this year, and I know I’ll kick myself if I don’t have a drone to explore a little and view my location from overhead. Thanks to the compactness of the Phantom drones, including one in my check-in luggage would be quite feasible.
For those photographers who are interested in using the Phantom 4 professionally, I advise taking advantage of Amazon’s 30 day return policy to test it out for yourself. I’ve probably been a little critical with this review with regards to the still image quality, and certainly for web use, the images are still quite good.
Whilst the RAW files do have their limits, this shouldn’t be a major concern if you plan your flights at the right time of day, and rely on good natural light or the in-built exposure bracketing feature.
A huge part of photography is creating something that hasn’t been seen before, and with a drone, 99% of what you’re shooting falls into this category. Even the most mundane location looks interesting when viewed from above, and a drone is currently the most efficient and cost effective way to achieve this. It’s also a lot of fun, which is what photography is all about :-)
My Recommendations
If you’re looking for the best still photo quality, and the ability to push and pull your RAW files in post production, the Phantom 4 probably isn’t for you.
Instead, I’d recommend the newly released Zenmuse X5 camera which features an MFT sensor with expanded dynamic range capabilities. Then you’ll need something like an Inspire 1 drone to attach it to.
Editor: Here’s some footage at a recent wedding shot by an experienced UAV operator with an Inspire 1 with the Zenmuse X3 camera attached.
If you’re a videographer, I’d fully recommend the Phantom 4. The video quality is amazing and the drone itself is well designed, fully featured and a pleasure to fly.
Finally, if you’re like me and just like the idea of using a drone to explore a location from a bird’s eye view, I’d recommend snagging an older model Phantom drone such as the Phantom 3 Standard, which is currently available for a quarter of the price of the latest model.
 DJI Spark vs Mavic Pro vs Mavic Air
 19 Drone Photography Tips to Improve Your Aerial Shots in 2024
 DJI Mini 3 Pro Review: This Tiny Camera Drone Just Got Better
 How Much Does a Drone Cost in 2024? Comprehensive Price Guide
 Best FPV Drone for Immersive Flying and Racing in 2024
 Best Drone Accessories in 2024 for More Fun Flying


