


How to Take a Photo of An Eye Close Up
Taking photos of eyes close-up using a macro lens is a fascinating and rewarding experience. This guide reveals the secrets of doing it yourself at home.
Learn | Photography Guides | By Ana Mireles
Have you ever looked at a photo of an eye close up? They are fascinating and full of details, looking a bit like a celestial object or something from outer space.
Professional photographer (and physicist) Suren Marvelyan’s sure thinks so. He established himself by doing astrophotography, but more recently, he did a whole project of eye macro photography called Your Beautiful Eyes.
He said that he wanted to showcase the diversity of the eye structure – and it’s been one of the most visited portfolios ever on Behance. His project has since been published all around the world.
So, if you’re interested in learning how to make extreme close up images of the human eye, keep on reading.
In this article, you’ll find all the information you need – from gear to post-processing.
How to Take Amazing Eye Close Up Photos
Choose the right gear

Credit: Samer Daboul
Making stunning close-up photos of an eye is not that complicated when you have the right equipment. Here’s a list of everything you need, both the ideal gear and the budget-friendly alternatives.
- Camera
What is Macro photography? Simple – it’s all about capturing detail, and that’s why every pixel counts.
Even if you can make beautiful eye close up photos with any camera that allows you to use a macro lens (more about that in a moment), you should consider using a full-frame camera if you can.
Some of the best cameras for macro photography with high resolution are:
– Canon EOS 5DS R
- Lens
As I was mentioning, to make close-up photography, you need a macro lens. This is a dedicated camera lens that allows for a 1:1 magnification of a subject with a short focusing distance.
There’s a wide variety of focal lengths that have macro capabilities – the shortness of the focusing distance will depend on this.
Standard lenses offer the best perspective because they won’t cause any distortions, since they are the closest one to the way we see the world with the naked eye.
One potential issue is that if you get too close to the subject, you can cast a shadow, making lighting the eye difficult. To avoid having lighting problems, a short telephoto lens with macro capabilities will be a better choice.
Like any other specialized tool, macro lenses can be a bit pricey. Don’t worry though; you can start with some other possibilities that are more budget-friendly.
- Macro lens alternatives
Reverse ring – With this device, you can mount any lens backwards. If you do this with a wide-angle lens or standard lens, you can do macro photography. On the downside, you won’t be able to adjust the aperture of the lens.
Extension tubes – This accessory goes between the lens and the camera to move the lens further away from the sensor. By doing this, you shorten the focusing distance and enlarge the magnification. The cheaper versions won’t connect the lens to the camera, so you’ll have to focus manually, and you won’t control the aperture. If you can invest a bit more, I recommend that you get extension tubes with an electrical connection with the camera body.
Close-up filters – Like any other filter, it attaches to the front of the lens – it’s like holding a magnifying glass in front of your eye. They allow you to make macro photography, but the image quality won’t be the best.
- Tripod
With macro photography, you magnify the subject, but you also magnify the problems. The smallest amount of vibration can cause a very noticeable camera shake and will ruin your photo. Using a tripod will give you the stability for tack sharp images.
How Much Do You REALLY Know About Photography?! 🤔
Test your photography knowledge with this quick quiz!
See how much you really know about photography...

Tripods are also useful because you’ll have more control over the composition, and you’ll be able to use Live View to zoom in and focus more precisely.
- Remote shutter release
As I mentioned when I recommended using a tripod, camera shake is a big problem in macro photography. It becomes so sensitive that even pressing the shutter button can blur your photo.
To avoid this problem, you can use a remote shutter release, which can be a cable connected to the camera or a wireless shutter.
Choose the best camera settings
Credit: Sharegrid
Now that you have the gear, you need to know how to use it. Here’s a quick guide to the best camera settings for eye close-up and macro photography.
- Aperture
As you know, the aperture has an impact on the depth of field. Since you’re already very close to your subject, there’s no need to use a wide aperture – this would only increase the chance of missing the focus. You can use an f/8 or f/11, as long as you have sufficient light to expose the eye properly.
- Shutter Speed
Even if we don’t consider a posing subject to be a moving subject, it’s not an inanimate object either. Eyes are in constant movement, which we normally don’t realize, but it can be noticeable when you’re so close to them. Plus, your subject needs to blink and breathe. So, you can use slow shutter speeds but not super slow. You should experiment with this, but I wouldn’t recommend anything slower than 1/60.
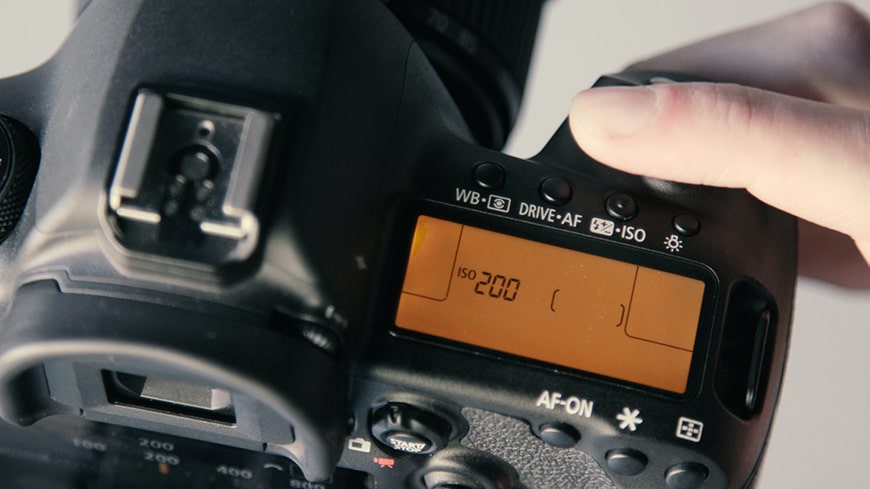
- ISO
Keep your ISO as low as you can. This is a recommendation that applies to all types of photography.
Many people think that ISO is the least important setting from the exposure triangle (see here). However, it’s the one that causes or prevents noise in your image.
Noise is one thing you definitely don’t want to creep in when photographing eyes since the final image needs details that are clean and tack sharp.
So, whenever possible, keep the ISO to 100. If this isn’t possible because there isn’t enough light, raise the ISO to reach the correct exposure.
- Focus
The best way to achieve the perfect focus when you’re photographing eyes in close-up or macro photography is to use manual focus.
I know this might sound scary when you’re a beginner, but keep in mind that you have a still model in a controlled environment, so you shouldn’t have any problems.
I recommend that you switch to Live View to use the LCD screen instead of the viewfinder – this will allow you to zoom in and find the perfect focus.
It would be best if you were using a tripod for this. If you don’t have one – or you feel more comfortable using auto-focus, then use AI Servo with a single focus point.
With this combination, you can choose which part of the eye you want to have in focus, and your camera can track it if there are any movements.
- Burst Mode
As I mentioned before, our eyes are in constant movement – even when staring at a fixed point. This isn’t usually perceptible by us, but it will make a difference for the camera if you’re doing an extreme macro shot.
Using burst mode, you’ll be able to catch multiple photos per second, and you’ll be sure to capture the eye in the best possible way.
Decide on the right lighting for your shot

Credit: Nong Vang(left); Anete Lusina(right)
Different lights create different effects. Not only will it change the mood of the picture, but it will also create a specific reflection in the eye. So, you have to decide what type of light you want to use and what’s the lighting setup.
- Natural Light
Natural light is always a great choice for portraits, including eye close-ups. If you are working in-doors, you can use window light. Otherwise, go outside but look for soft light. This can be found in the morning or afternoon; you can photograph in the middle of the day if there is some overcast or you’re standing in the shade.
- Flash
If you want to use a flash, try to avoid using the pop-up flash from your camera. You can use a Speedlight or any attachable accessories such as a ring flash.
Otherwise, you can use larger studio lights like mono lights or strobes. It’s best if you soften the light using a softbox or an umbrella.
When you use flashes, you might have to deal with some trial and error because it can make your model blink when you take the photo.
- Continuous light
Continuous light is a type of artificial lighting source that emits light as long as it’s turned on. By this definition, you can consider any type of lamp a continuous light source.
However, lights are specifically designed for photography because they are more powerful or have light modifiers or a controlled color temperature. You can use whatever you prefer.
Regardless of the type of light, a lighting setup regards the position and direction of the light. With the chosen position, you can also create a catch light in the iris.
Analyze different portraits and notice how you can see the reflection of the light source in the subject’s eyes – that’s the catch light.
A beauty ring light creates a pleasing reflection that circles around the pupil. You can also try a butterfly lighting setup, which creates a catch light on top of the iris.
If you don’t want to have a catch light, you can place the light to the side. Above all, when photographing eyes, light is key.
General tips

Credit: v2osk
- Safety first
If you’re working with natural light, never ask your subject to look directly at the sun, since this could cause permanent damage to their eyes.
As far as artificial light, they are usually safe for use but still be careful with intensity, and avoid having your subject looking at it for long periods of time – there’s no need to risk.
Also, if you’re experimenting with creative effects with light, keep in mind that highly-focused light can damage the eyes – so avoid laser beams, magnifying glasses, etc.
- Take breaks
Let the eyes rest in between shots. Staring at a target without blinking can irritate the eyes, especially if you add an intense light pointed at it.
Taking short breaks or using lubricating eye drops keeps your subject comfortable and will make for more beautiful pictures.
- Give the eye a few seconds to adjust
Our pupils dilate and constrict according to the amount of light. When we close our eyes, the pupils will dilate and constrict when we open our eyes.
Since your subject can close their eyes between shots, remember to give them a moment to adjust to the light again once they open them.
If you fire a flash while the pupils are still dilated, it will be very uncomfortable for your subject – and you’ll probably get a photo of the eye squinting.
- Reflections
Our eyes are constantly ‘wet’ by oil and other secretions released by the eyelid to keep the eyes clean and healthy – this makes them extremely reflective. So, pay attention to what’s being reflected.
- Use your phone
While I suggested a DSLR or a mirrorless camera at the beginning of this article, you can also use your phone to photograph eyes up close too.
You will still need the rest of the accessories mentioned above, though. Get an external macro lens to attach to your phone. A phone tripod and the built-in self-timer will help with the camera shake, and maybe add some artificial light if necessary.
- Practice with your own eye
You don’t necessarily need a model to do eye macro photography. If your camera has an LCD screen that flips 180 degrees, you can try to photograph your own eye. Otherwise, try attaching a mirror to the back of your camera to reflect its LCD in order for you to see it.
Taking a photo of your own eye can be tricky, but it’s also very rewarding – a really unique form of self-portraiture.
- Try photographing an animal’s eyes
If you’re not much of a people’s person, you can always focus on an animal’s eyes. Of course, this presents some more challenges because your model won’t be as likely to stay still on command, but that can be the fun part!
- Get creative
To add a personal touch to your eye close-up photography, you can always use props and makeup around the eye.. You can get as creative as you want.
Edit your images

Post-processing is part of the digital photography process. One of the most common edits is cropping – especially if you didn’t have the equipment to get as close as you wanted. You can also use the crop tool to improve your composition.
Then, the adjustments you make can be as subtle or as creative as you want.
For example, you can simply adjust the exposure and white balance using the Levels or Curves tools. You can also make the colors pop by pushing the vibrance and saturation.
If you’re feeling more creative, you can turn your image into black and white, or you can change it to unrealistic colors. You can even make a photo composite or double exposure to create surreal and conceptual images, such as in the example above. The choice is entirely up to you.
Final Words
I hope you enjoyed the article and feel inspired to do some eye close-up photography. You have all the information; now it’s time for you to try it.
Let us know how it goes. If you have any questions, feel free to ask in the comments section.

Check out these 8 essential tools to help you succeed as a professional photographer.
Includes limited-time discounts.


Ana Mireles is a Mexican researcher that specializes in photography and communications for the arts and culture sector.


