


How to Take Photos During Golden Hour (+ Editing Tips)
Learn how to make the most of the photographer's secret weapon - Golden Hour! Discover 15 shooting and editing tips for getting the most out of every image.
Learn | Photography Guides | By Greg Cromie
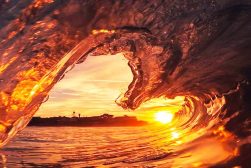
Golden hour is the first hour before sunrise and the last hour of light before sunset. It’s a magical period that produces warm, soft and directional rays when the sun is low above the horizon.
Golden hour – also known as Magic Hour – is the best time of day to take photos outdoors. Low-angle light casts longer shadows, adding drama and texture to scenes while bathing everything in beautiful golden light.
What time is golden hour for photos? Well, it depends on your latitude and the season, which also affects its duration. Depending on the weather conditions, it may not happen at all.
One thing’s for sure, though – capturing the magic of golden hour can elevate any images from portraits to landscapes and still life.
In this guide, you’ll learn how to take stunning golden hour photos no matter what photography gear you’re using.
So let’s dive right in!
How do you Take Golden Hour Photos?
In photography, golden hour light has been celebrated since its inception. Taking golden hour photos isn’t that different to taking photos at any other time of the day. The critical difference is that you don’t get the soft, warm glow of sunlight at any other time of the day.
Making the most of this magic hour and its unique lighting conditions is what this article’s all about.
Plus, a photographer doesn’t need special gear for this genre – just the camera they already own.
In this article, we look at our top 15 tips for a photographer who wants to take golden hour photos.
1. Best Camera Settings For Golden Hour Photos

The best camera settings for golden hour photos depends on what you’re trying to photograph – there are no rules on golden hour settings.
A good starting point in capturing the golden hour is to learn the Exposure Triangle. It’s a photography term describing how to control the ‘stops’ of light to expose a photo correctly.
The Exposure Triangle has three elements to represent a triangle – Shutter Speed, ISO and Aperture.
- Shutter Speed
First and foremost among the golden hour camera settings is the shutter speed. Shutter speed controls how long the light hits the camera sensor. The speed varies from a 1/4000 fraction of a second to several seconds and minutes.
To shoot fast-moving subjects, you’d need a faster shutter speed of around 1/500 or higher. Keep in mind a fast shutter speed gives the sensor less time to capture the incoming light – compensate for this with ISO and Aperture.
When shooting a landscape during golden hour, there’s little chance of objects moving in your composition.
A slower shutter speed, such as 1/30 or 1/60 – gives the sensor time to capture the incoming light. Too slow a speed and you overexpose the photo – an overexposed photo has bright highlights that can’t be corrected when editing.
Compensate for a slower shutter speed with ISO and Aperture to achieve correct exposure.
- ISO
ISO controls how the camera sensor handles incoming light. ISO values vary from a low setting (usually 100) up to their highest value of around 12,800 – some cameras reach 102,400.
ISO 100 is best for bright situations where there’s enough light for the sensor to read the scene. High ISO values like 3200 or 6400 suit conditions such as shooting at night or in a dark room.
How Much Do You REALLY Know About Photography?! 🤔
Test your photography knowledge with this quick quiz!
See how much you really know about photography...

For GH photos, keep your ISO at 100 – there’s enough light from the setting or rising sun. Aperture and Shutter will compensate for a low ISO to ensure there’s enough light.
- Aperture
Aperture is the third element of the Exposure Triangle. It controls how much light passes through the lens before hitting the sensor.
Most lenses have an aperture ring marked with ‘f-stops’ – each f-number represents a stop of light or the amount of light passing to the sensor.
Inside, rotating metal blades open and close as you turn the aperture dial – these blades make a circular whole wider and narrower. Each lens has a maximum aperture where the hole inside the lens opens to its widest – represented by the lowest number on the aperture ring.
A wide aperture is f/1.4 or f/2 and serves two purposes – letting in more light and creating a shallow depth of field (the foreground is in focus, and the background is blurry)
A narrow or minimum aperture has the largest f-stop on the aperture ring, and the opening is at its smallest. It’s represented by f/16 or f/22 and restricts the amount of light passing through the lens. Plus, it ensures that everything the lens sees is in focus.
For golden hour landscapes, a narrow aperture reduces the golden light entering the lens and ensures the landscape is focused. Compensate for a narrow aperture and low ISO by reducing shutter speed.
For golden skin tones during golden hour, use a wide aperture, so your model is in focus while the background is blurry. Remember – a wide aperture has a small f-number and a narrow aperture has a large f-number.
- Bringing It All Together
The best settings for golden hour photography depend on what you’re photographing.
- For golden hour landscape photography, set ISO 100, a narrow aperture like f/16 and a shutter speed of 1/30 or 1/60.
- For golden hour portrait photography, use ISO 100, a wide aperture like f/2 and a shutter speed of 1/250 – 1/500 – preventing an overexposed image.
2. Use Smartphone Apps To Predict Golden Hour
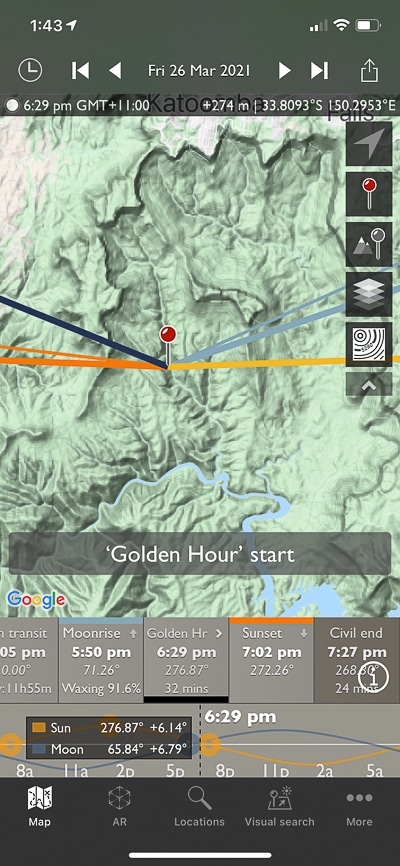
There’s a range of smartphone apps to predict and plan for golden hour. PhotoPills and The Photographer’s Ephemeris (TPE) are popular for planning celestial events, including twilight and golden hour.
TPE combines your phone’s compass, Google Maps and scientific tables (ephemeris) of celestial events.
This golden hour time app uses Google Maps and overlays coloured lines to point to sunrise and sunset, moonrise and moonset.
Plus, set any future date, time and location and The Photographer’s Ephemeris provides accurate predictions of when golden hour starts and ends.
Using TPE is also a great way to access star charts, shadow length and when to expect the next supermoon. It features Augmented Reality to view the scene via your camera with information overlays showing celestial activity.
See our review of The Photographer’s Ephemeris app here.
3. Fake It Until You Make It
If you don’t want to get up early, fake it – until you make it on time! But how do you fake golden hour lighting?
There are ways to cheat the golden hour look with camera features, accessories and software. Here’s a list of popular ways to fake golden hour images:
- There’s a range of quality smartphone apps that apply filters to images to change the look – including golden hour lighting effects.
- White balance (WB) controls on cameras change the colour palette of the photo. Adjust the WB white balance for a cooler (shifting WB to blue) or warmer (shifting WB to yellow) photo for that gorgeous golden hour colour.
- Adjust WB in editing software such as Adobe Lightroom – available for desktop and mobile devices.
- Apply filters in desktop editing software to add a GH look.
- Luminar AI (photo editing software) features a Golden Hour filter with AI to add a warm, soft glow.
- Apply an orange CTO gel to the front of your lens to filter with warm colour.
4. Bounce The Light With A Reflector

Control the direction of the golden rays with a pro tool or a DIY-hack. Photographers use reflectors to bounce light in studios or outdoors when photographing models.
They have reflective material on each side – silver on one for cooler and gold on the other for warmer. With the sun in front of you, the reflector angles the glow to the desired point during golden hour.
Instead of a reflector, pick up an A2 sized piece of white card from an art store – use it as a reflector to direct the golden glow at your subject.
5. Use Lens Flare For Effect
Lens flare occurs when pointing your camera at the sun. Light rays pass through the lens to hit the sensor head-on – it scatters those rays for appealing looks.
During golden hour, the sun sits low in the sky, making lens flares easy – look through the viewfinder towards the sun to create the flare effects.
With your subject partially blocking the sun, you’ll achieve flares like beams streaming from the tip of the subject’s silhouette.
Pro tip: older lenses tend to produce more exaggerated lens flare since they lack specific coatings designed to reduce it.
6. Should You Use Filters During Golden Hour?

Filters aren’t necessary when shooting during golden hour, provided you control the Exposure Triangle for correct exposure.
If it’s super bright, using a Neutral Density (ND) filter works like a pair of sunglasses to reduce the amount of light entering the lens.
An ND filter allows for even slower shutter speeds with a wide aperture to achieve correct exposure – best used in landscape photography.
7. Use Golden Hour For Portraits
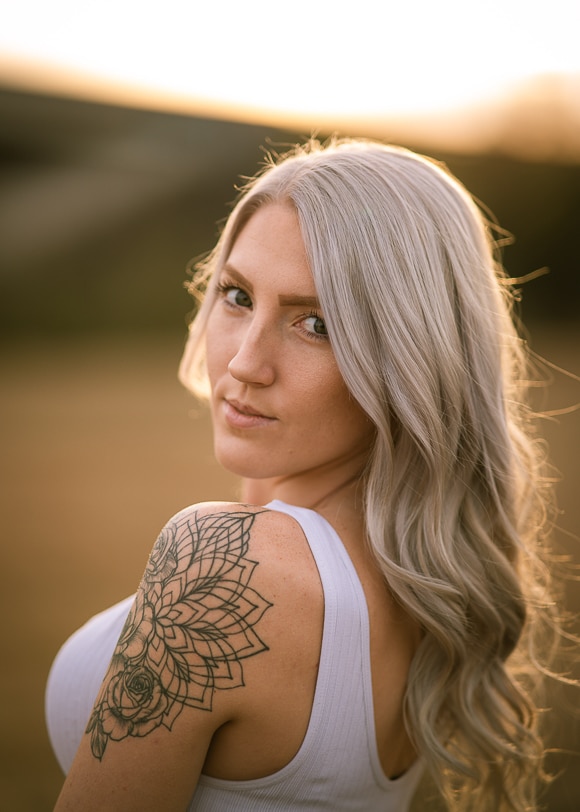
The golden hour produces extraordinary conditions ideal for portrait photography – it delivers excellent definition in skin tones.
Position your model with the sun behind them so they don’t squint. Having the sun behind the subject can result in the face being in shadow, so adjust your camera settings and the Exposure Triangle to expose for the face rather than the background.
It may result in strong highlights around the sun, but the model’s face will be correctly lit.
Alternatively, use a reflector to bounce the twilight sun’s glow onto the face or use a fill flash to push back facial shadows.
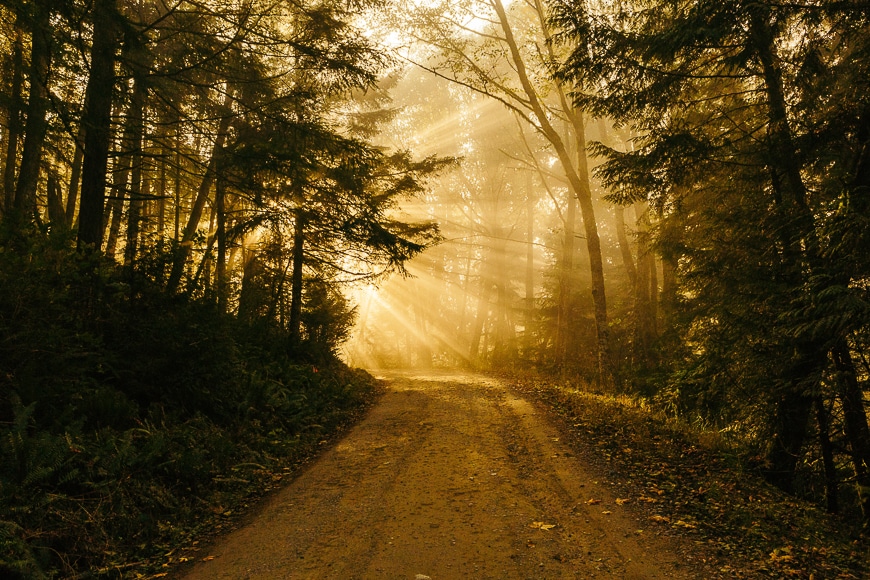
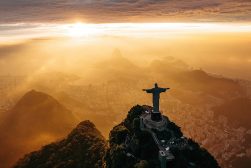
8. Capture Stunning Landscapes With Golden Light
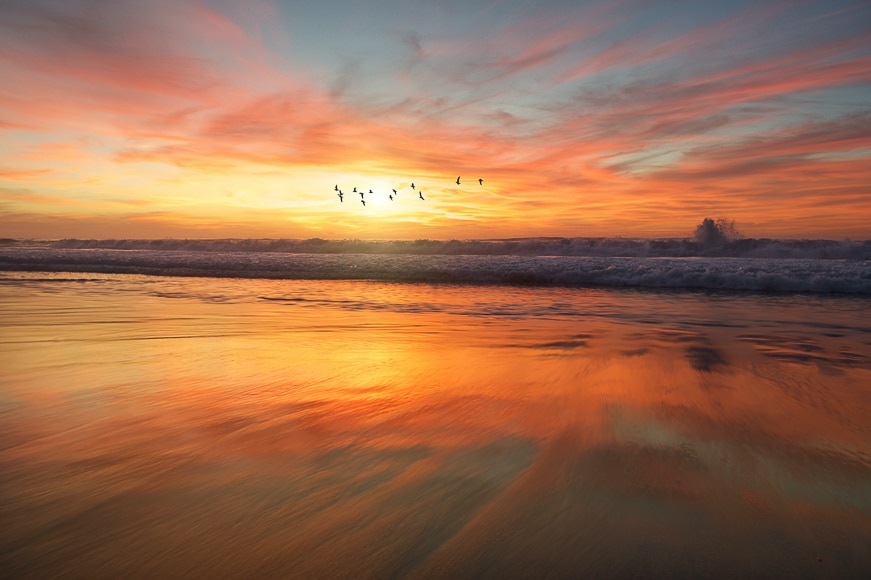
Photographing landscapes in the period of time around twilight results in stunning photos with a warm golden glow across the scene – bringing any landscape to life.
Position yourself so the sun rises or sets behind you, so the landscape in front of you is perfectly lit. Or have the sun face you and control exposure correctly.
Use light planning apps like The Photographer’s Ephemeris to discover the right time to photograph mountain tops lit with golden light while the rest of the land is still waking to the new day.
During the summertime, in particular, the sky will be full of spectacular colours around sunset, so use them to your advantage.
9. Use Shadows For Dramatic Scenes

Golden hour creates nice contrast due to the low directional rays from the sun.
Look for shadow areas to contrast against those with an orange glow in your composition – the long shadows make objects stand out.
The shadow of someone standing on the beach will be three-to-four times longer than they are tall.
For cityscapes, taller buildings shine in the golden glow reflected from their windows. The shorter buildings will fall into shadows.
Remember to avoid essential details of your composition falling into dark shadows.
10. Use Golden Side Lighting
With an interesting foreground element, position yourself, so the golden glow falls to one side of that object.
Consider a large rock formation in the desert with the light falling to one side, and the other falls into darkness.
Use it in photographing a range of subjects, including portraits with half the face half-lit golden light. Or, photograph a forest where one side of each tree glows and the other in dark shadow.
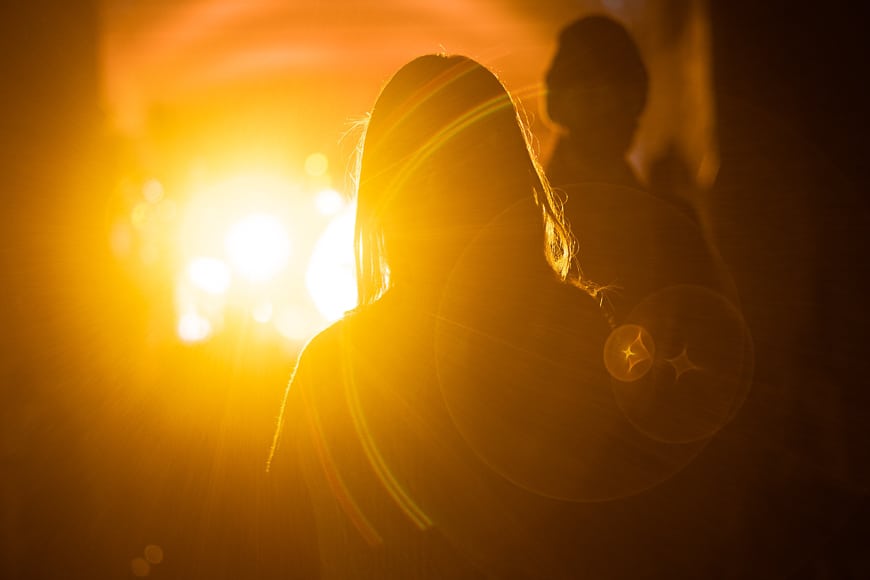
11. Backlighting and Rim Lighting For Perfect Silhouettes

A silhouette features a foreground subject in a dark shadow due to the bright light directly behind it.
It’s a popular cinematic effect often created with artificial lighting. But, you can harness the power of the sun during golden hour to create mesmerising silhouettes.
With the sun so low in the sky, photograph foreground objects with the background’s warm glow. With a portrait, the body outline glows a little like rim lighting and defines the subject.
12. Starbursts At Golden Hour

Starbursts occur when an object partially blocks the rising or setting sun, e.g. if you’re shooting in the countryside and your subject is a large boulder on a hill, position yourself so that the boulder mostly blocks the sun.
While looking through the viewfinder, move the camera slightly until a tiny edge of the sun peeks from behind the boulder. When this occurs, you’ll see the sunlight burst into a star-pattern with points of light radiating outwards across the horizon and entire scene.
Shooting starbursts around sunrise and sunset is a great way to get attractive images – even with the most simple foreground subjects.
13. Timing is Everything

Using an app like The Photographer’s Ephemeris, you can plan to get to the location early enough to be ready for the entire color palette that this magical period of time can produce.
Another advantage of arriving on time is scouting for a location that suits your intended composition – pro landscape photographers do this.
What’s more, if you’re shooting a landscape scene where you want natural elements and no people, the morning golden hour is best as there are fewer people at this time.
Shooting photos at a beach in the late afternoon is a recipe for disaster as the beach attracts people enjoying the end of the day, so aim for the morning.
14. Stick Around For More

I get it – you want to shoot some amazing photos. A neat trick is to stick around a little longer to capture the sun’s rise or set and blue hour during the same session.
The best bit about photographing the morning sun is that it’s preceded by a blue hour and the sun rising. If you’re already at a stunning location that’s ideal for golden hour, chances are it will look great during the blue and sunrise hours too.
The same applies at the other end of the day with sunset. It’s a great idea to hang around a little longer and take advantage of sunrise and set.
15. Shoot Golden Hour Indoors

The definition of golden hour photography suggests it’s an outdoors thing – think again. You can make the most of it when shooting indoors too.
Imagine a room with golden rays streaming through the windows to cast a warm glow on the interior. Using this time to capture indoor portraits with the model near a window results in marvellous photographs.
Using this sunlight for indoor work also casts deep shadows and shafts of light, making for a dramatic scene.
Just remember to use spot metering (or a light meter if you own one) to get an accurate reading of the scene to correctly expose your subject’s face.
In some cases (such as the above photo), you may want to deliberately underexpose your subject to create a silhouette.
How do you Edit Golden Hour Photos?
If you’re shooting your golden hour photography in RAW, you’ll need to use editing software to enhance the beautiful golden sunlight in post-processing.
Here’s how to do that in two popular software apps:
Editing Golden Hour Photography in Luminar AI

Luminar AI makes adding or enhancing golden hour light incredibly easy. Here’s how to do it:
- Select your image
- Click Edit in the top menu
- Click the Landscape menu
- Adjust the ‘Golden Hour’ slider to your tastes.
You can also play around with the Dehaze and Foliage Enhancer sliders too for added punch.
An additional benefit of Luminar AI is that you can also completely replace the sky in your scene and have the lighting reflect the changes – check out our full review for more examples.
Editing Golden Hour Photography in Lightroom
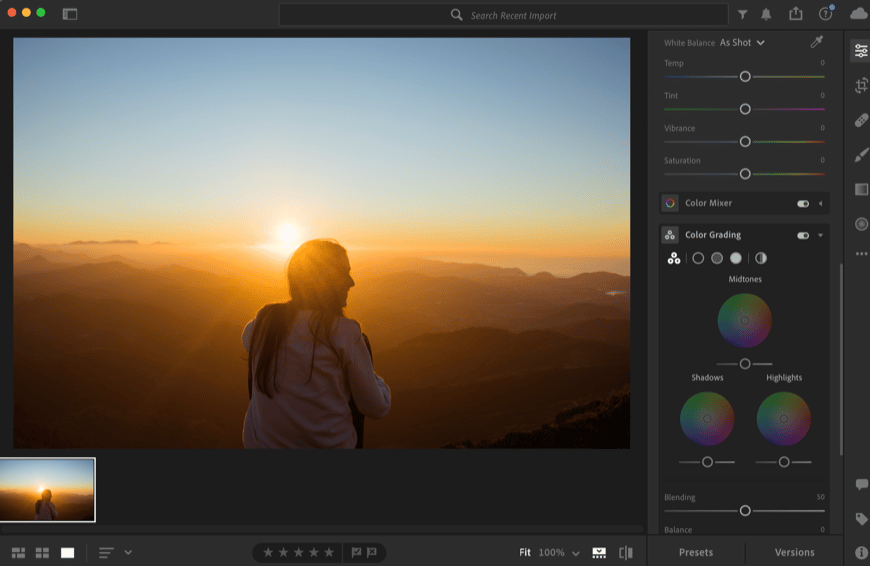
Whether you’re using Adobe Lightroom Classic or Mobile, the technique is similar but involves a fair bit of tweaking and experimentation.
Here’s the general process:
- Adjust the exposure and contrast of your image
- Raise the temperature by adjusting the white balance
- Adjust the tone curve to add some contrast
- Adjust the colour grading to add some warmth to highlights and shadows (split toning)
- Optional – use the HSL adjustment to enhance any golden colours
Check out these Lightroom tutorials for some more editing tips.
Golden Hour Photography FAQs
What time is golden hour for selfies?
There are two times each day where you can take selfies during golden hour. The first is in the morning and lasts for an hour after sunrise. The second is in the evening and lasts for an hour before sunset.
What causes golden hour?
As the sun sets and rises, the sunlight is soft and warm in colour. Plus, the sun’s low angle illuminates the atmospheric particles like dust and pollution with warm colours.
Why do photographers like golden hour?
Photographers like golden hour as the sunlight is warm and soft – compared to it being bright and harsh in the middle of the day. Plus, the golden light makes landscapes, cityscapes and also skin-tones pop.
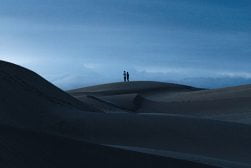
What is blue hour photography?
The blue hour begins about an hour before the sun rises and lasts an hour after sunset when the sun is below the horizon – it’s sometimes referred to as twilight. Blue hour is ideal for using the cool, blue light for landscape scenes.
How do you tell if there will be a good sunset?
If the day has been clear and there are no heavy clouds in the sky, chances are you’ll get a good sunset.
A great sunset needs scattering clouds that are higher than the horizon line – as the sun sets, these illuminate in oranges and pinks. A brilliant sunset occurs if unique cloud patterns are streaking across the sky as the sun sets.
Final Words
Golden hour takes place twice a day, every single day – provided no clouds are covering the sky. It offers an excellent opportunity to use warm natural sunlight in a range of photography genres.
The essential part about golden hour photography is getting out to shoot and experiment with the Exposure Triangle. Every photographer should do this as often as possible.
What are your thoughts on this magical period of time? Have you experimented and had success with the tips we have provided above?
Please share your experiences and feel free to ask questions or get involved in the conversation. Happy shooting.

Check out these 8 essential tools to help you succeed as a professional photographer.
Includes limited-time discounts.


I’m a Melbourne-based street photographer and blogger. I love to travel to Japan to photograph and document its dynamic people and culture.


