


This article by adventure, travel and landscape photographer Andy Day offers helpful advice on how to customise your Sony a7III/a7RIII for efficient handling.
As well as continuing to add new functions, manufacturers are blessing photographers with the ability to customise every button and knob, and Sony Alpha cameras
If you’re a photographer, check out these suggestions for setting up the a7III/a7RIII to make shooting easier and more intuitive.
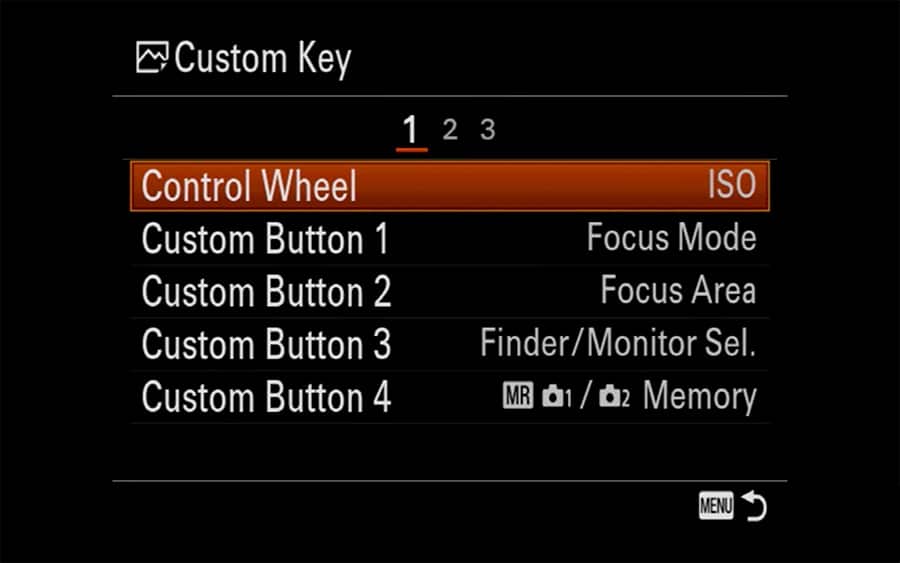
Sony has effectively added three layers of customisation to the a7III/a7RIII : Custom Keys, Function Menu, and My Menu.
At first it can be a bit daunting, but once you get your head around it, it will make shooting a breeze.
Once you’ve got it set up, it more than makes up for Sony’s somewhat complex menu system. You might never have to dig through it ever again.
Everyone shoots differently and of course, your choices may vary, but this is what works for me.
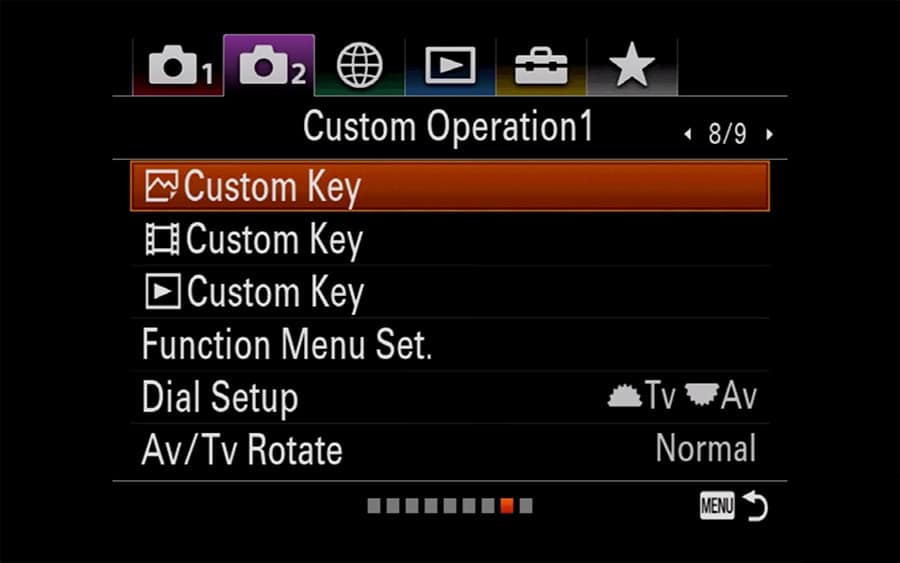
Custom Buttons/Function Menu
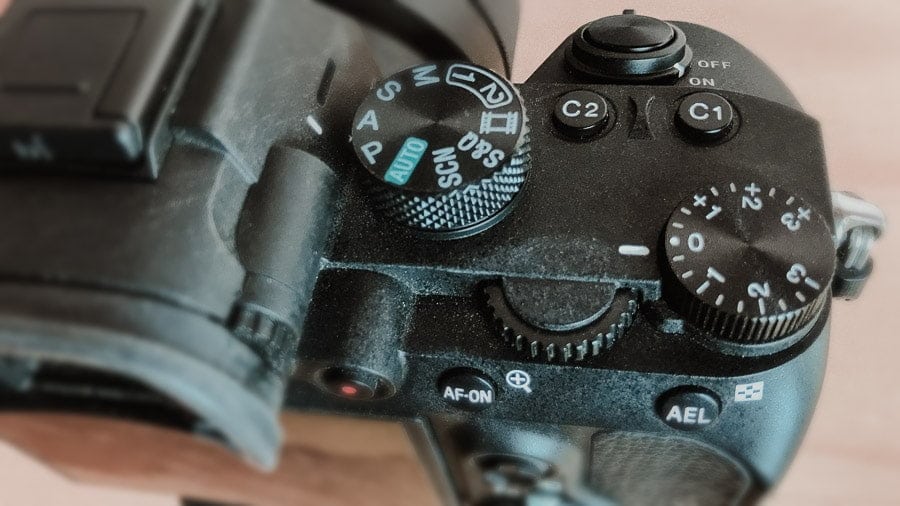
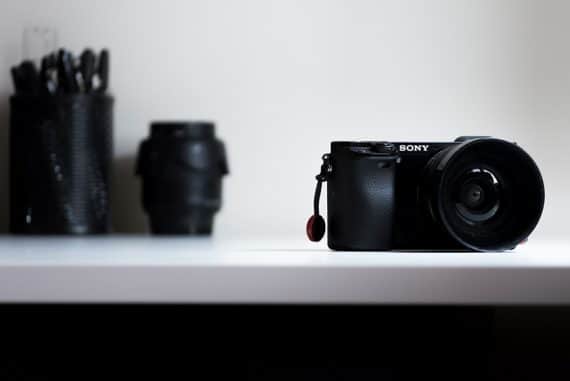
The Sony a7III ‘s C1 and C2 buttons allow for custom functions within easy reach.
C1, C2, C3 and C4 are scattered around the camera, putting your thumbs and fingers in easy reach of very specific functions and features.
In addition to this, you can also tweak the functionality of many of the other buttons, such as those around the control wheel, not to mention the control wheel itself.
The Sony a7III Custom Buttons are programmable according to what mode the camera is in: stills, video, or review. This gives you a huge number of options.
When I’m photographing, these buttons do a lot of the heavy lifting.
Here are some suggestions for Custom Buttons 1 to 4 so that you can access Sony a7III custom settings without having to think. Here’s how to set custom buttons on Sony a7III.
Alternatively, you can allocate them to many of the other buttons on the camera. If any of these are not such a priority, you can put them in your Function Menu instead.
Activate AF
I’m used to back button focusing so taking autofocus away from the shutter and having it only trigger when I push the AF-ON button was an obvious choice for me.
If you’ve not tried this way of shooting, it’s worth giving it a go to see how it works for you.
Eye AF

You can assign Eye AF to the AEL button on the Sony a7III .
.
By default, Eye AF is triggered by the centre button of the control wheel, but, like many others, I prefer allocating it to the AEL button.
This way, with Active AF ascribed to the AF-On button, both options are immediately under my thumb.
If you’ve just updated to Sony’s latest firmware, you will find that Eye AF now happens automatically whenever you trigger autofocus, regardless of which autofocus mode you’re using.
ISO
ISO’s default position is the control wheel on the Sony a7III .
.
By default, ISO is ascribed to the right button of the control wheel, but this isn’t convenient if you’re looking through the viewfinder.
One shortcut is to set the control wheel to immediately vary the ISO, but for me, this is too easily knocked when the camera is hanging at your waist.
It can be a problem if you think you’re shooting with auto ISO but have inadvertently nudged it to ISO 100!
Focus Mode
Events and weddings require reacting to all sorts of situations, and being able to swap focusing modes on the fly can be essential.
However, if you find yourself switching frequently between two specific modes, there’s potentially an even better option…
Activate Alternative AF Area
I shoot primarily in Flexible Spot: Small but want to be able to switch to Area Wide when necessary.
Sony cameras have an extra level of customisation to achieve this: Recall Custom Hold.
By allocating a button to a Custom Hold with just Autofocus On and Autofocus Wide selected, I can activate the wide focus area whenever I need it.
Silent Shooting

Climber Zofia Reych bouldering in the forest of Fontainebleau, France. Silent shooting is perfect for those moments when you don’t want to break your subject’s concentration | 1/500 f2.8 ISO 400
One of the great features of shooting with a mirrorless camera is not having to disturb your subject with the sound of your shutter.
I find myself swapping modes regularly and having it available at the push of a button is very useful. I look forward to Sony making it toggle.
ISO Auto Min SS
If you love aperture priority mode coupled with Auto ISO, having quick access to the minimum shutter speed can be critical if you suddenly switch from portraits to action, as I often do.
Having this available has genuinely changed the way that I shoot.
Focus Magnifier
If you prefer to focus manually or simply love adapting old lenses for your a7III, having the focus magnifier immediately available is a no-brainer.
AEL toggle
Another great feature of Auto ISO is to let your camera choose the perfect exposure at your desired aperture and then lock it in.
If your subject suddenly moves and is framed against a lot more sky, you don’t underexpose. If you need to make small tweaks, simply turn the exposure compensation dial.
Switch Between Viewfinder and EVF
If you’re frustrated by the EVF triggering and your LCD going blank whenever you get too close, this is for you.
First, head to your display settings and the Finder/Monitor item and switch this over from Auto to Manual.
Then you can allocate one of your Custom Buttons to Finder/Monitor Sel. in order to switch between the two manually.
Flash Compensation
If you shoot regularly with flash, having this immediately available will speed things up immensely, allowing you to increase/decrease the intensity of your flash on the fly.
Zebra Display
The zebra display can be a little distracting!
Judging your exposure through the EVF and the display is a huge advantage of the move from DSLR to mirrorless, but it’s not an exact science.
Zebras can be distracting, so you don’t necessarily want them on all the time, but having them quickly available can be useful.
Shot Result Preview
On the subject of strobes, you might discover that Sony tries to help you by simulating a brightened scene, making it difficult to judge any ambient light that you might be trying to balance.
Shot Result Preview overrides this slightly irritating automated feature, saving you from having to constantly turn off your flash to be able to judge the right exposure through the EVF.
Drive Mode
Sony defaults this to the left button of the Control Wheel. I mention it here because it’s very easy to forget if you’re new to Sony, and especially if you’re not used to having such a fast frame rate available.
Swapping between modes is crucial for me, and having it so easily available compared to some other cameras makes life much easier.
My Menu

The “My Menu” on the Sony a7III can save you a lot of time when shooting.
With this insane level of customisation, you might be wondering why you would need an extra menu. Some operations, though, simply can’t be activated by a button or Function Menu item.
The My Menu is a good place to keep things that you don’t want to trigger accidentally.
It’s also good for things you use so infrequently that they don’t warrant a dedicated button, but are still worth having on hand so that you don’t have to dig through Sony’s labyrinthine menu system.
Here are my suggestions:
Format
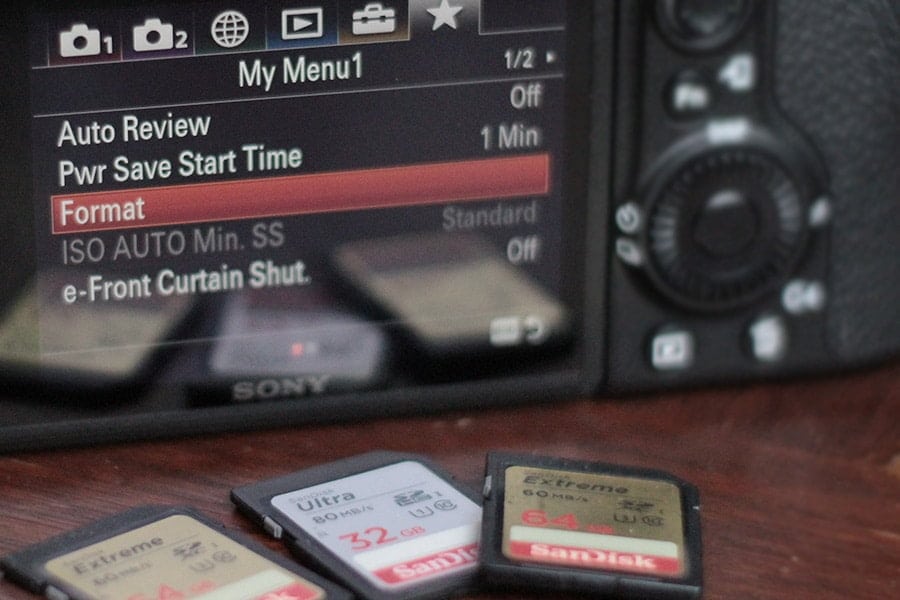
It’s easier to format your cards quickly if you add the Format option to “My Menu”.
Sony decided to hide this item, even though it’s a good idea to format cards on a regular basis. Keep it handy and save yourself some time.
Power Save Start Time
I like to trim this occasionally when I’m trying to save on battery. On the other hand, I keep it extended when I know that I need to react to events quickly and can’t afford the time it takes to wake my camera up.
Auto Review
This is one of the first things I switched off on my a7III as it interrupted the flow of my shooting. However, in studio settings and photography that’s more considered and slow moving, this can be very useful.
Electronic Front Shutter
There are pros and cons to shooting with the Electronic Front Shutter: switch it off if you see banding or if you’re attempting super creamy bokeh at shutter speeds above 1/2000th of a second.
For everything else, you probably want it switched on. It can’t be allocated to a Custom Button or the Function Menu, so this is a good place to keep it.
Final Words
The Sony a7III/a7RIII gives you multiple options for customisation – try and make use of them all!
The Sony a7III/a7RIII offers a huge amount of customisation, and spending some time setting it up can make shooting more instinctive.
It will save a lot of time digging through menus. For me, having certain controls at my fingertips has made a vast difference in my work, and it allows me to react more quickly to what’s happening in front of me.
The customisations that will work best for you will depend on how and what you shoot, but hopefully this list will be more than enough to get you started.
If you have your own suggestions, be sure to leave them in the comments below!


Andy Day is a British photographer and writing, living and working in France, specialising in adventure, travel, architectural and landscape photography.


