


How to remove objects from photos
Want to learn how to remove unwanted objects from photos? Using Luminar's simple but powerful Erase too, the solution is just a click away.
Learn | By Erin Spiller
If you’ve ever wanted to quickly remove objects from your photos, this is the simple guide for you.
Let’s face it – editing photos to remove random objects can be a complete pain in the backside!
Lightroom’s spot removal tool can be rather frustrating, especially when cloning and healing multiple objects.
Photoshop makes it a bit easier with its Spot Healing Brush tool, clone tool, or clone stamp, but not everyone has an Adobe subscription to this software.
Then there are all the various online editing tools that promise to make removing objects from photos a breeze… but often give unfavourable results.
My tool of choice to eliminate all those pesky objects from photos is Luminar 4 and its handy Erase Tool.
It’s not perfect by any means, but it does a better job than Lightroom, and is much easier to use than other tools, and doesn’t require any subscription payment.
Need to Remove Objects from Your Photos Easily?
Removing Unwanted Objects from Photos Using Luminar
1. Finding Your Tool

First, you need to upload or select an image from your library in Luminar 4 and open it.
Make sure your photo has been colour corrected because this tool will create a new layer once you have made all your changes.
After you have opened your image, click the Canvas Tools icon located on the right side of your sidebar – the icon is a pencil next to a ruler.
Now click the Erase tool. Alternatively, you can use the shortcut Cmd+E (Mac) or Ctrl+E (PC) to select the Erase tool.
2. Customizing Your Brush
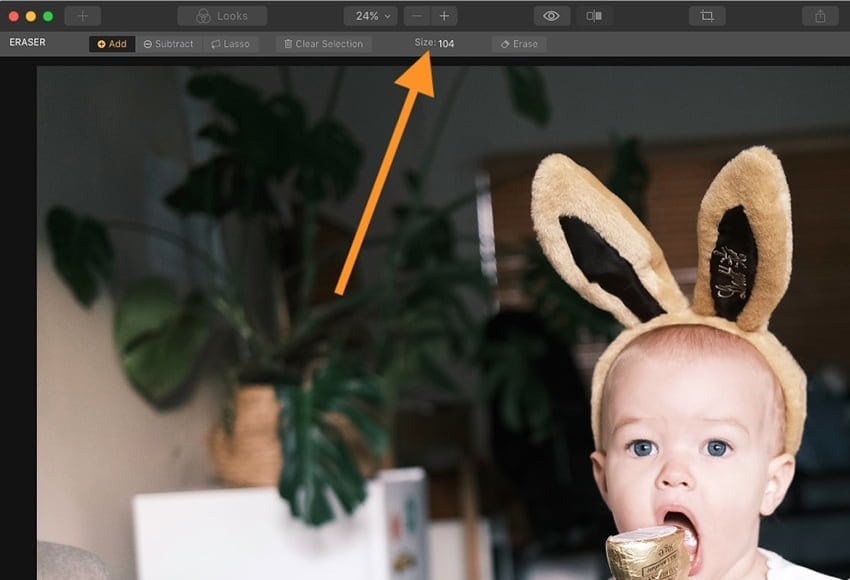
Using the top toolbar, change the size and hardness of your brush. (You can also change the size by using the square bracket keyboard keys.)
Make sure your brush is close to the size of the object that you want to remove, but don’t worry if it’s a little bigger. As long as it’s covered with your Erase tool brush, the software will take care of everything for you.
You can toggle between adding more pixels to your selection or subtracting pixels by using the X key. (You’ll see the cursor turn from a + to a – when you press the X key.)
Mistakes happen so this is a great feature because you can simply add or take away from your selection instead of starting all over.
3. Removing Unwanted Objects

The Erase tool in Luminar 4 is a little different from other editing softwares.
Rather than Option + clicking to sample from your image (sampling tells your software what to replace unwanted objects with), all you need to do is click and paint over the objects you want removed, and Luminar will do all the hard work for you.
The Erase tool uses the area surrounding your object as a reference, automatically sampling to fill and replace the painted area. It’s a bit like magic when you see it happening the first time!
The tool even matches texture and lighting to produce a more realistic result. The key is to make it look like those objects were never there to begin with :-)
Use the Zoom and Hand tools to move around and zoom in or out of your image to make a more precise selection or check for tiny, sneaky details that you want removed.
Once you have erased everything you want to remove, click done and that’s it! A new layer will be created with all your changes saved.
How Much Do You REALLY Know About Photography?! 🤔
Test your photography knowledge with this quick quiz!
See how much you really know about photography...

This method is very easy and fast, and arguably better than other high end softwares. If you don’t have an Adobe subscription, this is a fantastic alternative.
4. Fine Tuning

Final Image Before/After
Obviously, there will come a time when you’re not satisfied with the job Luminar’s Erase tool has completed on part of your image.
(This is usually when there isn’t enough data around the object to sample from.)
When this happens, simply click the Layers icon at the top right side of your tool bar, then select the newly edited layer by clicking it.
Then click ‘Edit Mask’, and select the Brush tool.
Now, all you have to do is press the X key to toggle to the minus icon (-), then paint over the spots you’re not satisfied with, or, toggle to the plus icon (+) to adjust your original selection. Then, simply press Enter to save the changes.
Final Words
The goal in the first place is always to take a photo that doesn’t include any unwanted object… then you have nothing you need to remove!
We all know of course that this isn’t always possible, no matter how good we are at photography.
Fortunately, there are ways to tidy up photos using post production editing tools, so don’t feel bad about ‘cheating’ a little ;-)
I’ve recommended Luminar to do your cleaning up work, but have an experiment with whatever clone tool or clone stamp you can get your hands on!
Leave a comment if you have any questions about removing an object from your image.
You should also check how to remove objects from photos in Lightroom.

Check out these 8 essential tools to help you succeed as a professional photographer.
Includes limited-time discounts.
 Luminar Neo Review (My Latest 2024 Test Results)
 Luminar 4 Review
 Luminar Neo vs Luminar AI: 6 Key Differences to Know in 2024
 Luminar AI Review – Can Artificial Intelligence help you Edit your Photos?

I am a passionate writer and travel photographer with an affinity for learning new languages; I currently speak English, French, and a little Italian.


