


Editing photos can be a daunting process, but learning how to use Lightroom presets can be a great way to get to grips with the software.
On top of that, it also gives you a neat shortcut to delivering impactful images without too much effort.
It’s worth noting that there are different types of Lightroom presets, including ways to add metadata when importing or add watermarks when exporting.
This article will focus on Develop Presets to help you edit the look and feel of your photos.
Whether you’re using Lightroom Classic, Lightroom CC, or even Lightroom Mobile – this guide will get you started.
Popular course reveals the simple tricks to getting incredible results with Lightroom in record time. Give Your Photos The Look They Deserve!
![]()
How to Download Lightroom Presets
There is a wealth of Lightroom presets available to download, both for free and for purchase.
In my experience, free Lightroom presets are often a bit more extreme and can make photographs look a bit ‘overcooked’.
Instead, you might want to spend a small amount of money on presets by one of your favorite photographers. Many sell their Lightroom presets via their website for as little as $5.
These Develop Presets tend to be more subtle and work better as a foundation you can build on when editing a single image.
If you’re concerned that with presets, you’re just copying someone else’s style, don’t worry: one of the quickest ways to learn how to use Lightroom is to take inspiration from elsewhere and then use it to develop your knowledge to create something that is your own.
Whether you find some free presets or pay for a pack, you’ll need to download and save the presets to your computer’s hard drive.
Let’s look at how to install Lightroom Presets.
How to Import Presets into Lightroom
Most Lightroom presets come as a pack rather than individual files. Often they will arrive as a zip file that needs to be unzipped first.
Once unzipped, you should find a folder containing a number of .xmp files. You can leave these where they are for now – see our guide: ‘what is an XMP file?‘
In Adobe Lightroom Classic, make sure you’re in the Develop module (for a shortcut, press D). On the left-hand side, you’ll find the Presets tab which you may need to click on in order to expand it.
To the right of the word “Presets” you’ll find a plus symbol. Click on it and choose “Import Presets…”
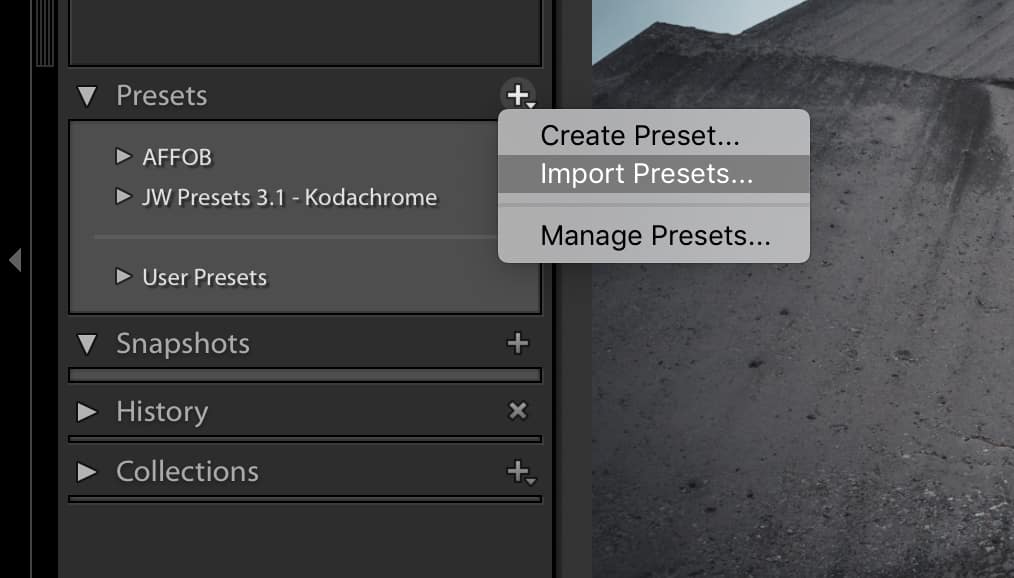
Getting presets to Lightroom is simple
For Lightroom CC, the process is very similar. Click on the Edit icon to bring up the Edit panel (or press “E”) and then click on “Presets”.
From there, click on the three dots and choose “Import Presets…”
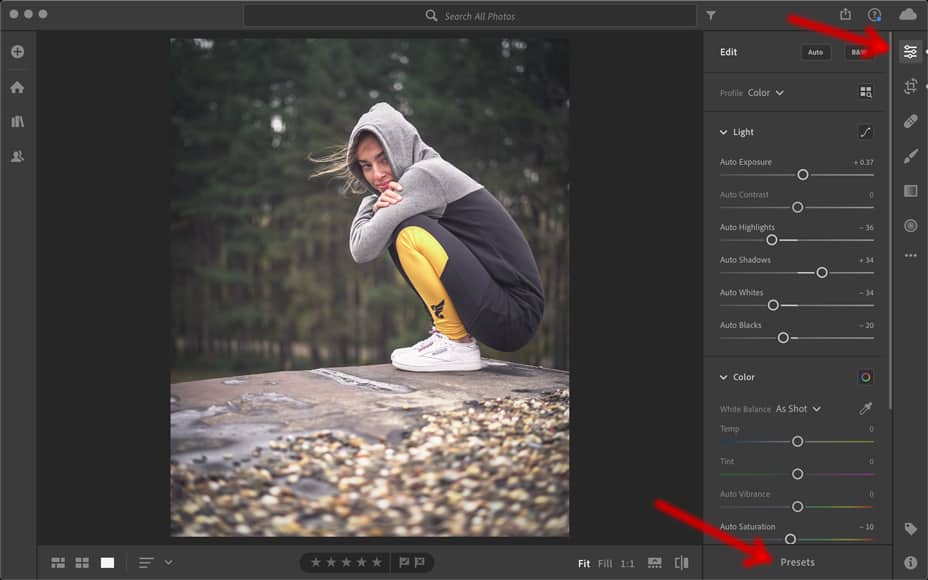

The process is then the same.
You can then navigate to the folder that contains the .xmp files that you just downloaded. Highlight all of them and click “Import” on the bottom right.
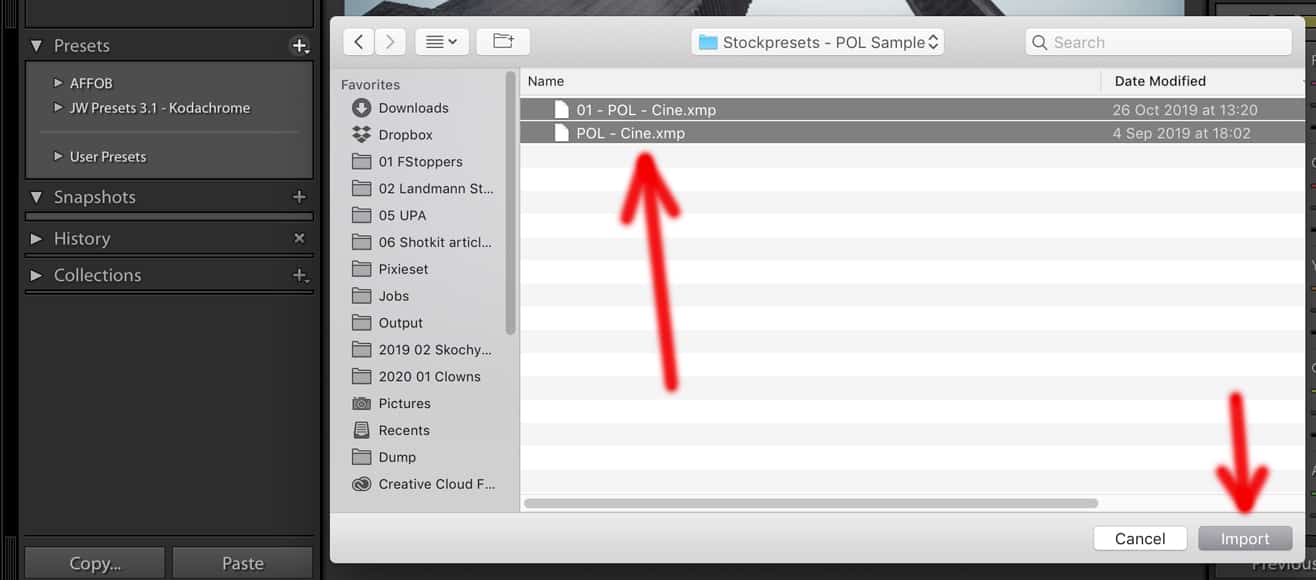
One of the ways to import presets into Lightroom
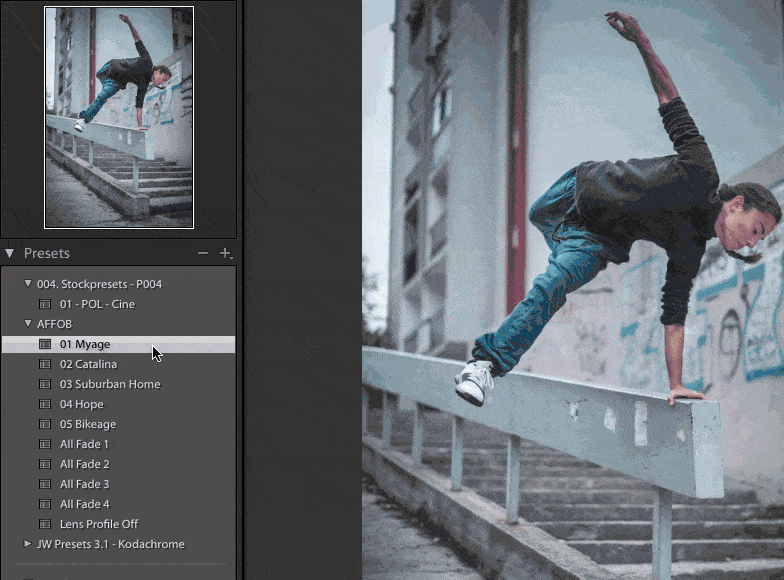
You should then find that these Lightroom presets are now visible in your Presets tab.
Often, if you are buying a collection of presets, they will all be contained in a drop-down that you need to expand by clicking the small arrow next to the main preset title.
How to Use Your Downloaded Presets
If you’ve just installed a pack of several Lightroom presets, your first step will be to spend some time familiarising yourself with them.
To start to understand what presets do, a smart way is to apply them to a variety of photographs shot under very different lighting conditions. You’ll quickly learn when their effects are most pronounced, and get an idea of how they’re changing your image.
If you have photos that you’ve already edited, you may wish to create a Virtual Copy and completely reset the editing so that you’re starting from fresh — and without undoing any work that you’ve already done.
It’s best to apply a preset to an image that has had no editing done to it because, as we will see below, existing edits might not always be overridden by the preset.
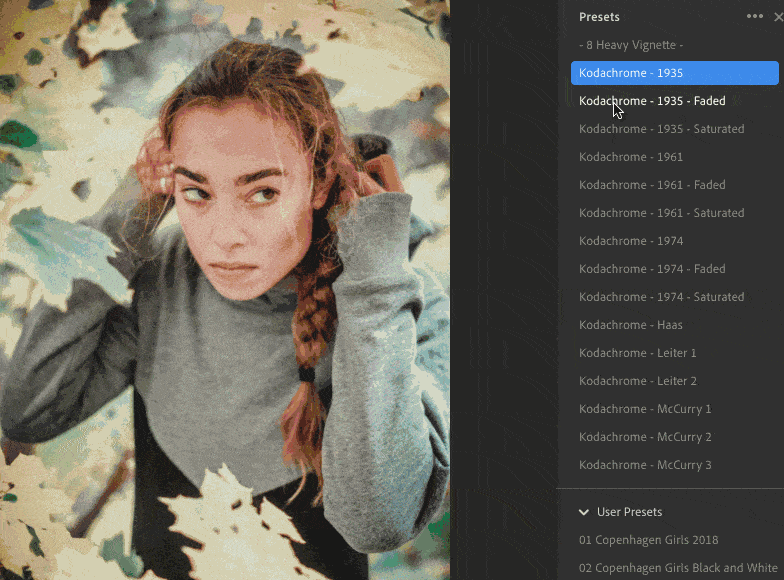
Lightroom has a useful feature: if you hover over a preset in the Presets tab, you’ll notice that the effect is temporarily applied to your image.
(Check out these free Lightroom tutorials for more useful tips like this.)
Applying presets in Lightroom Classic
Applying presets in Lightroom CC
If you’re interested in developing your knowledge of Lightroom, you may wish to spend a bit of time understanding how a particular preset is giving a particular look.
Has it made changes to the Tone Curve?
What is it doing with the sliders in the Color panel?
Has it done something funky by adding a Split Tone?
Looking at these settings will help you become familiar with the inner workings of each preset, and the software itself.

How to Create Your Own Adobe Lightroom Presets
The real power to be gained from mastering Lightroom presets comes from creating your own.
As well as being able to apply a complete look and feel to a specific image, Lightroom presets can also be used to speed up more detailed elements of your post-production workflow.
First of all, let’s run through how to create your own custom Lightroom preset.
Once you’ve edited a photograph — perhaps using a downloaded preset as a starting point — you might wish to then take those edits and save them for use with other photos.
Of course, you could copy all of those settings or even use Lightroom’s Synchronize feature, but creating a Lightroom preset can save you a lot of time.
To the right-hand side of the Presets panel, click on the plus symbol (Lightroom Classic) or the three dots (Lightroom CC) and choose “Create Preset.”
Don’t be too confused by the list of tick boxes that appears — you can dig deeper into this later on.
For now, hit “Check All” and then untick the following boxes: White Balance, Exposure, Graduated Filters, Radial Filters, and Transform.
If you’re using Lightroom CC, you’ll need to expand some of the drop-down options. For example, you’ll find Exposure listed under Light, and White Balance is listed under Color.
Remember to give your new preset a name that will help you to remember what it does.
Creating a preset using Lightroom Classic

Creating a preset in Lightroom CC
When you hit “Create” (Lightroom Classic) or “Save” (Lightroom CC) to complete this process, it might feel like nothing has happened. However, if you expand “User Presets” in your Presets panel, you’ll see that your new preset has just appeared.
From the tick boxes mentioned above, you’ll notice that Lightroom allows a lot of customization, something that’s useful as you become more experienced with Adobe Photoshop Lightroom.
It’s a good idea to turn off White Balance, Exposure, and Transform because those three aspects are unique to every photograph. If you’re editing a large number of photos, you don’t necessarily want to increase the exposure by +1, or crop every image a certain way, for example.
Similarly, Graduated Filters and Radial Filters tend to be very specific tools, and having them applied uniformly to a batch of images is rarely ideal.
How to Apply Lightroom Presets to Multiple Images
A preset can be applied with a simple click. It’s worth remembering that even if you have a number of images selected in the Filmstrip, clicking on a preset will only apply that preset to the photo that you’re currently viewing.
To apply your preset to a group of images at once, you’ll need to follow the steps below.
-
Applying a Preset to Multiple Images in Lightroom Classic
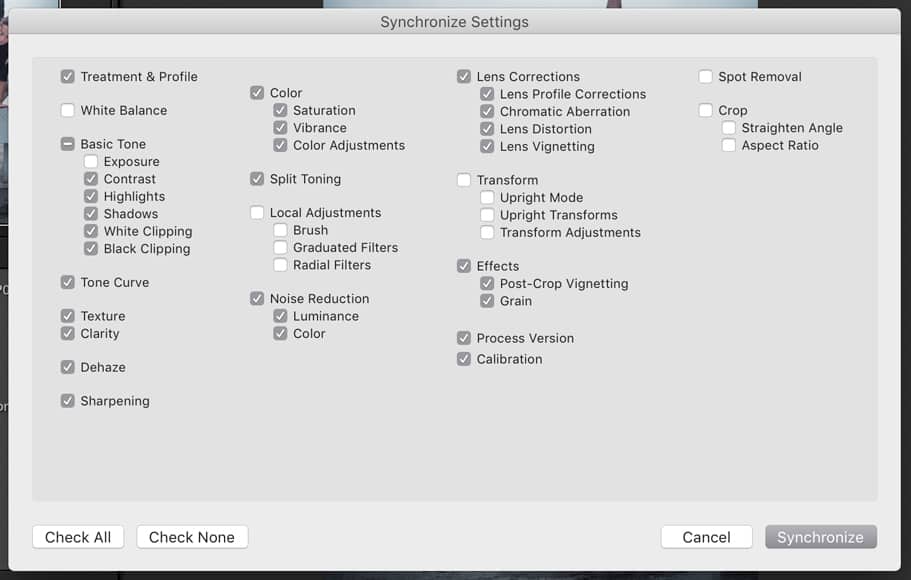
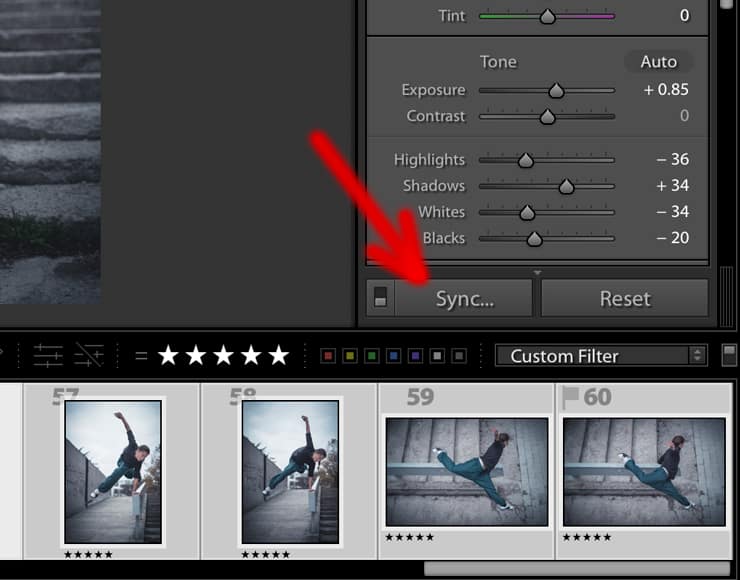
In Lightroom Classic, in order to apply the edit to multiple images, select the images, click on the preset to apply it to the current image, then choose “Sync…” from the bottom of the right-hand panel.
The window that pops up looks very similar to the one that appeared when creating your preset, though it’s not exactly the same.
Again, there are some boxes that you typically want to leave unticked: White Balance, Exposure, Local Adjustments, Transform, Spot Removal, and Crop.
Leaving these unticked is a good habit to get into as it will stop you from accidentally wiping out any image-specific edits that you might have already done, such as correcting the exposure or straightening a photograph.
When you hit Synchronize, all of the selected images will take the settings from the first photo, effectively applying the preset.
-
Applying a Preset to Multiple Images in Lightroom CC
If you’re using Lightroom CC, the process is slightly different.
Select the image that you’ve finished editing and hit Command-Shift-C (Mac) or Control-Shift-C (PC). From the window that appears, go through and deselect Tools, White Balance, Exposure, and Geometry.
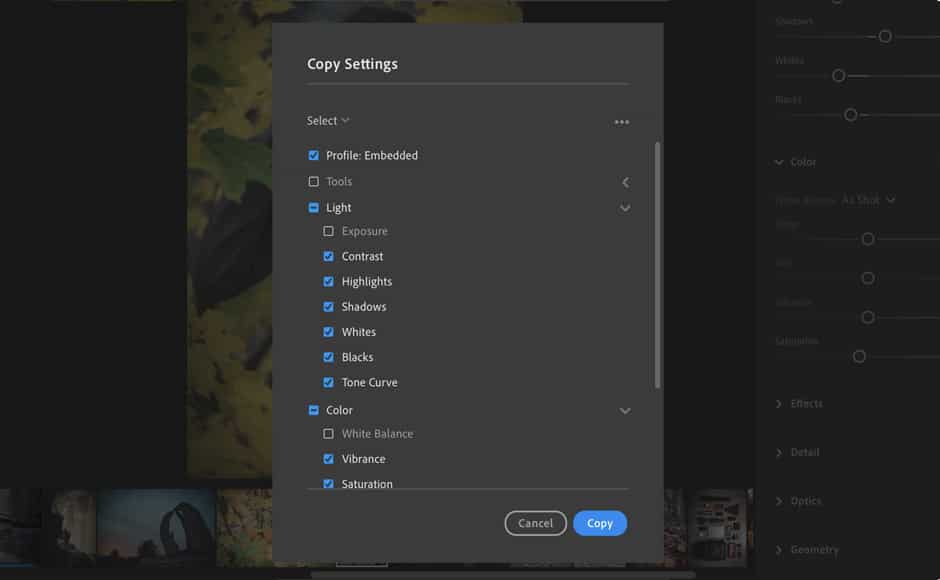
Then select all of the photos in the film strip that you want to edit. Hit Command-Shift-V (Mac) or Control-Shift-V (PC) and your settings will be applied.
How to Take Lightroom Presets Even Further
Whether you’ve just applied a downloaded preset or one of your own, there’s still work to do.
Some presets might make an image darker as a result of changes to the Highlights and Shadows sliders. This means that even if you edited the exposure before applying the preset, you might need to go back and make adjustments.
Similarly, you might need to tone down changes to colors or tweak the Shadows slider so that details are not being lost.
Once you’ve got your head around Lightroom presets as a means of creating a distinctive style, you may wish to use their potential to speed up aspects of your workflow.
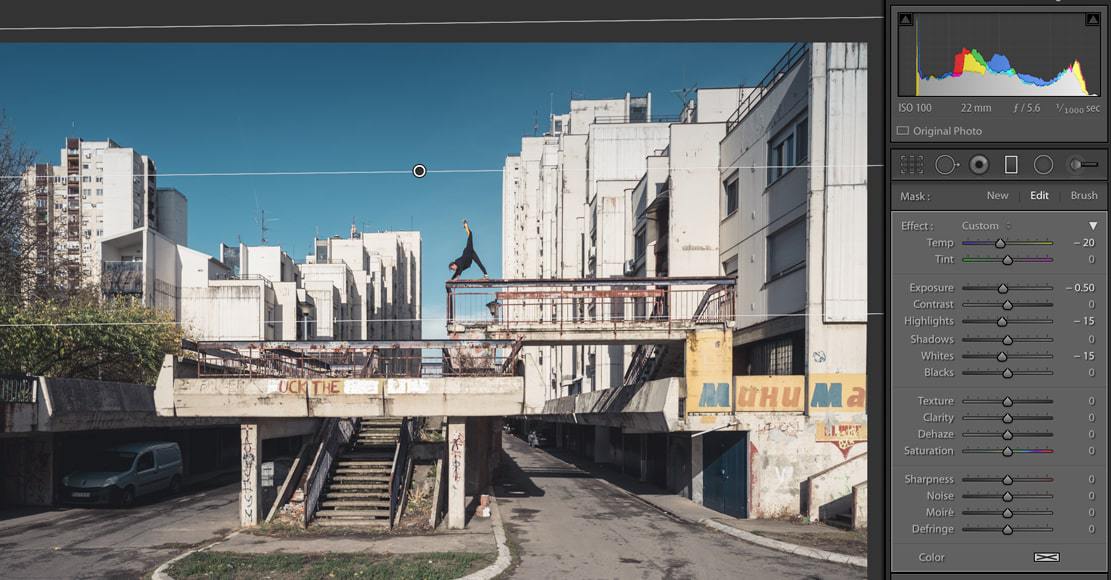
For example, to reduce the brightness of a sky in a landscape photograph, you may want to use a Graduated Filter (keyboard shortcut M), reducing the exposure by -0.5, reducing Highlights and Whites each by -15, and perhaps pushing the color temperature to -20 to give it a slight hint of teal.
Alternatively, if this is something you use regularly, you could have this set up as a preset so that it can be applied in a single click. Hit the plus symbol and choose “Create Preset…”
Then select “Check None” and make sure that the only box that is ticked is “Gradient Filter.” Don’t forget to give it a name, too!

How to Install Presets in Lightroom Mobile
If you use Lightroom CC, you probably also use Lightroom Mobile on some sort of handheld device.
Installing presets directly on your mobile device is quite a tricky process, so instead, it’s much easier to use Adobe’s automated synchronization.
Because everything synchronizes using the Cloud, any presets that you install or create in Lightroom CC will automatically become available in Lightroom Mobile, assuming your device is connected to the internet.
Just make sure that your device has completed synchronizing all of its files and your Lightroom CC presets will appear in Lightroom Mobile, and vice versa.

Presets added to Lightroom CC become automatically available in Lightroom Mobile.
How to Use Lightroom Presets | Final Words
If you’ve ever wanted to experiment with presets but are daunted by the prospect of figuring out how to use them, don’t be. It’s really quite simple.
Hopefully, the above guide will kickstart your adventure with presets – whether you’re a user of Lightroom Classic or Lightroom CC.
Just remember that they’re a great way to learn more about post-processing with Lightroom, as well as a shortcut to impressively styled images.
Happy editing!


Andy Day is a British photographer and writing, living and working in France, specialising in adventure, travel, architectural and landscape photography.


