


How to Use Narrative Select to Save Time Culling Images
Narrative Select is a great Mac OS app that helps you cut your image culling time in half. Read our step by step guide on how to get the most out of it.
If you haven’t checked out Narrative Select yet, trust me. You’re going to want to.
I’m a minimalist when it comes to my business – I had always culled using Smart Previews in Lightroom and never saw the need to do it anyway otherwise.
Narrative Select was the first culling program that actually piqued my interest, and the first one I ever tried.

Lightning fast, intuitive and fun way to halve the time of your image culling workflow.
Listen, I’ve tried a LOT of other culling programs since. And don’t get me wrong – they’re all great in their own ways.
However, Narrative Select is the one I keep coming back to because it literally cut my culling time in half.
We all know that culling is a tedious and time-consuming process. Narrative Select not only makes it significantly faster but also somehow manages to make it satisfying to an almost ASMR level.
Here’s my guide on how to use Select to get the most out of it.
How to use Narrative Select for Image Culling
Step 1: Download Narrative Select!

Let’s take it from the top. The first thing you have to do is download the program, which you can do here.
Spoiler alert: it’s literally free on macOS.
All you need to do is tell them your email, make a password, and choose your adventure on the drop-down menu (which won’t affect your experience, by the way).
Step 2: Create a project

Got it downloaded and installed? Okay, now you can open Narrative Select and choose the Create a project option. It will take you to the above-pictured window.
Clicking on Choose a folder will open Finder, and you can navigate to and select the folder that your shoot is in.
Once you have chosen a folder, click Open on the Finder window and watch as your images miraculously import into Narrative Select at the speed of light.
Step 3: Choose how you would like to view your workspace
Now that our images are in Narrative, we can choose how we would like to view our workspace by navigating the three little icons at the top left of the program’s window or by using their hotkeys.
To view your shoot as a Grid, choose the first option or tap [G] on your keyboard. This will enable you to view your gallery in full as a series of thumbnails.
To enlarge or shrink the way they appear, you can use the size bar directly to the right of the view options.
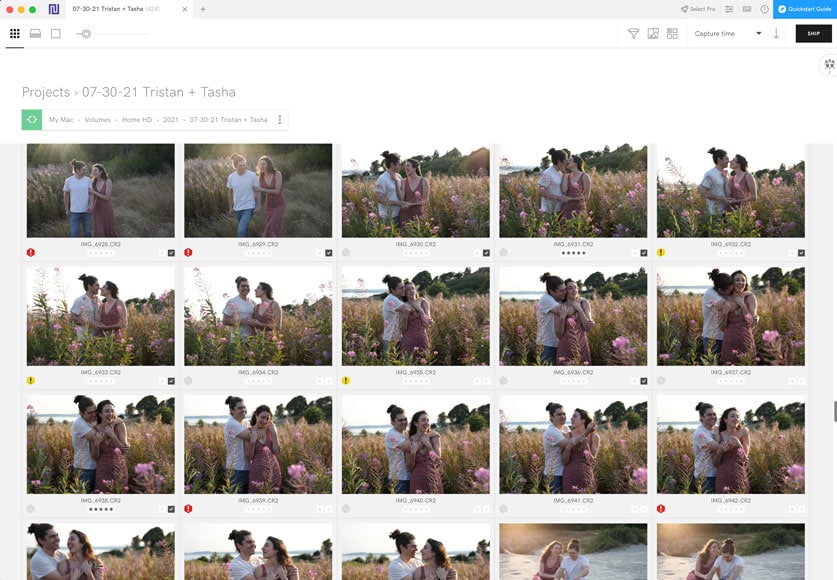
To view by Scene, tap [S].
This view is my personal favorite way to cull because it groups images together that are in a similar scene.
I find it makes it much easier to navigate through the shoot in Narrative if I am looking for something specific.

Step 4: Toggle The Close-Ups Panel
![]()
Before you start culling at all, toggle on The Close-Ups panel.
How Much Do You REALLY Know About Photography?! 🤔
Test your photography knowledge with this quick quiz!
See how much you really know about photography...

Near the top right-hand corner of your Narrative Select window, you will see an icon that looks like a group of people. Clicking on this icon, or hitting [/] will toggle its visibility.
Step 5: Moving, zooming and keyboard shortcuts
- Moving
You can quickly navigate from one image to the next by pressing the [up] and [down] arrows.
You can also move from scene to scene by tapping the [left] and [right] arrows.
- Zooming

To zoom in to an image, tap your [SPACEBAR]. If there are faces detected in the photo, it will zoom right to their face. This will zoom you to 100% by default, but you can use the [+] and [-] keys to change the percentage.
While zoomed in, you can use the [left] and [right] arrows to navigate from face to face in each image.
Hitting the [up] and [down] while zoomed in will go to the next image and keep you in the same spot (still zoomed in). In other words if I am zoomed in on Tasha’s face in the first picture, hitting the [down] arrow will take me to the next image and automatically find her face again.
- Keyboard shortcuts
Narrative Select has a ton of keyboard shortcuts that make culling quick and simple! A list can be found here.
Step 6: Quickly assess images using Narrative’s icons and flags
- Face Assessments
I highly recommend toggling The Close-Ups panel before you do any culling so that you can take advantage of one of Narrative’s most incredible features: Face Assessments.

With Face Assessments on, two icons will appear over each subject’s face. The ellipse icon on the top will give information about the subject’s eyes and expression. The curved line icon just below tells us about the overall focus of the subject’s face.
You can hover your cursor over these icons for an explanation. It will tell us if the subject’s eyes are fully open, partially open, or fully closed. It also gives us a focus score out of 10 (can I get a high five for the solid 9 and 10 I got above?)
Assessments are also color-coded as follows:
- Clear = no problems detected.
- Yellow = there might be something sub-optimal, double-check if you’re not sure.
- Red = there’s likely to be a problem.
I’m sure you can imagine how insanely fast culling group photos is when using this feature!
- Image Assessments

You’ll notice that some frames have an Image Assessment icon that appears in the bottom left corner of the thumbnail and the full view.
The ![]() yellow icon means you might find better images in the scene. The
yellow icon means you might find better images in the scene. The ![]() red icon means you will very likely find better images in the scene. These overall assessments are made based on the average score between your face and focus assessments.
red icon means you will very likely find better images in the scene. These overall assessments are made based on the average score between your face and focus assessments.
Frames that have no flag are considered pretty dang good in terms of focus, eye status and expression by Narrative’s standards!
Step 7: Select by tagging and rating

Now for the fun (and oddly ASMR) part. Let’s cull!
Tapping [T] allows you to tag (or pick) an image. Tapping [U] will untag it.
You can also assign star ratings to each image by tapping [1],[2],[3],[4] or [5]. Tapping [0] will clear your stars.
Star ratings only have as much meaning as you give them. Personally, I only use [T] to select images I want to bring into and edit in Lightroom, and the [5] when I find an absolute banger that I know I’ll want to include in a sneak peak or Instagram post later.
All star ratings will transfer over when you ship your images to Lightroom later!
Note: When you assign ratings to an image, a .XMP sidecar file is created within its folder. If you remove or delete these files from the folder, your ratings will be lost.
Step 8: Ship it to Lightroom

After what feels like no time at all, your shoot will be culled and ready to ship to your editing tool.
When you tap the Ship button in the top right-hand corner of your Narrative Select window, a window will appear.
Here, you can select what program you would like to ship to. At the time this was written, Lightroom Classic, Lightroom CC, and Capture One were supported.
If you use editing software that is not listed, you can select Other in the dropdown menu and Narrative will give you instructions on how you can manually ship your images there.
If shipping to Lightroom, you can choose to add to a specific catalog by using the Add to Catalog dropdown.
The last dropdown allows us to choose whether we want to ship Images with rating (default), All images in current filter view, or selected images (if you have highlighted images within Narrative).
Assuming you’re going with the default Images with ratings, select the items you would like to import based on any star ratings or tags you have assigned.
Once you’re ready to roll, it the big SHIP ### IMAGES button. Lightroom will automatically open with the photos you’ve starred an/or tagged chosen in Narrative Select.
Now you can click the Import button in Lightroom, as you do, and start editing!
Final Words
Narrative Select is aesthetic, easy to use, and there’s just that certain something about culling with it that makes it so incredibly satisfying.
It’s my hope that you can get just as excited about Narrative Select as I am. It has definitely cut my editing time in half (or more, honestly, but “cut your time in half” has a better ring to it) and it’s my hope that it cuts your cull time in half as well!
I love sharing tools and tips that I’m really excited about with other photographers, and I am always extra excited to share Narrative Select! I am absolutely thrilled with the tool and the convenience it has brought into my business.
If you have any curiosities, strong feelings of pure joy, or even feelings of existential dread about using this amazing culling program, I invite you to include them in the comments below.

Check out these 8 essential tools to help you succeed as a professional photographer.
Includes limited-time discounts.
 Narrative Select Review (AI Image Culling Software)
 Guide to Culling in Photography: 8 Pro Tips for Faster Results
 Best Photography Culling Software to Speed Up Your Image Selection Workflow
 Aftershoot Review: AI Photo Culling & Editing Software
 Narrative Photography (Ideas, Examples and Techniques)
Jaki is a professional photographer and content creator based in Seattle, WA. She is the owner and operator of the self-titled wedding photography brand Jacquelyn Portolese Photography. as well as Seattle based visual creative agency Roro Creative Co.


