


Landscape Photography Tips
Learn 9 landscape photography tips to create powerful compositions with amazing light and the best camera gear - capture beauty in nature with this guide.
Learn | Photography Guides | By Greg Cromie | Last Updated: March 4, 2024
In this guide to landscape photography, we’ll cover the essentials tips to master this exciting visual adventure.
Stunning landscape photography is about capturing the beauty of nature and creating a visual journey into a world others may never visit.
It’s all about translating your experience into a two-dimensional plane without losing any of the magic.

Take incredible landscape photos with just your iPhone - grab a huge discount on this popular course.
Landscape photography is something any photographer can attempt, but only a few can master… but the first step is to get outside and start exploring.
Landscapes are a perfect photography genre for beginners as there’s no real barrier to entry – you just need to set foot outside your front door, camera in hand.
Hopefully, this selection of tips and alluring landscape photos will inspire you to create something magical yourself.
Let’s get stuck in!
9 Essential Landscape Photography Tips
In this landscape photography guide, I’m going to give you the kind of advice and photography tips you need to capture stunning images of the natural world like a modern-day Ansel Adams.
Every landscape photograph you capture has the potential to be unique – but let’s aim to start with just one ;-)
I’ll break these tips down into digestible chunks so you can develop your understanding. Through this beginners landscape photography guide and our 9 top landscape photography tips, you can master nature and landscape photographs and capture inspirational images every single time.
1. Select The Right Gear For Landscape Photography – Cameras and Lenses
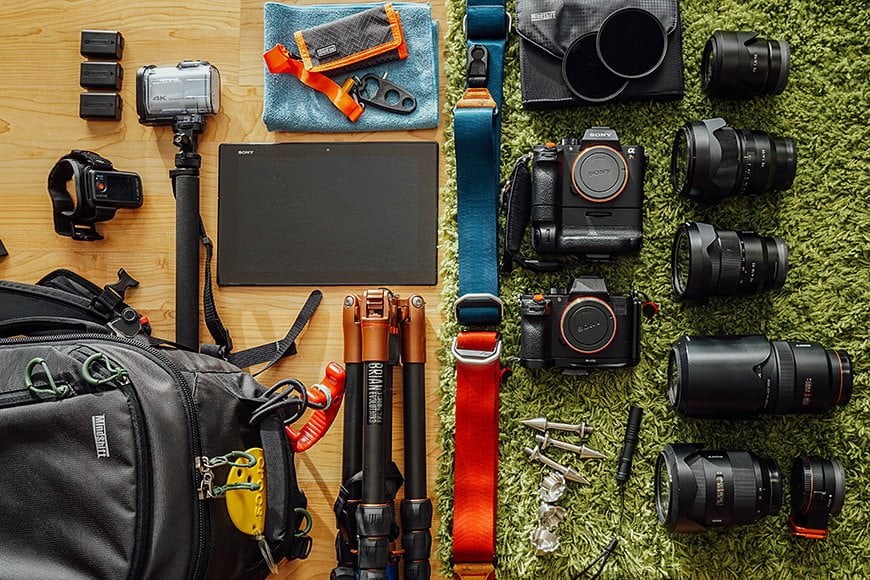
Landscape photography rules needn’t include an excessive gear collection. Credit: Spencer Pablo
Before you even take a look at a map, fuel up your car or even step foot in an outdoor setting, you need to consider the essential gear.
As with a lot of photography genres, you don’t need a lot of special equipment for this style of shoot. However, if you want to maximise the opportunity of capturing stunning landscape photography, consider these eseential pieces of kit.
- Camera
You may be thinking that you can shoot nature with any camera – even the one in your pocket. While that’s technically true, there are better ways to get the shot right.
Modern mirrorless DSLR camera are capable of shooting a quality landscape image… but what’s the best camera for nature photography and why is it so necessary?
For a more in-depth answer to those questions, take a look at our guide: Best Camera For Landscape Photography, which will give you particular camera brands and models that excel in this field.
A lot of entry-level cameras feature a scene selection mode where the camera uses a complex algorithm to read the scene and select the necessary settings for you. While convenient, it’s also a basic approach and results in missed opportunities.
As we will discover, some vital elements in landscape photography are achieved through the use of manual settings. A camera that can manually control individual functions is going to win the day.
Being able to control shutter speed, aperture, exposure compensation, and ISO (manually) is critical. Also, the ability to switch your camera to a manual focus mode will make all the difference to nailing your focal point in a complex composition.
- Lens – Shoot With What You Have
There’s a lot of gear-guides featuring pro photographers and educators who talk about the best lens for landscape photography. And while there’s a lot to learn from these sources, there’s also a lot of confusion.
I have two pieces of sound advice learnt from years of experience – the first is to shoot with the lens you have. It’s a piece of advice I give anyone asking what the best camera lens is for any desired shoot or genre.
The best way to learn a skill is to work with what you have – well before you splash out on the best gear available. There’s a lot to learn through experimentation and working with the most basic of tools. More importantly, you need to understand that the gear doesn’t make you a better shooter; practice does!
How Much Do You REALLY Know About Photography?! 🤔
Test your photography knowledge with this quick quiz!
See how much you really know about photography...

You can even do landscape photography with 50mm lens! That kit lens can capture stunning shots on its own or you can stitch together 50mm landscape photography panoramas.
So if you’re new to photography and only have a 50mm lens in your kit, then shoot with that. Even if you are an enthusiast shooter with years of experience, don’t rush out for the best landscape lens. Shoot with what you already have in your kit bag.
- Lens – Avoid The Statu Quo
The second piece of advice about choosing a lens for landscape photography is to choose your style. We will cover the use of wide lenses later, but consider shooting a scene with something other than a super-wide prime – that’s exactly what everyone else is doing.
Create your style by experimenting with lenses other than those with a wide angle – this will teach you a lot. If you have a macro lens, drop it onto your camera and take some shots to see what sort of results you get.
You’ll see a lot of pros using wide-angle lenses, but 50mm lens landscape photography (and even telephoto landscape photography) can help you stand out from the crowd.
(I have a photography friend who is an exceptional landscape photographer and shoots with a 50-140mm telephoto lens – something no ‘landscape photography tips’ articles will ever recommend!)
- Lens – What The Pros Use
Let’s talk about the conventional lens used in landscape photography – wide angle lenses. You have the option to choose either a wide prime or a wide zoom lens. Which one you go for all depends on your style and what you traditionally like to shoot with.
Wide primes generally have optical sharpness and less vignetting but a fixed focal range meaning that if you want to zoom in, you have to do so with your feet. A wide angle zoom is less sharp across the focal range but grants greater flexibility in composing and framing your shot.
Other considerations for wide angle lenses include weather sealing, filter threads, lens hoods and stabilisation. The weather sealing is useful if you are shooting in poor conditions while the filter thread allows you to attach filters easily – the ND filter is an essential piece of kit in the bag of every landscape photographer.
As for the lens hood, this helps to minimise lens flare, especially if shooting while the sun is at a low angle.
When it comes to lens image stabilisation, this is not a must as you will likely have your camera and lens mounted to a tripod for stability. If you use image stabilisation while mounted to a tripod, you can cause more image shake than without – make sure to have it turned off.
2. Essential Accessories For Landscape Photography – Tripods and Filters
Don’t always reach for the wide angle lens – long lenses are great for landscape photography too.
- Tripods
Using a tripod for landscape photography goes a long way to creating gorgeous landscape photos. It’s especially true if shooting with a slow shutter speed or with focus stacking. But that’s not to say that you cannot get by without it.
I like the mixed-bag approach to using a tripod. When on a nature shoot, I will have my camera in hand with a tripod-mounting plate attached to the base. While I explore an area, I am free to raise my camera at any time and grab some great shots. But, when I want to stop and set up for a more serious capture, I can quickly mount the camera to the tripod.
A good quality tripod can make all the difference in how you compose your shots. With a tripod, you can mount your camera at a low angle above a flowing stream, or get a stable set up even in a rocky spot.
Plus, when you want to stop and set up for a long exposure shot, you are guaranteed crystal clear images. A good tripod is a must have for nature & landscape photography.
Tripods come in many shapes and sizes, including some great options available for travel. These are ideal for nature photographers as they’re lightweight yet made from sturdy materials such as aluminium or carbon fibre. Plus they have collapsable and lockable legs making transportation far easier.
- Filters
The core role of any lens filter is to ‘control’ the light that is entering the front of the lens to alter the look of the image. You’ll be able to capture some unique landscape photography thanks to a few good filters.
Filters are circular and identified via a millimetre (mm) size to suit most standard lenses. Then there are square filters that drop into a frame attached to the end of the lens. Filters include UV, Circular Polariser (the most popular polarizing filter), Neutral Density (Fixed, Variable and Graduated) and even special effect filters.
For this genre, the most common filters are Neutral Density Filters available in varying degrees of light filtration.
Graduated Neutral Density filters are perfect for landscape as they have one half of the filter darker than the other half. It allows the landscape photographer to darken the exposure of a bright sky without darkening the landscape in the bottom half of the frame.
A fixed Neutral Density filter has the same level of filtering across the entire piece of glass. Variable ND can be turned to alter the amount of filtering across the glass.
Filters are also essential if you are shooting nature photos with a long exposure – the filter reduces the light from overexposing the image. See our guide to lens filters for more.
In addition, filters can help protect your lens, which is especially handy if you’re out shooting landscapes in the desert or anywhere with sand.
3. Bags, Batteries, Boots And Everything Else

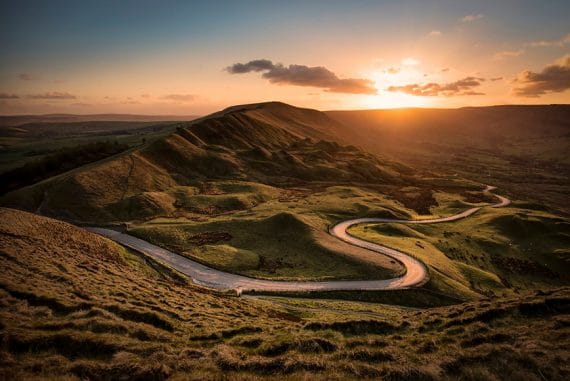
An S-curve guides the viewer’s point of view through an image.
Aside from the core essentials we have mentioned above, there are a bunch of other bits and pieces that will complete a landscape photographers kit.
Often when shooting such scenes, we are far away from the modern conveniences of comfort amenities such as power and water. With this in mind, you must pack spare, fully charged batteries along with a power bank for your other devices. The same goes for ensuring that you have enough memory cards.
Being out in nature can present you with the challenges of dirt, dust and moisture impacting your gear. I recommend ensuring that you have a simple cleaning kit including a lens cloth, blower and some alcohol-free lens wipes.
Keep in mind that while outdoors, you must pack water and dress for the conditions you’re likely to face. To avoid nasty blisters, wear suitable footwear designed for the terrain you will be exploring. Ensure to have all your gear packed into an appropriate bag such as a water-resistant backpack.
This way, your gear will be safe, and you will be comfortable for the duration of your landscape photography outing. Remember, capturing scenic photographs relies on off-camera gear as much as on-camera gear.
4. Understanding Camera Settings For Landscape Photography
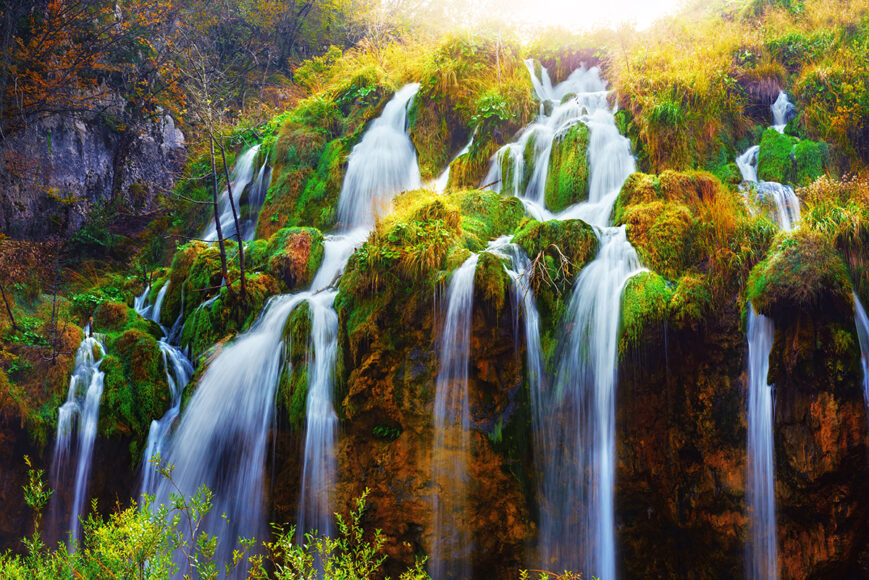
Use a tripod and filter to capture movement in water.
Now that you have the right gear and essential accessories to shoot your landscapes, let’s talk about your digital camera settings.
With the correct camera settings, you’ll capture stunning landscape photography worthy of printing and framing. Here’s how to get the best camera settings for landscape photography.
- RAW
The first change is to ensure your camera is saving RAW files versus JPEGs. RAW files hold almost 100% of what the camera sensor captures when a shot is taken. A JPEG only records the surface level of image information. Plus, a RAW file is far more workable in post-processing and editing software as there’s more data to push back highlights and pull out detail from the shadows.
- Aperture
The aperture setting can be dialled via the camera or directly on the lens depending on your system. Regardless, the most common approach to an aperture in landscape photography is to shoot with a narrow aperture ranging from f/8 to f/22. A small aperture will result in more of the scene in focus, but it does restrict the amount of light hitting the image sensor. Give thought to foreground and background – if you’re shooting a scene and only wanted the foreground subjects to be in focus and the background blurred, you would shoot with a wider aperture. This way, you’ll obtain a finer depth of field compared to shooting with a small aperture… but you will potentially have excessive light hitting the sensor.
- Shutter Speed
Like with aperture, Shutter Speeds also depend on the composition and the lighting conditions. A fast shutter speed results in far less light captured. If you’re shooting with a small aperture and a Neutral Density filter, a fast shutter speed simply won’t work.
A slower shutter speed allows time for the light and detail to hit the image sensor. Be warned that slow shutter speeds result in camera shake, so be sure to use a tripod. Plus, with a slow shutter speed, you can use it to capture motion such as the flowing of a stream or the sway of branches in the forest.
- ISO
Generally speaking, ISO controls the sensitivity of the light hitting the image sensor. For outdoor or nature photography, there’s already ample lighting in the frame. As a result, stick to a low ISO to ensure that the Aperture and Shutter Speed are doing the heavy lifting of exposing the image correctly with the available light in your landscapes.
- Focus
It’s up to you how you want to play the focus-game. If you prefer to shoot with manual focus and dial in image sharpness, then go for it. Equally, if you’d rather let the camera system achieve crisp focus, then that’s good too. At the end of the day, landscapes are not fast-moving scenes and using either focusing system will ensure reliable outcomes.
These DSLR settings for landscape photography will work just as well on mirrorless cameras or even iPhone photography!
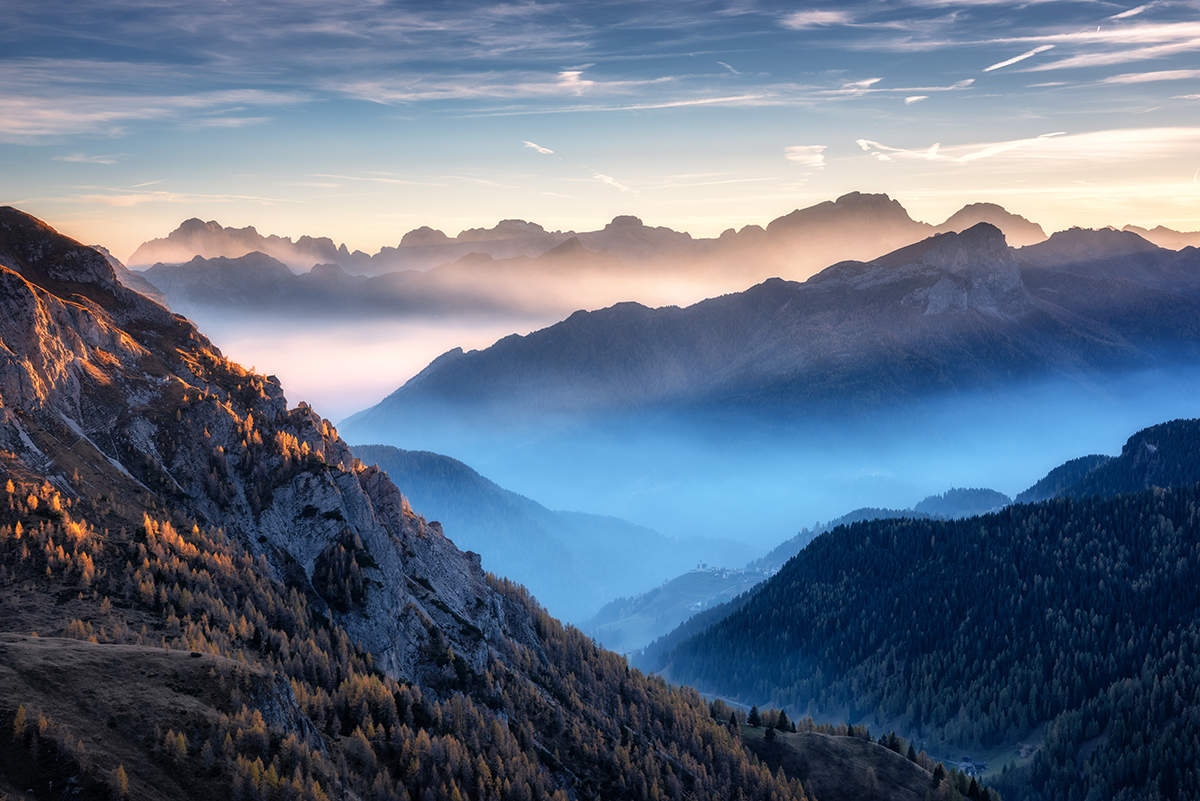
5. Research What You Want To Capture
Beautiful landscape captured at night with a wide angle lens.
To recap: you know the best gear and the right settings for your landscape photography excursions. The next step is to ask yourself questions around the where, when and how to get a truly unique set of landscape pictures.
You should do your homework online through travel guides, google maps or even talking to other photographers that have experience in the area.
Nature photography is all about capturing natural scenes that highlight the beauty and raw energy of the natural world. So when researching your next outing, you need to look for some of those natural elements.
Forests, hills, mountains, lakes, streams, fjords, glaciers, forests and barren wastelands are the sorts of elements you need to look for. You want to look for a scene that’s compelling and has enough natural features to make it an eye-catching photo.
Aside from the ground elements, what occurs in the sky can make or break a great landscape image. Cloud formations, especially those shot at sunrise or sunset, can add a lot of drama and narrative to a photo.
Other weather effects can also play a critical role in landscape photography, and include snow, fog, rain and even wind – see our guide to snow photography here.
Don’t forget about animals, too, which can help to introduce a sense of scale to landscape photos – birds in flight or cows grazing the pastures during the best light of the day are two examples.
You may even decide to use an ND filter to blur those moving elements to add an additional dimension to your landscape photograph.
Researching landscape photography locations, seasons, and times is also a great way to get some landscape photography ideas!
6. Research Where You Need To Go
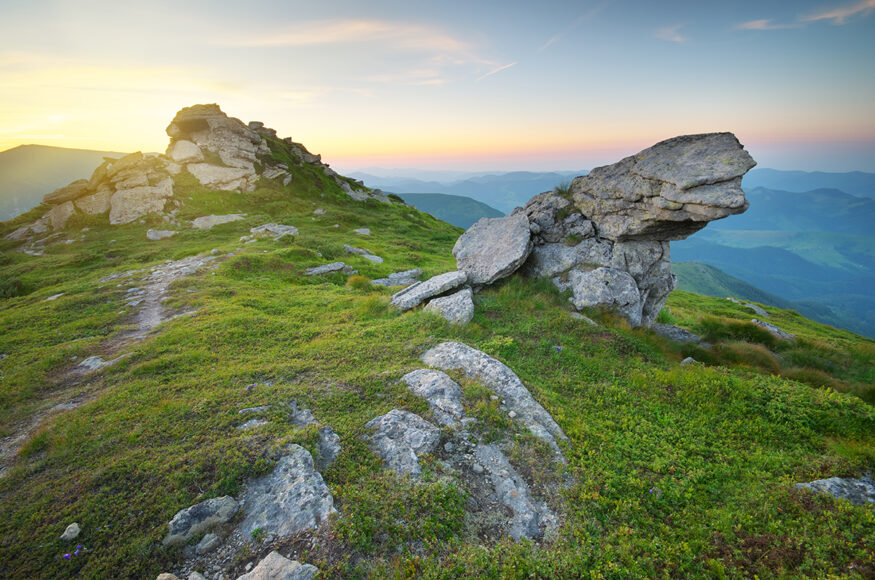
Leading lines from rock formations.
The question of where to shoot your landscape images is going to depend on several factors. The first of which is where on earth you’re located right now. If you live in a built-up urban or inner-city location, then you are going to need to do a bit of travel to find a great place.
Even if you live in the outer suburbs of a central metro area, you need to travel some distance to find suitable landscapes. In researching your next outing, start with areas of natural beauty that are within driving distance from your home or studio. Consider travel time, road conditions and also if you will need to hike from the parking spot.
Alternatively, if you know you are travelling to a foreign destination or even to another state, you have a golden opportunity for fantastic landscape shots. Take the time to research local nature spots. Familiarise yourself with how to get to them and where to explore once there.
Also, consider some alternative locations to shoot a scene that is popular with local photographers. Get off the beaten track to grab a unique shot – be sure to trek safely. One way to help with this is to join a community or forum to discover what other photographers deem to be hidden gems.
You can also mix things up by doing unconventional shooting at a popular location. Landscape photography with a 50mm lens might make a popular spot look totally new compared to the standard wide-angle style.
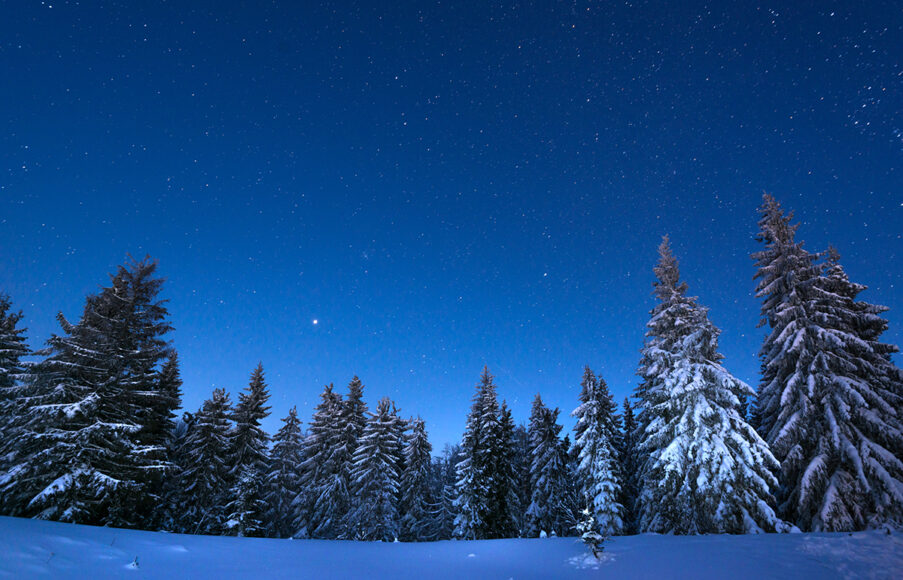
7. Research When You Need To Be There
Polarizing filters were used for this stunning image.
The time of year can play just as important a role as the time of day when preparing for a landscape photography shoot.
Consider the seasonal changes of the location and if it’s possible to access them in extremes such as mid-winter. The same area can have dramatic changes throughout the year from the starkness of winter to the colourful wonders of fal lor spring. One of the shots could be snow-laden trees while the other could be full of red fall leaves.
Do your homework on the best time to visit a particular spot or consider shooting a series in the same area at different times of the year.
As for the times of day, that all depends on your intentions and commitment. Shooting in the middle of the day is often considered to be a wrong time due to the harshness of light, but if that’s all you have access to then make the most of it.
Sunrise and sunset represent a pair of golden hours when the lighting conditions change as dusk or dawn falls. The light casts a golden glow across a landscape and can add a lot of punch and drama to your images.
If you’re keen to hang around a little longer, the blue hour throws a cooling and blue tone across a landscape about an hour after sunset.
For the extreme photographers out there, consider shooting a landscape at night. With or without the added magic of astrophotography, a nighttime scene can be fascinating, since the fall of shadows builds a dramatic composition.
With a little moonlight, starlight or even with some introduced light-painting, a dull landscape can become a moody and ominous scene.
8. Creating Breathtaking Compositions in Landscape Photography
Create depth with multiple visual elements.
With the world of social media, we are more and more aware of how other photographers are creating compelling images. As a result, it can be a little daunting to consider how to capture a unique look to a typical scene.
However, it’s also through these online platforms that we gain inspiration.
The questions remain: how can I make my landscape picture interesting and what makes a good landscape image?
If you have a bunch of photographers all standing in a line pointing their cameras at the same mountain range, you would expect all the photos to be identical… but they rarely are. If you’re looking to make the most of landscape photography for beginners, you want to master composition 101.
The key to achieving unique landscape photos is Composition – but it can’t survive without all of the above points first being observed. Composition works in harmony with the right gear, settings and the what, where and when. If anything, the composition is the ‘how’.
The composition is all about framing your scene to capture the desired elements and mood in your picture. In time and with practice, most photographers will develop the ability to see ‘frames’ in everyday scenes. You develop a knack for seeing where the boundaries of an image would fall and what elements would sit within it.
To help you along the way, one of the essential rules to adopt in landscape photography is the Rule of Thirds. The rule of thirds breaks up a frame into nine boxes with two horizontal and two vertical breaks or lines.
In essence, the rule of thirds dictates that any key features or subjects in your frame should sit on one of those lines or at the points where they cross.
Aim to put the physical horizon on one of the imaginary horizon lines from the rule of thirds in your frame. If you have a prominent outcropping of rock or a lone tree in frame, ensure that sits at one of the intersecting points.
In following the rule of thirds, you gain a greater level of depth and direction in your photo – it’ll appear to be a far more balanced sight than placing everything in the centre.
Aside from this, your composition should include some means to indicate depth – aside from using aperture to control depth of field. Having some foreground, middle ground, and background elements is the most natural way to do this. The correct placement of these elements in a composition are far more interesting and draw the viewer into the frame.
Equally, leading lines can add a lot of depth and narrative to a landscape photograph. A row of trees, mountain ridge or country road leading from the corner of the foreground, at an angle, towards the background is ideal. It will lead the viewer of the image on a journey deep into the scene.
Finally, it’s important to remember that landscape shots are not just a pretty photograph of a mountain, field or sky. It’s a mistake that a lot of beginners make when starting. It would help if you captured a story or narrative in the composition. A great way to do this is with interesting elements and subjects that create some form of contrast.
For example, a wide-open plane with a distant mountain peak is amplified by a single lone pine standing in the field. Or, photographing a shot of a massive still lake with glass-like surface framed against the jagged clifftops that tower above it.
The other option is to include people or even wildlife in your shots. With the right subjects, in the right place, at the right time, you can add a lot to the narrative of your photo.
As a side note, think about how you want the image to look. Shooting in color can bring out the elements of nature – but shooting in black and white or monochrome can add all sorts of drama and the lessen the distraction of excessive color. You can add black and white presets or filters to your images in post-processing.
Any photography expert will tell you that composition is one of the most important landscape photography techniques. It might even be more important than your gear selection!
9. Post Processing is the Icing on the Cake

Luminaris a favourite among landscape photographers who want to use artificial intelligence to boost their photography.
Post-processing refers to editing your landscape photos in order to bring out the best in them. Post-processing is an essential step in beautiful landscape photography and dates back to the days of the iconic work of photographer Ansel Adams, who would develop his medium format film in specific ways to accentuate highlights and shadows.
Nowadays with digital photography, editing landscapes is a whole lot easier, with various powerful editing software and tools available to help give your photos that finishing touch.
As long as you’ve used the right camera settings and filters to preserve your highlights and shadows, image editors can extract more data out of every pixel – basically, you’ll be able to boost your highlights and shadows to more accurately recreate the scene, or alternatively, create something hyperreal, such as with HDR photography.
Post-production gives you the power to merge focus-stacked or exposure-bracketed images and panoramas, and in some cases, even allows you to replace the sky.
Editing landscape pictures is a balance of experimentation and restraint. You can use all the fancy editing techniques to adjust foreground and background elements in your photos, but the final photo needs to look visually appealing.
Also, it should go without saying – unless the image you capture has a strong composition, no amount of editing will save it!
Go out and start experimenting with your favourite image editing software – here are a few to get started. Use gradient filters to separately control the exposure of your sky. Use brush filters to ‘dodge and burn’ elements of interest. Adjust the crop of your photo if necessary.
If you’re using Adobe Lightroom or Photoshop, have an experiment with the powerful new Dehaze tool (here’s a guide), which can help remove fog and haze, while giving the overall image a clarity and contrast boost, brightening details of landscapes where distant objects may look washed out.
Even if you’re shooting representational landscape photography and you want to be as faithful as you can to the original scene, editing is still going to be your best friend.
Have some fun with the image, but then take a step back and reassess whether you’ve made the most of a beautiful landscape… or overdone it a bit!
Landscape Photography FAQs
What are the 3 types of landscape photography?
The genre is usually broken down into three styles: representational, impressionistic and abstract. Representational is unmanipulated and true to life; impressionistic is guided by the photographer’s vision and presents real landscapes in unreal ways; abstract uses elements of the landscape to create an image that depicts something other than the scene itself.
What makes good landscape photography?
It’s really a combination of things. If you pay attention to your camera settings and equipment (including things like tripods and lens filters, which can help you get clear, well-exposed images) that’s a good start. From there, work on composition techniques to capture the scenes in a captivating way – for example, rule of thirds, leading lines, etc.
Developing your eye to seek out the best scenes and landscape elements will also help you capture beautiful images.
Can I use 50mm lens for landscape?
50mm for landscape photography is certainly adequate. Naturally, landscape with 50mm lens won’t give you a very wide field of view, which is a limitation. However, you can use that limitation to encourage your creativity, and nifty fifty lenses generally have the advantage of being crisp, versatile, and lightweight to carry around.
What is landscape photography?
Landscape photography captures naturalistic scenes that highlight the outdoors. A landscape shot can be as expansive as a mountain range or as focussed as macro photography. While a focus on nature is important, landscape photography can also feature the human presence in nature.
Final Words On Landscape Photography Tips
When asking yourself the question of what makes a good landscape photo, you need to consider all the above as part of the answer. Also, you must have a desire and commitment to explore the natural world and replicate your experience in your landscape photography.
Without this commitment, you are just capturing flat and dispassionate replication of a field, a hill and the sky.
With the right desire and necessary know-how, you will capture stunning and awe-inspiring images of landscapes every time. Now, get out there and make the most of everything mother nature has for us!

Check out these 8 essential tools to help you succeed as a professional photographer.
Includes limited-time discounts.
 Guide to Nature Photography
 Essential Camera Lens Filters in 2024 (How to Choose & Use Them)
 Best Nikon Lenses For Landscape Photography
 Best ND Filters for Creative Photography & Video (Neutral Density)
 28 Most Famous Landscape Photographers in 2024
 22 Essential Photography Composition Techniques for Better Photos

I’m a Melbourne-based street photographer and blogger. I love to travel to Japan to photograph and document its dynamic people and culture.


