


How to enhance Landscape Photography with Radiant Photo
Effective post-production of landscape imagery is arguably just as important as actually taking the photo. Fortunately, Radiant Photo can lend a hand.
Radiant Photo | Software | By Kevin La Rue
Shooting and enhancing landscape images is one of the most popular forms of photography that anyone can enjoy.
Whether you like the beach, mountains, desert, or forest, landscapes are generally accessible to practically anyone and easy to find, especially with the many online forums and travel sites now available.
However, landscapes also bring with them many issues photographers have to deal with.
Weather conditions, travel times, short time-frames to get the best light, and composition challenges all come to mind.
A goal of many landscape photographers is to recreate the magic of what they saw in the field.
The nature of camera sensors and the dynamic range they can capture often result in “flatter” images than what your eyes and mind experience.
This is where Radiant Photo can help. It is optimized for delivering extremely natural looking images, color balanced, with correct exposure and just the right level of details.
And, while lots of photo editors have tools that landscape shooters can use, let’s take a look at how easy it is to get stunning results in Radiant Photo.
(If you haven’t heard of the app yet, you might want to read Shotkit’s Radiant review or tap the button below to get a free trial.)
Download the latest version of Radiant Photo to follow along with this simple tutorial.
Start a free 14-day trial today
Smart Presets and the Quick Edit
When you open an image in Radiant Photo, the software automatically analyzes and identifies the scene. Then, it applies the correct Smart Preset that best matches the image.
A Smart Preset in Radiant Photo combines the power of AI scene detection, which analyzes the content of a photo, with Smart Editing tools and additional editing settings.
If your photo has not been edited previously (or just lightly pre-processed), utilize the “Pro” level Smart Preset. This results in a somewhat stronger application of the exposure, color, and detail controls.
If your photo has been edited in another application prior to opening in Radiant Photo, use the “Subtle” level. These are a bit gentler and work well for people who prefer minimal retouching.

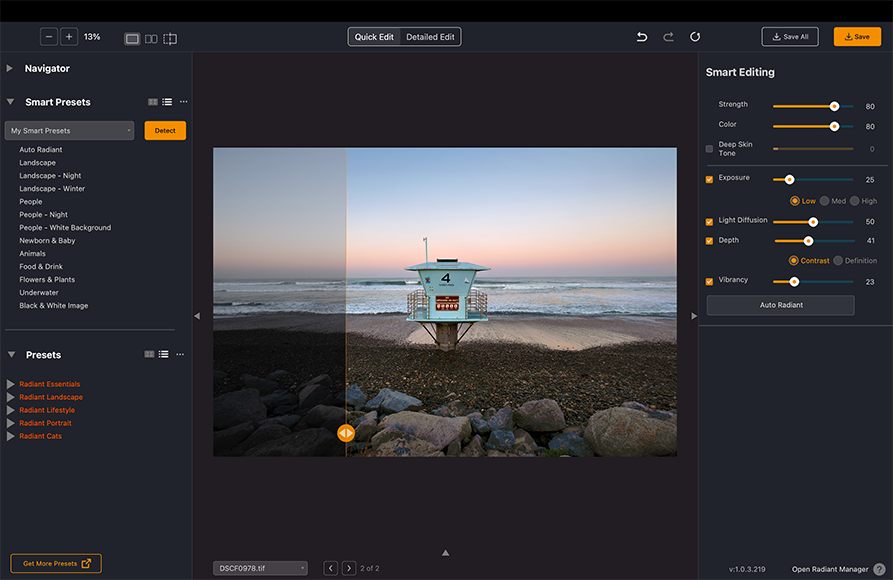
For fast results, make sure the Quick Edit tab at the top of the Radiant Photo workspace is selected.
That will reveal a panel of Smart Editing controls on the right size of the window. Adjust any of the seven sliders to “season” your image to taste.
The Strength, Color, and Exposure sliders are all essential choices, and I give them a tug on nearly every image.
Light Diffusion softens the light, while Depth is useful for adding contrast to each pixel, making it easier to see details. Explore these if your vision for the image suggests those directions.
The automatic Smart Presets and Quick Edit might be all you need to achieve a satisfying end result.
If your image begs for more extensive editing, a “deep dive” into the Detail Edit view might be in order.
- Read more: Landscape photography tips for beginners
Diving Deeper
If you want to take complete control over your photo, then you need to take advantage of the tools found in the Detailed Edit view.
The tools are grouped in logical categories of Tone, Color, and Details, each of which has an associated set of powerful tools.
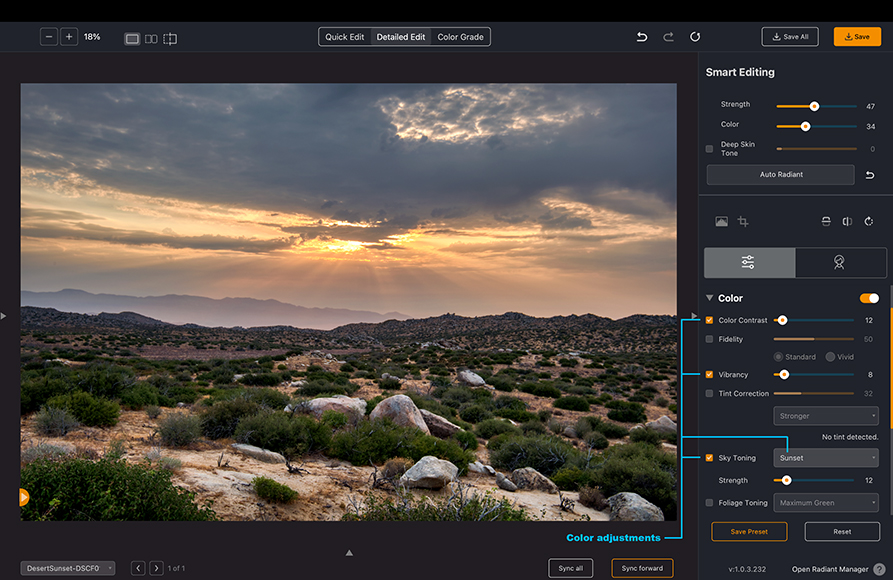
Let’s use some of them to edit this HDR landscape, which clearly needs some help!

In this case, I think the Smart Preset resulted in an image that’s a little too bright.
After clicking on the Detailed Edit Tab, I’m going to dial the Strength and Color down slightly.
Then, I’ll lower the Exposure in the Tone panel to get the image more to my liking.
I’ve also increased the Depth slider to enhance the contrast.

Next, I’d like to punch up the sunset slightly and have that warm glow wash over the land.
Moving to the Color panel, I increased the Color Contrast, added a slight bit of Vibrancy, and used Sky Tone with the Sunset option to enhance the sky.
Ordinarily, I might work with the Details panel a bit, but the image looks well-sharpened to my eyes. (See more on how to sharpen edges using Radiant.)
Clicking the Save button in the upper right finishes this one off, and it’s ready for printing!
Graduated Filters For The Win!
Graduated Filters can be a lifesaver for the landscape photographer. They allow you to make adjustments to specific parts of your image.
Most often, the Linear Gradient option is used for landscape images, affecting just the top and bottom of the image.
Take, for example, this image of a sunset over Lake Havasu, AZ.
I’ve already done some work on it to get the sky looking pretty good, however, the lower third of the image could use some shadow recovery at minimum.
By clicking on the Color Grade tab at the top, then the Target icon on the right side, the Graduated Filter tools are revealed. Select the Linear Gradient option to get started.

Click on the Bottom tab to select controls for adjusting the lower third of the image.
Unlike many other editors, Radiant Photo gives you a full suite of controls to modify each part of the gradient.
I’ll use the Exposure, Contrast and Shadows sliders to brighten up the foreground water and shoreline. As you can see in the Before / After split screen, the difference is dramatic.

Closing Thoughts

A landscape image finished using Radiant Photo
Being out in nature and shooting landscapes is fun by itself, but it becomes extra rewarding to put a final polish on your creations.
Radiant Photo is an ideal tool for achieving a natural look in your images, similar to how your eyes and mind originally saw them “in the field.”
In a hurry? Use Smart Preset and the Quick Edit controls to get to the finish line fast.
For more involved edits, Radiant Photo’s Detailed Edit and Graduated Filters can unlock even more deep beauty in your images.
Get outside and have a go of it, knowing Radiant Photo has your back when it comes time to enhance your landscape images.
Need more inspiration? See how Radiant Photo can help you with your Fine Art Black & White images.
Download the latest version of Radiant Photo to follow along with this simple tutorial.
Start a free 14-day trial today
 Radiant Photo Review: Fast & Fully Customisable AI Photo Editor
 How to Get Started with Radiant Photo (A Beginners Guide)
 How to Create Fine Art Black & White Photos with Radiant Photo
 How to Use Photoshop Smart Objects in 2024: Create, Edit & Fix
 28 Most Famous Landscape Photographers in 2024

Kevin La Rue has been in the graphics and photo software game for over 30 years, with the last 15 years focused exclusively on bringing world-class photo editing tools to market. An avid photographer and traveler, when he isn’t taking photos you’ll find him riding his dual-sport motorcycle, Jeep camping in the desert, or trading crypto!

