


Understanding (& Fixing) Lens Distortion
Learn the different types of distortion in photography, how to avoid lens distortion, how to fix it in post-processing – and when it's best to leave it in!
Have you ever looked at one of your images and thought, why do camera lenses distort your face? Well, it’s because of lens distortion.
In this article, we will look at why lens distortion happens, how to avoid it and how to correct it in post-processing.
We will also examine why, sometimes, you may actually aim for lens distortion to be visible in your photography.
So, let’s get started!
What is Lens Distortion?
Lens distortion, or optical distortion, occurs in many camera lenses of various focal length – even expensive, professional lenses.
To understand why it happens, first think about what lenses actually are: they’re curved pieces of glass that have to transfer an image onto the flat surface of the camera’s sensor.
To put it simply, optical distortion makes straight lines appear curved or warped in photographs.
There’s another type of distortion called perspective distortion which occurs as a result of the positioning of the camera relative to the subject. This is not an optical distortion caused by the lens, so we will consider it later.
First up though, there are three different types of optical distortion. Let’s take a look at each of them.
Barrel Distortion
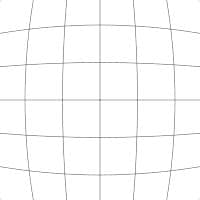
Barrel Distortion is when vertical and horizontal lines appear to bulge out from the center of the image. You can often see this in wide-angle images of cityscapes.
Of course, it’s not just lines and edges, it’s every pixel, but it’s in straight lines and edges away from the center that you will notice it.
Barrel distortion is present in most wide-angle prime lenses and zoom lenses, such as prime lenses with a focal length of 14mm, 20mm and 24mm through to zooms with a variable focal length of 14-24mm and 16-35mm.
The amount of barrel distortion will always differ depending not only on the lens but also on the distance between the camera and the subject you are photographing.
In standard lenses, you will see barrel distortion most prominently when you photograph things with clearly defined lines, such as images of architecture.
The center of the image may look optically correct, but the further you go to the edges of the image – and the subject – the more obvious the distortion becomes.
However, it’s not just buildings that show barrel distortion. Get too close to a person with a wide-angle lens like a 24mm and it can really warp their appearance – something to be very aware of when photographing people with wide-angle lenses.
Fisheye lenses are specialist, ultra-wide lenses – they vary in focal lengths and you can find 8mm fisheyes and 15mm fisheyes. Fisheye lenses actually make creative use of barrel distortion.
When you photograph an image with a fisheye, you are looking for that distinctive distorted look – it’s not something to avoid or overcome.
Fisheyes capture extreme wide angles of view and barrel distortion is inevitable in these images – the distorted look of fisheye lenses is what gives them their charm and wow factor.
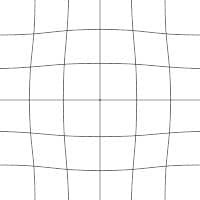
Pincushion Distortion

Pincushion distortion is when vertical and horizontal lines appear to pinch into the center point of an image.
Pincushion distortion is quite common in zoom lenses, particularly telephotos such as a 70-200mm.
How Much Do You REALLY Know About Photography?! 🤔
Test your photography knowledge with this quick quiz!
See how much you really know about photography...

Pincushion distortion is most apparent at the telephoto end of the focal length (for example, 200mm). Just like barrel distortion, pincushion distortion is most obvious in images with clearly defined, straight lines.
It becomes more apparent the closer to the edge of the frame the straight lines are – these seem to be falling towards the center of the image.
Mustache Distortion
Mustache – also called wavy or complex distortion – only occurs in some lenses and is a combination of the barrel and pincushion effects. It is probably the hardest type of optical distortion to ‘deal’ with.
This is because straight lines close to the center curve towards the middle of the frame, while straight lines further out curve towards the edge of the frame. No wonder they call it complex, hey?
Mustache distortion is most apparent in older lenses. Some older 18-35mm wide-angle zooms, for example, show mustache distortion at its worst.
What is Perspective Distortion?
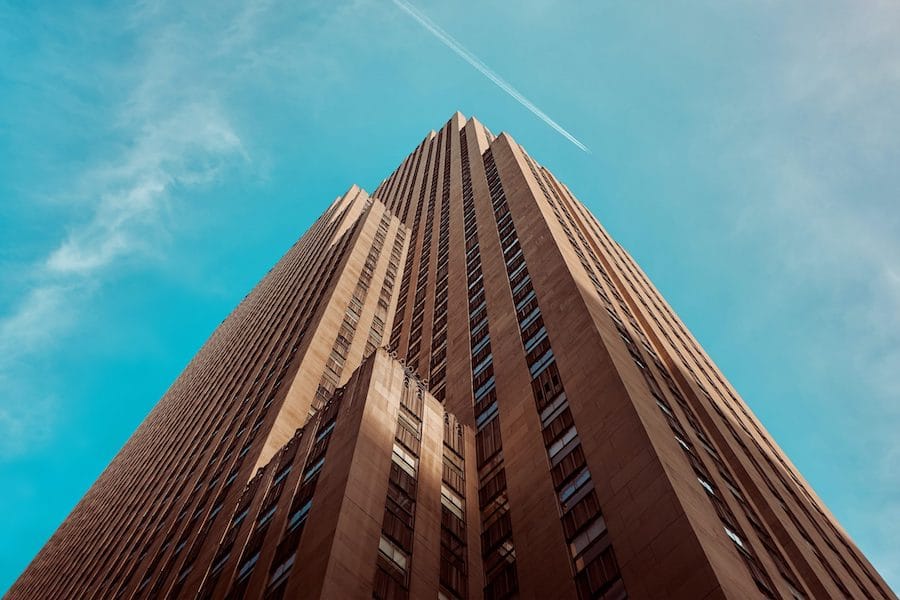
Credit: Anders Jilden
Perspective distortion is different to optical distortion. Unlike optical distortion, it’s not related to the lens you are using.
Perspective distortion is all about the subject you are photographing and the distance and angle you are photographing it from.
Get too close to an object, person or building with any lens and it will distort. Stand at the right distance and place your camera at the right angle and you can lessen or remove that distortion, even when using wide-angle lenses.
But of course, there are many situations when you can’t move further back. Also, in certain circumstances, if you went far enough to remove the distortion, your subject might become too small.
Perspective distortion is also nuanced – there are lots of different kinds.
Linear perspective distortion occurs when you point the camera up or sharply down at an object. The most obvious occurrence is pointing up at a building or down a street of tall buildings and the buildings, instead of being vertical, appear to lean inwards. The same effect can be seen easily with lampposts or tall trees.
To correct linear perspective distortions in post-processing, you can use the tools built into Adobe Photoshop, Lightroom, and other software. We’ll cover this in detail later in this article – you’ll see that it’s quite easy to bring the lines into a true vertical position.
Of course, you can choose to make a judgement and leave some lean for creative effect – in the end, it’s your choice in how you take and edit the photo.
Perspective distortion can also occur in other ways. In most images, the foreground looks much too big for the background. We might just accept that that’s perspective and it just means we’re closer to the foreground.
However, it can also give an inaccurate feel to the photograph where things just don’t look right.
As usual, though, you can turn the error into a useful effect. For instance, landscape photographers often use this distortion to privilege the foreground – say, the edge of a lake – to better show off the mountains and sky in the distance.

Image taken at 24mm to accentuate the size of the foreground object in relation to the background.
Another situation you will encounter is distortion of objects in the foreground, particularly when using wide-angle lenses.
A close-up image of a face and head may look large and dominating, but then again, it can also look amusing – you can play it up for comedic effect as we discuss below.
You may hear some photographers say that you can ‘fix’ perspective distortion using a telephoto lens. However, this isn’t quite the case.
With a telephoto lens, you have to stand further back to take your photograph and fit it all in – and this is the key point here.
Perspective distortion is all about the distance of the camera from the subject. Move further back and you’ll end up with an image featuring less distortion.
How Can Lens Distortion Be Prevented?
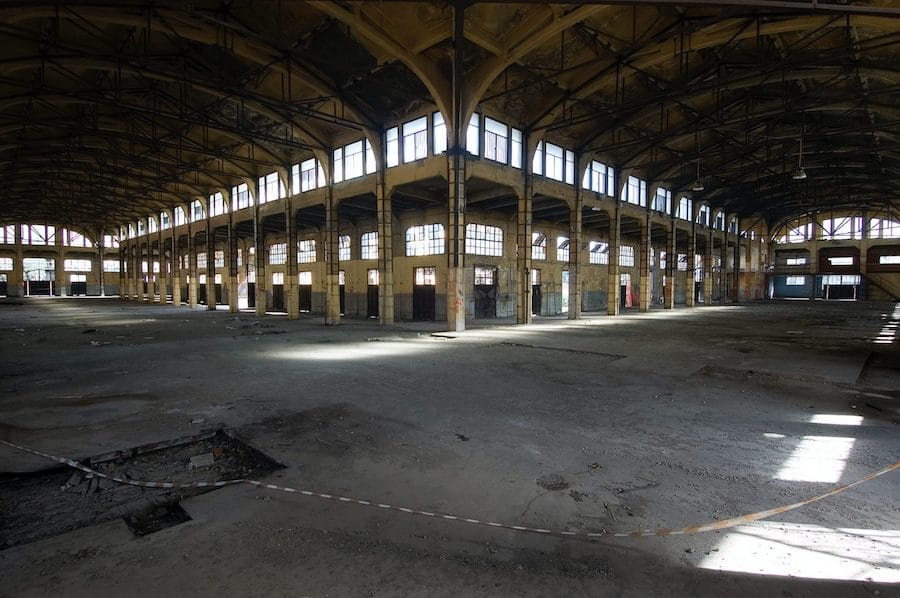
Credit: Antonio Idini
We’ve seen how some of the unacceptable results of lens distortion can be achieved or reduced by choice of lens and also by how far you stand from the subject.
With that in mind, here are some quick tips for preventing distortion:
- Avoid extreme wide-angle lenses – The wider the lens – for example, a 15mm prime – the greater the distortion. Sometimes an extreme wide-angle lens is needed, and distortion is unavoidable – but if you have the space to step back, you could consider different focal lengths.
- Don’t get too close – In many lenses this will increase the optical distortion, and in all lenses, it will increase the chance of perspective distortion.
- Be aware of your composition – There are many situations where some distortion can be acceptable or even something you aim for. But others, such as using a wide-angle lens to take a group photo of a row of people, must be considered carefully. Get too close to the group and the distortion makes the people standing at each end look much wider! So be aware of your composition. Stand back and add space around your group – you can always crop in later when editing if needed.
- Use a nifty fifty – 50mm lenses are often seen as ‘all round’ lenses. This is with good reason. A 50mm lens is great for portraits, street photography and many other types of photography – including architecture. You will of course just need the space to step back if your subject is large. You will see that a 50mm lens has virtually no optical distortion.
How to Use Lens Distortion to Your Advantage

Credit: Sakkarin Kaewsukho
Lens Distortion isn’t always something to be avoided – you can use it creatively, to your advantage.
You can use perspective distortion to show humour in an image. Get a person to stand close to your wide-angle lens to distort their facial features for an amusing photo.
You can also use distortion to accentuate perspective, thus making your image immersive. You can give the viewer a feeling that the subject is reaching out of the image at them.
Sometimes you’ll want to fix lens distortion and straighten out all lines. But sometimes, even when shooting buildings, you may want to leave the distortion in the picture.
Get down low and shoot up at a large building – it will distort the image, but in doing so, it can increase the sense of scale.
Also, a fisheye lens is a great example of a lens that will always distort. And fisheye lenses are a lot of fun to use.
How Do You Fix Lens Distortions?
How do you fix a wide-angle distortion or pincushion distortion where your photo is warped in some way?
Thankfully, Adobe Lightroom, Photoshop, Exposure X6, Luminar Neo and various other popular image editors make distortion correction simple here in 2024.
Here’s how to fix image distortion using two of the most common post-processing apps:
Lens Distortion Correction with Lightroom

You can fix lens distortion with Lightroom really effectively. There are several options to allow you to do this, all within the Lens Corrections and Transform tabs.
First of all, you can try to load up the automatic profile corrections, which are based on the specific lens you are using.
This will automatically correct both distortion and vignetting caused by your lens – however, it’s certainly not a catch-all solution.
Sometimes you’ll need to attempt to correct the distortion manually, but it’s worth trying profile corrections first. To do this, go to the Lens Correction tab, then select Enable Profile Correction. From here, a drop-down list will appear – simply choose the lens you used for your photograph.
However, though this will correct some optical distortion, it will be based on the lens – not the image. So if you’re dealing with really visible optical distortion or perspective distortion, you will need to correct this manually.
More nuanced correction of distortion in Lightroom definitely takes a little more effort – but it’s well worth getting to grips with. These processes work in conjunction with the Enable Profile Correction option.
First, find the Transform tab. Here you will find all the options you need to correct and fine-tune lens distortion.
You can start off by trying the automatic options within the Transform tab.
Click on Auto – it will give you a good all-round lens distortion correction. There are other automatic options to try under the Transform tab; here’s a full list.
- Vertical – Rights vertical distortion in the image.
- Level – Corrects any horizontal distortions.
- Auto – Both vertical and horizontal distortions are corrected. Auto also attempts to bring a good balance to the image overall without the need for cropping or losing parts of it.
- Guided – This gives more control to you and lets you draw guides to correct perspective distortion.
- Full – Similar to Auto in that it corrects vertical and horizontal distortions, however, unlike Auto, it will correct more extreme distortions and may result in cropping.
If the distortion is not too prominent, one of these options can do the trick. But for anything more extreme, you’ll often find it won’t be enough.
To fine-tune your corrections of distortions, use the Transform sliders on the Transform tab. Use the Vertical sliders to correction the upright lines in your image – you can also adjust the Horizontal lines as well.
You can also Rotate the image with the relevant slider. As you adjust the Vertical slider, you may find you need to adjust the Horizontals, or even rotate as well. Small adjustments to one can mean an adjustment to another and vice versa until you are happy that you have corrected the distortion.
The more adjustments you make, the more likely it is that you’ll have to re-crop the photo.
Sometimes it’s clear when you’re photographing a subject that you will have to correct lens distortions in post-processing later.
So, if you’re photographing a building or structure that you know you will have to correct in post-processing, you may want to leave plenty of space around the structure to allow for cropping.
Lightroom has a tickbox marked ‘constrain crop’ in the Transform tab – if you tick this, it will automatically crop the image as needed and won’t leave white space around it.
There’s also a slider for Aspect which helps if the image starts to bulge, or is pinched in. In these cases, adjust the aspect to remove the pincushion distortion or barrel distortion as needed.
Lens Distortion Correction with Photoshop
Photoshop also does a really good job of correcting lens distortions. Like correcting lens distortions in Lightroom, it can seem complicated at first, but in time it’s easy to get to grips with.
Also just like Lightroom, you can use Photoshop to correct the type of distortion relevant to your photo – be that barrel distortion or pincushion distortion.
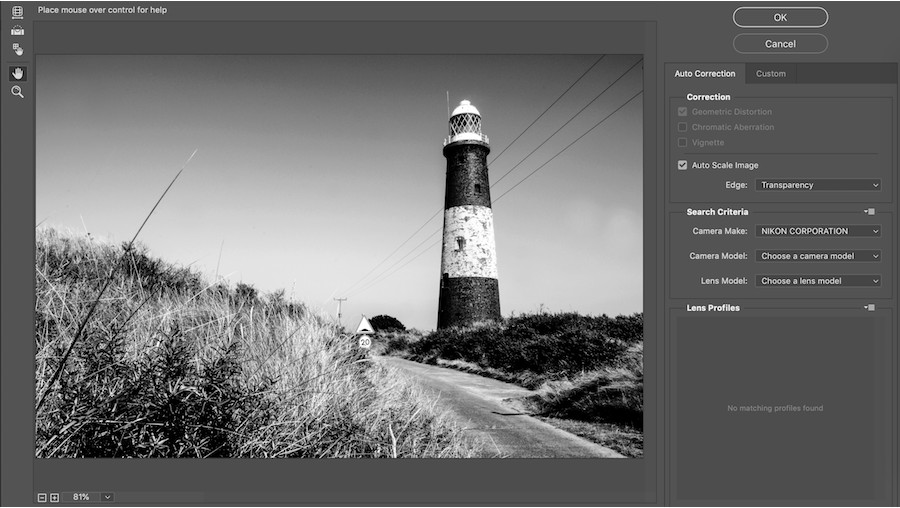
To start correcting lens distortion in Photoshop, go to Filter then select Lens Distortion. From here, you can first choose Auto-Correction and input your camera and lens information. However, just like Lightroom, sometimes the automatic options don’t work, in which case select Custom.
Under Custom, you can fine-tune your lens corrections. First, turn on the grid on the Custom tab by clicking Show Grid – this is on the bottom left of the image. The Grid will help you see if the lines in your photo are straight or not.
To define a straight horizon, use the Straighten Tool, to the left. Then you can use the sliders in the Transform tab to correct Vertical and Horizontal perspectives.
If you find your image bulging (as in Barrel Distortion) or pinching (as in Pincushion distortion), you can use the Remove Distortion slider. You’ll find that correcting lens distortions in Photoshop can be really powerful.
There isn’t a particular advantage to using either Photoshop or Lightroom; you can correct lens distortions with both and achieve similar excellent results.
Final Words
Whether your images are suffering from barrel and pincushion distortion, or you deliberately choose to work creatively with your field of view to exaggerate distortion in your image, I hope this guide has helped you understand the topic a little better.
As always, leave any questions or comments below, and happy shooting!

Check out these 8 essential tools to help you succeed as a professional photographer.
Includes limited-time discounts.


Patrick Mateer is an award-winning photographer who lives in Yorkshire, England with his wife (wedding photographer Hollie Mateer) and two children.


