


Adobe Lightroom Review – Still the Best Image Editor in 2024?
Is it worth subscribing to the Adobe Creative Cloud just to use Lightroom? Read this in-depth Lightroom Classic Review for an honest analysis.
Lightroom | Software | Software Reviews | By Mark Condon
This in-depth Lightroom review will help you decide whether the world’s most popular photo editing software is still worth paying for here in 2024.
It’s mainly a Lightroom review for beginners, amateurs and enthusiast photographers since I assume professionals are probably already using it!

Powerful, feature-rich and easy to use, with multi-device syncing and cloud storage for seamless editing, organisation and backups.
I’ve used Lightroom professionally for almost 10 years, and recommend it for photographers of all levels.
I upgraded from the last ‘standalone’ version of Lightroom 6 and now subscribe to the Adobe Lightroom Photography Plan.
Going from a ‘one-off’ purchase to a subscription is a big jump, especially if you don’t earn money via your photography.
This review will help you decide whether you need Adobe Lightroom Classic to edit and organise your photos.
What is Adobe Lightroom?

- Powerful non-destructive photo editing tools
- Incredible AI masking tool
- Powerful file management/cataloging system
- Simple syncronised editing
- Excellent cloud syncing/mobile workflow
- Excellent Lightroom Mobile App
- Powerful search tools
- Excellent camera & lens corrections
- Simple book, slide shows & gallery creation
- Great people/face recognition (Sensei)
- Broad plugin & preset support
- Wide support for new cameras
- Basic video editing
- Subscription payment
- Can be slow on under-powered computers
- File storage can be confusing for beginner
- Lightroom CC lacks features
Adobe Lightroom is a desktop-focused RAW image editor.
Commonly referred to simply as ‘Lightroom Classic’, it requires a subscription to the Adobe Creative Cloud Photography Plan – see my guide on how to buy Lightroom, and this comparison of Lightroom 6 vs CC to see why it’s best to upgrade to the latest version.
Lightroom Classic allows you to organise, edit, print and share your photos.
(There are also Map, Book, Slideshow and Web features, but the majority of your time in Lightroom will be spent editing images.)
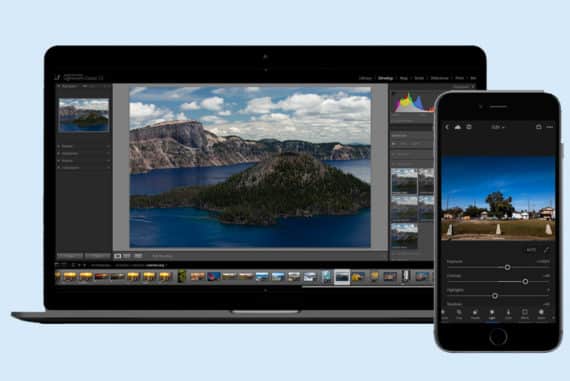
A Lightroom Classic subscription also gives you access to Lightroom (aka Lightroom CC or Lightroom Mobile), a web-based image editor.
There’s often confusion between Lightroom Classic vs Lightroom CC, since both apps reside on your desktop computer. The key difference is that the former stores images locally, and the latter in the cloud (i.e. online).
Both Lightroom CC and Classic have RAW image editing as their core functionality.
You can also edit JPG, DNG, TIFF, PSD, CMYK, PNG, video files, and since the Lightroom Classic 9.2 update, you can even edit enormous PSB files.
(Although a smaller feature, you can also edit videos in Lightroom mobile and the desktop app.)
Editing is performed via a range of sliders and buttons and is entirely non-destructive (i.e. you can return to any edited or unedited state of your original file at any time).
Many photographers like to use Lightroom Presets or Creative Profiles to speed up photo edits.
Lightroom Classic is simple to pick up but can take years to master – fortunately, there are many helpful Lightroom resources.
In recent months, Adobe has released various AI-powered feature updates that rely on Adobe Sensei to perform incredible tasks, including the ability to select subjects in one click (AI people selection), and then hone in on facial features.
System Requirements
You need a modern computer to get the most out of Lightroom Classic.
Minimum Windows Requirements
- Processor: Intel® or AMD processor with 64-bit support; 2 GHz or faster processor
- Operating system: Microsoft Windows 10 with 64-bit support (Version 1803 or later)
- RAM: 4 GB of RAM (8 GB recommended)
- Hard disk space: 2 GB of available hard-disk space for program installation
- Monitor resolution: 1024 x 768 display
- Graphics processor acceleration requirements: AMD: Radeon GPU with DirectX 12 support.
- Intel: Skylake or newer GPU with DirectX 12 support.
- NVIDIA: GPU with DirectX 12 support.
- 1 GB Video RAM (VRAM). 2 GB of dedicated VRAM (4 GB recommended) for large, high-resolution monitors, such as 4K- and 5K-resolution monitors.
Minimum Mac OS Requirements
- Processor: Multicore Intel processor with 64-bit support
- Operating system: macOS v10.13 or later
- RAM: 4 GB of RAM (8 GB recommended)
- Hard disk space: 2 GB of available hard-disk space
- Graphics processor acceleration requirements: AMD: macOS 10.13 or later with Metal support.
- Intel: macOS 10.13 or later with Metal support.
- NVIDIA: macOS 10.13 or later with Metal support.
- 1 GB Video RAM (VRAM). 2 GB of dedicated VRAM (4 GB recommended) for large, high-resolution monitors, such as 4K- and 5K-resolution monitors.
You install and update Lightroom through the Creative Cloud utility that sits in your Taskbar, with the install taking up nearly 2GB of drive space.
There are various tricks to make Lightroom faster, but in general, it’s advisable to have plenty of RAM, a modern GPU and an SSD or fast HDD.
Importing Photos into Lightroom Classic

Getting images into Lightroom Classic involves the Import module.
After installing Adobe Lightroom Classic, the next step is getting your photos into the Library module for organization and initial proofing.
Lightroom imports photos into a Catalog, which establishes a link between the Catalog and the physical file. The Catalog can be stored separately to your image files.
This means you can store your images on external hard drives, and even wirelessly on a Network Attached Storage (NAS), and access them from anywhere.
At import, you can choose to Copy, Copy as DNG (Adobe’s own RAW file format), Move or Add your images, depending on how you plan to store them.
You can create Previews of various sizes during import, which helps speed up subsequent viewing/editing within Lightroom. You should also build Smart Previews.
Smart Previews are a huge advantage of Adobe Lightroom Classic, allowing you to edit images that are not physically connected to your computer. They’re a lightweight, smaller, file format, based on the lossy DNG file format.
If you’re using an older computer which struggles to process large image files, the lighter, smaller Smart Previews allow much faster editing in Adobe Lightroom Classic, while still retaining the malleability of the original RAW file.
You can also choose to Ignore Duplicates, Add to a Collection (a kind of virtual folder), Make a Second Copy to another location, add Keywords and Meta Data, and add Develop Settings, aka Presets.
Lightroom Presets are a popular way of saving time during the photo editing process, by applying certain ‘looks’ to images – whether ones you’ve created yourself or have acquired elsewhere (e.g.here are some free Lightroom presets).
Applying Presets at the import stage is simple and enormously efficient, especially when editing large quantities of images.
Another more advanced way to get photos into Lightroom is by Tethering, with images transferred directly to the screen of a computer or tablet.
Organising Photos in Lightroom Classic
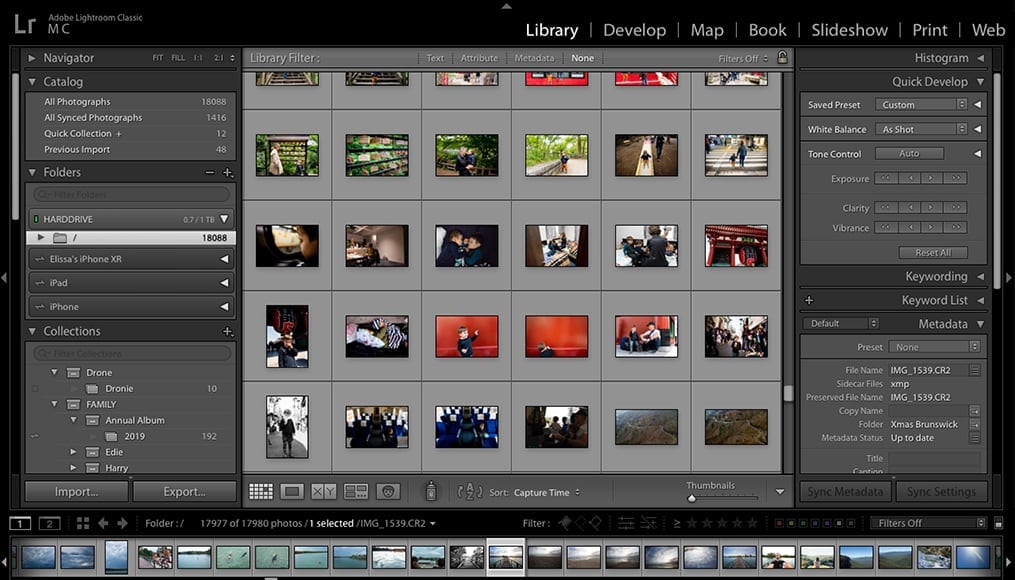
The Library module offers several ways to organise and filter your photos.
Photos imported into Lightroom Classic can be found in up to 3 locations – Catalog, Folders and Collections, all of which reside in a panel on the left of the Library Module.
The Catalog shows every photo that exists in Lightroom as well as various filtered views.
Folders show your computer’s folder hierarchy, based on any images that have been imported.
Collections are like virtual folders, which allow you to create groups of images without affecting their actual location on your computer’s hard drive.
Smart Collections in Adobe Lightroom Classic obey various ‘rules’, automatically organising your photos based on star ratings, colours, or other criteria. These can be a useful way to group your images, particularly when culling (i.e. selecting what to keep and what to delete).
Anything deleted from a Collection remains inside your Lightroom Catalog.
Anything deleted from your Catalog will be deleted from either your Catalog only, or from your Catalog and your hard drive.
It certainly takes some getting used to but it’s a logical way to handle large volumes of photos, especially if files are scattered across your internal and external hard drives.
It’s also important to note that once your image files are ‘referenced’ in Lightroom’s catalog, you need to make all changes to their location within Lr – any changes you make outside it (i.e. on your harddrive), will disassociate the file’s location, and lead to various problems.
One of the biggest advantages of the Collections in the Library module is the ability to sync them with Lightroom Mobile (i.e. the web-based application) and all your smart devices, just by clicking a tiny bi-directional arrow icon next to your Collection.
Synced Collections become like a ‘watched folder’, automatically updating with any photos you add or remove, or any edits you make on the original computer, or any of your devices – this wireless workflow can be hugely liberating and fun.
The free iOS/Android Lightroom CC app and Photoshop for mobile are powerful and well-implemented ways of editing and organsing your photos on the go.
I deliberately haven’t spoken about the web-based version of Lightroom (aka Lightroom CC) in this Lightroom review, for risk of introducing more confusion – it’s crazy that Adobe has named their software so similarly!
It’s also confusing that both versions of Lightroom reside on your desktop, despite one of them being a web app, and each of them having their own catalogs – one stored locally (i.e. on your computer), and the other, online (i.e. in the Adobe Creative Cloud).
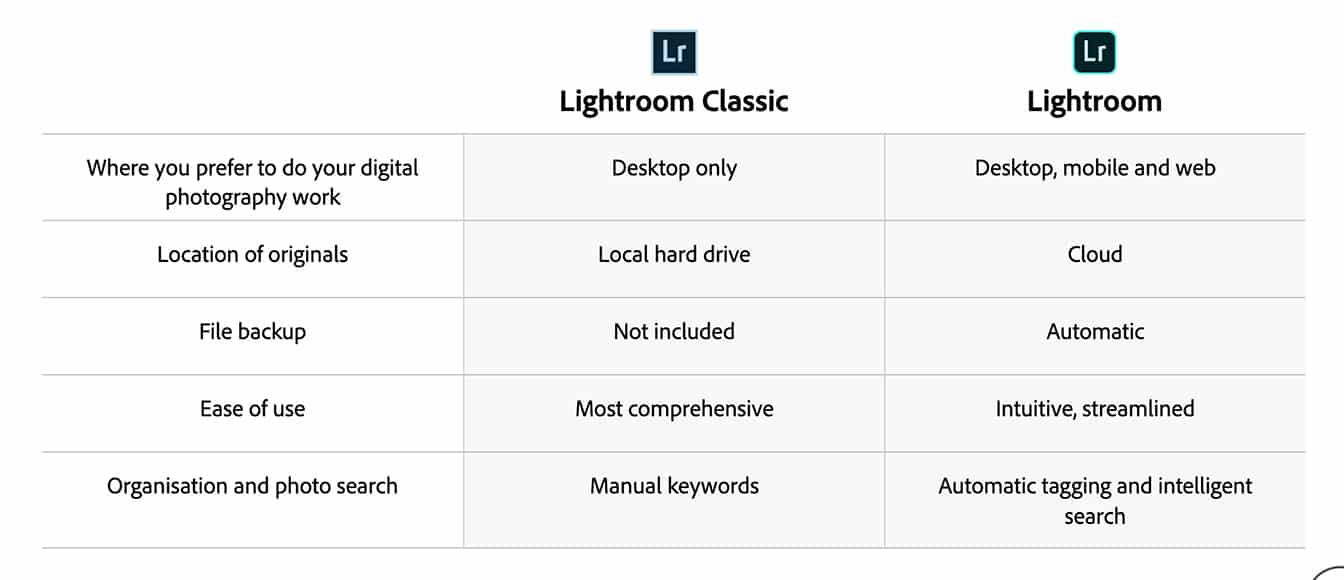
The differences between the two applications are subtle but important.
Despite the baffling naming convention, the integration of the Lightroom Classic and Lightroom CC is seamless and allows you to easily create online galleries for friends or clients to view and interact with.
The Library module is the quickest way to view larger versions of each image thumbnail. Used in conjunction with Smart Previews, viewing is lightning fast, even with thousands of images.
You can filter your images using various criteria, including flags, ratings, colour labels, EXIF data (ISO, Shutter Speed, Aperture, etc) and even what camera or lens was used to take the photo.
You can also add keywords and sort them into commonly used lists.
Keywording photos is a powerful feature but is obviously only effective if you take the time to do it yourself. Done correctly, it’ll allow you to find that needle in a haystack…
You’re able to perform minor edits to photos in the Library module via a Quick Develop panel, using Saved Presets, White Balance, Tone Control, Exposure, Clarity and Vibrance.
This can be useful if you need to add the same batch edit to multiple photos, but the Develop module provides much finer editing control.
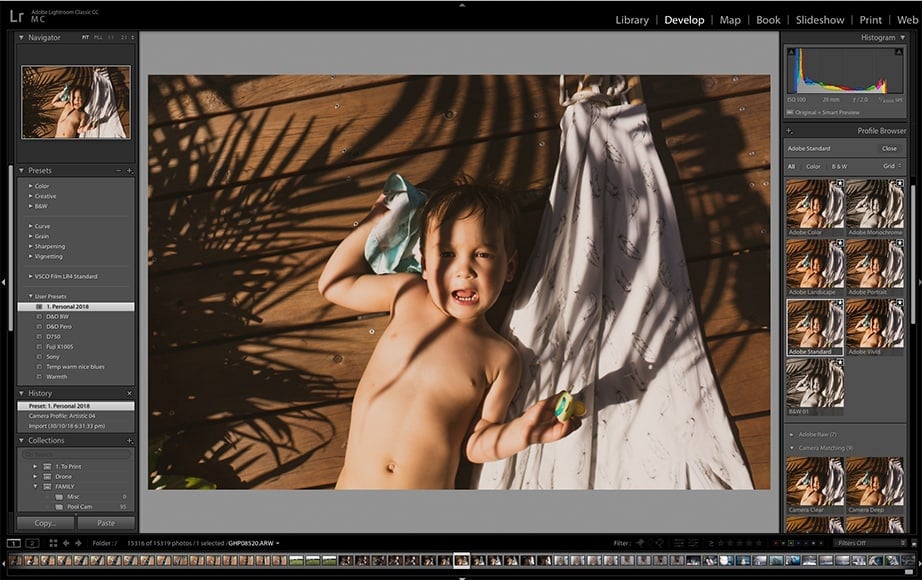
Developing Photos in Lightroom Classic
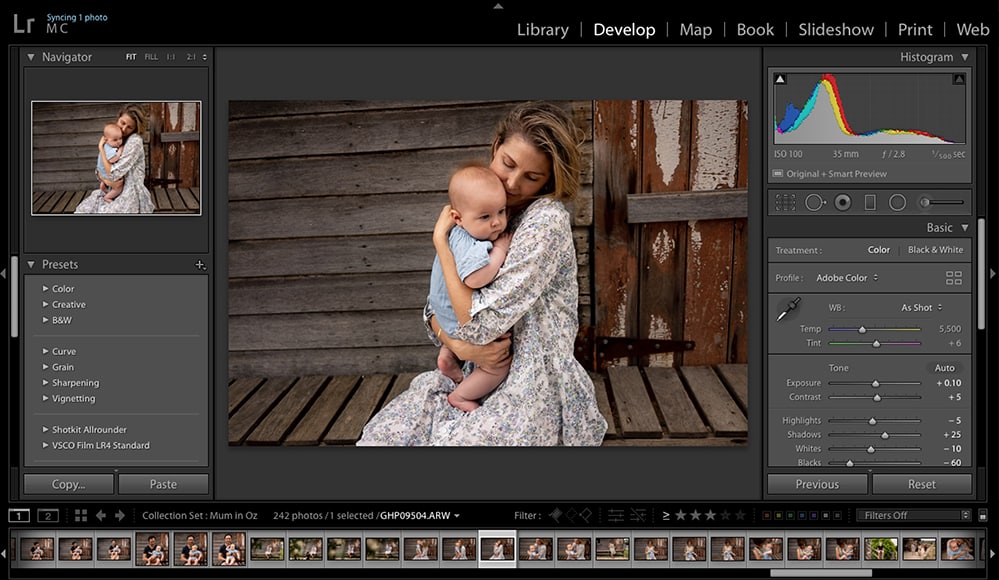
The Develop module offers a range of powerful editing tools.
Lightroom Classic offers a suite of editing tools in its Develop module, which can squeeze every last bit of data from your camera RAW files.
You can use the tools to edit JPEGs or any of the aforementioned file types, but it’s in the editing of camera RAW files where you’ll see the most difference in your images.
At the time of writing this Lightroom review, the Basic Editing Tools in the Lightroom interface include:
- Treatment – color or black and white
- Profile – Adobe RAW profiles: Color, Monochrome, Portrait, Landscape, Neutral & Vivid
- Profile Browser – one-click Creative Profiles to give your photos a ‘look’
- White Balance – colour temperature
- Exposure – overall brightness
- Contrast – the contrast between darks and lights
- Highlights – bring out or reduce bright areas
- Shadows – darken or lighten shadow areas
- Whites – adjust the brightness of whites
- Blacks – adjust the darkness of blacks
- Texture – smooth or enhance textures without losing finer details
- Clarity – enhance the mid-tones to increase texture and sharpness
- Dehaze – enhance or remove the hazy effect created by sun or fog
- Vibrance – adjust the brightness of colours
- Saturation – increase or decrease colour saturation
Dehaze and Texture were introduced in recent Lightroom updates, and are powerful tools that don’t exist in other image editors.
Adobe is clearly invested in developing and launching powerful new features to anyone subscribed to one of its Creative Cloud Plans – see all the options here.
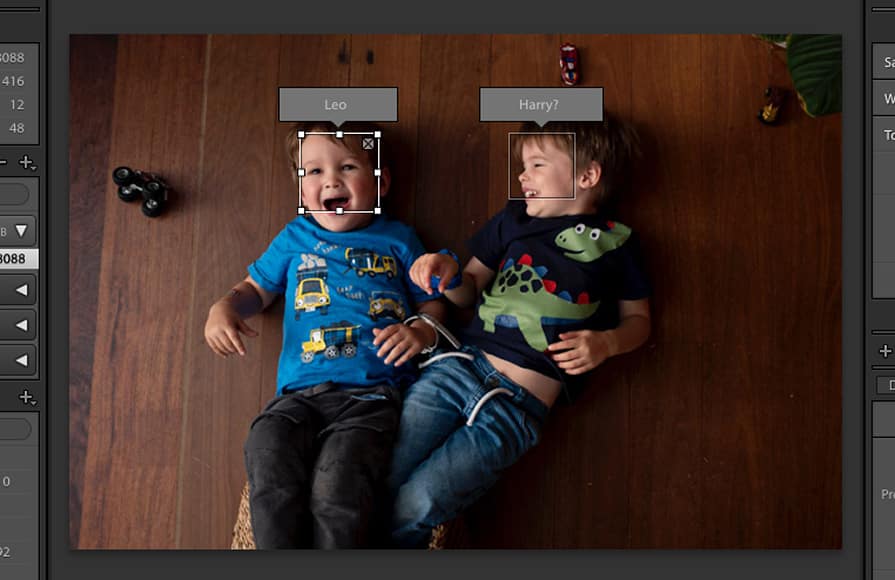
Face recognition in People view is useful for finding and organising photos.
If you’re just getting started with editing RAW images, you’ll spend most of the time in the Basic panel, where sliding the sliders will bring immediate changes to your photos.
While not as powerful as its main competitor Capture One, Lightroom’s RAW conversions are definitely still good enough for the majority of photographers, both amateur and professional.
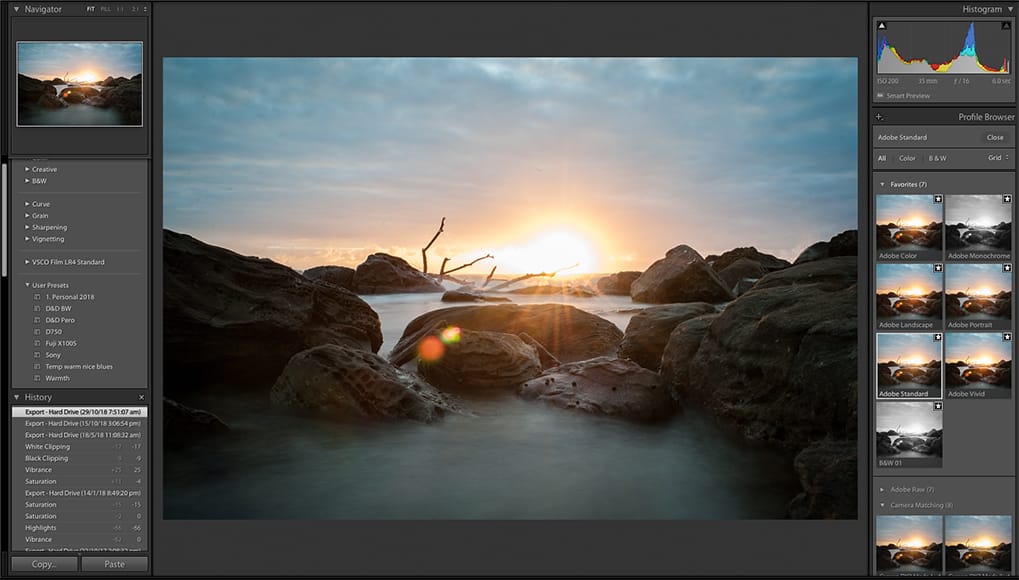
A lot of learning how to use Lightroom comes about from experimenting, and fortunately this is made easy and ‘safe’ – all edits are reversible, using the Undo function, or via the handy History panel which allows you to pinpoint a past edit.
In addition, you can create Virtual Copies of any image, which allows you to experiment with editing to your heart’s content, then create multiple versions of the same image.
The key with Virtual Copies is that your original image file is not affected – you’re simply creating virtual ‘replicas’ of the image, solely in Lightroom – this is enormously useful and allows you to easily compare multiple edits.
Moving down the panels on the right side of the Develop module, we have:
- Tone Curve – increase or decrease contrast and brightness
- HSL/Color – adjust the Hue, Saturation and Luminance of all the various colours
- Split Toning – add different colour tints to shadows and highlights
- Detail – add sharpness and reduce noise to bring out finer details
- Lens Corrections – automatically fix lens issues like distortion, chromatic aberration and vignetting
- Transform – adjust perspectives, straighten horizons
- Effects – add vignetting and film grain effects
- Calibration – fine-tune the colour profile that’s calibrated to your camera
On the left side of the Develop module, you can access your Presets, History and Collections.
(You can easily learn how to use Lightroom presets, including how to edit and create your own.)
Above the Basic panel live the Selective Editing Tools, allowing you to make more precise edits to specific areas of your photos.
- Crop – straighten and crop your image
- Spot Removal – remove small unwanted details (e.g. blemishes on skin)
- Red Eye Correction – automatically correct red eye
- Graduated Filter – digitally apply the effect of a graduated neutral density filter
- Radial Filter – apply local adjustments to a specific, circular area
- Adjustment/Healing Brush – apply local adjustments by painting them onto specific areas
There’s also a histogram, which allows you to make direct adjustments to shadows, exposure and highlights. It’s a great way to understand how a camera histogram works.
Each of the Develop module editing tools are powerful and useful in specific situations.
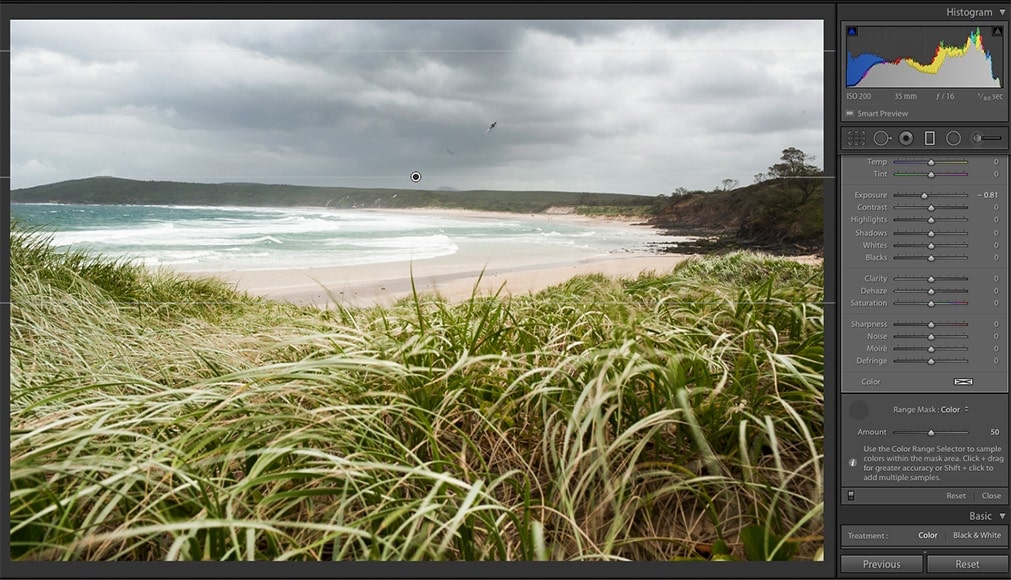
The useful Range Mask tool was introduced in a Lightroom Classic update.
As a professional wedding photographer, I find myself using less than 50% of the editing tools while editing an entire wedding.
Most amateur photographers will only access a fraction of the editing tools, but it’s nice to know everything’s there when it comes time to experiment further.
A typical editing workflow could involve the following:
- Import photos with a develop preset to get a ‘head-start’ on the editing process
- Cull images in the Library module using a star or colour rating
- Separate ‘keepers’ into a Collection
- View each image in the Develop module, and adjust exposure etc
- Export images using an export preset
All tools can be accessed quickly using Lightroom keyboard shortcuts, and changes made to photos are for the most part instantaneous.
There’s also a handy ‘Edit In’ feature, where ‘higher-level’ editing changes can be made using external editors you own, such as Adobe Photoshop, Skylum Luminar, Topaz Studio, and most other 3rd party apps.
One of the most powerful features of the Develop module is the ability to make batch edits, using the Copy/Paste or Previous buttons.
Batch editing in Lightroom can be a huge time-saver, particularly f you’ve shot the same scene in similar lighting conditions, allowing you to make the same edit to multiple images at once.
Batch editing isn’t currently available in Lightroom (CC) or the Lightroom Mobile App – instead, you can only copy/paste your edits onto another photo.
There’s also a handy (if somewhat hidden) Match Total Exposures feature, which references the first photo in a sequence and adjusts any subsequent photos to match the overall brightness.
This is typical of most photo editing software available in 2024 – aside from the core tools, there are a multitude of other useful features hidden away in menus for you to discover while experimenting.
Depending on the speed of your computer and how you have Lightroom set up, some lagging is noticeable in the Develop module, particularly on images that require numerous edits.
The editing history of every photo is stored in an Lr database file, which is accessed each time a new photo is loaded to develop. The more edits a photo has, the slower this can become.
Using Smart Previews can alleviate speed bumps to some extent, but it’s important to keep your workflow efficient to really maximise your computer’s available resources to operate Lightroom efficiently.
Image editing using the Develop module in Lightroom Classic is, on the whole, a smooth, intuitive and enjoyable process.
Using the various photo editing tools allows you to extract and manipulate the existing data in your RAW images, with various time-saving features accessible to all level of user.
Exporting Photos from Lightroom Classic
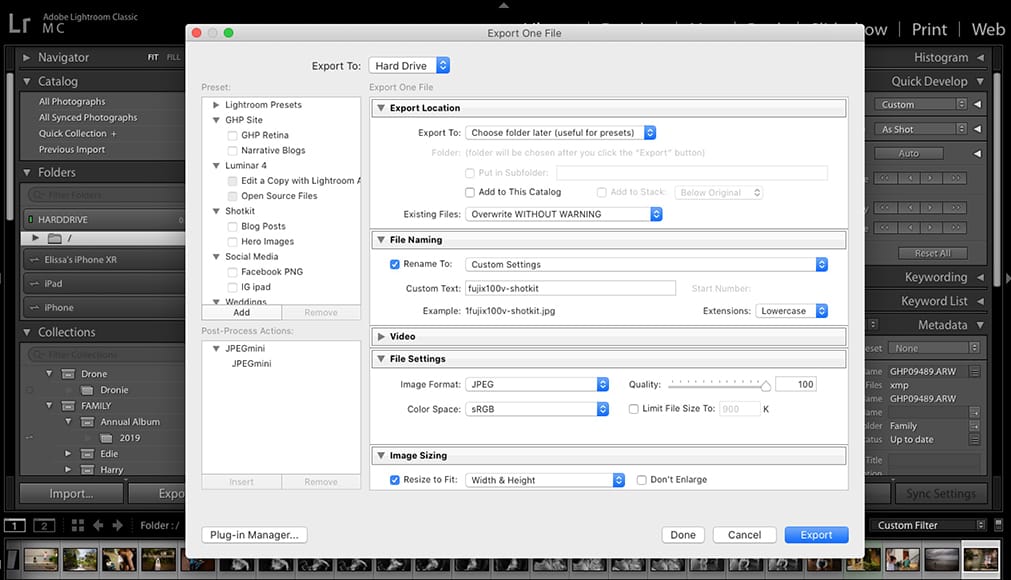
The Export module allows you to customise multiple useful export presets.
The newly designed Lightroom Classic Export module allows you to get your edited images out of Lr and onto your hard drive(s), social media, online galleries, and various other customiseable locations.
Options include:
- Export Location – select where to save your files
- File Naming – choose how your files will be named
- Video – choose whether to include video files in your export and select the video format and quality
- File Settings – select desired image format, compression and colour profiles
- Image Sizing – set image resolution and choose whether to resize your images on export
- Output Sharpening – apply sharpening effects
- Metadata – select whether or not to include metadata in your images
- Watermarking – apply a pre-saved watermark
- Post-Processing – choose whether to open your images in another application (e.g. Photoshop) after export
Being able to apply final adjustments to your images in one automated swoop is a huge time-saver.
In addition, Creating Export Presets allows you to save commonly used export settings, for further workflow efficiency.
With a recent update, you’re even able to export photos using multiple Export Presets simultaneously.
An example usage would include the resizing, sharpening, watermarking, then converting of your images to PNG, for optimal sharing on Facebook.
In combination with the powerful Post-Processing option, you’re able to choose an action to perform after export, such as opening the files in an external editor or application, like an email client or DropBox folder.
All in all, the Export module is an efficient and well-implemented way of getting your edited photos out of Adobe Lightroom Classic.
Other features of Lightroom Classic
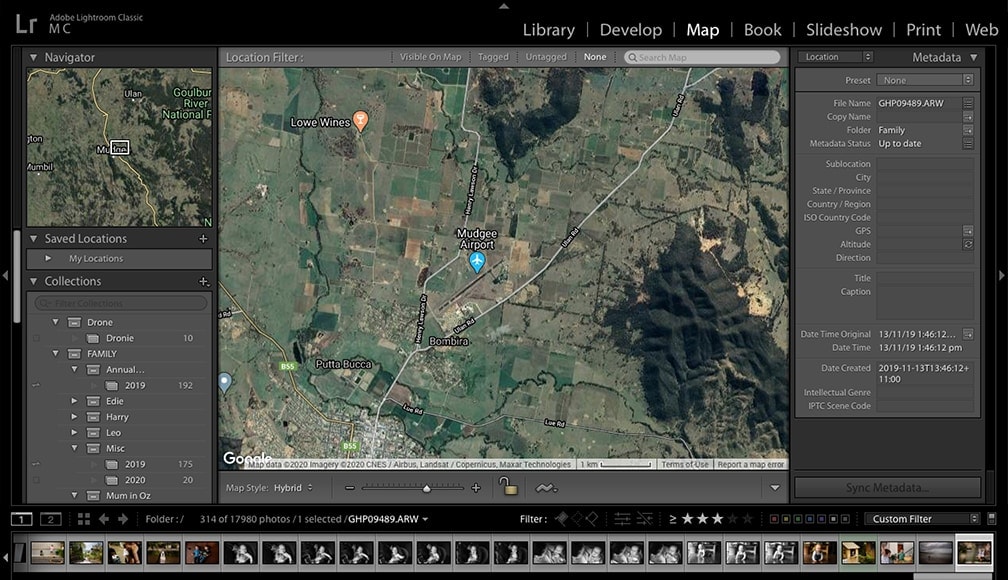
The Map module is a fun way of seeing where your photos were taken.
Most photographers spend their time editing and organising photos in the Library and Develop modules of Adobe Lightroom Classic.
Indeed, there are other useful features ‘hidden’ within the various menus, such as a powerful Photo Merge tool, allowing you to create panoramas and HDR photos in Lightroom.
You can even add plugins to Lightroom, to further expand its capabilities.
In addition to the code Library and Develop modules, there are 5 other modules that deserve a few words:
- Map – organise and view your photos by location using GPD data plotted onto a map
- Book – create a photo book or magazine layout
- Slideshow – create a slideshow with photos, text and transition effects
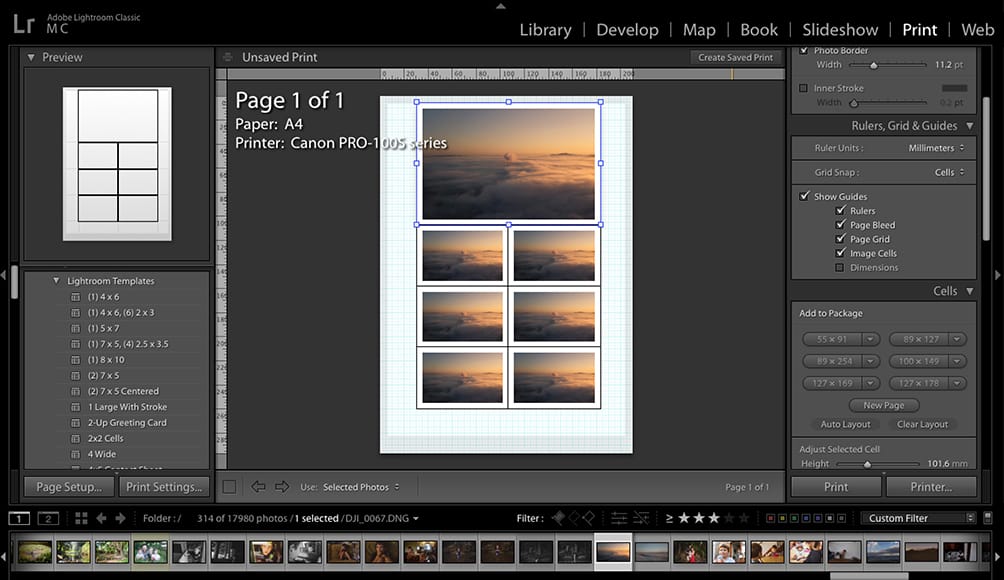
- Print – specify the page layout and print options for photos and contact sheets
- Web – create a website layout from your photos
Each of these functions can be useful depending on your needs.
Personally, I enjoy the occasional glance at the Map module, which uses embedded GPS data from photos to plot their location on an embedded Google Map.
If you do a lot of smartphone photography, this can be a fun way of reviewing your images.
The Print module is also particularly convenient, when you want to create custom photo collage layouts (tutorial), with most standard professional paper stock and sizes supported.
Lightroom Review – Ease of Use
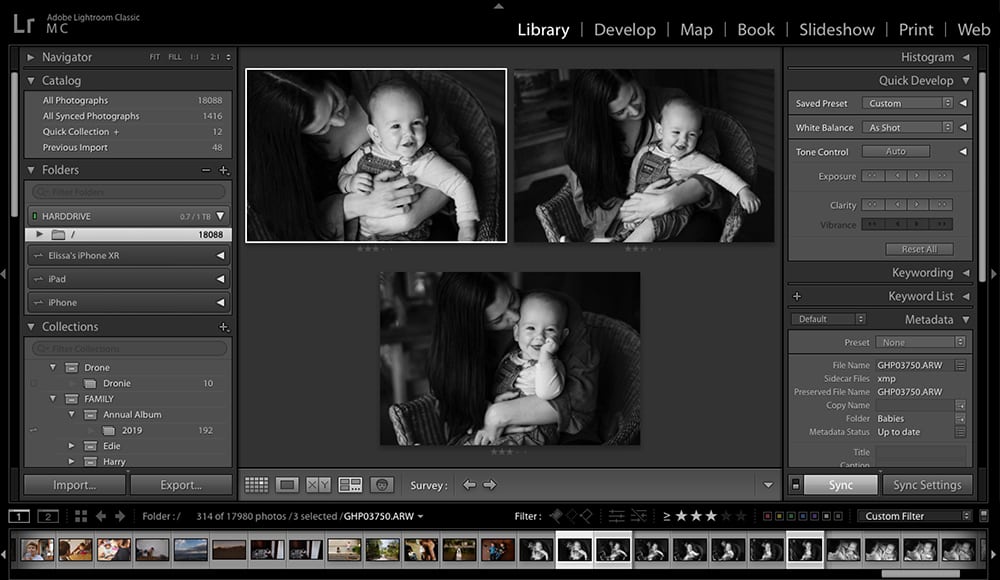
Survey view is one of several ways that Lightroom Classic makes choosing between photos simple and efficient.
Some new users of Adobe Lightroom may be confused initially about the difference between the desktop-focused application (aka ‘Classic’), and the web-focused application (simply called Lightroom).
The import process can also cause some head-scratching, with the difference between Copy, Move and Add not being immediately obvious.
The notion of having to add each and every photo (that you wish to edit) into Lightroom via the Import module, may also be new to some.
Aside from this, the basic editing and organising of images using either version of Lightroom is mostly intuitive, simple and fun.
Local adjustment tools and more advanced options do have a learning curve, but thanks to the age and popularity of the software, everything is well documented online.
The WYSIWYG Lightroom interface provides instant visual feedback of any image adjustments, with everything reversible, and the original file left intact (aka lossless editing).
Beginners should be able to dive right in, and the various options and intricacies provide more advanced users with years of creative experimentation.
Performance
Performance depends heavily on your computer hardware and Lr settings.
One occasional complaint from professional photographers who rely on Adobe Lightroom Classic to organise, edit and deliver photos to clients, is sluggish performance.
As with all software, slow performance can be attributed to several factors, most of which have nothing to do with the software itself.
A modern computer with plenty of RAM and preferably a SSD and will serve you best when running Lightroom, especially when editing large files. However, even with the fastest computer set up, there are still some operations that hit a speed bump.
In general, importing large numbers of images to your Lr Catalog is rather slow, especially if you’re creating Previews and applying Develop Presets.
(Wedding and event photographers who need to import thousands of images know that it’s better to leave the process running overnight, rather than sit around and wait!)
It’s also difficult to start culling and editing images before the entire import process has finished. Many pros choose a standalone software like Photo Mechanic to import photos for this very reason.
Exporting images is a processor-intensive process, with performance improving on computers with multiple cores.
(Exporting images on my 2015 3.1 GHz Dual-Core Intel Core i7 16Gb MacBook Pro leaves other applications unresponsive to use.)
Some users may also experience lags when switching between the various modules in Lightroom Classic, although this can depend on the number of images in your catalog.
On the whole, with your computer and the application set up properly, performance is good enough.
Using Smart Previews makes things much quicker, and every Adobe update brings about overall performance boosts.
Value for Money
Lightroom Classic is packed full of useful features that make it great value for money.
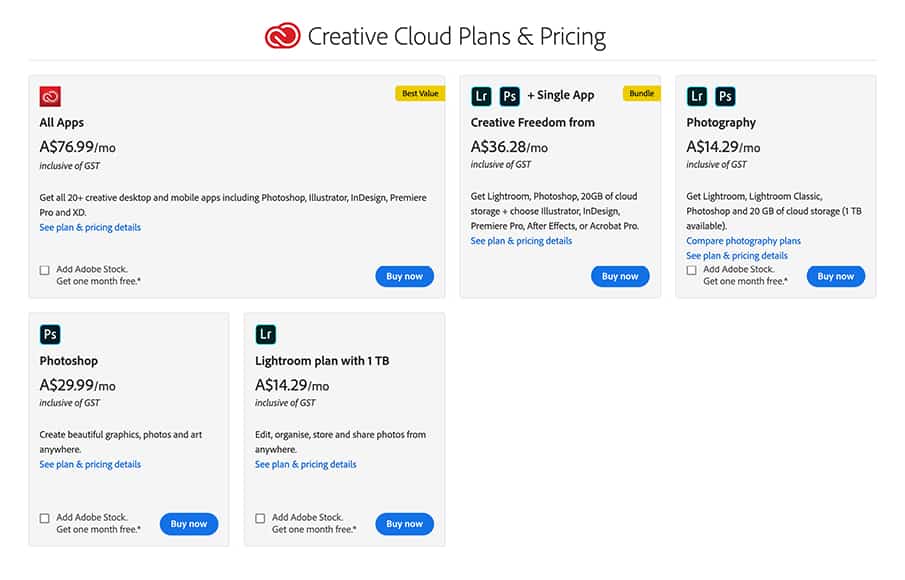
The pricing and packages of Lightroom Classic change frequently, so it’s best to check here for the latest subscription fees.
(You can also check for special discounts here, and if you’re a student or teacher, there’s a nice discount here.)
There are plenty of alternatives to Lightroom that offer a competing suite of photo editing tools for a one-time payment.
The Adobe Creative Cloud subscription model is a bitter pill to swallow for some photographers, especially since Lightroom 6 was available for a one-time payment.
However, Lightroom Classic offers a lot of additional features and speed improvements over its predecessor.
It contains 7 powerful modules, with each one packed full of useful functions for everyone from beginners through to pros.
I’ve only really introduced 2 of them in this review (Library and Develop), but each of the others deserves much deeper investigation – the Print module shown above, for example, is an intuitive way to print out custom layouts and photo collages.
Then of course, there’s the excellent device-syncing functionality of Lightroom Classic/Lightroom Mobile, which is reason enough for many photographers to pay the subscription fee.
Syncing and backing up your photos over via the Adobe Creative Cloud/Lightroom CC is truly liberating, and being able to edit photos on your tablet or smartphone is a real game-changer for many photographers.
While the Lightroom Mobile/Photoshop Mobile apps are available for free, there are several useful features that are only available when you subscribe to one of the Lightroom Photography Plans – the most notable of which is the ability to sync everything back to your desktop computer via Lightroom.
If you subscribe to the Photography Plan, you’ll also be able to use Adobe Photoshop 2020, the world’s most popular image editing and photo retouching software.
(If you’re confused as to the difference between these two tools, check out our Photoshop vs Lightroom guide.)
In addition, Adobe ensures that every new camera model will be supported by their editing tools, as long as you’re a subscriber.
This means that if you buy a new camera after October 2017 and are still using an older version of Lr, you won’t be able to edit its photos.
Choosing a Plan which includes Photoshop and online storage space for multi-device syncing is recommended.
The Adobe Lightroom suite of tools is unrivalled in 2024 and is useful and enjoyable for all level of photographer.
For professional photographers, paying each month for an Adobe Lightroom subscription is just a cost of doing business, and most of us are happy to do so.
For non-pros and beginners, you really need to ask yourself how useful the above features are to your post-production workflow.
How much do you value your time spent making your photos look good?
How useful is it to have an online cloud storage backup of your raw files and JPEGs, and the ability to easily share images in private galleries?
How important is it to be able to edit and sync your images using your smartphone or tablet?
Only you can decide, but I hope this Lightroom review has made the decision easier for you.
Frequently Asked Questions
- Is Adobe Lightroom CC worth it?
If you’re a professional photographer, yes, definitely. If not, you need to decide whether you need advanced RAW editing tools, multi-device photo syncing, cloud storage/backup, and several other useful features.
- Which is better Lightroom or Lightroom Classic?
Lr Classic is a more fully-featured application, but lacks all the cloud storage features of Lr. If you require cross-device editing, they are best used in conjunction with each other.
- Which is better Photoshop or Lightroom?
They are both excellent applications, used for different requirements. Lr offers a better workflow and organisation tools, whereas Ps is for more advanced editing and retouching.
- Which version of Lightroom is best?
The latest version of Adobe Lightroom Classic is the most fully-featured desktop editing software, supporting RAW and JPG images from all modern cameras.
Final Recommendations
I subscribe to the Adobe Lightroom Photography Plan (with 1TB cloud storage) and highly recommend you consider doing the same.
Despite the subscription fee, I believe that the advantages of using Adobe’s cloud-synced platform, in conjunction with Lightroom’s range of powerful adjustment tools for photo editing and organisation, are second to none.
Thanks to regular updates, the software keeps getting better and better, and new cameras continue to be supported.
The Lightroom interface is logical and invites experimentation – a perfect environment for beginners to get the most out of every image.
Are you an existing Lr user? How are you finding the experience?
Powerful, feature-rich and easy to use, with multi-device syncing and cloud storage for seamless editing, organisation and backups.


Mark Condon is a British wedding photographer and editor of Shotkit. When he’s not taking photos or reviewing the latest camera gear and software, Mark can be found cycling around the northern rivers.


