


Loupedeck Review – Photo Editing Console & Keyboard for Lightroom
Check out this LoupeDeck+ Review to see if this unique gadget can shave valuable time off your photo & video editing workflow. (Real world usage.)
Loupedeck creates controller devices for Adobe Lightroom, Photoshop, and a bunch of other photography and video apps.
These devices allow you to drive those applications with physical, tactile buttons, dials and sliders rather than having to use your mouse to move those sometimes fiddly controls on the app’s user interface (UI).

Edit photos quickly and easily with this intuitive console for all major photo editing programs.
If you’ve ever recorded music, you’ll be familiar with the idea of a dedicated controller – it’s all about giving a more organic link between you and the creative process.
It’s a tempting lure of an improved, more efficient workflow – where you are ‘at one’ with your images and not at the RSI clinic though 10 hour editing sessions with your mouse…
Loupedeck devices certainly add a bit of tech-coolness to your editing setup. But let’s dig a bit deeper and see how those benefits stack up in use.
What is Loupedeck+
- Build Quality (compared to the original Loupedeck)
- Configuration possibilities for efficient and accurate editing
- Price
- Occasional need to re-start the Loupedeck software
- Very fast use can confuse Lightroom
The ‘+’ in Loupedeck+ refers to the latest version of the device, updated and improved from the original Loupedeck.
I have owned both devices and so will refer to these improvements, but fundamentally, in terms of use, benefits and usability, they are very similar and so much of this review applies to the original version also.
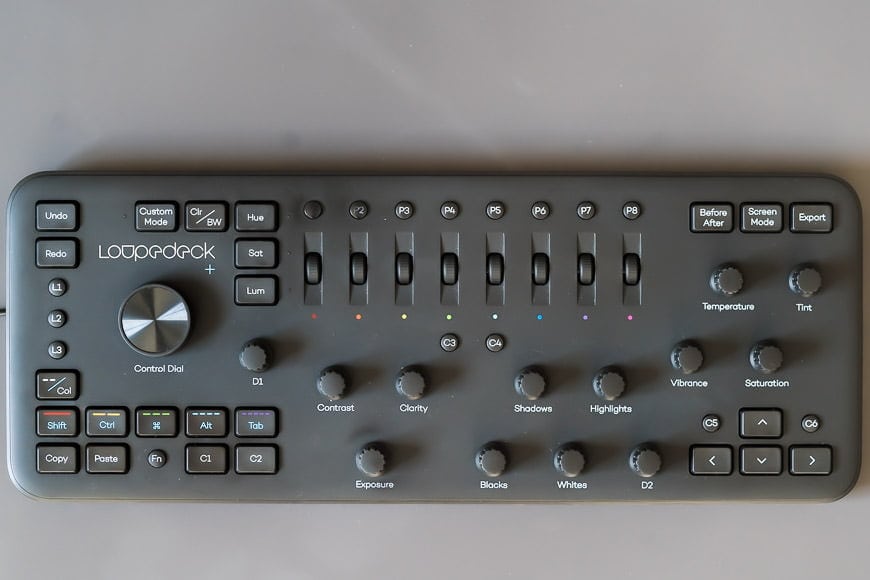
Once connected to your machine, the Loupedeck+ is extremely intuitive to use. Each physical control on the device is designed to control the equivalent parameter in Lightroom.
For example, controls for Exposure, Contrast, HSL, Colour Flags all link directly to the app as you would expect.
The device and Lightroom connect using the Adobe API (Application Control Interface), which is what all software has to allow it to be connected to other things in the system.
In this case, the API allows signals to be sent from the Loupedeck+ to Lightroom, and the user-interface and image is adjusted in real time as you twiddle the knobs (yes, I said ‘knobs’, let’s get the giggling out the way now).
Features

There is a long list of Apps that the Loupedeck+ supports (on either Windows or Mac):
- Lightroom Classic 7.4 or later
- Lightroom 6
- Photoshop CC 20.0 or later with Camera Raw
- Premiere Pro 2018 or 2019
- Final Cut Pro X 10.4.5 or later
- Capture One Pro 11 or later – Beta
- Audition 2019
- After Effects 2019
- Skylum Aurora HDR 2018 (1.2)
While this list is impressive, I think the ordering is important. The device is clearly designed with Lightroom Classic in mind, with each physical control paired with the equivalent Lightroom setting.
The further you progress down this list, then the larger the number of controls that don’t map and this means it won’t be as intuitive.
For example, Final Cut Pro has no colour flags, so those buttons (and very many others) will be mapped to other functions.
Not the end of the world, but to user those apps, it will take longer to get up and running and you will presumably need a crib-sheet for a while.
But either way, Lightroom is what it was designed for and that’s what I use it for. In my opinion that’s what it does best with other apps being in the ‘nice to have’ category. I don’t think you would buy this to control After Effects alone.
Installation & Build
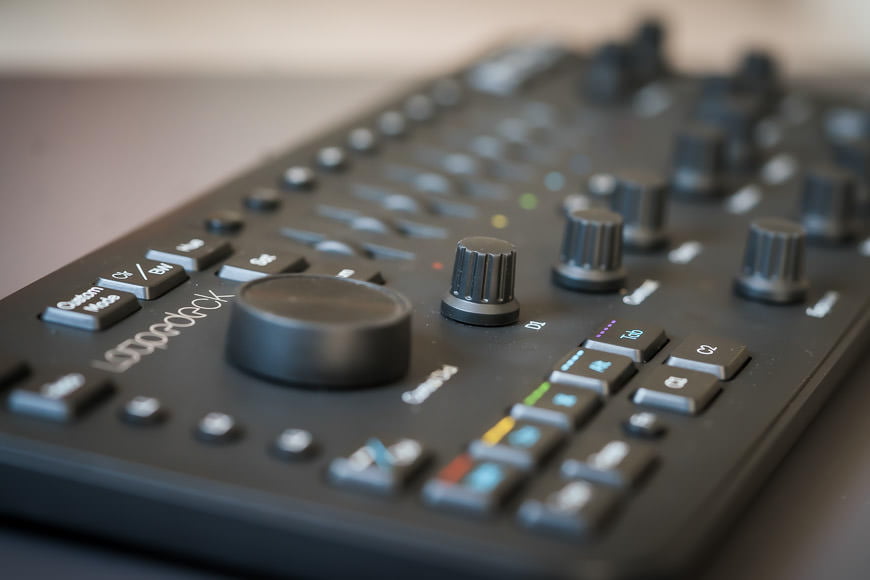
A welcome update for Loupedeck+ is a significant hike in build quality compared to the original; higher quality materials, finishing and generally a big physical improvement.
It looks sleek and is tactile to the touch and much less ‘plastic-ey’ than before.
The older version suffered from infuriatingly sticky keys, but no such problems on this update. Much finer finish all round.
The controls move quite smoothly and have a generally high quality to them. For anyone that has used a music mixing desk, they may initially be disappointed, but for the price of this unit I feel the quality is very good.
There is very little to do other than plug in the USB, which is the large USB-A type so you’ll need a cheap converter for your MacBook Pro.
The other thing you need to do is launch the Loupedeck Software. This runs in the background and gives you a little icon on the status bar to show you it’s running, which is also how you access ‘Setup’.
Configuration
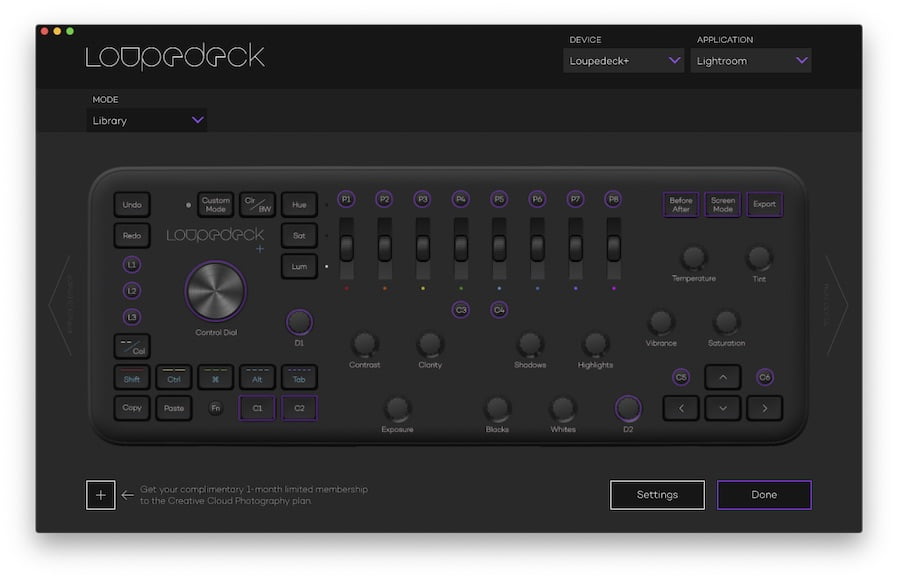
‘Setup’ is where you tell the system which app you want it to control. When you select Lightroom Classic, you get a little welcome message in Lightroom and then your controller is active.
If you do not customise anything, that’s it, you’re done.
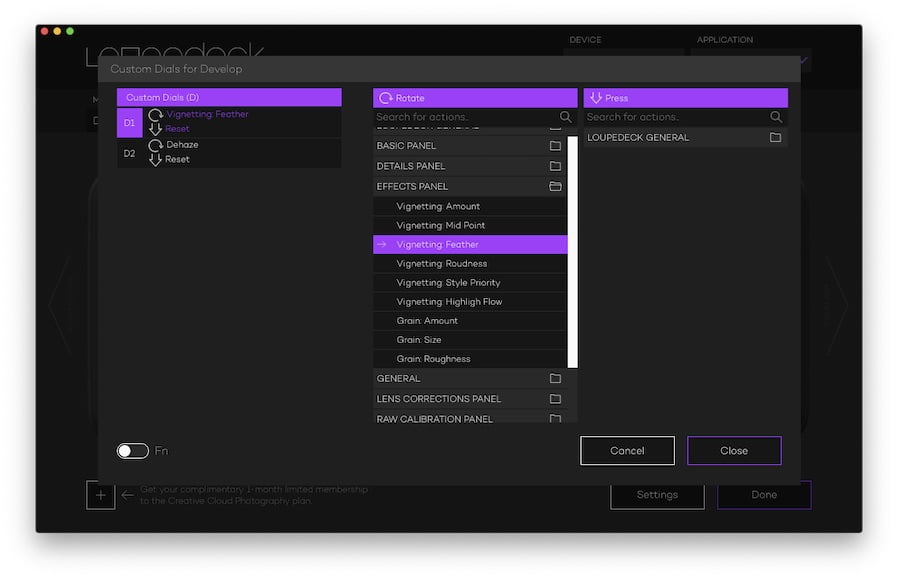
The Key to Success: Customising Controls
Using the device ‘out the box’ is fine, however you can greatly improve your experience by customising the controller, and so I strongly recommend going back into ‘Setup’ and customising a few things.
These customisable physical controls (19 in total, double if you add in the Fn Key) are much more abundant in Loupedeck+ than that original device and this is one of the very welcome improvements.
The success of using the Loupedeck+ (from a time-saving point of view) is dependent on minimising the times you need to go back to your mouse, so a good configuration could be make or break for you.
Sure, changing the vignette amount might only take 10 seconds in the Lightroom App. But if that feature is mapped to a dial that you can adjust in 2 seconds then, over the course of 500 images, you’ve just saved over an hour on your edit. By that feature alone!
The good news is that configuration is intuitive and easy. On the on-screen graphic of the device, by clicking one of the purple controls (coloured to indicate they can be changed) you simply select from lists of Lightroom functionality that you want that control to connect to.
If you use Dehaze, then click configurable dial D1 and select ‘Dehaze’. That’s its now Dehaze will change when you move that dial.
Controls & Layout
Most of the commonly changed parameters in Lightroom have their own control on Loupedeck+.
Anything that needs finer control with a mouse, is not really covered on the device, and that’s for good reason as this is not intended to replace a drawing surface type controller.
In fact the two would probably be the perfect set up!
But without a surface, you resort back to the mouse for fine cropping or rotation or using any of the local adjustment brushes and filters. But once those filters are active you can then use Loupedeck+ to control some of the parameters.
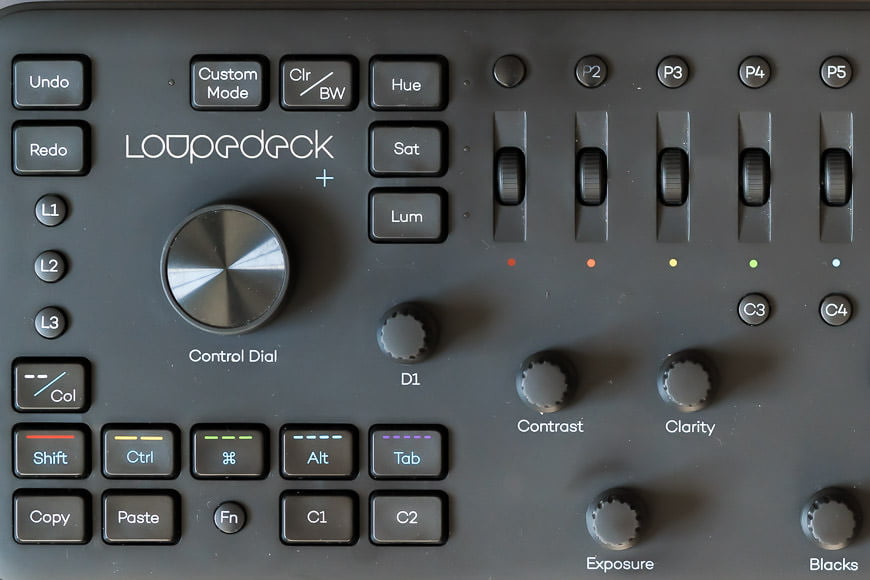
The keyboard is broadly arranged in groups of controls with your hands naturally finding the controls where you would expect them to be.
Your left hand automatically goes to the colour flag and star-rating controls, with your right going to the keys allowing you to move between images. This is a great start for culling which on paper can simply be done while looking at each image as it flashes up.
While we’re on the topic of culling, there is a slightly frustrating limit to how fast you can do this. Normal culling, where you look at an image then select/rate/whatever is no problem.
But if you wanted to rattle thought lots of images to set all to 3 stars, then if you’re too quick you confuse things, and you star the wrong image which can be frustrating.
My discussions with Adobe showed that this is simply how their API works, and there is nothing Loupedeck can do about it.
Essentially, the actions should be queued if they come in too quick to be processed, but they are not. It’s not a deal breaker, if you want to do this, you’re better off going to the Lightroom Library Grid View and doing it there.
Moving upwards through the controls the next ones you come it are the Basic Tone Controls that allow you to adjust most of the global parameters in the image.
These are laid out not in rows, but ergonomically so that you can easily get to them all. Really good design being shown here.
At the top of the device, you see a set of slider wheels for each colour (HSL) and this allows me to get more accurate colour adjustment than usual
The only other stand-out control is the large Control Dial which allows cropping and rotation of your image. The remainder are a variety of other useful editing features and those 19 customisable controls.
In Use
Loupedeck+ is, by its nature a hands-on device. What I mean by that is that you can’t very easily describe it. Any description sounds clunky and confusing, but actually it’s extremely natural to use.
The two selling points are the enhanced control and the efficiency improvements. Let’s look into these to see how they perform in real life.
Enhanced Control

First off, without question it is so much easier to control an app from this device than the on-screen UI.
The learning curve is short and after an hour, you will find your muscle-memory taking you straight to the control you need.
Imagine you are changing the Colour Temperature in Lightroom. We all know that for some images, the difference between Arctic Blue and Lava Orange is a slight miscue with the mouse!
But with Loupedeck+, once you are on the ‘temperature’ rotary control you can change the value while looking at the image, not at the slider.
This sounds like a small thing but makes a massive difference in ones’ ability to dial in the right setting.
This control is also helped hugely by the non-linear nature of the controls. On Loupedeck+, if you move the rotary slider quickly it gives you a large change, but do it slowly and you can get very fine control.
In fact you can move things so finely that you can barely see the on-screen slider moving. This allows you to get the right temperature bang on and it is a joy to use.
Another well thought-out feature is that all the rotary and slider controls have a ‘push’ function which returns that parameter back to the ‘default’ position. Lightroom has the same functionality by double-clicking the control.
There’s definitely a lot more knobs and dials than the Tourbox, its main competitor in the editing console space, but this means there’s more customisation to be had.
Efficiency
If you’re anything like me you over-play the benefits or savings you will make just in order to justify purchasing a new toy (ringing any bells at the back there?).
So it was with Loupedeck+ (or to be factually correct, the original Loupedeck). I imagined ripping through images with both hands whirring over the controls like Dr Dre or Mark Ronson in the studio.
The time I would save through editing would pay for the device for the first wedding I edited? Right?
Sort of…
How much of a saving in time you will get depends on a number of variables and each photographer will have their own results.
Part of my Wedding Photography Master workshop is all about time management and getting importance of using every minute in the most valuable way possible to ensure business success. Loupedeck+ plays along nicely here.
In the Library module when culling a set, yes Loupedeck+ is convenient as there are star and colour flag buttons. But the number keys on your usual keyboard do the same thing so it’s not really a speed-up per se.
In the Development module during editing, this is where you can get some improvement. This improvement is greater the more you configure your Loupedeck+ to assign common tasks to the custom keys.
This minimises the number of times you have to dip back into ‘keyboard and mouse’ mode in Lightroom.
Every time you do that you take a hit, and that hit is more than it would be before because you have to pick up the mouse and find the pointer. Only a second or two, but with 1000 images, that is significant. So minimising the times you have to do this is a really important.
The other variable is that the the speed-up you get depends on what sort of edit you do to a particular image.
If a lot of images need a preset, with some basic corrections only, then you can indeed tear through a large number of these quickly and undoubtedly get a reduction in time you’re taking to edit them.
But as soon as you have an image that needs a filter to be created, or a brush, then you need to drop the Loupedeck+ and go back to the mouse for those bits.
It is the ratio of those two types of image editing that you have that will determine the performance you get in real use.
In my case, I felt that I did indeed shave off a couple of hours in the editing of a full wedding set, including culling. So on that basis alone I feel I can probably justify the purchase, although it’s an inexact science as I have yet to work out a way to accurately time an edit!
Overall Performance
Although I have no accurate way to measure this, I do feel I edit more quickly with the Loupedeck+.
I suspect I do more dodging and burning than many photographers so I have to still use the mouse and keyboard a lot. But if you do less, then I imagine the time you can save will be even higher.
What is a much clearer benefit though is that your hands are so used to the device it becomes an extension of yourself. This is what I really like; the fact that when I see an image, my hands go to the right control I want.
It does not take time or effort to learn it, the skill comes complete by osmosis and silently does it’s magic. Coupled with the finer control possible than the on-screen Lightroom UI this makes for a pleasurable device to use that is definitely an improvement to your editing setup.
In fact, when I’m editing on my laptop somewhere else, I sometimes feel my hands move over to where the Loupedeck+ ‘should’ be to adjust things.
Like a backseat driver planting their feet on non-existing brakes when I pull out in front of a truck (it only happened once, don’t judge!)
Value for Money
At around £230 I do feel that this is really good value for money.
I know there is a bit of a trend to save money by fashioning your own controller from a music midi surface, but then you are investing much more time instead.
It’s well packaged, good enough quality to look great on the editing station and to receive ‘ooh’s and ahh’s’ from any visitors, and it gives a generous helping hand to my editing.
Loupedeck+ Review | Conclusion
My editing is more consistent and more accurate when I use the Loupedeck+. This alone is reason enough for me to recommend it. If it saves me the time that I suspect it does, then that’s a bonus.
What I do know is that if I’m about to do some editing with my laptop, I do pop down to my training area and studio to grab the Loupedeck+ before I start.
My hands expect it to be there now, and quite right too.
Edit photos quickly and easily with this intuitive console for all major photo editing programs.
 12 Best Adobe Lightroom Alternatives in 2024 [User Tested]
 Guide to Culling in Photography: 8 Pro Tips for Faster Results
 Lightroom CC Mobile Guide
 Adobe Lightroom Review – Still the Best Image Editor in 2024?
 Best Photography Culling Software to Speed Up Your Image Selection Workflow
 What’s the Best Way to Buy Lightroom in 2024?

Nick Church is a wedding photographer based in Bristol, UK.

