


Luminar vs Affinity for Photo Editing: Key Differences
Luminar vs Affinity: Read a feature-by-feature comparison of Luminar and Affinity and choose the image editor which is best for you.
Luminar | Software | By Kavita Verma | Last Updated: March 4, 2024
Whether you shoot to collect memories or you’re a professional photographer, you need software to organize and edit your photos.
The big question all photographers in 2024 face is: Which software should you use?

Affordable image editor with powerful features & regular updates. Great for all levels of photographer.
While it’s true that Adobe still dominates the photo editing market, many other tools have burst onto the scene as Lightroom alternatives for those who want to avoid subscription fees.
Two of the most popular are Skylum Luminar 4 and Affinity Photo – similar in some ways, but very different in others.
Wondering which image editor is better for you? Here we tackle the question of Luminar vs Affinity, so read our comprehensive review to get the answer.
Luminar Neo vs Affinity Photo in 2024
1. RAW Image Development
The main difference between Luminar and Affinity Photo when it comes to RAW image development is the workflow.
Affinity Photo has different areas called “personas”: pre-processing is done in the Develop Persona, while detailed photo editing happens in the Photo Persona.
The thing about this is that you really need to commit to your RAW adjustments first in the Develop Persona before you can move across to the Photo Persona and make use of its more powerful tools for advanced editing.
This two-step process sets Affinity at a bit of a disadvantage because it means that you can’t easily change your initial adjustments once you’ve moved from one Persona to the next. Additionally, batch processing is limited to one Persona at a time.
Luminar, meanwhile, allows for non-destructive image editing in a single workflow. Any adjustments can be tightly and selectively applied to parts of an image using masks, and it tends to allow for very accurate edits.
As mentioned above, it wouldn’t be unfair to think of Luminar as being more like Lightroom and Affinity Photo as being more like Photoshop when it comes to image development.
In picking a winner here, we’re going with Luminar because the workflow is more streamlined, plus you can easily sync adjustments made in one image with any other photos in the image library – a great time-saver, especially for professional photographers (see our Luminar tutorial to see how simple it is to get started.)
That said, if you can get around the workflow issues, Affinity Photo is certainly very powerful for detailed, slick photo edits. It’s just a matter of pre-developing in the Develop Persona first and then making your more complex adjustments on top of that.
2. Workspace
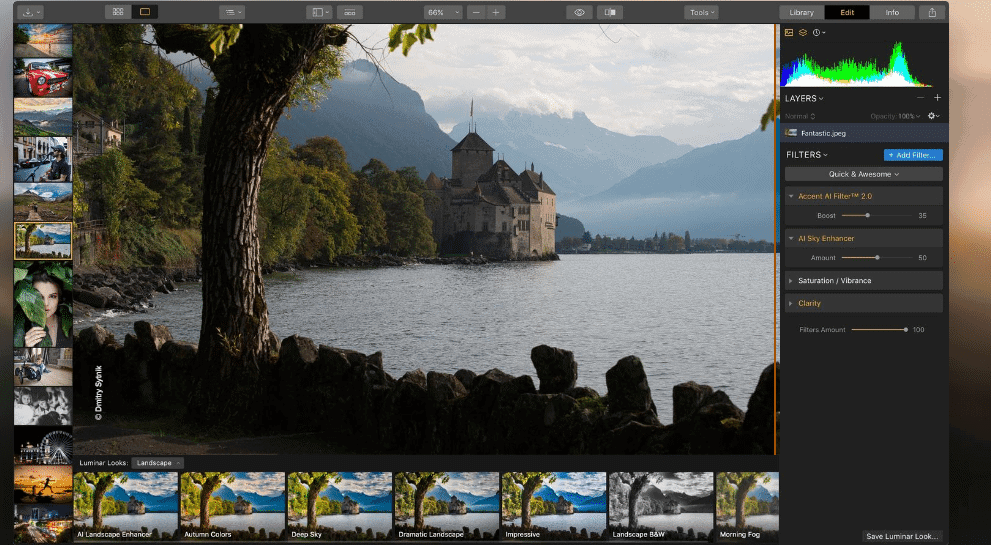
Luminar’s interface is stylish and intuitive.
Both Luminar and Affinity Photo have a similar general layout and design aesthetic. The image you’re working on sits in the center and control panels run on the side or top of the workspace.
As we touched on previously, Affinity Photo divides its primary functions into sections called Personas. These make the workspace less cluttered by refining your focus to one task at a time. The Personas are:
- Photo Persona (for retouching & editing)
- Develop Persona (for RAW photo development)
- Liquify Persona (liquify tool)
- Export Persona (for saving your images)
- Tone Mapping Persona (HDR merging)
Because the system of Personas is unique to Affinity it can be confusing at first. Once you get the hang of it though, Affinity is pretty straightforward and easy to use. See our Affinity Photo review to learn more.
The photo interface of Affinity Photo is also highly customizable so you can change it to fit your needs – this is similar to Affinity Designer, the software for graphic designers who want something like Adobe Illustrator but without the monthly fees.
Luminar, meanwhile, is known for its simplicity and a clear user interface. Like Affinity, it has a configurable interface and allows you to choose which adjustments you’d like to have displayed in the control panel.
Luminar’s Edit and Library functions are separate, and an information section displays metadata about exposure settings.
Considering that both applications have slick, customizable, easy-to-use interfaces (despite an initial learning curve), we can’t pick a clear winner here. We’re giving them a tie.
3. Performance

Affinity Photo, despite some issues, wins out on performance.
Unfortunately, neither Affinity Photo or Luminar is flawless when it comes to performance.
Both programs could stand some improvements with regards to processing power, stability and speed – though there’s always going to be some compromise between powerful features and performance.
Luminar needs a little more work than Affinity in this regard. It lags from time to time, and the Windows version in particular seems to suffer from episodes of non-responsiveness.
Affinity sails along happily when you’re editing smaller file types (like JPEG) but struggles to cope with larger RAW files.
On the whole, though, editing in Affinity Photo is quite responsive and the app seems more stable overall.
One saving grace for Luminar 4 is that updates are plentiful, and Skylum addresses performance issues continuously.
4. Value for Money

Try entering Luminar coupon code SHOTKIT15 at checkout to save $15.
Both Luminar 4 and Affinity are available as a one-time investment for Windows and Mac OS. Affinity Photo charges a one-off fee of US$49.99.
Users can install it on up to two computers for commercial purposes, or five PCs for non-commercial purposes.
Luminar’s fee differs each year – click here to see how much it costs today, but in general, it’s around $70. Once paid, users can install it on up to five different computers.
One major difference between the two pricing plans is that Affinity has to be purchased separately for each OS, while Luminar’s multiple licenses can be used across different operating systems.
Though Luminar is pricier than Affinity, it’s stil competitive as a one-time purchase price, and Skylum publishes a whole roadmap of free updates which will become available over the coming months.
These updates usually bring with them useful new features (as well as bug fixes and under-the-hood improvements) – we feel that the asking price is justified when you see just how much value you receive after purchase.
In addition, you can save $15 by using the code SHOTKIT15 at checkout – click here, then look out for the text ‘Enter Promotional Code’ (see above screenshot).
5. Local Editing Tools

Luminar 4 allows for precise local editing using filters and masks.
Both Affinity and Luminar use adjustment layers with editable masks. Both offer cloning, healing and stamping, but Luminar’s cloning implementation process is fairly basic.
Where Luminar’s local editing capabilities shine are with its pre-designed filters. Rather than having to apply every little adjustment individually, you can choose to apply one of the dozens of filters then use the corresponding sliders to tweak how it looks.
You can combine different filters or layer them over each other, and use masks to select where in the image you want the filters to be applied.
Thanks to its filter system, Luminar allows for a vast realm of editing potential.
When it comes to local editing with Affinity Photo, you’ve got access to advanced tools for image selection, cloning, and masking in the Photo Persona. Because you’ve already done your RAW image processing in the Develop Persona it’s important to make your local adjustments in layers so as to keep the editing non-destructive.
For some reason, Affinity Photo puts its liquify tool in a separate persona, so you’ll need to switch across to that to do any liquify edits.
The liquify tool works well overall, but processing here is notably slower and you’ll probably get some lag.
While you can make detailed and accurate local edits with both Luminar and Affinity, we’re giving this one to Luminar because its library of pre-designed filters makes editing both powerful and easy and gives you a lot to work with out of the box.
6. Extra Features

Affinity photo has extra features like seamless photo stitching.
Affinity Photo offers a long list of extra features like HDR merging, panorama stitching, focus stacking, frequency separation, typography, and much more.
Affinity also has an Assistant feature which, when clicked on, lets you create presets for specific tools.
The most obvious downside to Affinity is the lack of any photo organization system. You can’t use it to catalogue your images, nor does it integrate with social media or email for seamless uploading.
While Affinity Photo is great for creating professional images in a Photoshop-like way, it’s just not an all-round photo editing and management tool.
On the other hand, Luminar 4 is a full-featured photo editor with more than 300 robust tools and features, including fast RAW support, custom brushes for selective editing, watermarking, and dozens of customizable photo filters, to name a few.
Intelligent filters like Accent AI 2.0 allow you to take your photo from average to impressive in mere seconds.
The Sky Replacement tool is particularly impressive, allowing you to realistically replace the sky in your image in seconds.
Luminar also offers library management options. In this section, you can search for images, assign star ratings, add color labels to images, and flag images as selected or rejected.
You can sort the image library by multiple options, though you can’t use custom tags or metadata (an issue Skylum promises to resolve soon with a free update).
While Luminar is still a long way off Adobe Lightroom with regards to DAM features and general organisation of files, it’s definitely a lot better than Affinity in this regard. (See Lightroom vs Luminar 4 for a more in-depth feature comparison.)
WINNER: Luminar
Overall Winner: Luminar Neo
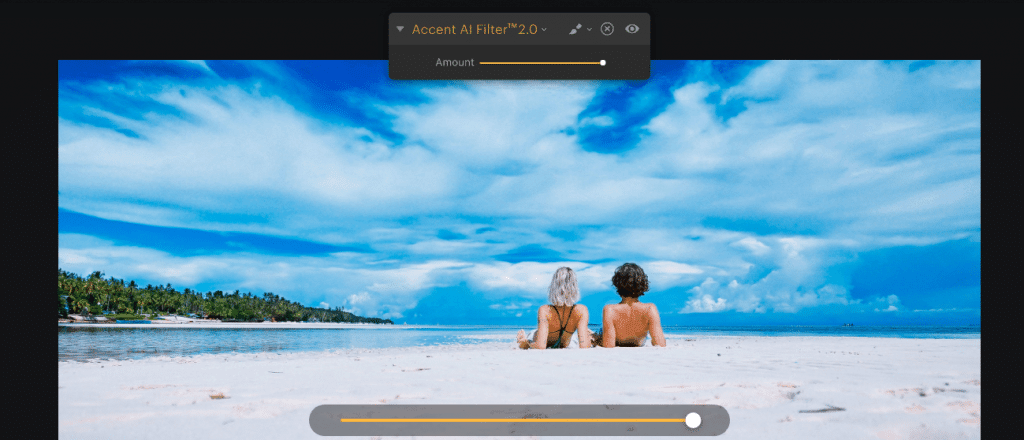
Luminar’s Accent AI 2.0 lets you selectively adjust elements like skies just by dragging a slider.
When it comes to the crunch, we’d pick Luminar as the better out of the two image editing software.
Affinity Photo might win on the sheer number of features and image editing tools, but Luminar‘s tools are simpler to use and come with a huge amount of customization.
Luminar’s library module is another added advantage because it lets you edit your photos and manage your image collection all in one place.
And finally, Luminar wins out because Skylum is dedicated to constant updates and improvements – something which isn’t quite as clear with Serif and their Affinity Photo product.
Here are a few of the updates with the release of Luminar 4:
- NEW: Edit Module
A completely redesigned experience that improves the discoverability of tools and simplifies the editing process - NEW: AI Sky Replacement
Using Skylum’s machine learning technology, Luminar 4 is the first photo editor to offer fully automated sky replacement technology - NEW: AI Skin Enhancer
Automatically remove skin imperfections like acne, freckles, and moles in addition to smoothing skin - NEW: Smart Contrast
Easily improve contrast where needed without destroying key details
- NEW: AI Structure
Boosts details where needed without damaging the rest of the photo — without selections, layers, or masks - NEW: Color Styles Library (LUT Mapping) Quickly change the color and mood of your photos with cinematic color styles
- NEW: Luminar Looks (presets)
Unlock creative options and quickly solve problems with adaptive presets - IMPROVED: Stability and performance • IMPROVED: Golden Hour filter
- IMPROVED: Denoise filter
- IMPROVED: Adjustable Gradient filter
What is Luminar?
Skylum’s Luminar Neo is an all-in-one, full-featured photo editor.
Luminar is a fast, user-friendly standalone app that offers everything photographers need for photo editing. It’s available for users of both Windows and Mac.
Luminar has advanced AI-powered tools that intelligently make selective adjustments. For example, you can easily apply effects only to people using the software’s “human-aware” technology or quickly dramatize an expanse of sky without changing the rest of the image.
Additionally, the library management section lets you catalogue and organize your images (making it one of the most viable alternatives to Adobe Lightroom).
If all you need are powerful artificial intelligence editing tools, you may want to check out Luminar, reviewed here.
What is Affinity Photo?
Affinity Photo is a photo editing app from Serif. In their own words, it’s “the fastest, smoothest, most precise professional creative software” on the market.
Of course, there’s some debate about whether that claim is true, as we’ll explore below.
For now, let’s just say that Affinity does have a lot going for it.
It has powerful functionality for things like non-destructive photo editing, seamless photo stitching, HDR, and complex image composition.
Affinity Photo was originally developed for Mac only, but Serif has since released a Windows-compatible version as well.
Affinity offers plenty of editing tools and supports more than 15 file types. And while it includes all the simple editing functions you’d need, it also has the benefit of advanced functions as well.
One thing Affinity still lacks is DAM/cataloguing functionality. As such it works more as an alternative to Photoshop rather than to Lightroom.
Luminar vs Affinity | Conclusion
Both Skylum’s Luminar and Serif’s Affinity Photo are powerful, intuitive photo editing apps that offer good value for money.
If you’re looking for alternatives to the Adobe suite and want to avoid subscription fees, these two software programs can provide you with what you need.
Naturally, there are pros and cons to any app. But in the question of Affinity Photo vs Luminar, Luminar offers a few big advantages that get it over the line. It’s also the winner of the EISA image editor of the year awards for 2019/20 – more proof that you’ll be investing in a high-quality, popular product.
…and if you’re still unsure, here’s some good news: Luminar offers a 30 day money-back guarantee, and Affinity offers a free 10 day trial.
This gives you access to all the features, so you can fully test the software out for yourself.
Give them a shot – and you’ll quickly get a better idea of which one is right for you.
And if you still can’t make up your mind, check the differences between Affinity Photo and Photoshop – 2 other popular image editors.
Affordable image editor with powerful features & regular updates. Great for all levels of photographer.


Kavita Verma is a seasoned technical and review writer with Shotkit. She loves to solve people’s problems and answer their questions with her knowledge and writing skills.


