


How to Photograph the Moon
Ever wondered how to get an amazing photograph of the moon? This in-depth guide reveals the secrets to moon photography, including 12 pro tips and tricks.
Learn | Photography Guides | By Greg Cromie
When we think of astrophotography, we usually think of photographing the Milky Way. However, there’s a lot more to celestial photography, including capturing amazing shots of the moon.
That raises the question, “How do you take good pictures of the moon?”
Photographing the moon requires a little knowledge about the best gear, the correct camera settings, and some steps for nailing the shot.
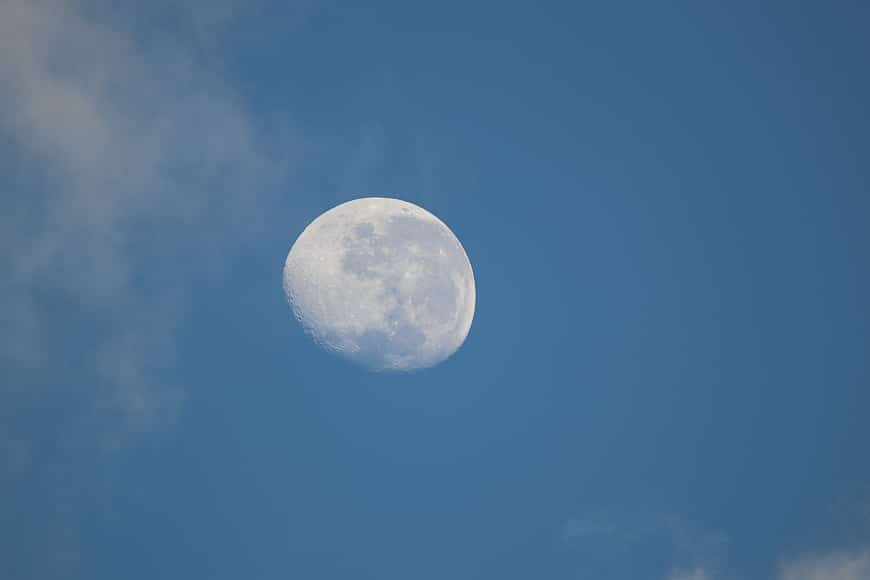
(You should also know a thing or two about the phases of the moon to tell the difference between a crescent moon and a new moon.)
In our guide to photographing the moon, we’ll provide you with all the tips you need to get out there tonight.
Before long, you’ll be capturing jaw-dropping images of the next Full Moon, Waxing Gibbous or Super Moon, so let’s dive in!
12 Moon Photography Tips
Knowing how to photograph the moon involves a little more than simply pointing your camera skyward. Regardless of capturing the close-up detail of a full moon or the stages of a lunar eclipse, there’s a lot to know.
That’s why we’ve put together these 12 moon photography tips. With them, you can take a step-by-step approach to preparing the right camera gear, using the correct camera settings, and everything else involved in lunar photography.
Why should NASA have all the fun with their giant telescopes and fancy gear? You can take amazing photos of the moon, too – so let’s get into it.
1. The Best Gear For Moon Photography
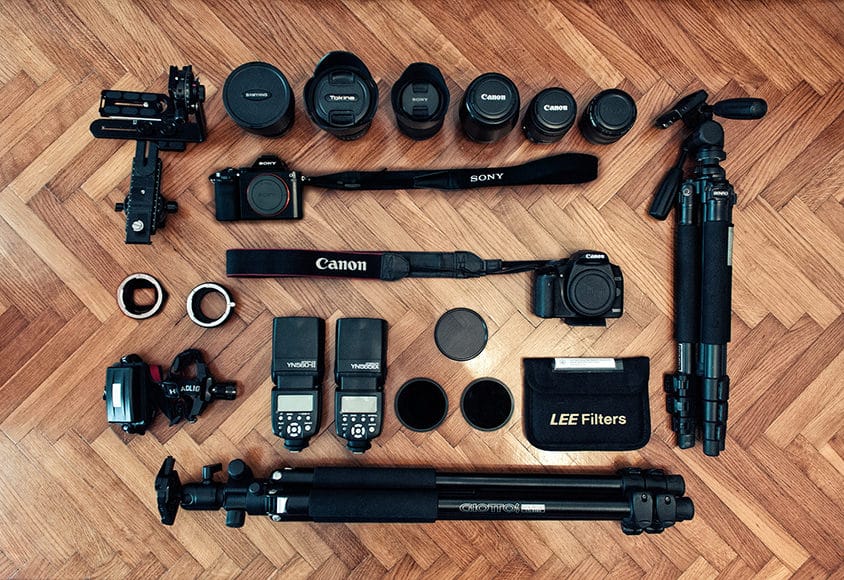
Camera equipment of landscape and moon photographer Ivan Pedretti.
It’s certainly possible to take a photo of the moon as you’re strolling down the street with your phone in hand, but to capture a genuinely majestic picture of the moon, you’re going to need a little more photography gear than that.
The right camera, lenses and accessories are what you need for stunning lunar compositions. Plus, as we’ll discover, that smartphone is going to play a crucial role in your shot of the moon after all.
- Camera
When it comes to photographing any celestial event, you’re going to need a camera suited to the task. Regardless of shooting the Milky Way, star trails or the moon, the right camera will ensure you have perfect photos every time.
For moon photography, your digital camera is going to need a few features – most notably, manual settings. However, you must first decide if you’ll shoot with a DSLR camera or a mirrorless one.
Either a DSLR camera or a mirrorless body will be well suited to moon shots, so don’t be afraid to use whatever you have at hand.
DSLR cameras were used for this genre for decades as they deliver exceptional image quality in low light settings.
As for the sensor, full-frame or cropped will work well – however, in some situations, cropped sensor cameras are better for this genre due to the crop factor.
Cropped sensors are smaller than a full-frame sensor, and they have a crop factor in calculating the actual range of a lens.
For example, the Canon 90D features a cropped APS-C sensor with a 1.6x crop factor. Any lens you place on the 90D will magnify the range by 1.6x. A 200mm lens placed on the 90D achieves a range equivalent to a 320mm lens (200m x 1.6 crop factor).
When photographing the moon using a crop sensor, a long lens gives you greater reach – especially if you want close-ups of the moon’s surface.
If you prefer to shoot with a full-frame mirrorless camera, the Sony Alpha A7R IV is ideal. It features a full-frame 61-megapixel sensor that’ll capture an incredible amount of detail.
What’s more, the a7R IV has a standard ISO range from 100 to 32000 and an extended range of 50 to a staggering 1024000. The Sony is one of the best mirrorless cameras for low light photography, including landscape and astrophotography.
Mirrorless cameras handle low light situations exceptionally well thanks to better ISO and low light shooting performance.
How Much Do You REALLY Know About Photography?! 🤔
Test your photography knowledge with this quick quiz!
See how much you really know about photography...

Regardless of which you choose, ensure your camera has a high dynamic range (DR). Dynamic range is the term used to describe how well a camera captures detail in a scene’s dark areas. Plus, how well it handles highlights without causing overexposed areas in your images.
When photographing the moon, having a high dynamic range allows you to capture the light from the moon without losing the detail on its surface.
If you include the moon as a critical element in a night landscape, the camera DR will capture the detail in the composition’s dark areas.
As you’ll mostly be shooting the moon at night in a darkened landscape, your camera needs to have good low light and ISO management.
ISO is one element of the Exposure Triangle (along with Shutter Speed and Aperture). It controls how sensitive the camera sensor is to light. In a dark scene, increasing ISO increases the light captured and improves the photo’s overall exposure.
However, if you dial ISO up too high in a dark setting, the camera sensor may have trouble identifying detail in deep shadow areas. As a result, the sensor is unsure how to read the pixels and often leaves messy clusters of pixels in the image.
This is better known as noise and is a result of either too high an ISO or a camera not managing ISO effectively. For moon photography, a camera that has excellent low light performance and noise management is best.
Check out our guide to the best camera for low light photography for more information.
- Lens
A critical part of choosing your kit for moon shots is to ask the question, “What lens is good for moon photography?”
To answer that, we need to go back a step to your decision on a DSLR camera or mirrorless camera and a full-frame or cropped sensor.
If you’ve decided to go ahead with a cropped sensor DSLR camera such as the Canon 90D, you have a vast range of lenses available to you – a zoom lens gives you greater flexibility.
To get close-ups of the moon so that you see the details of its surface, you’ll need a quality zoom lens – even taking into account the 1.6x crop factor of the camera.
Having greater reach from telephoto lenses prevents you from having to crop your moon images later in editing software, which would reduce the image quality and overall resolution.
The Canon EF 75-300mm f/4 – 5.6 is a great telephoto lens that delivers exceptional image quality. When paired with the Canon EOS 90D DSLR camera, its zoom focal length extends to 120-480mm, bringing the moon up super close.
The second option to consider is the Canon EF 100-400mm f/4.5-5.6L IS USM telephoto lens. This beast delivers superb image quality, and its crop factor converts to 160-640mm.
It’s super-telephoto lens territory, and you’d almost find the moon landing site with that focal length!
If the Sony a7R IV mirrorless digital camera is your choice, Sony has an exceptional line-up of lenses for this kind of work.
A great telephoto option for moon photography is the Sony FE 70-300mm f/4.5-5.6 G OSS lens. When paired with the Sony A7R IV, the 70-300mm focal length is perfect for getting in nice and close with the moon.
Plus, as the A7R IV packs a 61MP sensor, you can still crop your images and not lose noticeable resolution.
If you’re looking for other recommendations on lenses to shoot astrophotography with your Sony camera, check out our article here.
You should also read our guide to the pros and cons of using teleconverters to extend the reach of your existing lens.
If you have a kit lens, you’re probably asking the question, “How do you shoot the moon with an 18-55mm lens?” …and this raises an excellent point; you don’t need a whopping telephoto lens to shoot the moon.
Not every shot of the moon has to be a close-up. Including the moon in a landscape shot during the day or night results in awe-inspiring images.
With an 18-55mm lens, you can compose moon images where the moon stands over a mountain range or a vast forest.
This style of lens’s wide-angle capabilities allow for a lot of creative expression in how you focus on the moon in a composition.
You should also read our guide to understanding the 500 rule in astrophotography.
- Tripod
Any form of celestial photography, especially at night, requires a tripod.
When photographing the moon, you often use slower shutter speeds to expose the whole composition and capture detail.
The biggest challenge to photographers during low light photography is keeping a camera still when shooting at slow speeds. Even the slightest bump or breeze will shake the camera enough to ruin a long exposure.
Most photographers can’t hold a camera still beyond 1/8 shutter speed – let alone at several seconds.
The easiest way to manage this is with a sturdy and stable tripod. Including a tripod in your photography kit is probably more essential than the camera itself. If you can’t keep the camera still, you might as well be trying to take photos with a brick.
Tripods come in all different shapes and sizes, but there’s a couple of things to keep in mind when choosing the right one.
The most crucial factor is to ensure that the tripod is rated to carry the gear you intend to mount atop it.
If your camera weighs 1.3lb (600g) and your lens weighs 2.2lb (1kg), the combined weight is 3.5lb (1.6kg). Your tripod must be rated to support at least this weight – it’s always better to get one that can hold more to ensure it’s stable and not on the brink of collapse.
The next factor is your intended use of the tripod. If you plan to work from your backyard, then having a portable tripod is less critical. However, if you plan to travel and even hike to a remote location, then your tripod’s portability is essential.
Lugging heavy gear takes the joy out of the experience.
Fortunately, tripod manufacturers have prepared for this with tripods constructed of alloys such as aluminium and carbon fibre – see here for some affordable carbon fiber tripods.
A brilliant example of a suitable tripod for moon photography is the 3 Legged Thing Leo 2.0 + AirHead Pro Lever kit.
It’s constructed of lightweight aluminium and features legs that collapse in five sections. The 3 Legged Thing Leo folds from 14″ (35cm) up to 58″ (147cm); being able to collapse it and work from a sitting position is excellent for long nights out photographing the moon.
Plus, at just 14″ long, this will fit neatly into a camera backpack or strap to the bottom of a bag. Most importantly, Leo 2.0 weighs only 4lb (1.85kg) but supports a whopping 66lb (30kg) or a medium-sized child.
- Remote shutter release
As mentioned, even the slightest bump while capturing a long exposure will result in camera shake. Camera shake equals blurry photos of the moon.
While a stable tripod will keep a camera still during the exposure, there’s still the issue of pressing the shutter button. Even pressing the shutter button to take a photo can cause a bump – no matter how careful you are.
One way to avoid camera shake while pressing the shutter button is to use the camera menu’s self-timer function.
But by far, the most popular way to activate the shutter remotely is with a remote shutter release mechanism.
In the old days, astrophotographers used a shutter release cable that saw a long cable screwed into the top of the shutter button. A plunger would be pushed down at the other end, and the cable would push the button in.
Now we rely on more advanced solutions such as Bluetooth or wireless remotes.
For Canon photographers, the Canon RC-6 Wireless Remote allows you to activate the shutter from up to 15′ (4.8m) away. It’s a simple device that pairs with your camera and is used to fire the trigger plus activate mirror-lock and bulb modes.
Most mirrorless camera brands have companion smartphone apps that pair via Bluetooth with the camera. These apps allow you to perform a range of functions, including changing ISO, shutter speed and even aperture – plus fire the shutter.
- Equatorial Tracker
An equatorial tracker, or star tracker, is a device that connects to the tripod. The camera then mounts to the star tracker instead of directly onto the tripod.
Function settings allow the equatorial tracker to align with the polar axis in the night sky. It then uses motors to move the camera and follow a celestial element such as the moon.
The purpose of the tracker is to compensate for the rotation of the Earth and the moon. With the camera always pointing directly at the moon, you can capture long exposures without the rotation that causes your images of the moon to become blurry.
A popular choice for start trackers is the Sky-Watcher Star Adventurer Pro Package – an all-in-one kit perfect for moon shots.
- Accessories
While you think you have a complete kit for taking pictures of the moon, a few accessories are essential for this kind of genre.
– Batteries
Shooting long exposure can quickly drain camera batteries, especially with mirrorless cameras. To combat this, pack as many batteries as you own and if you only own one, buy a second for moon photography.
Some photographers opt for a battery grip that attaches to the base of the camera. Most battery grips allow for two or three batteries to be powering the camera – that should last the whole night.
More cameras can be charged via USB-C even while still operating. Having a quality power bank on hand is a simple way to manage power needs.
The point is, don’t get halfway through your shoot only to discover that you ran out of juice.
– Memory Cards
If shooting with a high megapixel camera like the Sony A7R IV with a 60MP sensor, every single picture will take a lot of data. So having a high capacity memory card plus a backup is the best solution.
If your camera can take two memory cards, then load it up with two.
Just like with batteries, have more than you think you need.
– Camera Bag
Getting all of this gear to the top of a hill via a long walking track is going to be tricky – especially if it’s the middle of the night.
The best solution for carrying your gear is a comfortable and sturdy camera backpack.
I say a backpack versus a sling bag as you have a lot to carry, and by far, the best way is on your back. A camera backpack has supporting straps, padded back support and protective storage for your expensive camera and lenses.
Plus, camera backpacks feature a way to stow and carry your travel tripod.
After a long hike to your destination, you’ll appreciate not feeling too tired to photograph the moon.
– Safety Gear
Here’s a couple of quick pointers on your safety.
Make sure to dress for the expected temperature and wind-chill – nothing worse than shivering through your shoot. Protective footwear is a must, especially if you’re hiking to a suitable location to set up.
Along the way, it’s going to be dark, so pack a torch, a headlamp, and spare batteries for both.
Astrophotograph, moon photography and night photography in general can take hours to complete; you’re likely to get tired from standing around during long exposures. Or, as with a lunar eclipse shot, it can be over in a matter of minutes.
Pack a ground blanket or a small folding stool – you’ll thank me for it later.
Finally, pack water and some snacks to keep your energy up throughout the night.
2. Best Camera Settings For Moon Close-Ups

One of the most common questions I get asked is, “What is the best setting for moon photography?”
In terms of camera settings for a close-up shot of the moon, a list of basic camera settings is a great start. The rest is up to you to get out and shoot and use trial and error as your teacher.
These are the settings I recommend for capturing just the moon in glorious detail (as opposed to including the moon in a landscape shot).
Just remember that for moon close-ups, a telephoto lens delivers the best outcomes and that you should always expose for the moon when composing an image.
- Camera Mode
While the temptation is there to use Auto settings, you need to use all manual mode for moon photography – it’ll become clear why.
- Image Format
Ensure that your image file format is RAW – this is the largest file size a camera captures. It uses almost 100% of the sensor’s image data and makes editing images far easier later on.
- Aperture
For moon shots, stick with an aperture between f/8 and f/11. That way, everything in the shot will be in focus even with the curvature of the moon’s surface.
- ISO
Manually set your ISO to the lowest value – this is usually around 100 for most cameras.
The moon is super bright, so a high ISO is not necessary for a picture of the moon. But when you’re shooting a night landscape with the moon as a minor feature, a higher ISO is needed.
- Shutter speed
For a close-up shot of the moon’s surface, you won’t need a long shutter speed.
As the moon reflects a lot of light, a faster shutter speed of around 1/125 is a good starting point. If the moon is super bright, increase the shutter speed – do the opposite to gain more light.
- Focus Mode
With the camera mounted securely to the tripod, use manual focus to gain sharpness of the moon’s surface. Fortunately, there’s enough light reflecting from it to gain focus.
Another way to do this is to set your lens focus to infinity. Find a bright star and use auto or manual focus to get it sharp – then turn the auto-focus off, lock focus or just don’t touch the focus ring again.
- Image Stabilisation
If your camera or lens has image stabilisation, make sure to turn them off. Image stabilisation doesn’t help when photographing the moon – if anything, it causes camera-shake when the camera mounts to a tripod.
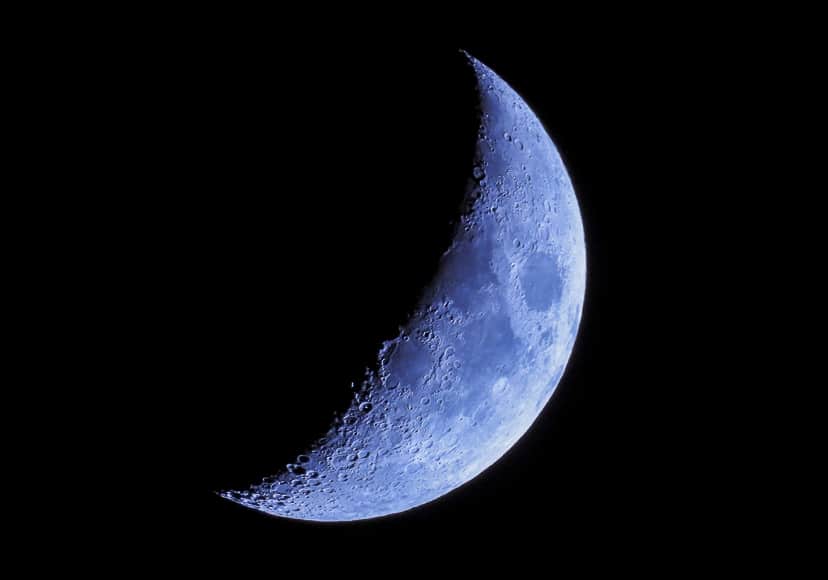
3. Understand The Moon Phases
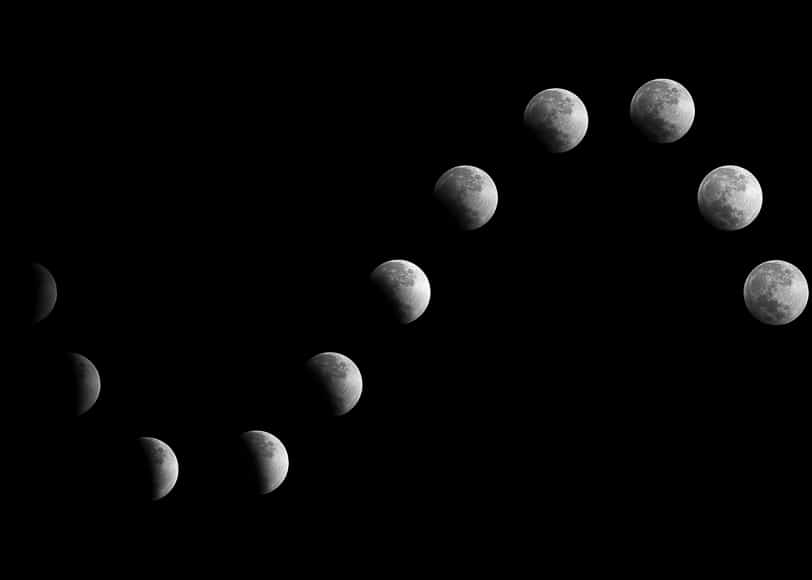
So you have your camera, lenses, tripod and knowledge of camera settings. Next, it’s time to know what you’re looking for in the night sky and how to identify each moon phase.
Before you head out to capture images, it’s essential to know what the moon phases are and when they occur – no point heading into the woods with no moon in the sky.
The moon rotates around the Earth on a 30-day repeating cycle – or a 29.53-day cycle, to be precise.
These are the phases of the moon:
- New Moon – This is the start of the moon phases. The moon is between the Earth and the sun – as a result, no light hits the surface of the moon facing the Earth.
- Waxing Crescent – The Earth mostly hides the new moon. A crescent-shaped sliver of light appears.
- First Quarter – More of the moon reflects the sun’s light- lighting up half the moon while the other half is in darkness.
- Waxing Gibbous – As the shadow recedes from the moon’s surface, almost all the surface reflects light.
- Full Moon – The Earth is between the moon and the sun. As a result, light falls on the moon surface facing the Earth, and we see the whole surface lit up.
- Waning Gibbous – After the full moon, a shadow starts to cover part of the surface. It’s similar to Waxing Gibbous but on the other side of the surface.
- Third Quarter – As the moon hides more behind the Earth, half the surface is lit, with the other half in darkness.
- Waning Crescent – Only a sliver of the moon’s surface reflects light while the rest is in darkness. A New Moon follows this phase.
4. Planning Moon Photography With Apps

Fortunately, you don’t have to get a degree in astrophysics to know when and how to photograph the moon.
There are many great apps available for smartphone users that take all the complexity out of moon photography.
Designed for photographing all celestial events, PhotoPills is one of the most popular moon photography apps.
It’s an app that allows you to plan photography events where natural lighting is involved – day or night. PP uses maps as a base layer for searching for locations to set up and shoot.
The app provides all relevant information on the direction of sunrise, sunset, moonrise and moonset.
For shooting the moon, PhotoPills provides accurate calendars of the moon phases in any location and a reference for the next full moon or upcoming blood moon and super moons.
Plus, thanks to the Augmented Reality feature using your camera phone, you can hold it up to a scene and get a graphic overlay of where the moon will be at any given time.
Another great app is The Photographer’s Ephemeris (TPE) that works in much the same way as PhotoPills. TPE also has overlays for star charts and even light pollution, so you know where to find total darkness for your next shoot.
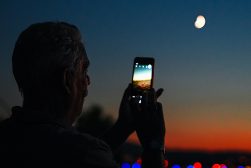
5. Photograph The Moon With Your Phone

There’s no doubt that phone camera technology presents a challenge to the exclusive features and performance once held by digital cameras. They’re not entirely on par yet, but they’re fast approaching.
As such, you may be wondering: “How do I take pictures of the moon with my iPhone?”
Fortunately, current-generation smartphones have on-board technology for this.
With your iPhone mounted to a tripod (via a smartphone mount), zoom in on the moon to ensure you get a closer shot. The lens automatically focuses on infinity – just as long as you tap the screen to ensure the moon is the focus point.
If the moon is not bright enough, use the Night mode to increase the exposure time – up to 2-seconds.
A far better option is to use an app such as NightCap Camera – a purpose-built iOS and Android app for astrophotography and moon photography.
NightCap allows you to adjust far more than just the focus point. You can adjust ISO, Exposure, White Balance, and zoom the camera in on the moon.
6. Light The Scene With Moonshine

Important to point out that we’re not talking about bootleg liquor! Instead, we’re talking about using the light reflected by the moon to light a scene at night.
The moon casts a gorgeous and soft light when compared to the sun. Using this moonshine in your landscape or cityscape photographs adds a dreamlike quality to a composition.
Full moons cast more light, so planning to use the natural light to your advantage takes a little preparation – consider PhotoPills for planning (see above).
You’ll need to use a long exposure – much longer than when photographing the moon directly. You need to give the camera sensor the time it needs to read all of the light falling on the landscape over an extended period – start with 3-5 minutes and go from there.
Just remember, in these sorts of photographs, the moon is just a light source and does not have to appear in the final image.
7. Capture Landscapes Featuring The Moon
A popular way of shooting the moon is to include the moon as a feature in a landscape composition – with help from the rule of thirds.
Except for the telephoto lens – a wide-angle lens is better suited to this kind of scenario – the necessary gear remains the same.
Regardless of shooting day or night, the rules of composition are much the same – especially the rule of thirds. You frame the scene to include exciting foreground elements such as lakes, mountain ranges, forests or even distant cities.
The foreground landscape element will fill the bottom third or bottom two-thirds of the frame. The remaining space fills with the night sky (or daytime sky) and the moon – usually offset to one side for greater compositional value.
By applying the rule of thirds, you compose the scene to have balance while the moon becomes a point of interest in the sky.
8. Reveal The Moon With Clouds
There’s a lot of joy in getting a clear night to photograph a full moon. But what if you were to use a cloudy night sky to add drama and reveal the moon in your images?
Thick cloud cover is going to ruin your chances of capturing that Waxing Gibbous moon phase. But, with patchy clouds that drift in front of the moon, you can use the same techniques to get stunning shots.
The outcomes will depend on what the breeze brings you, but with a bit of planning and a watchful eye on the weather forecast, you can make it work.
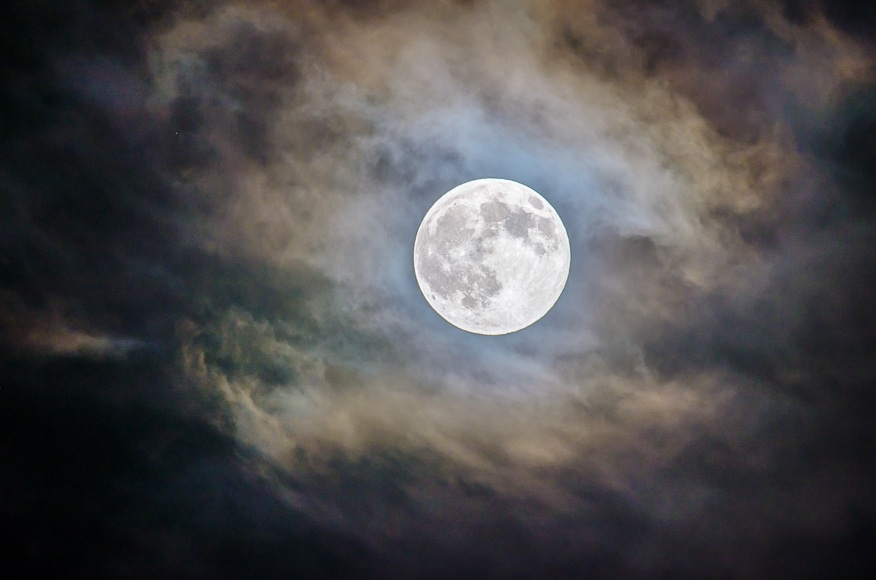
Another popular way to photograph the moon is when there’s a fine mist in the night sky.
Photographing the moon on a misty night is a great way to capture moody photos. The glow of the moon illuminates the moisture particles in the air and casts an eery light on a landscape.
9. Use The Looney 11 Rule – Sometimes
Photographers often tell you that photography is full of rules – created in the days when you wound film into a camera to take photographs. But, despite my avoidance of rules in general, some of them make things a little easier to remember.
The Looney 11 Rule applies to shooting the full moon and states that for an ISO value of 100, use 1/100 for the Shutter Speed. If the ISO is 200, set the Shutter Speed to 1/200 and so on.
While it’s handy to know, don’t be bound by it, nor be afraid to experiment with ISO, shutter speed and aperture once you’re comfortable with the base settings.
10. Photograph The Moon With A Telescope

A telephoto camera lens and a telescope have a lot in common as they both serve the same purpose – to magnify the view of a distant object making it appear closer and sharper.
You can take a picture of the moon’s surface with a telescope in place of your telephoto lens. There are unique camera mounts that allow you to attach DSLR cameras to the telescope.
The camera mount replaces the optical viewfinder on the telescope.
Another way to achieve this is to use a telescope to focus on the moon. Depending on the telescope’s quality and range, you should be able to get great clarity and detail.
You can then point your lens at the scene in the telescope viewfinder – it’s also possible to do this with a smartphone camera.
Holding a camera to the telescope eyepiece isn’t a precise process, nor will it surpass attaching the camera to the telescope via the first method.
See the best telescopes for astrophotography here.
11. Should You Use Filters For Moon Photography?
There’s a wide range of lens filters for different photography styles – these are glass discs that fit the front of a lens and ‘filter’ the amount and quality of light that enters.
Despite what you’ve heard, you shouldn’t use a filter when shooting the moon, as this reduces the amount of light entering the lens.
Regardless of taking photos of a full moon, super moon, or crescent moon, you won’t even need a protective UV filter.
Less natural light means that you need to change your exposure settings – slower shutter speed, higher ISO and smaller aperture. Slower shutter speeds can result in blurry images of the moon due to the rotation of the Earth.
Filters tend to reduce the sharpness with a moon shot and result in less contrast in details.
The only time you should use a filter to photograph the moon is for daytime landscape photography. Using a Neutral Density or Graduated Neutral Density filter reduces over-exposed images when you wish to use a slower shutter speed.
12. How To Edit Moon Photos
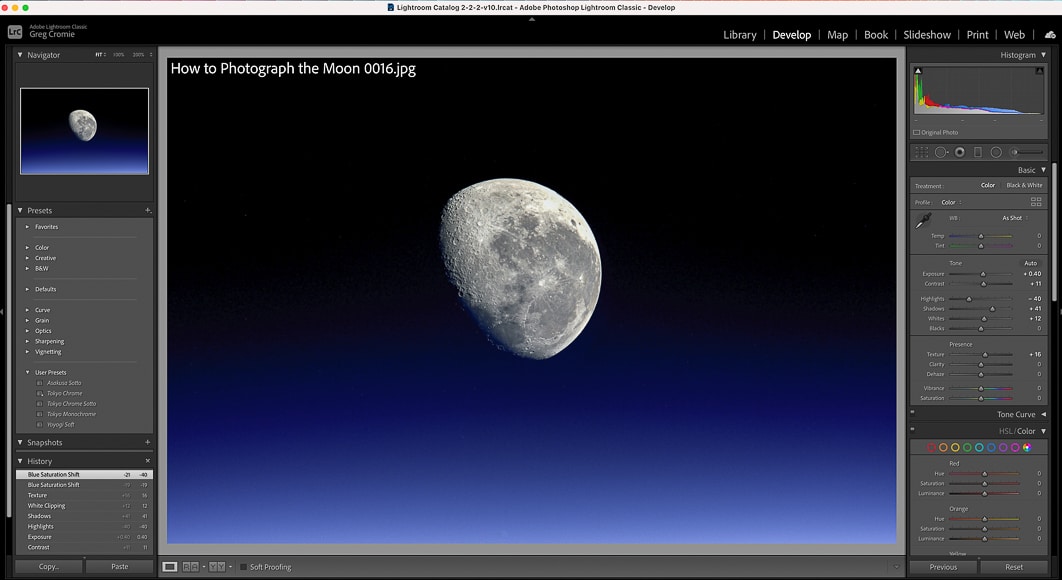
Provided that you set your camera to photograph moon photos in RAW format, the post-processing stage is much simpler than with a JPEG.
RAW photos contain all of the image, detail and light data as captured by the camera sensor. With all of this image data, you have a better chance of creating a stunning full moon photo using editing software such as Adobe Lightroom (see our full review).
Once you’ve imported your RAW image files into Lightroom, use the Develop tab for post-processing and editing. Here’s a couple of quick and easy edits to get you started (though trial and error are once again the best teachers):
- Use the Crop tool to crop the moon shot and remove unwanted background and foreground elements. Be careful not to crop too much as you’ll lose resolution and clarity.
- To bring out the moon’s detail, use the Texture slider to increase texture a little to emphasise craters and terrain.
- Slide the Highlights to adjust the moon’s overall brightness – this is handy if you overexposed the original photo.
- Then use the Exposure slider to control the exposure of the whole image – you may need to fine-tune Highlights simultaneously.
- Apply a little Contrast to make the moon ‘pop’ in a dark sky.
- To get a nice colour contrast between the paleness of the moon and the night sky, adjust the Blue Saturation slider under the HSL/Colour panel.
- If you’re not happy with the colour, hit the Black & White option to convert the moon shot to black and white.
- Use the Noise Reduction slider to manage unwanted noise from shooting with a high ISO.
- Apply Post-Crop Vignetting with a delicate touch, and don’t forget to apply Feather to soften the effect.
How do you Photograph the SuperMoon?
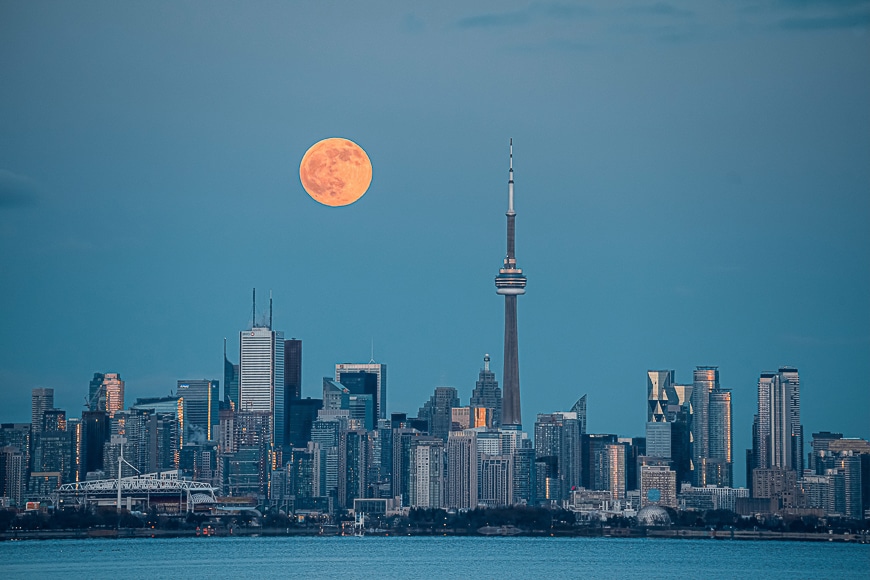
Super moons are rarer occurrences than a full moon, and if you’re involved in a photography group or watch the weather forecast, you’re bound to hear when one is coming.
A supermoon occurs when the elliptical orbit of the moon brings it closer to the Earth than usual.
The moon’s orbit sees it fly around the Earth at an average distance of around 238,855 miles (384,400km), but during a supermoon, the orbit brings it to its Perigee (closest point to the Earth) with a distance of 224,00 miles (360,000km).
If you plan to shoot a supermoon, a great resource is either PhotoPills or The Photographer’s Ephemeris app. Both provide accurate information for planning a supermoon shot, including the best location and which way to face.
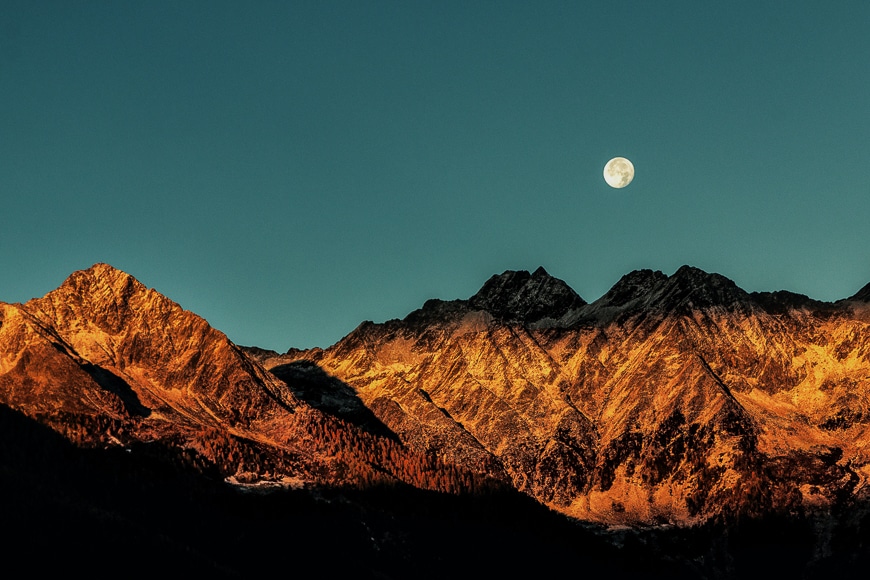
A great way to photograph a supermoon is with a landscape image showing mountains or a forest in the foreground – or a city scene like the one shown above. That way, there are objects to provide a sense of scale to represent the moon’s closeness.
It’s also worth knowing the reason why the moon appears larger when it’s lower in the night sky – this is known as The Moon Illusion.
Believe it or not, this is not the moon’s doing – it’s a psychological phenomenon that causes our brain to conceptualise the moon as being bigger. As the moon nears the horizon, our brain’s function that calculates size and distance gets a little distorted.
How to Photograph the Blue Moon
Capturing the ethereal beauty of the Blue Moon requires a blend of the right equipment and technique.
Here’s a quick cheat’s guide on how to do it, including some camera settings for blue moon photography.
- Choose the Right Day: Ensure you’re shooting on the day of the Blue Moon.
- Use a Tripod: Stabilize your camera to prevent any shake.
- Select a Long Lens: Opt for a telephoto lens for a closer shot.
- Manual Focus: Autofocus might struggle in low light; manually focus on the moon.
- Use a Low ISO: Start with ISO 100 or 200 to reduce noise.
- Opt for a Small Aperture: Set your aperture between f/8 and f/11.
- Shutter Speed: Begin with 1/125 sec and adjust as needed.
- Shoot in RAW: This allows for better post-processing flexibility.
- Check Histogram: Ensure highlights aren’t blown out.
- Post-Process: Enhance details, contrast, and sharpness in editing software.
Moon Photography FAQs
How do photographers make the moon look big?
To make a full moon look big in a photo, you need to use a telephoto lens – something with a focal length of 300mm or more.
You can use short lenses and add a magnification teleconverter to the lens – this increases the focal length by 1.2, 1.4 and even 2.0 times. Taking photos with a crop sensor digital camera means that a crop factor also increases the lens’s magnification.
Why is the moon smaller in pictures?
If you’re taking photos of the moon with a point-and-shoot or smartphone camera, the moon will appear small. These cameras use a wide lens that captures a wide area rather than zooming in close to a subject.
How do you photograph the moon in daylight?
To photograph the moon in daylight, you would use the same gear as at night.
The best way to photograph the moon during the day is to include it in a landscape shot.
Your shutter speed setting will need to change as you no longer need a long exposure (depending on how bright the day is, the shutter speed will be quite fast). ISO will remain low at 100, and the aperture may be anywhere from f/11 to f/22, again depending on how bright the day is.
Where does the moon look biggest on Earth?
The moon travels in an elliptical orbit at an average distance of 238,855 miles (384,400km) from the Earth.
An elliptical orbit means that it doesn’t travel at the same distance during the whole orbit. The point where the moon is closest to Earth is called the Perigee, and the point where it’s furthest away is the Apogee.
During a supermoon, the Perigee can be as little as 224,00 miles (360,000km). The apogee can extend out to 251,655 miles (405,000km).
The moon looks the biggest on Earth where it’s closest to Earth at the time of its orbit.
How to get a Good Picture of the Moon | Final Words
Photographing the moon is a beautiful pursuit, as there’s so much fun in the process of capturing awe-inspiring images.
Heading out into the night – possibly in a remote location – is an adventure in itself, and doing so with the right knowledge to set up your gear and capture amazing photos of the moon is another thing altogether.
What are your thoughts on photographing the moon? Have you experimented with this genre, and what were the results of your efforts? Do you have any gear, settings or process advice for those wanting to snap the perfect moon photo?
Please feel free to join the conversation in the comments below and add your two cents worth or ask questions to build your knowledge.

Check out these 8 essential tools to help you succeed as a professional photographer.
Includes limited-time discounts.


I’m a Melbourne-based street photographer and blogger. I love to travel to Japan to photograph and document its dynamic people and culture.


