


Narrative Publish Blogging Software Review
Check out this in-depth Narrative Publish review for photographers looking for a faster, more efficient way to build their blog posts using an offline desktop app.
Software | Software Reviews | By Mark Condon
It goes without saying that every professional photographer should have a photography blog.
Whether used for marketing purposes, for attracting search engine traffic or simply as a place to display all your pretty pictures, a blog is still a must in 2024.
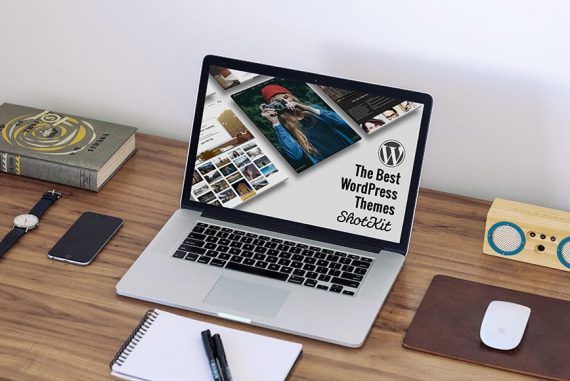
Most photographers use WordPress, while others use Squarespace or WIX. Each publishing platform has its own themes, which govern how your blog posts look.
Fast, simple and fun way to create and manage image-heavy blog posts.
Traditionally, there’s been only a couple of ways to display photos on your blog – in some kind of gallery, or just with one image on top of the other.
With Narrative Publish, all that has changed. Now you’re in complete control of how you want your photos to be displayed… and you can really go to town with it!
Let’s have a closer look at whether you should be using Narrative Publish to make your blog posts look awesome this year.
What is Narrative Publish?
- Simple & fast user interface
- Excellent SEO integration
- Fast to import images
- Fast blog post display
- Useful Facebook comments integration
- Useful Pinterest integration
- Allows offline blog management
- Requires desktop app to edit blog posts
- Limited export option
- No Command-Z undo option
- Mac only
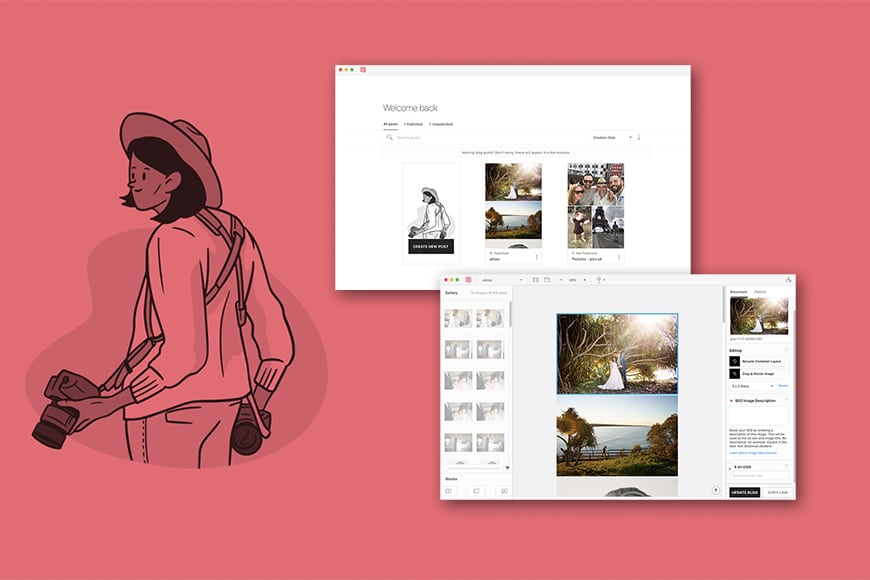
Narrative Publish is a macOS desktop app that allows you to easily create attractive non-standard image and text blog posts in record time.
By ‘non-standard’, I mean that you can do pretty much anything with the layout of your images – change the image ratios, crop or resize them, drag them outside existing template boundaries, make them fade into view and more.
You may have seen some wedding photographers using this style of higgledy-piggledy non-sequential layout in their blog posts.
Now, this visually-impactful style of displaying your own images is within your grasp… and it’s dead-easy to do.
Key Features of Publish
-
Fast blog post building
First, you need to import your folder of images ready to import to Publish – this process is surprisingly quick, much like the Narrative Select app, with hundreds of images being sucked into the app and displayed in seconds.
Once all your images are displayed in the Gallery Panel, you can start selecting them to drag and drop into the main post building area of the screen. You can also just click one or multiple images in order to add them.
Since the app is running natively off your Mac computer with all images already stored on your hard drive, everything is super snappy.
One thing to note is that the Publish app is constantly referencing the images from your designated image folder – if you remove images from there, they’ll appear as missing in the app – much like they do in Lightroom.
Similarly, if you add images to the folder, they’ll appear in the Gallery Panel, ready for you to use – this is great!
-
Easily design creative blog posts

For most photographers, this is the favourite feature of Publish – the ability to create image-heavy blog posts that don’t look like your average WordPress image-after-image-after-image blog post.
Using the Utilities Panel, you’re able to cycle through various layouts, crop and resize images or change their ratios.
The Recycle Container Layout button is particularly useful, allowing you to cycle through a few layouts in order to quickly choose which one looks the best.
A ‘container’ houses your image(s) and using the app, you’re able to do pretty much anything within that container – something that’s hard if not impossible to do on other blogging platforms.
Essentially, you can have a certain WordPress theme for the main elements of your website (homepage, about page, header, footer, etc), but display your blog post image contents however you like using Publish.
This is a great way to ensure your website is as unique as you are. It’s also a smart way to help your blog posts stand out in a sea of similar-looking blog posts, created by photographers or otherwise.
(Indeed, I can see Narrative Publish being used by other industries to make their product-related blog posts stand out, for example.)
I found the drag and drop experience simple and fun, and being able to double click images to envoke the resize/crop function quickly becomes second nature.
-
Auto Layout tool for lightning-fast blog post creation
Nestled away in the top toolbar is a mysterious star button which when pressed, offers the ability to automatically lay all your images out at once.
(If you’ve ever used album building software, you’ve probably seen some similar magical tool that lays out all your photos in a predesigned template.)
Having this tool in Publish for laying out all your images in an attractive blog post is a huge time-saver, and I recommend using it as a starting point every time you create a new blog post.
Then, you can simply drag and drop images to swap them around in the layout, or get even more creative with one of the other image tools.
-
SEO integration is simple and intuitive

I’ve been involved with SEO for years now, but for the purposes of this Narrative review, put myself in the shoes of a novice – someone who knows that SEO is somehow important… but doesn’t have a clue how to ‘do it’!
Thankfully, with Narrative Publish, things are kept simple.
First, you’re instructed to enter some SEO Focus Keywords, so in the case of my example, I entered Cabarita, Norries Headland, (the location), Wedding and Sunset.
This won’t do anything magical with the Google-Gods, but rather, will let Publish know what your blog post is about, in order for it to help you with some other text and image optimizations.
Next, you need to enter a Blog Title – once you start typing, you’ll get some tips regarding what and how much to write. The goal is to make the little red light turn to orange and then on to green.
The same thing goes for the Meta Description, which is a short blurb that the search engines may choose to display when someone Googles a term related to your blog post.
If you have time, it’s also good practice to type a few words as the SEO Image Description for each of your images, e.g. Wedding couple on Cabarita Headlands at sunset. Try not to get too repetitive with the exact same text on multiple images, since Google won’t like this.
One handy little tool is the ‘Image Descriptions Overlay’ which can show you quickly which images need their Descriptions added – red means they’re missing, while green means you’re good to go – see the screenshot above.
Finally, you’ll need to add some Text Content by dragging and dropping a Text Block into your blog post preview. The text will inherit the styling from your website when you publish your post.
However, the image layout and any individual image edits must be performed from within Publish – more on this below.
-
Fast loading image blog posts
Once you’re happy with the blog post you’ve created with Publish, it’s time to publish it to your website. At this point, you’ll need to enter your website’s URL and login details – everything is saved for subsequent uploads.
For WordPress, you can either use the Narrative plugin to handle the upload, or you can do it manually.
(Note that the Narrative plugin doesn’t slow your website down or affect it in any way like some plugins – it’s active only when you upload new blog posts, and lies dormant at other times.)
If you decide to upload the post manually, you’re given some code to place on your website – when you preview or publish the post, all the image content will be pulled from the Narrative servers and shown to your visitors.
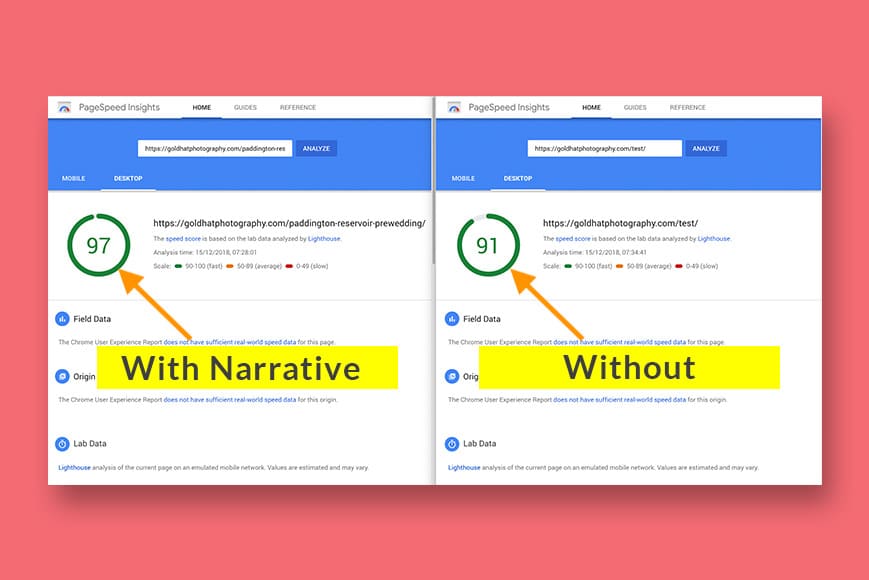
Since the Publish app automatically creates images of various sizes and displays the most relevant ones to your viewer, everything loads extremely fast. The Narrative servers are arguably much faster than your shared hosting plan, too.
I conducted a Google PageSpeed test, building one post entirely with Narrative, and another identical one using my normal method of uploading images to WordPress. As you can see in the screenshot above, even with my speedy non-shared hosting plan, the Narrative-built post knocked some seconds off the load time.
-
Offline blog post creation

Since the Narrative Publish app is installed on your Mac and all the images it uses are available locally on your hard drive, the Internet isn’t actually required until you actually need to upload the blog post to your website.
This means that for blog post design and management, you can use the Narrative entirely offline. This makes it great for those times you might be working on a plane or somewhere with limited Internet connectivity.
It also provides a handy offline way to manage your blog posts really quickly – if you’ve ever been annoyed with the sluggish pace of the WordPress dashboard, you’ll know where I’m coming from here.
With Publish, you’re able to click, browse around and make edits to your existing blog posts really quickly – there’s no waiting for things to load. I love this.
-
Make things pretty with buttons, comments and animation
You can make your images slide or fade in by using the handy Animation toggle switch in Publish.
You can also include Pinterest Buttons, download buttons (so clients can grab all the images, for example), and even a Facebook Comments section at the end of your blog post.
All these things are possible with WordPress by using various free plugins, but they can also add bloat to your site, causing it to slow down. It’s nice to see these things as options to spruce up your blog posts, all built within the Publish app.
-
Export images option available
You might be wondering at this stage, what happens to all my beautiful blog posts if I decide to stop using Narrative Publish?
Thankfully, there’s a way to export your images from Narrative – whether that’s to create an offline backup of your blog post designs or to move them elsewhere.
It’s easy to do this and well-documented here, but the limitation is that your blog post designs can only be exported in certain ways, such as in rows, based on the Containers you created earlier.
You may also want to export single post files in order to work on multiple computers, although thanks to a recent update, your blogs automatically sync between different devices.
Caveats
Time to address the elephant in the room here – if Narrative Publish is a subscription service, what happens if you decide to stop paying the annual fee?
What happens when you cancel your Narrative Publish account?
It’s all detailed here, but the long and short of it is this:
Cancelling your account means that all the blog posts you’ve created with Narrative will vanish.
However, there is a handy option called Parking Plan, whereby you pay $10 per year to have your Narrative-created blog posts remain on their servers. Everything will look the same on you website – you just won’t be able to edit those posts.
Hopefully, this option should remove the biggest hurdle for photographers wanting to use this amazing app.
Obviously, you’ll have to weigh up the pros and cons for yourself.
Value for Money
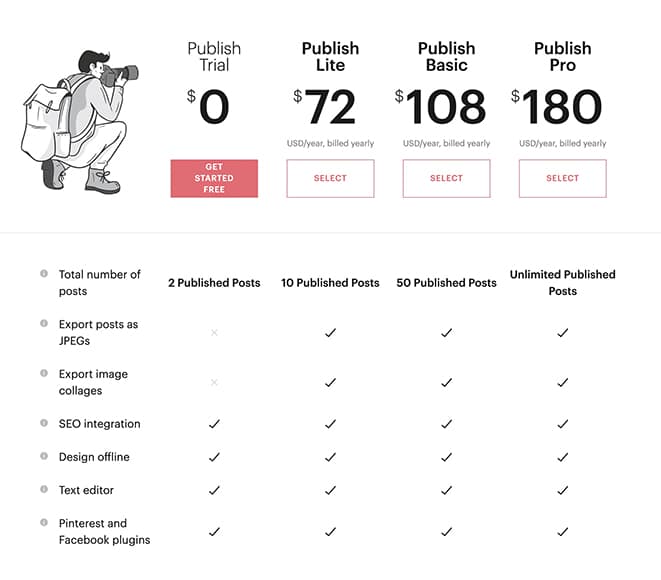
Narrative Publish is free to use in Trial mode, where you can create and manage 2 active blog posts. After that, you’ll need to upgrade to one of the subscription plans.
You can see the pricing above along with what’s included at each level – note that the total number of published posts isn’t an annual count but rather, an overall total.
The Publish Basic plan seems to be the best value for money, and having 50 blog posts as a target will ensure you really get the know the ins and outs before upgrading to the unlimited plan.
Narrative Publish Code
Be sure to use code SHOTKIT to save 10% on your first year with any of the plans!
Narrative Publish Review | Conclusion
The more you use Narrative Publish, the more you’re publishing blog posts on your website… which in turn can lead to more business, especially if you’re using the SEO features to drive traffic to your website.
There’ll probably be some photographers who are hesitant to be signing up for another subscription service, but as long as you’re making more money than the cost involved, it shouldn’t be an issue.
I’d recommend you download a free trial version of Narrative, and kick the tires yourself for a few days and let me know in the comments what you think.
Fast, simple and fun way to create and manage image-heavy blog posts.


Mark Condon is a British wedding photographer and editor of Shotkit. When he’s not taking photos or reviewing the latest camera gear and software, Mark can be found cycling around the northern rivers.


