


How to Shoot Night Landscape Photography (+ Best Settings)
Discover all there is to know about the alluring world of Night Landscape Photography, including how to capture incredible photos of the stars and night sky.
Learn | Photography Guides | By Greg Cromie
In this guide to night landscape photography, I’m going to cover a lot of technical and practical information, which will help you plan, prepare and capture fantastic night shots.
What’s more, your images will have compelling compositions that include guest appearances from our galactic neighbours.
Before you even touch a camera, dive into our guide to learn about how to capture night shots, the gear you’ll need, and the skills necessary.
How to Shoot Better Night Landscape Photos

Decide the best time
When shooting landscape photography at night, there’s a lot to consider well before you even pack your bag.
One of the most important considerations is to determine the best time to head out and shoot. Some factors alter the timing of your nighttime outing, including the time of night, month and year.
There are a bunch of mobile apps and sites informing the best time to capture stars in your photos. We’ll cover it in greater detail, but the Milky Way is more visible and vibrant at different times of the year.
The best time to shoot is when it’s full dark – around two hours after sunset when the contrast between the sky and the stars is strongest.
Another big challenge is to include the moon in your composition. I recommend researching the different phases of the moon and what each of them means – knowing when each phase appears makes it much more manageable.
Some applications allow you to pinpoint your location and where the moon will appear.
Plan for the best weather
Weather forecasting is good at predicting nighttime weather conditions. In general, night skies are calmer and result in less dramatic weather changes. The best time to shoot night landscape photography is with clear skies.
You’ll likely be on your shoot for several hours, so check the forecast for the remainder of the night. There’s no point heading out and getting set up if there’s a storm approaching within a couple of hours or thick clouds forecast.
If you want to include clouds in your compositions, check the level of cloud coverage for the area that you will be shooting in.
Decide the best location
Deciding on the best location for your next night landscape outing is critical to your success.
The first thing to know is that you must escape light pollution. Light pollution is most evident in urban and inner-city locations. City buildings, house lights, street lights, shopping centres, and even car headlights contribute to light pollution.
The glow from these lights makes the sky less dark, and as a result, you can’t get a dark enough sky to effectively capture stars.
An area that’s far away from sources of light pollution, such as rural and country areas are best.
While the nearest star is 2.5 Light Years from the earth, each light-year is about 6 trillion miles, so a few hundred meters above sea level may seem insignificant. But, the air at higher altitudes is thinner and generally clearer.
Do your research to establish where the moon or Milky Way will appear. Your job during the day is to scout locations where those elements will combine with landscape features.
Having natural ground elements, such as a lake or mountain range, will add to your final composition.
Prepare your camera gear

- Camera Bag
OK. You now have my permission to start packing your bag! First, let’s talk about the bag you’re going to choose for your night landscape excursions.
I would recommend a comfortable and durable camera backpack – here are some great options.
It’s essential if your location demands a hike to the perfect spot – a backpack is far more comfortable and holds gear other than your fancy camera and best landscape photography lenses.
How Much Do You REALLY Know About Photography?! 🤔
Test your photography knowledge with this quick quiz!
See how much you really know about photography...

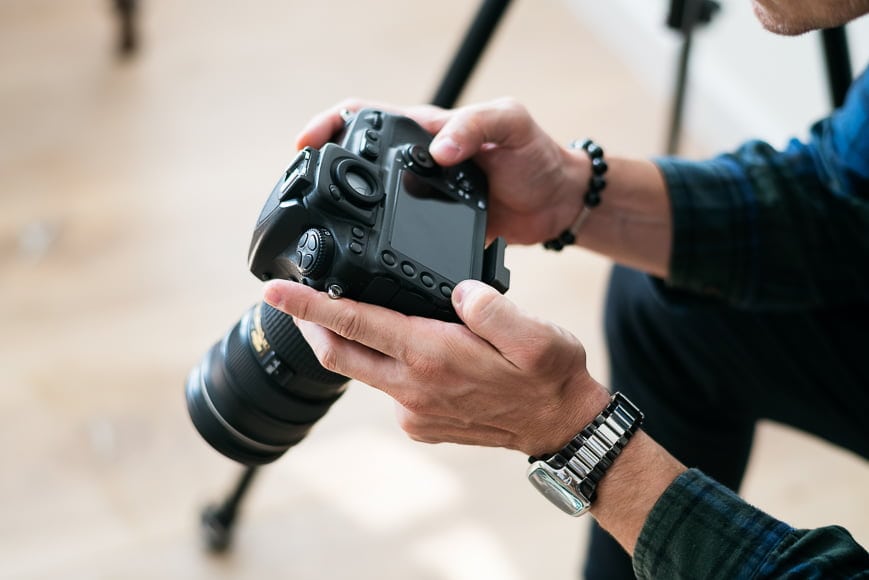
- Camera
I’m a believer in shooting with whatever you have. But, for night photography, it should have some essential features.
A camera with proper ISO management and performance is ideal – the last thing you want is a star trail riddled with image noise.
Having a self-timer or the ability to connect your camera to a mobile app will fire the shutter without touching the button. Finally, make sure your gear is rated to handle cold conditions.
Remember that you need to turn off image stabilisation as this will not be necessary.
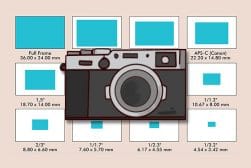
As regards full frame vs crop sensor (or any camera sensor size for that matter), the larger the sensor, the more image data being captured, and consequently, the more leeway you have for your editing when you’re back at your computer.
A full frame sensor also produces cleaner results at high ISO compared to a crop (or smaller) sensor, although this may not be relevant for what you are shooting.
- Lenses
A wide-angle lens is going to be best for this kind of shoot – especially one that you can manually focus. The wide field of view allows you to capture both the foreground and night sky.
A suitable lens should also have a relatively wide aperture – around f/2 is a good starting point.
Image Stabilisation on a lens is not essential as you would need to turn that off anyway for long exposure time work on a tripod.
Check out this guide on the best Sony lenses for astrophotography if you’re a Sony shooter.
- Tripod
Having good quality and sturdy tripod is a must. Camera shake during a long exposure time is going to ruin your night shot.
It doesn’t have to be a particularly tall tripod – just steady with no wobble. I recommend only extending the legs enough to make yourself comfortable, as this will keep the tripod steady.
Some tripods have a handy hook at the bottom of them so you can hang a weight to add stability – here are some of our favourites.
- Accessories
Filters can be a great addition to your kit for this kind of shoot. There are specific filters available that reduce light pollution – especially if you can’t get to a dark spot.
And please, pack as many camera batteries and SD cards as you own. Long exposure work drains the battery very quickly – you don’t your only battery draining in under 30 minutes.
Prepare your safety gear
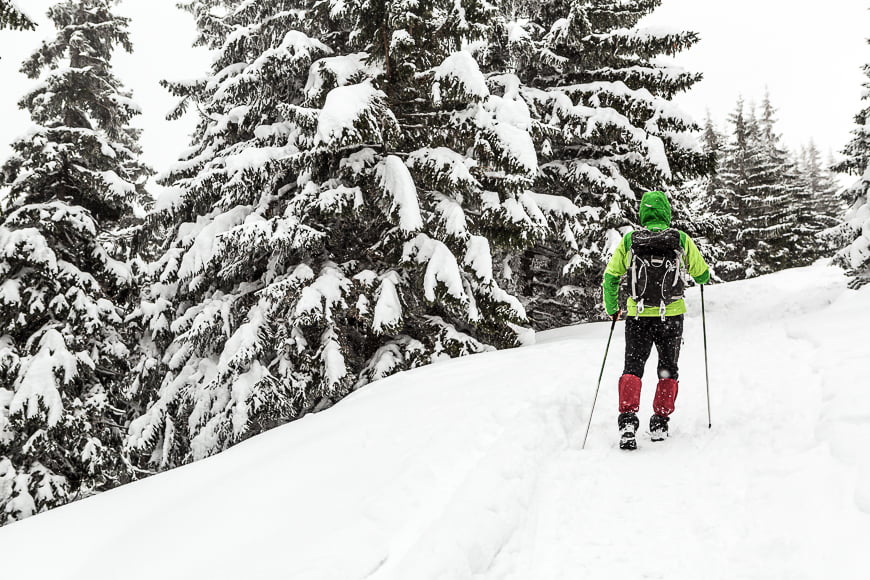
- Clothing
You should never underestimate just how cold it can get at night. Being outside in the country is a lot different from being out in your backyard.
I would highly recommend visiting a camping store for thermal layers rated to the temperatures you will be experiencing. A high-quality coat is not cheap, but it could be a potential life-saver while you sit out on a mountain top.
You need footwear that’s going to support you, especially if you have a hike to reach your destination. This is essential if you’re in near-freezing conditions.
You’re going to need gloves, but the bulk gets in the way of camera controls. Try fingerless or photographers’ gloves that have thinner textured fabric suitable for touch screens.
Thermal hand warmers are inexpensive and available in most supermarkets. Crushing the packets cause a chemical reaction that radiates heat – stick one in each pocket and keep a couple of spares in your bag.
Thick socks and a quality beanie are the last pieces of clothing I would recommend.
Related: How to take portrait photos at night
- Visibility
A powerful torch AND a headlamp are essential pieces of safety gear. Headlamps are great for hiking or setting up your equipment as it frees up your hands. You don’t want to trip over or drop something in the dark and never be able to find it.
A torch also provides additional illumination, plus you can use it for light painting – remember to pack spare batteries.
Researching your location and even visiting it during the day gives a greater understanding of the terrain and potential risks. You’re prepared for cliffs, broken trails, and other hazards.
The last thing you need is an enjoyable night of star trail photography ending badly due to a twisted ankle.
- Personal Comfort
On that note, a small first-aid kit packed in your bag or at the very least in your car would be a smart move.
Your preparation should also include knowing what local wildlife is in the area. If you’re in an area that has the potential for dangerous wildlife, know how to manage the situation to ensure your safety. If you aren’t experienced in the great outdoors, start in safer locations first.
You may be out sitting on a rock for several hours, and on occasions like these, I would back a waterproof picnic blanket and a small collapsable aluminium chair. Why be uncomfortable doing what you love?
I would also recommend a 1-litre water bottle to stay hydrated and some high energy snacks too. Plus, a thermos of your favourite hot drink will make a world of difference.
The final point is to let people know where you’re going. If it’s an unfamiliar area, notify local police or park authorities of your plans. Also, let friends and family know about your travel plans, duration and destinations.
Finally, consider bringing a fellow photographer with you. Safety in numbers, and you have someone to chat with while you work.
Choose your camera settings
Picking up a camera and taking a shot during the day is a far more straightforward process to shooting at night.
At night, autofocus is next-to-useless as it’s challenging to find a subject lit well enough to focus on. As a result, I would always recommend using manual focus.
To take crisp and sharp images, focus on the brightest star in the sky. Or, if the moon is a feature in your composition, focus on that.
You may choose to focus on a nearby ground feature, such as a tree or boulder. Your torch comes in handy to illuminate that object and gain focus.
Alternatively, dial your focus to the infinity end of the range. Always check for sharpness with the focus assist feature on your camera.
Modern cameras shoot in both JPEG and RAW formats. I recommend shooting night images in RAW as you’ll have a significant amount of image data to work with in post-processing.
It’s far easier to control the brightness and tonal levels of a RAW image compared to a JPEG.
(If you accidentally shoot in JPEG, I wrote this review of a handy software that attempts to convert a JPEG to a RAW, giving you back a bit of latitude with your post-processing.)
When you press the shutter button, the camera experiences a tiny vibration. That movement is enough to cause image blur.
The best way to combat this is by using the self-timer setting, a remote camera app, or a physical shutter release with a cord. No touching, no shake.
Dial-in your exposure settings

In normal circumstances, you would dial-up your ISO to compensate for the darkness in a scene – such as a wedding shoot.
The challenge with night landscape photography is that there’s often zero light. Dialling up the ISO too high to accommodate the lack of light is only going to result in noisy and grainy images. I would set an ISO of somewhere between 800 and 1600 as a good starting point.
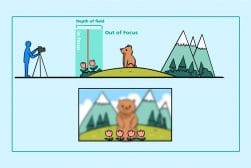
Photography teaches us that with a wider aperture, such as f/1.2, more light hits the image sensor. And a narrow aperture such as f/11 will allow less light in, so the images are darker.
The temptation is to crank that aperture as wide as possible when shooting darker scenes. But, the issue arises that an aperture like f/1.2 delivers a very shallow depth of field – foreground subject in focus and background out of focus.
While advanced photographers will work with hyper-focal distance calculations, I would recommend a more straightforward approach for those starting.
Start with an aperture of f/2.8 – as long as you’re not too close to foreground subjects, most of the composition will be in focus. You can attempt a narrower aperture and higher ISO but keep an eye on image noise and the amount of light you capture.
Camera shutter speed is the most critical setting to capture night landscape shots – but it’s a delicate balance.
Too fast a shutter results in not enough time for the available light to hit the sensor. This results in dull landscapes and muted stars.
But, too slow a shutter results in well-lit ground elements but blurry stars – caused by the sensor capturing the movement of the stars as the earth rotates.
If you’re shooting dramatic images of star trails, where you want to capture their movement, longer shutter speeds are a must.
Most modern cameras offer ‘Bulb Mode’, which allows you to keep the shutter open for a longer duration. When combined with a remote shutter release, bulb mode allows you to open and close the shutter whenever you like.
Slow shutter speeds for long exposures is probably one of the easiest ways to get more light in the camera. Keep in mind that long exposures can generate noise – more advanced cameras compensate for this to some degree.
Every night sky and location is going to generate different amounts of light. While there are some advanced rules for calculating shutter speed, practice makes perfect.
I would recommend starting with a 1-second exposure and check the results. Then extend the exposure time to get the clarity and light you want. If you begin to see the stars with trails, dial back your shutter speed.
Choose your composition carefully

Detailed images of the moon or the Milky Way galactic core splashed across the sky are mindblowing. But there’s a lot to be said for creating a unique composition.
Ground elements in your composition ‘ground’ the scene as well as add interest and drama. Consider adding horizon-level aspects such as a distant city or a mountain range. Having the galactic core soar above a snow-capped mountain range makes for a fascinating shot.
Consider some middle-ground elements such as farms, forests, or even a lake. Also, think about foreground subjects to draw the eye in and around the composition.
Abandoned farm buildings, rusted-out trucks, boulders and lone trees make for perfect additions to your image, and remember you can still try and use elements on the ground or in the sky to create an s curve in your photography – see our guide.
Consider Light Painting
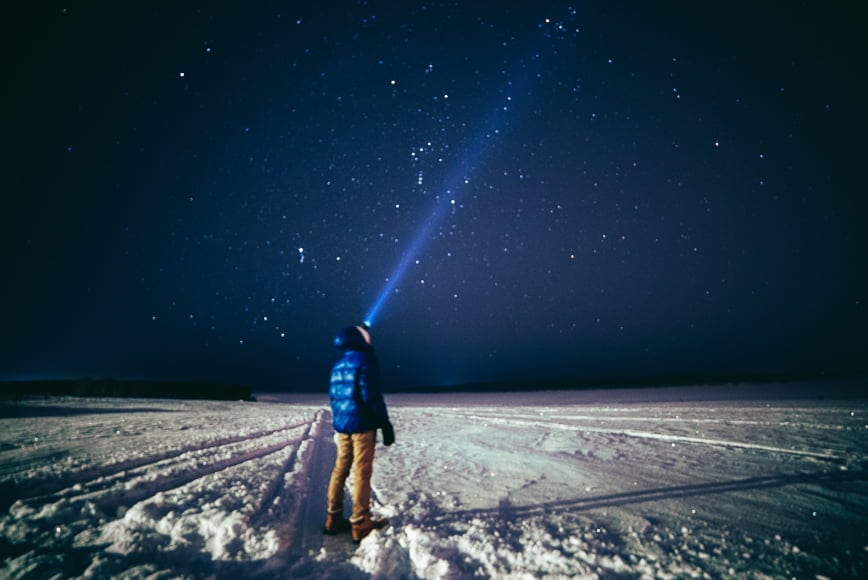
An excellent way to add interest and drama to your image is with light painting.
You can use conventional photographic tools such as flashes and strobes to illuminate a subject part way through your exposure.
Or, you could use a source of constant light hidden behind or in front of a foreground subject – consider adding colour gels to these lights.
A straightforward method of light painting is with that high powered torched you packed.
If you want to get a bit more experimental, there are plenty of tools for light painting available too.
Given that some exposures could last from 30 seconds up to several minutes, you have plenty of time to paint your scene. Use a torch to splash beams of light across the tops of trees or even a building to give it some punch in your composition.
Consider setting the self-timer for ten seconds then run to the centre of the foreground. Point that beam of light up for the duration of the exposure. You’ll appear in your image as a galactic explorer.
Decide how to shoot the stars
- Milky Way
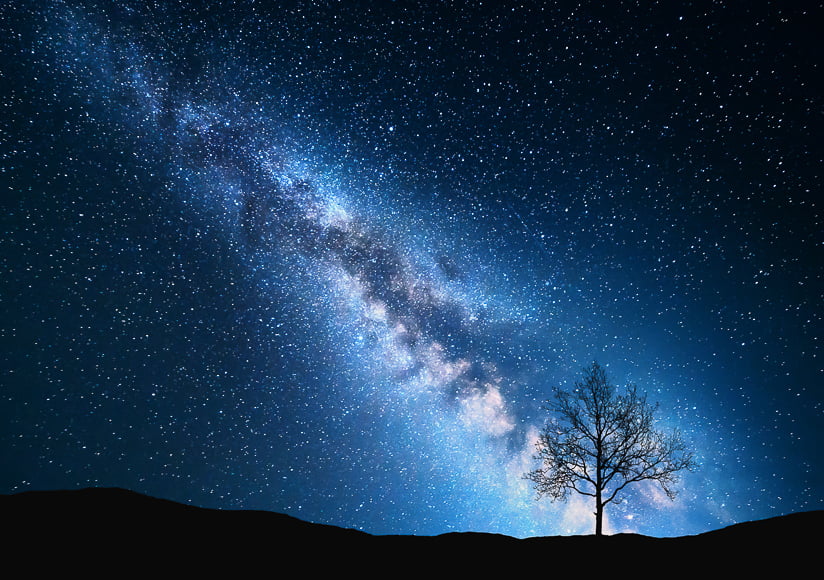
By far the most satisfying outcomes of night photography is to capture the galactic core of the Milky Way.
It’s estimated to be one hundred thousand million stars in our immediate galaxy – with only 5,000 stars visible with our own eyes. Capturing the milky way with a camera can yield far higher numbers and deliver stunning images.
To achieve this, you apply the camera settings we discussed above and experiment with your shutter speed. A good starting point is an exposure between 1 and 30 seconds – experimentation and test shots are vital here. This is with an aperture of F2.8 and an ISO of around 1600.
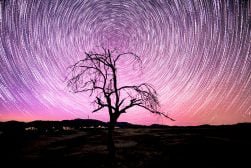
- Star Trails

Star trail photography shows the path that the stars have travelled during the night. If done right, star trail images show a grouping of starts completing a full circular path as the earth rotates.
With the right research, you’ll know where to position yourself, which direction to face (both horizontally and vertically) and how long to hold the exposure are critical.
Fortunately, there’s a range of apps and sites that can answer these exact questions for you. You enter a location, and it will advise on the direction to face your camera, the angle of elevation, and even the duration of the rotation.
But, stars can take hours to complete their arc – it’s going to be a long night, and you will be glad I told you to bring a chair, hand warmers and snacks.
This raises some mechanical issues with your camera. The obvious one is that your battery isn’t going to last that long – especially shooting with a mirrorless camera like these.
Consider using a camera with a battery grip so that you have a total of three batteries. Alternatively, plug your camera into an external power bank if your camera supports this. Having an empty high-capacity memory card is also a must.
Your camera sensor is also going to get very hot, and this can result in unwanted pixel damage in your image.
To manage this, take multiple images over a long period with each exposure lasting a minute. Then, in editing software, you stack all the photos together to form a single image.
I’d be aiming for a total of 30 minutes to an hour’s worth of these multiple images.
Final Thoughts
Taking up night landscape photography is an incredibly rewarding genre. As we’ve discovered, it’s not without its challenges – both physical and technical.
But what adventure is not without challenge? It’s due to these challenges that night landscape photography is such a rewarding pursuit.

Check out these 8 essential tools to help you succeed as a professional photographer.
Includes limited-time discounts.


I’m a Melbourne-based street photographer and blogger. I love to travel to Japan to photograph and document its dynamic people and culture.


