


Portrait Lighting: 7 Best Techniques, Examples & Setups
Discover 7 portrait lighting setups that every photographer should know, including tips and examples of great face lighting you can do at home or in the studio.
If you’re looking at becoming a portrait photographer, you’ve probably already asked yourself, ‘what is the best lighting setup for portraits?’
And if you plan to shoot portraits at home, the next question to ask is ‘how do you light a portrait at home?’
Fortunately, Shotkit is here to provide you with beginner-friendly advice on how to build a portrait lighting setup.
Regardless of shooting in a professional studio or setting up a studio at home, we have all the essential advice.
So buckle yourself in for the most helpful portrait lighting patterns, photography lighting techniques, necessary gear and best tips for successful portrait photography in 2024.

Revolutionary lighting simulation software that streamlines studio photography and film making.
Use code SHOTKIT10 to save 10%.
7 Useful Portrait Lighting Patterns
1. Rembrandt Lighting

Rembrandt lighting is one of the oldest portrait lighting techniques. It relates to the 17th Century painter and his technique of applying light to the side of the face in his paintings.
The Rembrandt lighting pattern is considered a dramatic lighting effect with half the face in shadow and the other half-lit. The telltale sign result is a small upside-down triangle of light on the cheek that’s in shadow.
To achieve this look, turn the subject’s face away from the light source, making one side of the face lit and the other half in shadow.
Rembrandt lighting requires enough light to peak over the bridge of the nose to cast light on the cheek. The nose shadow forms one side of the triangle, while the cheek shadow creates the other.
Rembrandt lighting is one of the most difficult to achieve, but with practice and the correct position of your subject, you’ll get there.
Use a ring light or other light source to cast light into each eye and make them come alive.
2. Butterfly Lighting
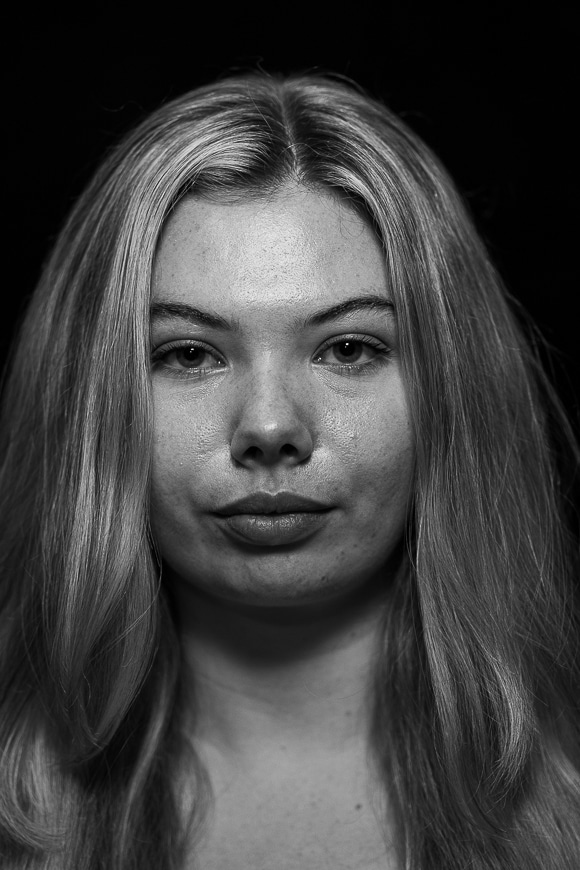
Butterfly lighting creates an even amount of light across the face. It’s a great lighting pattern when photographing a subject with strong cheekbones.
The light source sits above and behind the camera (above the model’s eye level) to cast light downwards on the subject’s face.
It creates a butterfly-shaped shadow under the nose that falls away below the cheeks on either side. With the light source behind the camera, fine wrinkles and lines minimised.
In some cases, the subject can actually hold the reflector to angle light under the chin, without impacting the shadow under the nose.
Butterfly lighting delivers a flattering look that removes the deep shadow that forms under the chin.
Pro tip – use set.a.light 3d lighting simulator to help you create all these various lighting setups.
3. Broad Lighting
Broad lighting is an easy to master photography lighting style that requires the subject to turn their face away from the light.
As a result, the side of the face that has more surface area facing the camera is lit. The shadow side has a smaller surface area and is in shadow.
It makes a face look broader and works well with people that have a thin face.
Using broad lighting on someone with a broad face won’t be flattering as it makes their face look wider.
4. Split Lighting

The split lighting technique is a simple pattern that splits the face down the middle. It is one of the simplest types of portrait lighting style in modern portrait photography.
One side of the face lights up while the other side is in shadows – with a lighting split between the two running down the middle of the nose, mouth, and chin.
How Much Do You REALLY Know About Photography?! 🤔
Test your photography knowledge with this quick quiz!
See how much you really know about photography...

With split lighting, have the subject’s face at a 90-degree angle to the light to illuminate only half the face – the other half falls into shadow.
Split lighting is a dramatic lighting technique that’s easy to achieve with a single light source. You should use it in conjunction with a ring light at low power to brighten both eyes, while not lighting the side of the face in shadow.
Split lighting experimentation is your best teacher in achieving the right balance of light and shadow down the middle of the face. It’s also popular for achieving a mysterious chiaroscuro look.
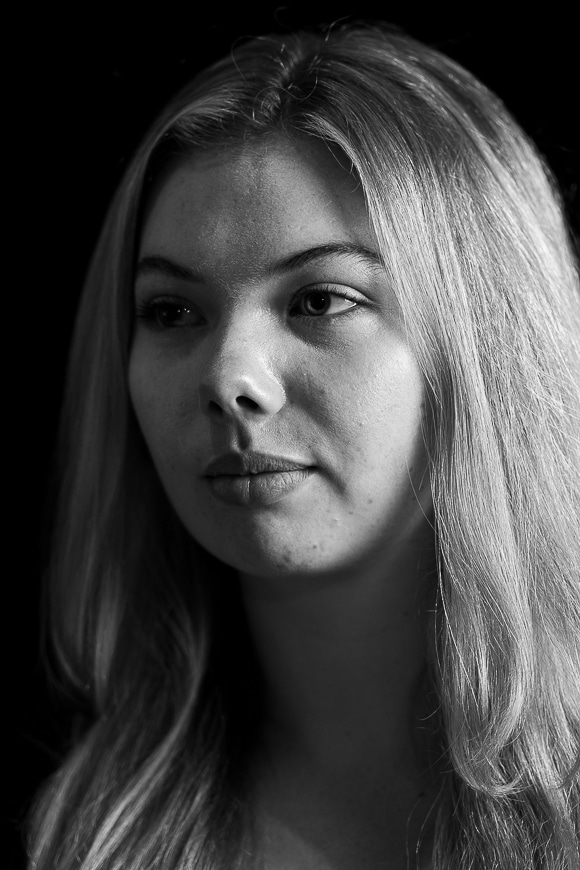
5. Loop Lighting

A loop light delivers a natural level of illumination with enough shadows to create depth and contrast.
The light source faces the subject at a 45-degree angle so that the face lights up with soft light. The angle of the light source casts a small shadow from the nose to the cheek to create depth.
The cheek that’s facing away from the light source is also partially in shadow.
Unlike the Rembrandt portrait lighting setup where these two shadows meet to create a small triangle of light, the two shadows in loop lighting don’t meet under the eye.
A loop lighting pattern is a form of side lighting that’s soft (as opposed to ‘hard’ light) and less dramatic, making it great for natural-looking portraits.
Loop lighting is one of the more difficult techniques, but it’s for this very reason that you should give loop lighting a go!
6. Short Lighting

A short lighting pattern is the opposite of broad lighting.
The subject’s face turns so that one side of the face is broader than the other. Short lighting is the opposite of broad lighting, so instead of turning away from the light, the subject turns towards it.
With short lighting, the broad side of the face (facing the camera) is all shadows while the thin or short side lights up. With soft lighting, the shadows under the cheekbone and next to the nose are more pronounced.
Short lighting is considered a valuable pattern for a dramatic photo or to slim down the face.
Ensure you have some form of fill light or catchlight when creating short lighting or broad lighting to bring the eye on the shadow side to life.
7. Experimental Lighting
Now that you’ve discovered the six most common lighting patterns, it’s time to develop your own lighting patterns.
Use the skills gained here to experiment with a subject to develop your face lighting techniques.
Consider using the split method horizontally rather than vertically. Light the bottom half of the face while the top half is in shadow for an unusual, sinister look!
Learn what the professionals do and then mix it up to create your unique types.
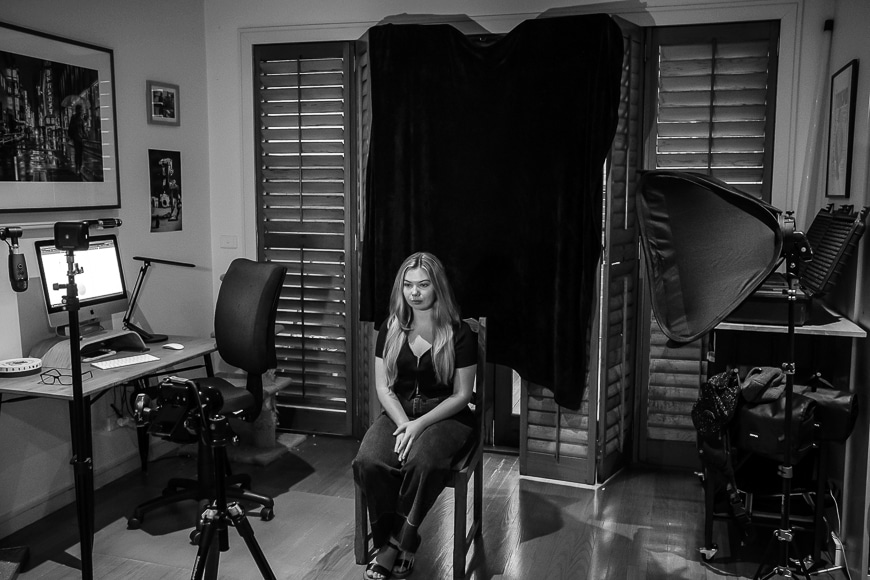
What do you need for Portrait / Face Lighting?

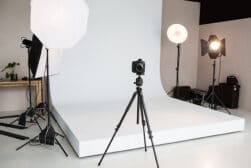
Before you rush out to the camera store to buy up big, let’s take a look at exactly what you’ll need.
(The photo above shows what I used to create all the example images in this guide.)
There are some critical pieces of kit for portrait lighting setups. But sometimes, less is more – especially as a beginner working from home.
Basic Lighting Gear
- Camera – Use a camera with interchangeable lenses and a hot shoe – it’s the small bracket that sits on top of the camera. The hot shoe connects a flash or a flash trigger to the camera. Use a camera with manual controls to change the ISO, Shutter Speed and Aperture – components of the exposure triangle and essential camera settings for portrait photography.
- Lens – For successful portraits, the most common focal range is between 50mm and 100mm. Plus, the wider the aperture, the better – f/1.4 or f/2 creates a narrow depth of field with the subject in focus and the background blurred. With a 90mm lens you can neatly frame the face without any distortion and minimal background.
- Speedlight/ Flash – You’ll need at least one speedlight or flash to achieve different creative looks. It attaches to the hot shoe, so the camera controls it and shares data. Flash power is set to a manual value or Through The Lens (TTL) providing the needed light determined by the camera.
- Flash Trigger – Instead of connecting a speedlight to the hot-shoe, connect a flash trigger to communicate with an off-camera flash. Place the flash away from the camera on a light stand. When you take the photo, the trigger sends a message to the flash to fire.
- Rechargeable Batteries – Both the flash and flash trigger require batteries, but high-quality batteries are expensive. Use rechargeable batteries – buy two sets, so you have one in user and the other on charge.
Advance Lighting Gear
- Tripod – As your subject will be still, mount the camera to a tripod. With a tripod, you can use slower shutter speeds and not worry about motion blur.
- Light Stand – Speedlights come with a plastic stand to use on the ground or tabletop. But you often need the speedlight to be at eye level with your model – or higher. A light stand is compact, lightweight and supports a speedlight. You adjust the height and move it around to get the best lighting effect and angle, such as with Rembrandt lighting.
- Strobe – A strobe is controlled with a wireless trigger and works in the same way as a speedlight. A strobe shoots a far brighter burst of light with a faster cycle time – how quickly you can set off multiple bursts. Strobes are powered via a mains socket to achieve more powerful bursts.
- Softbox – Flash pointed directly at the subject washes out features, and creates harsh shadows. To compensate, soften the light with a softbox – a material box the flash sits within. It mounts to a light stand via a bracket that rotates to control the angle of light. The flash points at an opaque layer of white material to modify and soften the light. A softbox works well with a subject that requires broad lighting or short lighting.
- Beauty Dish – A beauty dish works like a softbox but delivers a more direct light for dramatic photos. The light is modified halfway between the harshness of a direct flash and the softness of a softbox. It’s beneficial with a loop lighting setup.
- Umbrella – A lighting umbrella looks the same as a wet-weather umbrella, but the interior lining is a reflective material. You shoot the flash into the umbrella, and light bounces from the reflective material to spread out evenly. Some umbrellas are semi-transparent to soften the light over a more extensive area. Lighting umbrellas are used to create background lighting.
- Reflector – A reflector is a flat disc of material framed with rigid plastic. One side is a gold reflector, and the other is a silver reflector. It’s ideal for reflecting light towards your model – the gold side reflects warm light, and the silver side reflects a cooler light.
- Boom – To position a speedlight above your model, you’ll need a boom arm that attaches to a light stand. You connect your light or modifier to the boom and hang it at the height you need. A boom is more effective to position a light source for split lighting people.
- Multiple Flash – Pro photographers use multiple flash units to create dramatic lighting. One flash applies soft light to the left, another with a beauty dish applies harder light to the right, and the third lights up the background. Flash triggers control multiple flash units at the same time.
- Backdrops – Material and paper backdrops come in a roll and hang from a frame to fall behind your model. They provide exciting or plain backgrounds allowing you to set up anywhere.
General Tips for Portrait Lighting
Here are some very simple and easy to follow tips for portrait lighting. While these are for beginners, every photographer needs reminding from time to time.
- Keep it simple – As mentioned, don’t rush out to the store with a fist full of dollars to buy it all. Start with your camera, a suitable lens and a single flash or Speedlight mounted to the hot shoe. Master that combo before you advance to a flash trigger and multiple flash units.
- Bounce it off the ceiling – A simple way to spread flash more evenly is to point it up at the ceiling. The light travels from the flash up to the ceiling and bounces back down less powerful and softened.
- Shoot handheld – A tripod is not essential, but it does help – if you have one, use it. If not, shoot handheld but be conscious of using slower shutter speeds.
- Grab a seat – The trial and error of loop lighting and Rembrandt lighting can take time. For the sake of your model and yourself, grab a chair for them to sit on – preferably a bar stool.
- Recharge your batteries – As mentioned, using rechargeable batteries are far better for your wallet and the environment in the long run. Make the investment upfront to buy two sets of batteries for your flash and trigger. Keep one always on the charge, ready to go. If you’re shooting away from your home or studio, make sure all of your batteries are fully charged and packed where you can find them in a hurry.
- Window light – If you don’t have a flash, you can capture images with window light. Just stand your model close enough to the window to make the most of the light streaming in. Strong and direct sunlight can be used for patterns such as broad lighting and short lighting.
- Clean background – Portraits are all about making a face the centre of attention in a photo. Having a cluttered or distracting background can detract from the main focus. Consider where you place your model and what’s behind them that may cause distractions in your photos.
- Use a backdrop – Most of us don’t have nice looking backgrounds in our home that are suitable for portrait photography. The best solution is to use a backdrop of some kind – either DIY or store-bought. Paper and fabric backdrops come in a roll that can hang down from a bracket or frame. For a DIY approach, peg an ironed bedsheet behind your model.
- Makeup – Studio lighting can make skin look too shiny. Professional photographers employ makeup artists to prepare a model for a shoot. If shooting a subject in your home with studio lighting, consider the use of minimal and natural makeup to hide blemishes and prevent the skin from looking shiny – on men and women.
- Clothing – Just like backgrounds, the clothing worn by your model can be distracting. You want images to be about the face, so do your best to select a suitable outfit (top half at least) with your model.
- Posing – I recommend practising posing with one of your kids, partner or a random subject before you try it with a model. Fortunately, most models know their best poses but will still expect direction from you. Posing also helps to get the right angle in patterns such as loop lighting and butterfly lighting.
Portrait Lighting FAQs
Can you use a ring light for portraits?
Ring lights are a form of catch light and are a great addition to portrait lighting setups.
By mounting the ring light in front of you, you can point your camera lens through the opening. That way, your model will have perfect circle lights reflected in their eyes.
Ring lights cast a constant light that illuminates the front of the subject. They are ideal for patterns such as loop lighting and Rembrandt lighting to make the eyes pop.
What is the most flattering light?
Portrait photographers usually consider the light from a large, soft, diffused light source as the most flattering.
Flattering light brings skin to life without revealing too many blemishes and imperfections. It also makes features such as the eyes, brow and mouth stand out.
Generally, a warmer light with a value of 2700 Kelvin is better. Avoid fluorescents at all costs – they make you look like a ghost!
What are common lighting mistakes?
The most common portrait photography lighting mistakes relate to the incorrect exposure settings on speed lights. Such as trying to achieve split lighting but incorrectly setting the flash too high or too low resulting in a photo that’s unrecoverable in editing software for portraits.
Getting the correct exposure with lighting is a tricky balance and takes trial and error to master.
To overcome this, take multiple images using a range of lighting levels with a flash to choose the most flattering image later on in editing.
Practical lighting is a technique used in the film industry where a light source is visible within the frame of a scene, not hidden behind the camera.
Final Words
Successful portraits need an element of directional lighting for the most flattering looks. Regardless of using natural light through a window, or a single flash, controlling the light adds depth and drama.
You can’t always rely upon the sun being in the right spot, of course. As a result, having a simple portrait lighting setup for your home studio is a worthwhile investment.
By far, the essential things for portrait lighting are knowledge and practice – especially lighting patterns like butterfly lighting, split lighting and Rembrandt lighting.
With our 7 useful portrait lighting patterns, plus our tips for portrait lighting, you have all the ingredients to get started.
What are your thoughts on the use of lighting patterns in portrait photography? Do you have any additional tips that will benefit others?
Share your thoughts and questions in the comment section below. Happy Shooting!

Check out these 8 essential tools to help you succeed as a professional photographer.
Includes limited-time discounts.
 Rembrandt Lighting: 8 Best Techniques, Examples & Setups
 How to Add a Realistic Drop Shadow To Images in Photoshop
 Beginners Guide to Photography Lighting Techniques (+Pro Tips)
 Expert Guide to On-Camera Flash (How, When & Why to Use)
 15 Tips for Creative Shadow Photography in 2024
 How to Use Light and Shadow in Photography

I’m a Melbourne-based street photographer and blogger. I love to travel to Japan to photograph and document its dynamic people and culture.


