


Guide to Real Estate Photography in 2024 (18 PRO Tips!)
Get started in real estate photography now with this guide! From what gear you'll need to how much you can earn, this guide has it covered.
Learn | Photography Guides | By Ana Mireles
If you’ve ever looked for a property to buy or rent, you’ll know how important professional photography is in the real estate industry.
Whether you’re looking to break into the real estate photography business or to sell your own home – this article is for you.
Join us as we take a look at what you need for property photography as well as some must-read real estate photography tips and more.
Well structured, up to date video course on everything you need to know to start earning money as a REP.
Get a 96% Discount! (limited time)
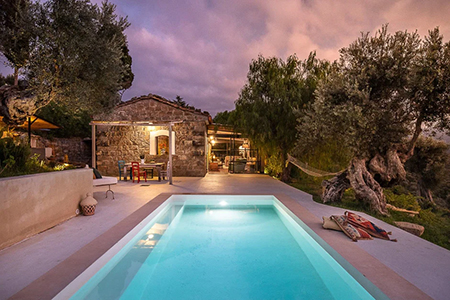
What Is Real Estate Photography?
Real estate photography involves taking photos of interiors and exteriors of properties to put them on the market.
Beyond this, real estate photographers are often hired to shoot for designers or magazines who need to showcase a property for different purposes.
Equipment Needed for Real Estate Photography

Gear needed for photography in real estate work | Credit: Jade Nolan
The good thing about real estate photography is that you can start small and grow with your business.
(You don’t need to make a great investment and then wait a long time until it pays for itself.)
To start shooting real estate photography, you just need to head out with your camera, a wide-angle lens, (or the shortest focal length that you have), and a sturdy tripod.
The rest of the equipment in this list is optional and can be acquired further along the way.
Keep in mind that it’s always possible to rent gear for a day or a week. This way, you don’t have to hold back on bigger and more complicated jobs.
- Camera
There isn’t a specific camera model or brand that you need to use for real estate photography. However, there are some things that you should consider when looking for the best camera for real estate photography.
Often in real estate photography, you’ll be dealing with situations where there’s a lot of contrast. For example, when you expose correctly for the interior of the room, you might end up with clipping on the windows.
For the exterior, to correctly expose the house you might need to overexpose the sky.
In summary, you need your camera to give you the best performance for these situations.
That’s why you need to be able to shoot in manual mode. This way, you can control your settings, do some bracketing, etc.
It’s best if the camera can capture photos in RAW format. This again relates to different light conditions. A photograph in RAW has more information to recover the details from the highlights and shadows.
Another must in the camera is the possibility to exchange lenses. I will get into more details about the best ones in the next section.
Finally – if you can afford it – aim for a full-frame camera. This is because they have a wider dynamic range, deliver sharper photos and have an impact in the angle of view. Here’s a list of the best full frame cameras of the year.
If you’re really on a tight budget, it’s also possible to take real estate photos with an iPhone, but I’d recommend using a dedicated camera for the best possible results.
- Lenses
For real estate photography, you need a wide-angle lens. Of course, properties come in many sizes – but usually, you won’t be able to fit in everything you need unless you’re using a short focal length.
Sometimes you’ll even need an ultra-wide-angle lens if the space is too small, or the building is too tall.
How Much Do You REALLY Know About Photography?! 🤔
Test your photography knowledge with this quick quiz!
See how much you really know about photography...

A focal length range between 16mm and 35mm should cover you if you’re using a full-frame camera. For APS-C crop sensors, you can use 10mm or 12mm to 24mm.
It’s best to avoid fish eye lenses like these, though. Yes, they do cover the widest angle of view – but they also give too much distortion.
Once you’re more established in the business, a tilt-shift lens can be a great addition to your gear. This will allow you to prevent perspective distortion and keep everything in focus – see our tiltshift lens guide here.
Also consider that real estate photography is not only about the big picture, especially for high-end properties or certain clients like interior designers.
Sometimes you’ll need to photograph specific details. For example, a handmade wrought iron window or something that enhances the value of the property. For these types of photographs, a standard lens can be handy.
For some specific recommendations on lenses to use for real estate photography, see our guide.
- Tripod
A sturdy tripod can be your best friend in real estate photography. Sometimes you need to work with slow shutter speeds, and this will prevent any camera shake.
Also, if you’re bracketing to compose an HDR image, you need to have the same framing across your images. This would be impossible to achieve without a tripod.
- Flashes
Natural lighting is great for real estate photography, but sometimes it just won’t do. Maybe the weather is not great, or part of the room has a strong shadow from the furniture.
Having a flash unit is the best way to handle these difficult situations. Just make sure that you bounce it on the ceiling if you don’t have modifiers, otherwise, the light will be too harsh.
- Light Modifiers
Shooting the flash directly into the scene can cause unflattering results. Also, it might not be enough to cover the entire room.
If you use an umbrella or other light modifiers, you’ll cover a wider area, and you’ll have a softer and more even light.
- Triggers
A remote shutter for your camera will ensure that there isn’t any shake or change in the frame when you take your photographs.
A flash trigger can also be useful in real estate photography. These are used to fire off-camera flashes. You attach the transmitter to the camera and the receiver to the flash or strobe.
- Gray Card / Color Checker
To have a more accurate white balance in your real estate photos, you can use a gray card. There are two ways to use it.
You can take the first shot with the card included in the scene, then use that one to correct the white balance in the editing process.
Alternatively, you can photograph the card and tell your camera to use it for the custom white balance. Either way, make sure to adjust it each time you change rooms or you change the lighting setup.
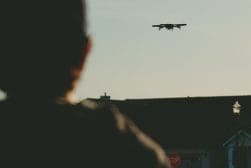
- Drone
Offering drone photography or video is a great way to separate yourself from the competition and gain the attention of real estate agents looking for a professional.
Note that you might need classes and certifications to be allowed to fly a drone. Also, you may need special permits to use drones in your area. So, before you make the decision to buy a drone, make sure you’ll be able to use it.
Furthermore, make sure there’s enough demand for this particular service. If you work in an area with properties that have big gardens to showcase and such, then it might be good.
If, instead, your average client offers apartments in busy areas – or not-so-beautiful areas – then they probably won’t care to have drone photos.
Check out the best drones for real estate photography and how to use a drone for real estate photography.
- 360 Camera
Virtual tours are often valuable and a required service in the real estate photography business. Investing in a 360 camera might be a good move.
There are plenty of budget-friendly options that you can start with., such as the Insta360, a cheap GoPro alternative that allows you to shoot spherical videos.
See also: How To Create A Virtual Tour For Real Estate
- Software
At the bare minimum, you’ll need tools to edit and correct your photos. The best editing software for real estate photography will include tools for HDR merging, panorama creation and even sky replacement.
- Online courses
The fastest way to learn real estate photography is via a course, and the one we recommend is called Picture Perfect Properties.
The best thing about the course is that there’s a generous money-back guarantee, which gives you ample time to put all the tips to use first.
How to Shoot Real Estate Photography

Now that you know what you need, here are some real estate photography tips to help you out.
- Make a shot list
Creating a shot list is important for both you and your client. You should make a standard list with whatever is included in the price – i.e. two pictures of the living room, one of the bathroom, etc.
Then there might be some negotiation if your client needs any other specific angles or shots. You can charge extra for each picture that’s outside the list.
Once you agree on it, this list will be helpful for you to pack everything you’ll need, and to make a plan of action for the day of the photoshoot.
Read: How do you make a shot list for more information on this – you can also download a free template.
- Take your time to prepare
Rushing a job is never a good idea, and real estate photography is no exception. Make time to prepare and double-check things the day before.
Pack your gear in advance and verify that everything is ready and in working order. You wouldn’t want to arrive there and realise your battery is low or your memory card is full of photos you haven’t backed up.
Remember to confirm with your client and make sure they have the property ready. If they wait for you to arrive before they start tidying up or styling the property, you’ll be wasting valuable time.
- Pick the best time
Real estate photography is time-sensitive. For the exterior, you should avoid shooting against the sun. Do some research to see what time the property will be in the best light.
The interior shots are also impacted by the time of day. It will depend if you want to have the sun coming in from the windows or you prefer to use artificial light.
- Find the best angle
With real estate photography, you often have to make compromises. To avoid perspective distortion in the interior shots, you should have the camera at chest level.
However, this is not always best for the composition. Try moving around to find the best point of view that also allows you to have the best result in-camera. This will save you a lot of time and effort in post-production.
- Be careful with reflections
This is always important, but especially if you’re adding artificial light. Make sure you don’t have the reflection of an umbrella showing up in the window, or a light stand reflecting in a mirror.
- Be meticulous
Photography for real estate is more about the details than it is about the gear. Even small things can make a big difference.
Think about things like taking off extra pillows that might make a room look cluttered, moving a plant closer to the window to add texture with its shadow, straightening wall hangings, etc.
How to Edit Real Estate Photography
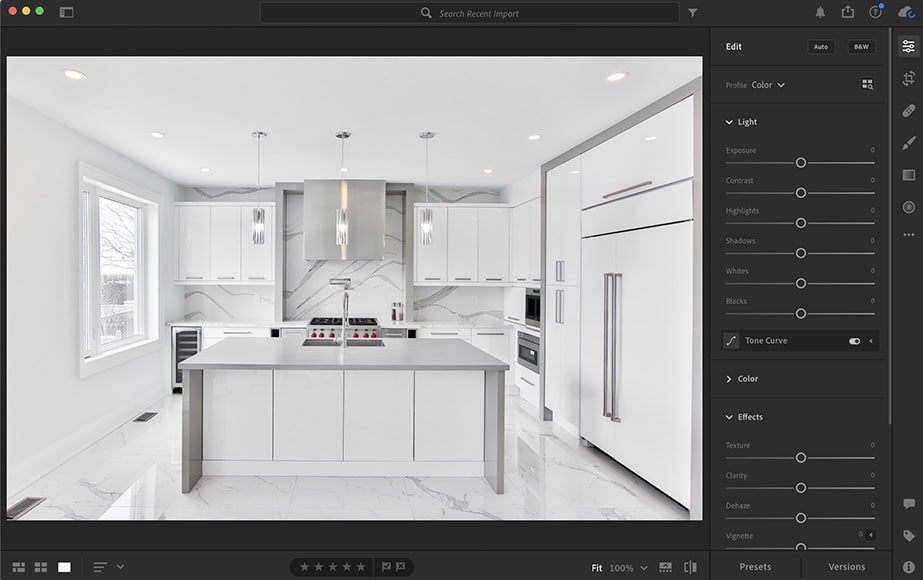
Consistency is essential in real estate photography. Since Lightroom allows you to synchronize your edits across your images, I believe it’s the perfect editor for this.
For more complex editing you may need to switch to other programs. For example, replacing the sky is often used in professional real estate photographs. To easily do this, you can use Luminar – see our review.
- Correct white balance
In Lightroom, it’s easy to set your white balance to one of the presets. Alternatively, you can use the eyedropper to click on the grey card if you used one, or choose a neutral tone.
Then you can sync the edit with all other photos that you took with the same lighting conditions.
- Correct lens
If using Lightroom, find the Lens Corrections section of the Develop module. There, check the box for Enable Profile Corrections.
This should take care of the optical problems automatically. You can fine-tune manually if needed. Then sync this change to all your photos that were taken with the same lens.
- Correct perspective
The perspective distortion created by the lens was corrected in the previous step. Beyond that, you can use the Transform module to correct vertical and horizontal distortions created by your angle of view.
You can use the sliders to do this manually or use the Guided Tool that allows you to draw the lines on your photo to correct it.
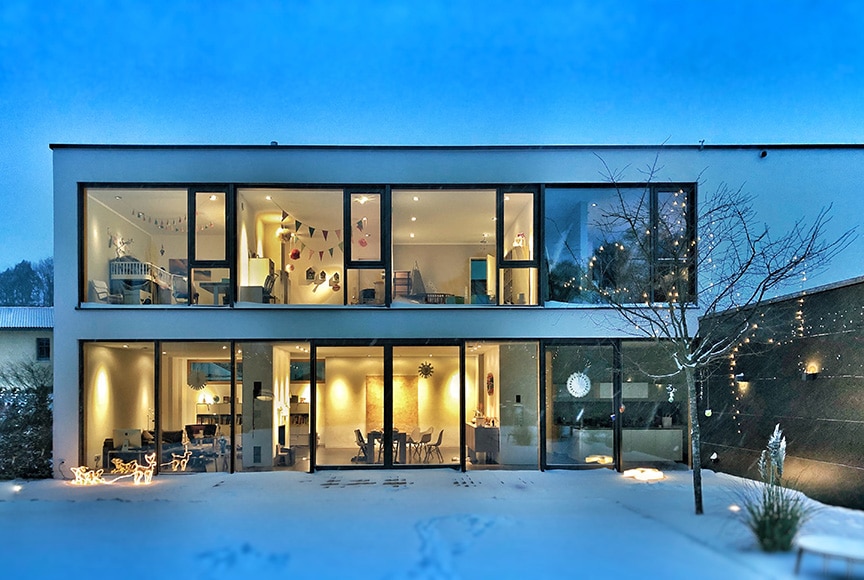
- Replace the sky
Real estate photographers often have major problems when it comes to taking photos of buildings in sub-par weather conditions. Specifically, poor weather can result in a lack of detail in the sky.
You’re probably used to seeing real estate photos that feature bright blue skies filled with fluffy clouds, or beautiful purple/pink sunsets.
However, capturing these skies on the day of the real estate shoot is notoriously difficult. That’s why most real estate photographers must resort to editing the image to remove the sky, then add a new one.
Often they may need to ‘relight’ the scene too, in order to make it believable.
Fortunately, there’s now a simple but powerful solution to this problem – Luminar 4’s Sky Replacement Tool – it’s an excellent one-click solution that’ll save you hours of time.
How to Become a Real Estate Photographer

Credit: Donald Tong
Now you’ve learned some real estate photography tips for getting better images. But if you want to really get professional at it, where do you start?
The first thing you have to do is take as many real estate photographs as you can. This will help you learn and build a portfolio at the same time.
You can obviously start with your own home. Then, move on to shooting the houses and apartments of family and friends.
Exterior real estate photography is easier because you can just go out and shoot what you find on your way.
Make sure that you don’t photograph any famous building or landmark that can be copyrighted.
Keep an eye on the windows, make sure no one from the inside is being captured or else you would need a contract or model release.
Once you’re confident enough and you have sufficient high-quality pictures in your portfolio, reach out to potential clients.
Build a website and open a social media profile – don’t use your personal profile but one dedicated to your business.
Visit local real estate agencies or try the old-style approach of printing flyers and delivering them in your neighbourhood to homeowners that might be trying to sell without a real estate agent.
Consider and contact everyone who needs real estate photography: contractors, interior designers, hotels, magazines… think outside the box.
Contacting a professional photographer to offer your services as an assistant is also a good way to go.
As an assistant, you’ll keep learning everything about the real estate photography trade, from pricing and contracts to technical improvements.
How Much Does a Real Estate Photographer Make?
Credit: Stephan Bechert
The price for real estate photography is usually based on a number of factors:
- The size of the property. It’s not the same photographing a 30-square-meter studio apartment or a 500 sqm villa – especially if you’re using artificial light and have to set up in each room. But even if you don’t, you still need to take and process more images.
- The amount and format of images that you’ll deliver. An average client will require two pictures per room, two of the living room and two of the kitchen. Then one per bathroom and any additional areas like the laundry room. Finally, one to three exterior shots. You can price that as a starting fee and add an extra cost per photo if they want more detail shots, shots of the garden, etc.
- The turnaround time. When the client needs extra fast delivery, you might have to push back other clients, or work extra hours. This should be reflected in the cost.
- The end goal. You should have different quotes according to the type of client and the use they will give to your photos. A homeowner that will use them to list his apartment online probably won’t pay as much for professional images. On the other hand, a fancy resort that will advertise worldwide and profit from your images has a different budget that also considers licensing fees.
- Special requests. If your client requires something particular that will require extra equipment, many hours of post-processing, several visits to the property, etc., remember to factor them into the pricing.
I know that giving you a bunch of factors that income ‘depends on’ hasn’t answered your question yet. So, I’ll include some references for you to get an idea.
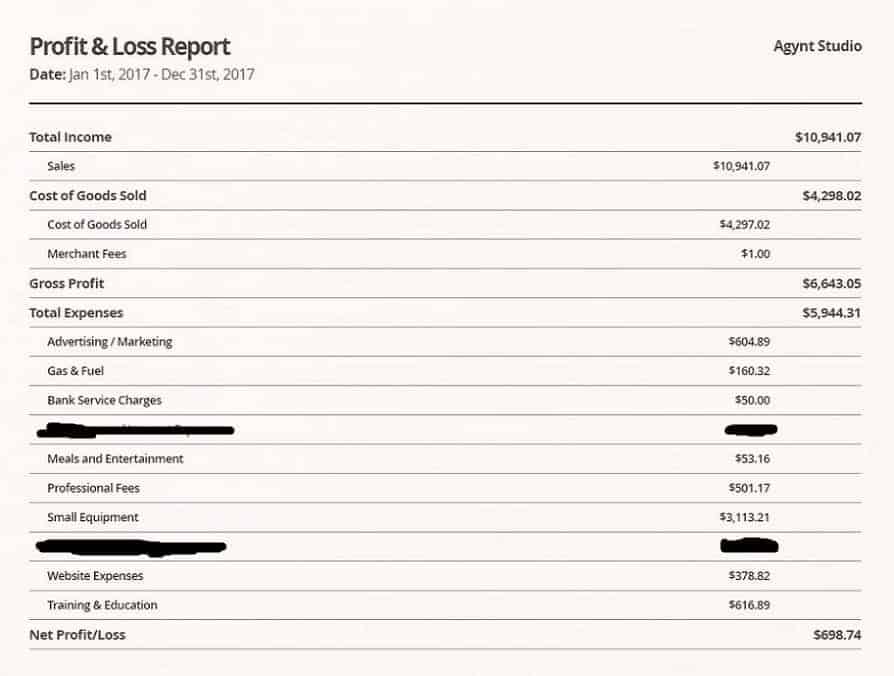
Kirk Bergman once posted his income report which you can see below. While it dates a few years back, it raises some timeless points.
During his first year, he still had to keep a day job because he only brought in $1500.
By the second year, he already made something around $11k; however, only 65% of the income came from real estate photography, and the rest was from landscape photography print sales.
Of course, that’s the raw income, and you need to take off the expenses – he goes into all those details in his report.
Credit: Improve Photography
It’s just one experience, and as I mentioned, it is a few years old, but I believe it’s beneficial in its details and honesty. Plus, it illustrates how you have to be patient before you can make your full living out of working in real estate photography.
Now, let’s see some average numbers. According to Thumbtack, a real estate photographer charges between $170 and $230.
Then it goes into some examples that show how the price changes when it’s based on the number of photos, by the square footage of the property and the time of the day.
It even offers some rate examples for other services like video, virtual tours or aerial photography. You can check it out here to see the details.
If we consider the middle ground of $200 and you manage to land three clients per week, you would be making $31,200 average per year.
You can research photographers in your area to get a better idea of what you can make. Of course, you can build on that income with stock photography or architectural photography.
Final Words
Now it’s time for you to take what you’ve learned and go out and practice your real estate photography.
Let us know in the comments section if these real estate photography tips were useful. We’d love to hear about your experiences.

Well structured, up to date video course on everything you need to know to start earning money as a REP.
Get a 50% Discount (limited time)

Check out these 8 essential tools to help you succeed as a professional photographer.
Includes limited-time discounts.
 Best Camera for Real Estate Photography
 Best Drone for Real Estate Photography in 2024
 Real Estate Drone Photography Tips for Professionals
 How To Create A Virtual Tour For Real Estate in 2024

Ana Mireles is a Mexican researcher that specializes in photography and communications for the arts and culture sector.


