


Rim Light Photography: 12 Best Techniques, Examples & Ideas
Rim light photography has a strong visual impact. If you want to add this technique to your portfolio, this article will teach you everything you need.
Learn | By Ana Mireles
Rim light photography has a strong visual impact. If you want to add this technique to your portfolio, this article will teach you everything you need.
We’ll start by explaining what rim light is. Then, we’ll show you different ways to use it to achieve different effects. Some of the examples are done with daylight, and others in the studio. Some of them can be done with one light only, and others include up to three.
So, there’s no excuse – you can start practising today! You can even use a smartphone and the sun rising to create rim photography. Just keep on reading and learn this amazing technique.

Revolutionary lighting simulation software that streamlines studio photography and film making.
Use code SHOTKIT10 to save 10%.
What is a Rim Light in Photography?
Rim lighting is when you place a light behind your subject to create a contour of it. This rim light effect separates the subject from the background. It gives the impression of depth in an otherwise flat image.
Remember that photography is a two-dimensional representation of a three-dimensional world. That’s why photographers need to use different lighting effects to add depth.
Rim lights can be part of a lighting setup, or they can be the key light. You can also do rim light photography with all sorts of subjects, from portraits to products.
What lights can I use for a rim light?
- The sun – you can do rim light photography using natural light. You’ll need to position your subject in between the sun and the camera. The best time to do rim lighting with sunlight is early in the morning or late in the evening. This way, the sun will be close to the horizon.
- An off-camera flash – You can easily do rim light photography in the studio by using an off-camera flash. This can be a Speedlight, a flashgun, a strobe, or any other artificial light. You simply have to position the light source behind the subject. You can use just one light or use it as part of a more complex light setup.
- LED light – LED lights or any continuous light will do just as good as a strobe. The only thing is that you need it to be powerful enough.
What is another name for a rim light?
Another name for a rim light is an edge light. Other photographers also refer to it as a hair light, halo light backlight, contour light, kicker or side-kick light.
Sometimes the name is defined by the context. For example, portrait photographers call it hair light, especially when it’s part of a bigger set-up, such as the traditional three-point lighting.
Contour lighting or edge lighting is often used when the rim light is the only light. This creates low-key images with just a bright rim to define the subject.
How do you do Rim Lighting in Photography?
1. Perfect your rim light photography setup
Credit: Nikolo Zi / Nardo
To create beautiful rim light photography, you need to understand how it works. This will allow you to build a rim lighting setup that creates the effect that you want.
It might seem very simple, but certain photos require a more complex approach. In the video above, you can see an example of how to do rim light portraits. The setup evolved from a single-light to a three-light arch. All solutions with the same scope of creating rim light-only photos.
Of course, the rim light doesn’t have to be the only one. You can use a rim light in a two or three-point lighting setup. Once you perfect this technique, you can create three-dimensional effects on your photos.
2. Select the right camera equipment

Credit: Josue As
As you can see, rim light photography is all about light placement. Then, you need to control exposure and light ratio if there’s more than one light source.
So, you can make beautiful rim lighting photography with any camera, as long as it allows you to work in manual mode. You can also choose any lens that you like.
So, you’ll need an external light source. You can’t use your camera’s built-in flash. If you’re using natural light, you don’t need anything else.
If you prefer, you can use artificial light. In this case, you’ll need a light stand and a trigger for your flash if it’s not continuous light.
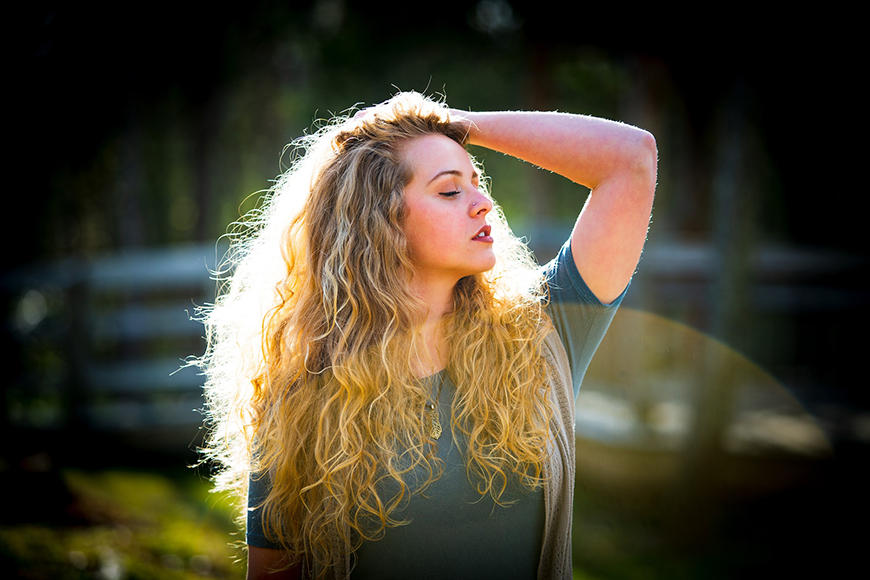
3. Make a rim light portrait

Credit: Aakash Solanki / Mohamad Babayan
To do a rim light portrait, you need to position the light behind your subject. You’ll have a single flat edge if you place it perfectly centred.
The rim lighting should be bright enough to overpower the ambient light. Just be careful that it’s not too bright so that it creates light spilling.
Nail the position and the exposure to achieve a black background as your subject remains dark.
4. Try rim light product photography

Credit: Derice Jason Fahnkow
In product photography, you usually want to showcase the brand and the entire product. That’s why rim lighting it’s usually used only as a complementary light.
Of course, if it’s a more conceptual shot, you can create a rim as the only element. You can see an example of this in the photo above.
How Much Do You REALLY Know About Photography?! 🤔
Test your photography knowledge with this quick quiz!
See how much you really know about photography...

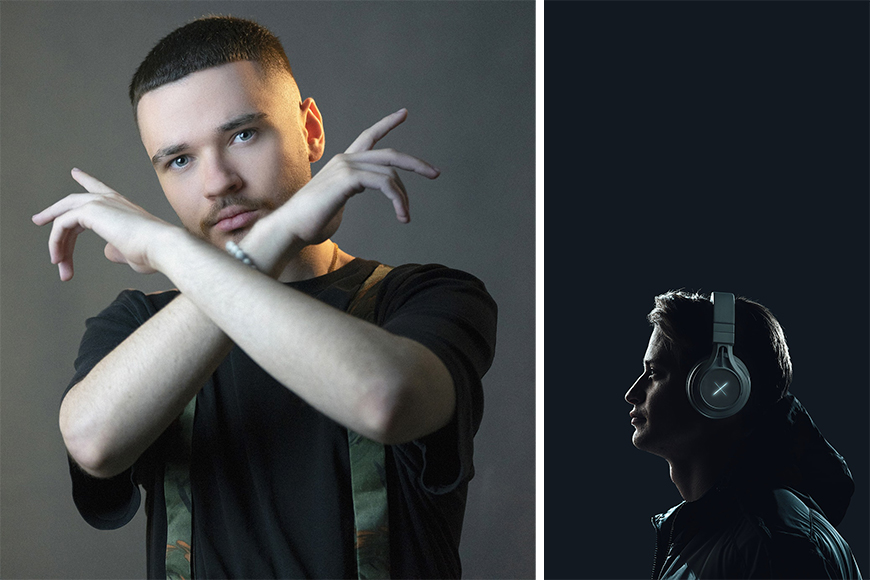
5. Use color gels on your rim lighting
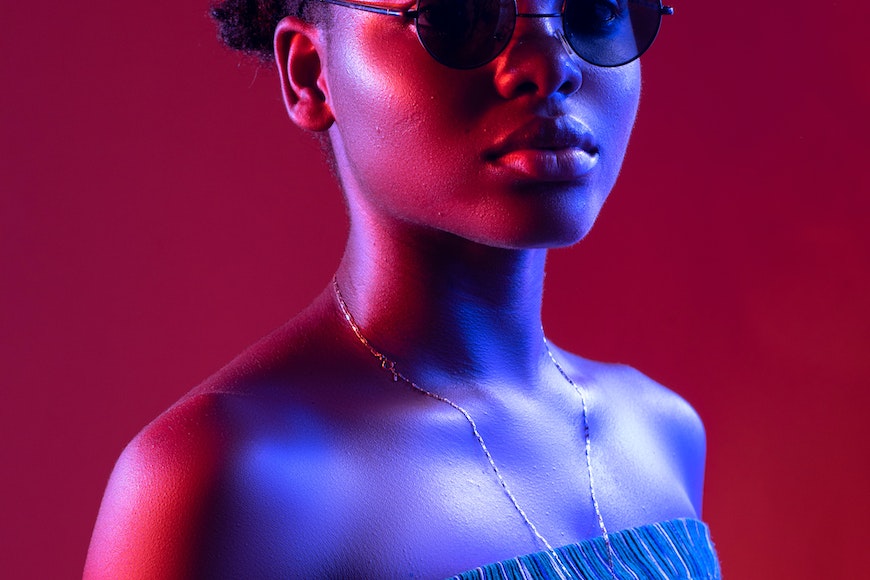
Credit: Chidimma Peace
Another idea you can try with studio lighting is to use color gels. This is mostly used in portrait photography. It gives the photographer many creative possibilities.
You can have a white main light and add color hair lights. Another combination is to use two lights and put different color gels on each one. Then, light the left side with one color and the right side with another.
Experiment with multiple setups and colors to create a unique look.
6. Low-key photography using rim lighting
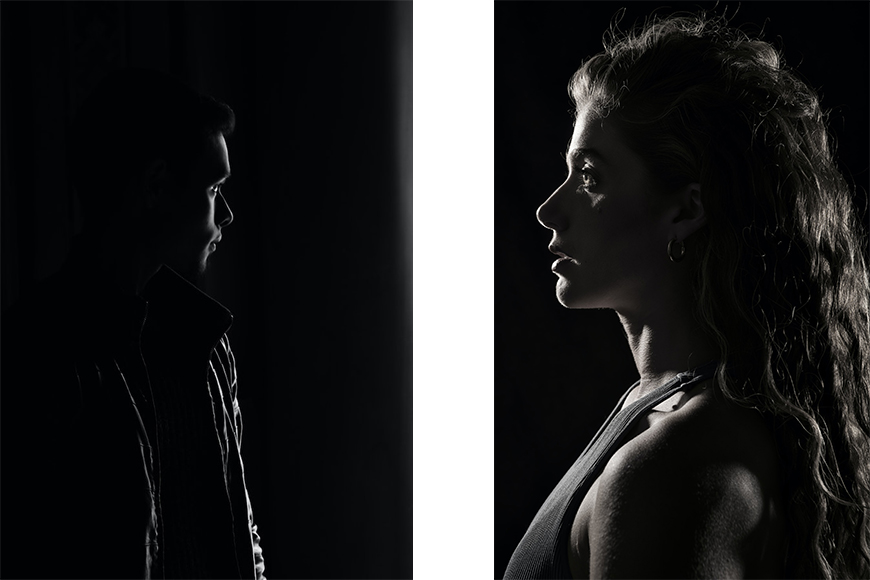
Credit: Mustafa Ezz / Venti Views
You create a rim if you place the light directly behind your subject. It will only create a thin edge around the subject. If you place it back and to the side, you can illuminate a bit more of the subject. This will give you a low-key photo using rim lighting.
Low key photography is a genre that emphasizes a part of the subject with light and leaves the rest in the dark. The high contrast creates very dramatic shots.
7. Experiment with glass objects on a dark background
Glass is the perfect subject for rim lighting. I’m sure you’ve seen tons of wine bottles and glasses rim-lit on dark backgrounds.
These images look stunning, and they are very easy to do with the most basic lighting equipment. If you have a softbox, you can place it behind the subject. Then, put a black card box in front of it. Just make sure that it’s not wide enough to completely cover the lightbox.
The edges should be free so that the light passing on the sides creates the rim. This cardboard will also be the black background of the scene.
If you don’t have a softbox, don’t worry! You can still create this effect by bouncing light into a white wall or a reflector. You can see how to build this setup in the video above.
You can use plexiglass to create a reflection on the bottom or add color gels. In other words, you can create any number of rim light photos with just a single light.
8. Use rim lighting for pet photography
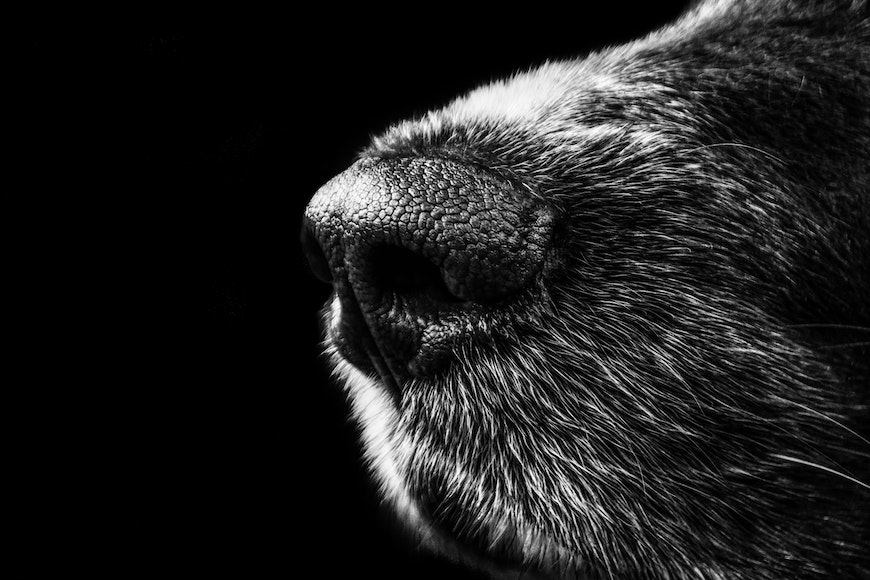
Credit: Pixabay
Another subject that really benefits from rim light is fur. That’s because the thin hairs allow the light to pass, creating a halo lighting.
This is why rim light setups are great for pet photography. You can have a key light on the front if you want to show the details of the animal. Then, add a second light from behind to create the rim.
Otherwise, you can create a rim light silhouette with a single light from the back.
9. Create rim light using your window

Credit: Cottonbro
The rim light is not exclusive to flash photography. You can use ambient light to create a rim-lit scene. You just have to make sure that the strongest light source is behind the subject. For example, when the sun is coming through the window.
This will illuminate the room with soft light, but the window light creates a rim. You can use this setup for any subject, and it helps to add depth. Also, when it’s a portrait, it’s often called a hair light.
10. Rim light photography with bokeh

Credit: Sajeesh James
As you probably know, bokeh is an effect created by blurring the lights in the background of a photograph. Since the lights are on the back of the subject, they can also be rim lights.
To create a bokeh, you need to use a fast lens and set it to its widest aperture. Also, being close to the subject and the background further away helps to blur the background.
Keep in mind that each lens creates a different bokeh shape. So, you can experiment with different lenses. Also, longer focal lengths make a narrower depth of field.
11. Silhouette photography and rim light

Credit: Mohamad Babayan / Vahid Kanani
Silhouette photography and rim light photography can be very similar. So I wanted to make a section dedicated to talking about the differences.
In the studio, the difference between rim light and silhouette photography is the direction of the light. For a silhouette, you usually have the light bouncing off the background towards the subject. This way, you prevent any light leaking to the front of the subject. Instead, as we already mentioned, you point the light at the subject to create a rim light.
In a silhouette, you don’t have any details on the subject. When there’s too much light, you can see some of the details of the subject, but the main goal is to keep it as a two-dimensional shape. You may or may not have a rim contouring the shape.
Instead, rim light photography can be a silhouette or not. If you only have the rim, then yes, you create a silhouette. However, you can add a rim light in combination with others and have a fully lit subject. The effect, in this case, is to add three-dimensionality.
In other words, a silhouette can or cannot have a rim and still be a silhouette. Instead, a rim light photograph may or may not be a silhouette – but it will always have a highlighted edge.
12. Add rim light in Photoshop
The rim light is usually created during the shot. However, it’s still possible to add it in post-processing. Here are the steps to follow if you’re using Photoshop.
Start by duplicating the background. While you’re in this new layer, select the subject. You can use any selection tool that you want, but try to be precise.
Then, add a layer mask. It will automatically mask the selection that you made. Now, click on the Adjustment Layers icon and add a Curves layer.
Using the Curves Adjustment layer, overexpose your photograph. Don’t worry if it looks terrible right now. You’ll only use the highlights you’re creating on the edge of your subject.
Now, copy the layer mask you had on the Background Copy layer and apply it to the Curves Adjustment Layer. Click on the chain icon that links the Curves with the mask. Then, go to the mask properties panel and click Invert.
Now, move the mask to uncover a thin edge of the overexposed version. You can use the arrow keys to move more precise or simply click and drag with your mouse.
That’s it. You’ve created a rim light in Photoshop. You can feather the layer mask to blend in the effect. If this isn’t enough, you can fine-tune it by painting on the mask. You can see these steps in action in the video above.
13 Examples of the Rim Light Effect
Here are a few examples of rim-light photos to get your creative juices flowing!

Credit: Cottonbro

Credit: Hassan Ouajbir

Credit: Jonathan Petersson
Credit: Michael S

Credit: Teddy Yang

Credit: Pixabay / Bernyce Hollingworth

Credit: Joost Crop / Luke Besley

Credit: Tarikul Raana

Credit: Brian Lawson / Venti Views
Final Words on Rim Light Photography
The rim light is a must-have light setup for portrait photography photography. However, as you’ve seen in this article, it can be useful in other types of photos. It’s also used in cinema and theatre.
You don’t need expensive equipment to create rim light. You can make the effect with a single flash or simply using daylight.
Try this technique, and let us know if you have any rim lighting issues. You can also share any helpful tips you have to create a rim light photograph.

Check out these 8 essential tools to help you succeed as a professional photographer.
Includes limited-time discounts.


Ana Mireles is a Mexican researcher that specializes in photography and communications for the arts and culture sector.

