


What is Silhouette Photography? (+ Ideas, Settings, Examples)
How do you take a captivating silhouette picture? What settings should you use? How do you turn a photo into a silhouette? Check out our guide + 5 pro tips.
Learn | Photography Guides | By Ana Mireles
Silhouette photography is a great way to capture the viewer’s attention thanks to its high contrast.
It’s also fantastic because of its versatility: photographers can use silhouettes in everything from wedding photography to sports; make them color or black and white; showcase an object, a person or a landscape, and more.
The basic idea of silhouette photography is to use a backlight to create a black outline of your subjects. This way, you eliminate all the internal details and turn your subjects into black shapes.
Interested in learning how to make silhouettes in your photos? Keep on reading!
In this guide you’ll find 5 useful silhouette photography tips and tricks to make your own stunning images, as well as plenty of examples to keep you inspired.
Let’s get started!
What Settings to Use for Silhouette Photography
Here’s a quick summary of the camera settings you should use to capture awesome silhouette photography:
- Set the camera to manual mode – The goal of Auto-mode is to find the correct exposure. However, since silhouette photography is about underexposing the subject, you need to take control of the manual settings.
- Focus on your subject – The best way to do this is by using manual focus because you don’t want the camera to re-focus when you’re metering the background.
- Change to spot metering mode – All cameras have a light meter to help decide the exposure. When you use this mode, you can tell the camera exactly where to get the light information.
- Measure the light of the background – Since you want to have a correct exposure of the background to underexpose the subject, you don’t need to know how much light is in the entire scene. So, frame in such a way that you have the background in the center. Then check the exposure meter and choose the settings.
- Set the lowest ISO – Start by setting the ISO to its lowest possible value – ideally 100.
- Set the aperture – use a narrow aperture such as f/8 or f/11 to have everything in focus.
- Set the shutter speed – Finally, decide on the shutter speed. It shouldn’t be too slow since your background will be very bright and you don’t want any details on your subject.
- Bracket – To make sure that you capture the best silhouette, take multiple shots, changing the camera settings each time. This way, you can choose between a fully dark, flat silhouette and one with a hint of the details.
Now let’s have a look at some tips from professional photographers on how to take great silhouette photos of your subjects.
5 Tips for Taking Stunning Silhouette Photos
Ever asked yourself: how do I take a silhouette picture? Here are five silhouette tips, techniques and examples for creating your first great photos.
1. Photograph against the sky

Credit: đặng Thanh Tú
The key to making a silhouette photo is having the light behind your subject. The easiest and most common way to do this is with natural light, as the sky is the perfect bright background.
The best moment to take a silhouette shot is when the sun is close to the horizon. That’s why it’s best to photograph at sunrise or sunset. It will also provide you with beautiful colors in the sky.
The trick is to position yourself facing the sun, then pose the subjects so that they will block all (or part) of the sun.
If you’ve tried this setup without getting good results, you might be wondering: What settings should I use for silhouette pictures?
As per the above, the first thing you need to do is switch to manual mode. Otherwise, the camera will try to expose the subject correctly while overexposing the background – you need the opposite of that. The subject should be underexposed, so much so that it will lose all of its ‘internal’ detail.
Then, change the exposure mode to spot metering. Many photographers overlook this setting, but it’s crucial to obtain a silhouetted subject – learn more about metering modes in photography here.
Then, frame the scene to have the background in the center – that’s where the spot metering is – and press the shutter button half-way down to measure the exposure.
Now, adjust the camera settings to that light reading. Once you have that, you can recompose and have the subject in the center if you want – it will still be a black shape.
If you are unsure about how to adjust the camera settings, follow the quick guide at the top of this article.
2. Capture a silhouette indoors

Credit: Ava Sol
There are two ways to take a silhouette photo indoors: with natural light or artificial light.
If you want to use natural light, you need to take your photograph against a window. Then, follow the same steps and settings for outside silhouettes mentioned in tip no.1.
If you want to use artificial light, you can do it with a flash, a strobe or a continuous light. The important thing is that you place it behind your subject.
How Much Do You REALLY Know About Photography?! 🤔
Test your photography knowledge with this quick quiz!
See how much you really know about photography...


Credit: Engin Akyurt
With this technique, you can even use a black background. Then, the silhouette is formed by a bright outline around the subject – as in the example above.
3. Capturing silhouette pictures using a smartphone
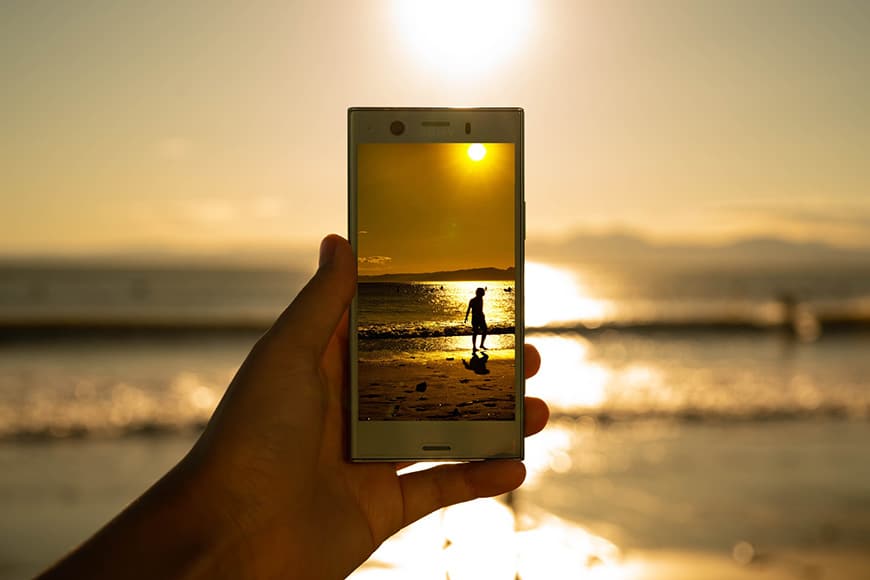
Credit: Natsuki
If you’re a smartphone photographer, you can also make stunning silhouette pictures – regardless of whether you have an iPhone or an Android. \
First, position your subject against the light, then stand in front of your subject.
Frame the scene as you want, then touch the background to determine the exposure. If your subject looks blurry, click on the subject to fix the focus and swipe down to underexpose it.
If your camera’s phone has a PRO mode where you can adjust the settings manually, it’s easier. Just set the lowest ISO and a fast shutter speed. You can also download camera apps that allow you this level of control, such as A Better Camera.
Also, there are different apps that allow you to edit your silhouette photos or create a silhouette out of any photo. Here are some recommendations that work for both Android and iPhone.
- Photoshop Express
- Lightroom Mobile
- Snapseed
- PicsArt
4. Create a silhouette in post-processing
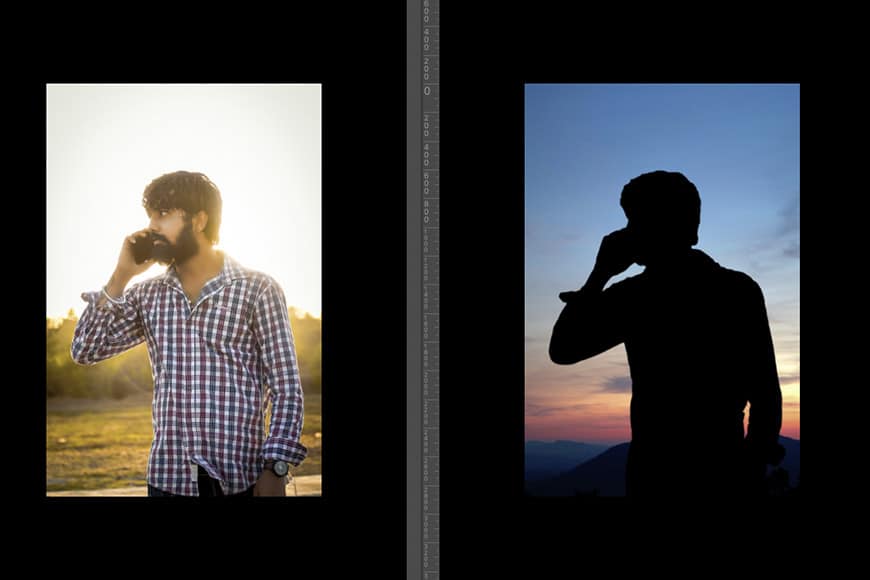
Credit: Sahil Patel
A lot of people ask, how do I turn a photo into a black silhouette? It’s much simpler than you probably think.
Here’s a step-by-step guide to doing it in Photoshop, but similar steps can be followed in other editing programs that work with layers.
- Open your image in Photoshop.
- Duplicate the background layer.
- Select the subject using the selection tool of your choice.
- Apply a layer mask.
- Add a Solid Color layer on top – pick black on the color picker.
- Create a clipping mask.
That’s it. You turned your subject into a shape! If the original image didn’t have backlighting, the effect wouldn’t look very realistic, so you may need to add a new background – for a sunset silhouette photo, for example.
Just add it as a new layer in between the original image and its duplicate, and play around with the settings to get the look you want – see tip below for the exact steps.
5. Editing silhouette photography
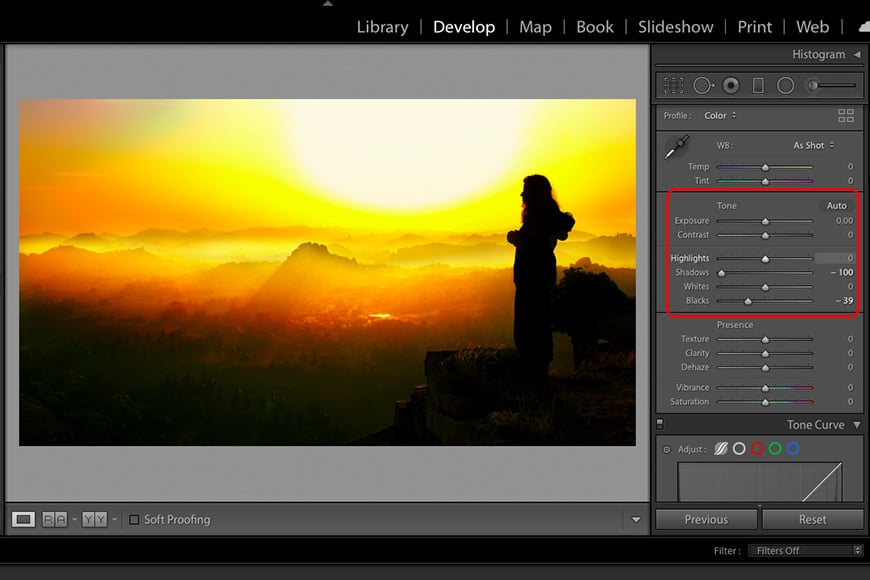
Credit: Nandhu Kumar
Your next question probably is: how do I edit silhouette photos? There are many techniques to do it, so it can be confusing.
First of all, you can do it with any editing program. Unlike the technique where you create the silhouette from scratch, you don’t need layers or any advanced tool.
Using the basic adjustments tools, you can edit your pictures to retouch any silhouette and help viewers concentrate their attention on the subject.
You need to heighten the contrast between the blacks on the subjects and the brightness of the background. To do this, adjust the blacks and shadows on the subject.
If the background became too dark with this action, you can adjust the whites and highlights. You can also do this with Levels or Curves.
After you achieve this perfect silhouette, you can make further adjustments to enhance the overall image. For example, you can use Vibrance and Saturation to pump up the colors of the background.
Final Words
Now that you know how to do silhouettes, it’s time for you to get creative. You can try fun action shots using burst mode or a romantic photo of a couple enjoying the sunset.
Remember that people are the most common subject for silhouette photography, but they’re not the only one.
You can add drama to a landscape if you photograph the trees as silhouettes, or place an object in front of the window for a moody still-life. The choice is yours.
I hope you enjoyed all the silhouette photography tips and you have everything that you need to create your own stunning images. If you have any questions, don’t hesitate to ask.
Do you think we’re missing something? Share your silhouette photography tips in the comments section below.

Check out these 8 essential tools to help you succeed as a professional photographer.
Includes limited-time discounts.


Ana Mireles is a Mexican researcher that specializes in photography and communications for the arts and culture sector.


