


Three Point Lighting in Photography (Setup, Diagram & Examples)
Learn the basics of three-point lighting including what it is, why it works, and how to set it up for your next photo or video project!
Three-point lighting is the basis for almost all other portrait lighting setups. With it, you can sculpt both the light and the shadows, as well as create just about any mood.
Properly done, it also makes sure that your subject is well-lit.
This lighting setup is used frequently both in video lighting and in photography. Though this article will focus primarily on how to light a subject in photography, the same principles apply when lighting for video.
Let’s take a look at what’s involved and how to set it up.
Summary
A three-point lighting setup is typical in both video and photography. It uses three different light sources in varying positions to illuminate a subject or scene (the lights are known as a key light, fill light, and back light). This gives the scene depth and allows shadows to be controlled.

Revolutionary lighting simulation software that streamlines studio photography and film making.
Use code SHOTKIT10 to save 10%.
What is a Three Point Lighting Setup?
A three-point lighting setup uses three different light sources to illuminate a particular subject or scene.
Because there is light coming from three different positions, you can make sure your subjects are well-lit, control the shadows that come from the main light source, and give your subject depth.
Originally used in theater with a warm light on one side and a cool light on the other, both the photography and video worlds quickly adopted it, as it’s one of the simplest and most versatile lighting methods for making sure that images come out well on camera.
If you’re wondering what the three lights in this setup are, here’s a simplified explanation:
Key Light
As the name suggests, the key light is the main light. It’s the primary light source and creates the overall exposure in a scene. Beyond this, its primary purpose is to make sure that one side of the subject is well-lit, while the other side has some shadow.
The key light is often placed at a 45-degree angle to the camera and a bit above the subject. The size and intensity of the light source you use will determine much about where and how the other two lights are set up.
In a studio or other indoor setting, the key light is usually some sort of a specialized lamp like a softbox or a beauty dish with a strobe.
It can also be a camera’s flash or even a window. Outside during the day, the sun usually serves as the key light. You can experiment with different lighting modifiers to provide more drama to how the key light looks.
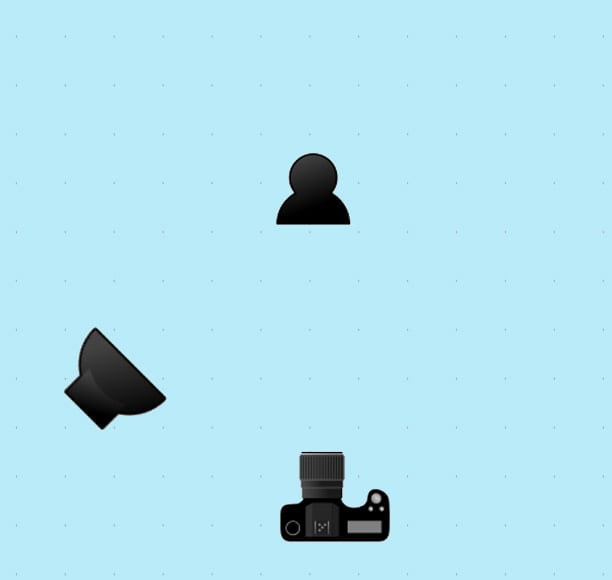
The key light is your main illumination source. Outdoors it’s usually the sun. In the studio, it’s often a softbox or a beauty dish. Set it up at 45 degrees from your camera and slightly above your subject. In this example the key light is a beauty dish.
Fill Light
Since the key light is usually to one side of the subject, the other side will usually be filled with shadows. This is a good thing, because shadows give both depth and mood, but you still want to be able to control how strong they are and where they fall.
That’s where the fill light comes in.
The fill light mellows out any harsh shadows by adding in a bit more illumination where there otherwise would be none.
Without it, the subject’s contours will come out starker. This can be fine if you’re going for a low-key effect, but for natural-looking photos, you’ll need a fill.
You can use a dedicated lamp for the fill light, a reflector, or even a white board.
It’s usually placed on the opposite side of the subject from the key light. In portrait photography, it’s usually placed at the level of the subject’s face.
It’s also softer and considerably less bright than the key light (up to half the intensity).
How you use your fill light is often where the overall feel of a shot comes in. A dim, diffuse fill light will keep much of the shadows in place, creating a high-contrast effect. Bump it up and your subject will have a brighter, more natural look.
Use a reflector instead of a lamp and you get a different effect, especially if the reflector is colored.
How Much Do You REALLY Know About Photography?! 🤔
Test your photography knowledge with this quick quiz!
See how much you really know about photography...

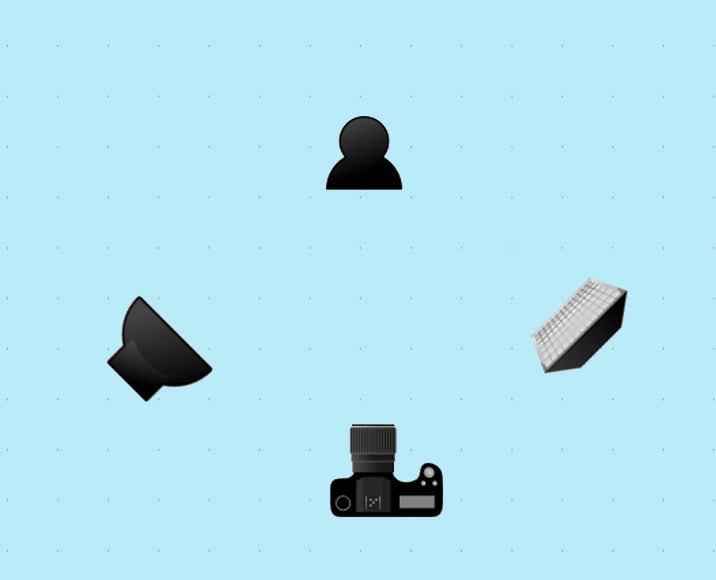
The fill light is generally smaller and set at a lower intensity than the key light. It’s placed on the opposite side of the subject from the key light. Here the diagram shows a softbox with a grid to better control the edges of the fill. It’s at half-intensity.
Back Light
The back light – also known as the hair light or rim light – is the final element of the three-point lighting setup. It’s placed behind the subject (out of the camera frame) and creates a highlight either just on the hair or around the upper part of the subject, also known as a rim of light or a halo effect.
This separates the subject from the background, giving them depth and definition around their outline.
Unlike the key and fill light, the back light isn’t intended to provide direct lighting. Instead, it’s used to create a thin outline or highlight around the subject. As a result, it rarely needs to hit the front of the subject.
Depending on your scene, you can place the back light directly behind the subject (so that the camera can’t see it) or off to one side, well out of the frame. The first option is often used when lighting videos.
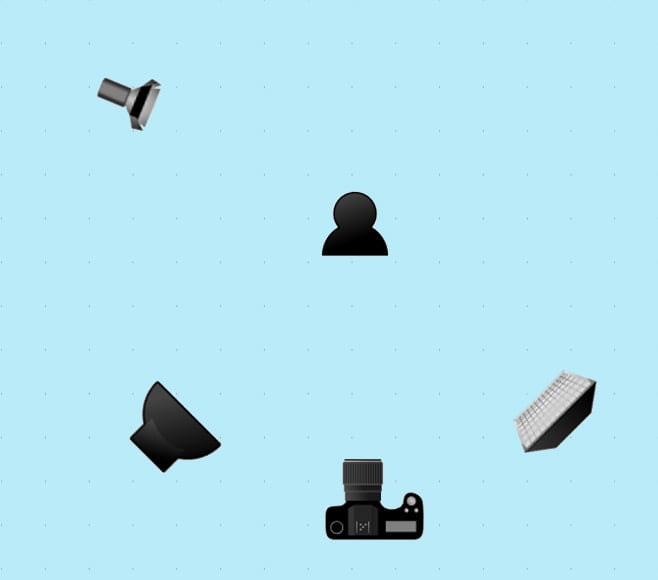
The back light is the last of the three lights. It helps to separate the subject from the background and is set up somewhere behind the subject, either off to the side or directly behind.
Three Point Lighting Technique FAQ
Why is three-point lighting important?
Three-point lighting is the basis for almost all other single-subject lighting scenarios, both in photography and when lighting for a video. You can build on it or take lights away, but understanding the key principles behind three-point lighting will help you light just about any portrait successfully.
What is the purpose of three point lighting as it relates to actors in a scene?
Because video recorders can’t see into shadows the same way our eyes do, it’s important to provide some light to the shadows to keep them from coming across as dark and featureless. The back light is needed to help give depth to images that would otherwise come across as two-dimensional.
Regarding the actors themselves, the three-point lighting setup adds dimension to the actors. The cinematographer can also use it to shape an actor, bringing out the best or worst of them.
Do you have to have three lights no matter what, for three-point lighting?
No, there are a number of substitutions you can make for both the key and fill lights. For the key light, the sun (outside) or a window (inside) are often used. For the fill light, you can use a reflector, bounce card or something white to reflect the key light back at the subject. This can be white card stock, poster board, or even a white wall.
Which is usually the brightest light on a subject in a three point lighting system?
The key light is almost always the brightest light in a scene. The rest of your lighting will be based off of that.
Which side should the key light be on?
The key light should be placed on the side where the main light in your scene would naturally be coming from. For example, if your key light is standing in for the sun, place it on the side where the sun would be in your scene. It’s also important to place it at an appropriate angle and height to approximate the light from the sun.
Also, the key light and the fill light need to sit on opposite sides from one another.
Final Words
Three-point lighting is extremely versatile. By varying the type of lighting instruments you use, experimenting with how close or far they are from the subject, and varying their intensity, you can create a number of different looks.
You can also change how hard or soft the light is by using different light modifiers (i.e. grids, diffusers, etc.).
Once you master lighting techniques with three lights, you can then broaden out to a four-point lighting system (adding a background light, for example) or reducing down to just one light, depending on the intended look.
Either way, understanding the principles behind three-point lighting will unlock the door to effective portrait and video lighting.
What do you think? Have you tried this particular lighting technique for either photography or for video? How did it work for you?

Check out these 8 essential tools to help you succeed as a professional photographer.
Includes limited-time discounts.
 How To Use Content Aware Fill In Photoshop
 Film Lighting Techniques, Examples & Tips for Beginners
 Best Lights for Video Recording in 2024
 Beginners Guide to Photography Lighting Techniques (+Pro Tips)
 What is Side Lighting in Photography? (Portrait Examples & Tips)

Usnea Lebendig is an experienced photographer and reviewer who loves to photograph professionally and in moments where the world’s beauty and/or strangeness leaps in front of the lens.

