


Guide to Toy Photography
Whether you're practising photography using toys or just want to try something fun and different, this guide to toy photography is packed full of useful tips!
Learn | Photography Guides | By Greg Cromie
Toy photography isn’t a style that pops up much on ‘Best Photography Genre’ online lists. However, it’s a fun genre for telling creative stories in photos and one that’s well worth the time and exploration.
Plus, it’s a perfect gateway to product photography with similar gear, settings and compositions.
Whilst I’m a camera gear and photography tip nerd, I also love building cool Lego sets and collecting Star Wars figurines.
Toys have stepped up their game since I was a kid – they’re serious products that often attract the attention of adults and collectors more so than children.
Collecting toys can even be a more expensive hobby than photography!
In this post, I’ll take you through some tips and ideas for photographing toys in creative ways so you can try creating some miniature stories for yourself.
13 Creative Tips for Toy Photography
Like product or still life photography, toy photography needs a little know-how to get the right look.
Anyone can take a photo of toy cars or some action figures, but to make it appealing and appear as though the toys exist in the real world is what you need to aim for.
Fortunately, I’ve had some practice in this genre as a toy photographer. My gift to you is sharing my knowledge, experience, techniques and photography tips so you can produce some engaging and fun toy photography.
1. Find the Best Toys to Photograph

The best toys to appear in your photos all depend on the types of toys you have available and what you’re willing to spend. Some toy photographers spend hundreds on their props.
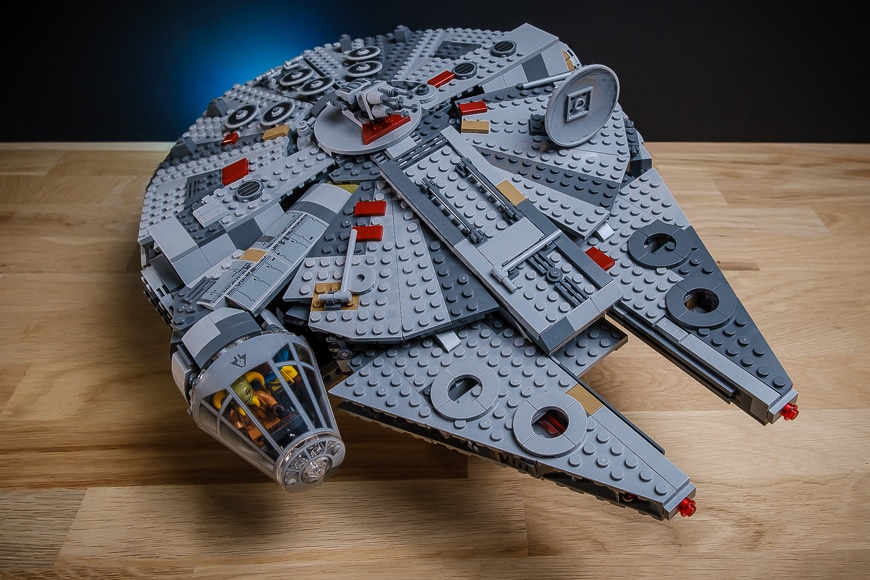
I collect the Black Series Star Wars figurines, especially those from the Mandalorian show. They’re articulated, highly detailed and look great on their own or when included in a scene.
There’s a growing range of action figures to suit a broad spectrum of the content we see in popular culture.
Another favourite toy to photograph is Lego – your own or your children’s. The world of Lego has come a long way since I was young and they also do a comprehensive range of 18+ kits for serious builders.
Since it’s available everywhere, Lego is an accessible way to learn how to take a miniature figure picture.
There’s also a range of fun themes with examples from Star Wars, Harry Potter, Pirates and even Super Mario.
The choice is yours, and you can even use it to revive some childhood memories.
2. Choose a Fitting Location
Location scouting for toy photography isn’t that hard. Setting up space within your home doesn’t require a home studio – working on the floor or dining table is enough.
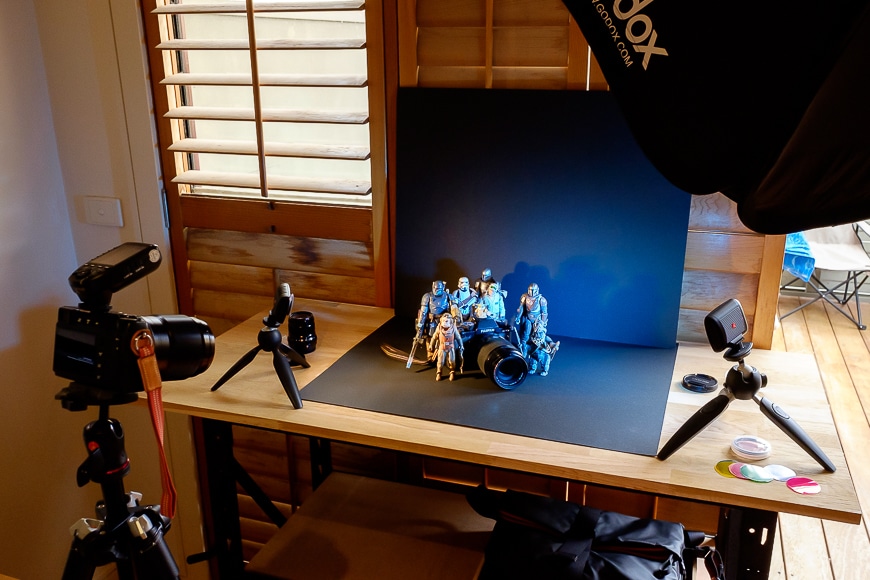
I tend to set up my shoots on a workbench with a solid timber benchtop – I use this for most of my Shotkit product images. My workbench is on castors to move it around my home or even outside.
A simple location option for toy photography is to head outdoors. Using an urban or natural setting for toy shoots adds a lot to composition and story.
You don’t need a lot of space and can work in your yard or at the local park. Having plant life or even grass in the composition can alter your composition scale, so be mindful of how your toy looks against a rock or tree.
3. Create Mini Stages

Some toy photographers take their art to the extreme by building custom sets as stages.
How Much Do You REALLY Know About Photography?! 🤔
Test your photography knowledge with this quick quiz!
See how much you really know about photography...

Photographing Teenage Mutant Ninja Turtles figurines with a stage that looks like a sewer tunnel creates the story. Or Marvel figures in outer space – consider a moon-like surface for your subjects to stand upon.
If you enjoy modelling, building and painting, add this to your toy photography. When building resin model kits like Gundam, transform the inside of a box to replicate a futuristic hanger to house giant mech fighters.
Paint the walls, add elements and even decals to create your stage for your main objects.
When shooting a Lego pirate ship, I placed a black card sheet on my work surface with a sheet of blue bubble wrap on top. It replicated the water look that I set the model ship on for next to no cost.
Building stages with rocks, pebbles, sand and dirt creates the foundation of a scene ready for your toy. Add larger sticks to replicate fallen logs or even place potted plants as an out-of-focus background.
The trick is to achieve a sense of scale that matches the toys you’re photographing while building upon the background story.
4. Add Lighting For Drama

Toy photography is a fun way of exploring the use of additional light sources in photography. External flash units are the best way to gain control of the exposure and create dramatic compositions.
I use a Godox TT350F fitted to a 60cm soft-box mounted to a light stand and pair this to a Godox XProF wireless trigger. You could also use a flash and bounce the flash off the ceiling or add a light diffuser to it.
In addition to this, I add a Manfrotto Lumimuse 6 LED and Lumimuse 3 LED. Mounted to a pair of Manfrotto Pixi tabletop tripods, I can position these around the subjects.
These cost-effective LEDs include colour gel filters to add effects and mood to my scene.
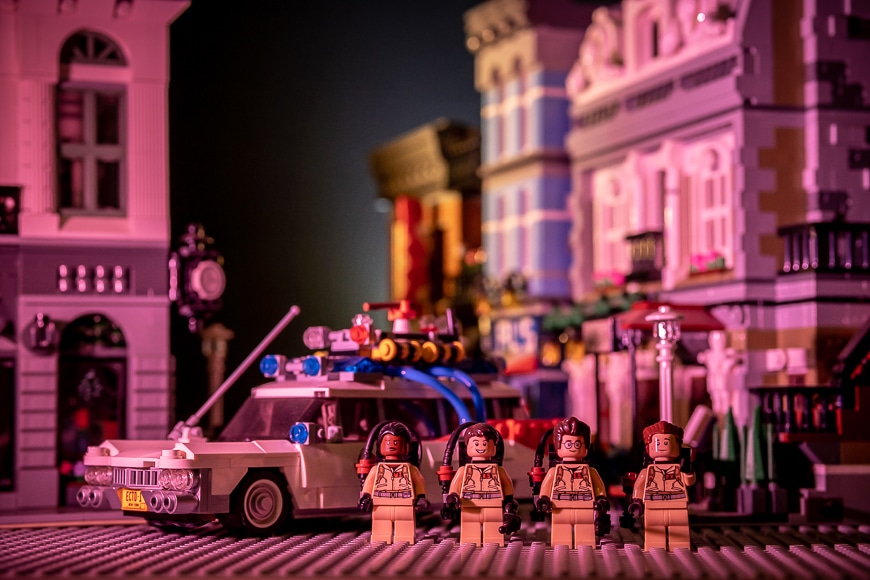
For example, a purple gel plays a crucial role in the spooky storytelling when shooting a Ghostbusters Lego set.
Or, hiding a light with a blue gel can add the Millenium Falcon boosting effect of – “Punch it Chewie!”.
5. Build An Interesting Composition
To build a composition and tell a story, toy photographers add all the elements discussed above. Setting up the stage, adding natural features, backdrops and preparing your toy is all-important. Next, consider the best way to photograph them.
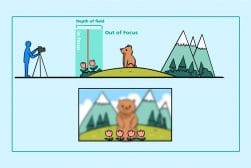
Set up the scene to ensure that you have elements that will work well with a desired depth of field. Having background elements blurred makes your in-focus foreground elements pop.
When photographing Lego, I use other sets to create background elements such as brick-built buildings that will be out of focus. These elements lead the viewer into your image and on a discovery journey.
Position your foreground elements with an interesting angle of view instead of side-on. Consider the angle – is it best to have your camera below, at, or above the usual eye-level?
Shooting from below eye level enhances your objects’ scale and makes them stand above the viewer. It adds to the composition and creates amazement at how you made a tiny toy look big.
6. Add Dynamic Effects
The next level of composition building happens when you add dynamic effects. Poseable action figures or army men running across a battlefield look great, but it will feel like something is missing.
Consider adding smoke that blows across the composition as you take the shot. Or, to portray a scene under heavy fire, drop smalls rocks and dirt from above as you capture the frame.
The same is possible with spraying water from above to appear as rain-drops falling. A fast shutter speed will freeze each drop while a slow one will make them appear as falling rain.
Pro toy photographers build tiny campfires or set their stages on fire to add intensity to the image. Others will use firecrackers to replicate actual explosions scaled to the figurines’ size.
With the right shutter speeds and timing, you capture the explosion and pieces of debris flying off in all directions in your toy photo. Just try not to blow up your toys!
7. Use A Camera With Manual Settings
Having the right gear is the key to success in toy photography. For the sake of this article, let’s take a look at an enthusiast-level kit that won’t break the bank.
Having manual controls for aperture, shutter speed, and ISO values makes toy photography easier and allows for more creative outcomes. I use either the Fujifilm X-T3 or the Fujifilm X-E3 mirrorless bodies as manual controls.
Also beneficial is a hot-shoe to add a flash unit or wireless trigger. While many cameras have a built-in flash, this creates direct and harsh light and is not ideal for toy photography as it gives you less control over the lighting conditions.
8. Select The Best Lens

There are many things to look out for when selecting the right lens for toy photography.
Consider the maximum aperture or f-stop of the lens. You want wide aperture for a suitable depth of field and excellent subject separation. A max aperture of around f/2 is ideal to avoid too narrow a focal area.
Using a telephoto lens makes no sense as you’ll achieve the same look with a 50mm lens. Avoid ultra-wide lenses that make the toys look insignificant in the composition.
I use primes in my product shots such as the Fujifilm XF 23mm f/2, XF 50mm f/2 and XF 90mm f/2.
The f/2 aperture is ideal for shooting toys, and these lenses have a fast focusing response should I shoot handheld at slower shutter speeds.
If you’re a zoom shooter, then a 24-70mm will work just as well.
9. Create Stability With A Tripod
The best results in toy photography come from using a tripod as it allows you to set up your shot and work with much slower shutter speeds.
A tripod like these ones also allows you to position your kit so you can make the necessary adjustments to the toys.
It’s convenient to shoot with poseable figurines that need incremental changes to get the pose right.
10. Control Shutter Speed To Freeze The Action
Camera settings are just as important as having the right gear. A fast shutter speed ensures a sharp focus, especially if there are moving parts in your composition.
If you’re outdoors contending with wind or moving elements, it will freeze the action in your photos.
A slow shutter is perfect for capturing movement and adding energy to your shot. With a slower shutter speed, falling water or dirt will appear as motion and bring life to your composition.
Shutter speed is also an essential ingredient in capturing the right exposure. For bright settings, use a fast shutter speed to control the light hitting the sensor.
If shooting indoors or avoiding using external lights, slow shutter speeds are best for your final photos.
ISO is less important in this genre, especially if you’re using additional light sources – keep it at around 200.
11. Set Aperture For Depth Of Field

Depth of field has a whole range of rules depending on what genre you’re shooting – at least that’s what the internet will have you believe. But this is an essential camera setting for this style of work.
In toy photography, go with what looks the best and don’t be afraid to experiment.
Achieving depth of field comes down to using aperture on your lens. The depth of field is the elements in focus and the separation between your foreground objects and the background.
For example, a small f-stop number such as f/1.2 will deliver a shallow depth of field. When taking a shot with f/1.2 – 3.5, your subject’s front will be in sharp focus, and the background will have a pleasant blur.
When shooting at f/8 – 16, provided you’re far enough away from your subjects, all of the elements will be in focus – foreground and background.
When setting up a scene, play around with aperture and depth of field. In some photos, having a single element in sharp focus while the rest falls out of focus looks ideal. Use this to highlight a particular figure or object within a scene.
Depth of field adds a lot of drama and background story to your photo and provides an avenue to draw the viewer’s eye to a particular element.
Another handy tip is to get in for intense close-ups and focus on a key element of your story.
12. Use Post-Processing Tools

As with any photography genre, sometimes capturing the toys in the shots is not enough. It’s mostly the case where you want to create a visual impact or tell a story.
The editing process in toy photography is a lot of fun. Toys are playful, so you can be a lot more free and creative in how you apply your edits.
Process your images in any application on a computer or with the built-in apps on your smart device.
If using an editing application such as Adobe Lightroom or Photoshop, use your cropping and alignment tool to tighten the shot’s compression and angle. Don’t be afraid to shift the horizon line or pull in the crop to focus on a specific element.
In other genres, photographers are sparse with the application of a vignette. But in toy photography, you can add a comic book or cartoon appeal with a lot of vignetting.
I use vignetting when I want to make the scene dark, add emotion or make it dramatic. Alternatively, you can use it to add a tunnel effect – be sure to feather the vignette to keep it balanced.
When editing a toy photo, another handy tool is to apply presets or filters as they add a whole new level of drama to your pictures.
Using deep contrast, grain or even monochrome presets to your toy photos can take a standard image to the next level. You can download some free Lightroom presets for desktop and mobile here.
13. Have Fun
One of the best things about toy photography is that it’s a lot of fun. There are many elements to explore to be as involved and creative as you want to be when photographing toys.
You can build toys, create stages, scout locations and even gather natural elements while out and about – and this is before you even pick up your camera.
Turning a store-bought toy into a visual experience for yourself and others to enjoy is highly rewarding… so it’s essential to have fun with the whole process.
You can choose to work solo or involve friends, another photographer, or even your kids as a family project with capturing toy photos.
Yes, you may have to share your playthings with the kids and explain to your friends why you have a toy box!
Final Words

I always have fun shooting toys to build a story. Getting into toy photography also gave me greater confidence in food and product photography.
After all, it is a form of still life – just with toys instead of fruit.
Toy photography gave me the creative freedom to have fun with product work. I encourage any photographer to look around the home for toys or visit the department store and pick up a little something to play with.
For some great inspiration, take a look at the toy photos on social media.
If you’ve had experience capturing toys and want to share your photography tips, or have questions about shooting toys, please leave a comment below and join the conversation.

Check out these 8 essential tools to help you succeed as a professional photographer.
Includes limited-time discounts.


I’m a Melbourne-based street photographer and blogger. I love to travel to Japan to photograph and document its dynamic people and culture.


