


What is Aperture in Photography? (Beginners Guide)
Learning about aperture can help take your photography to the next level. This is a fun guide that simplifies all you need to know, including examples and tips.
Learn | Photography Guides | By Mark Condon | Last Updated: March 19, 2024
What is aperture in photography and how does it affect the way our photo looks?
Aperture is the most important pillar of the exposure triangle after shutter speed and ISO, so it’s crucial you understand it!
Terms like f-stops and depth of field may intimidate beginner photographers, but they’re really not that complicated.
This guide will explain everything in simple terms so you can start using aperture to create some amazing images.
Let’s dive right in.
What is Aperture?
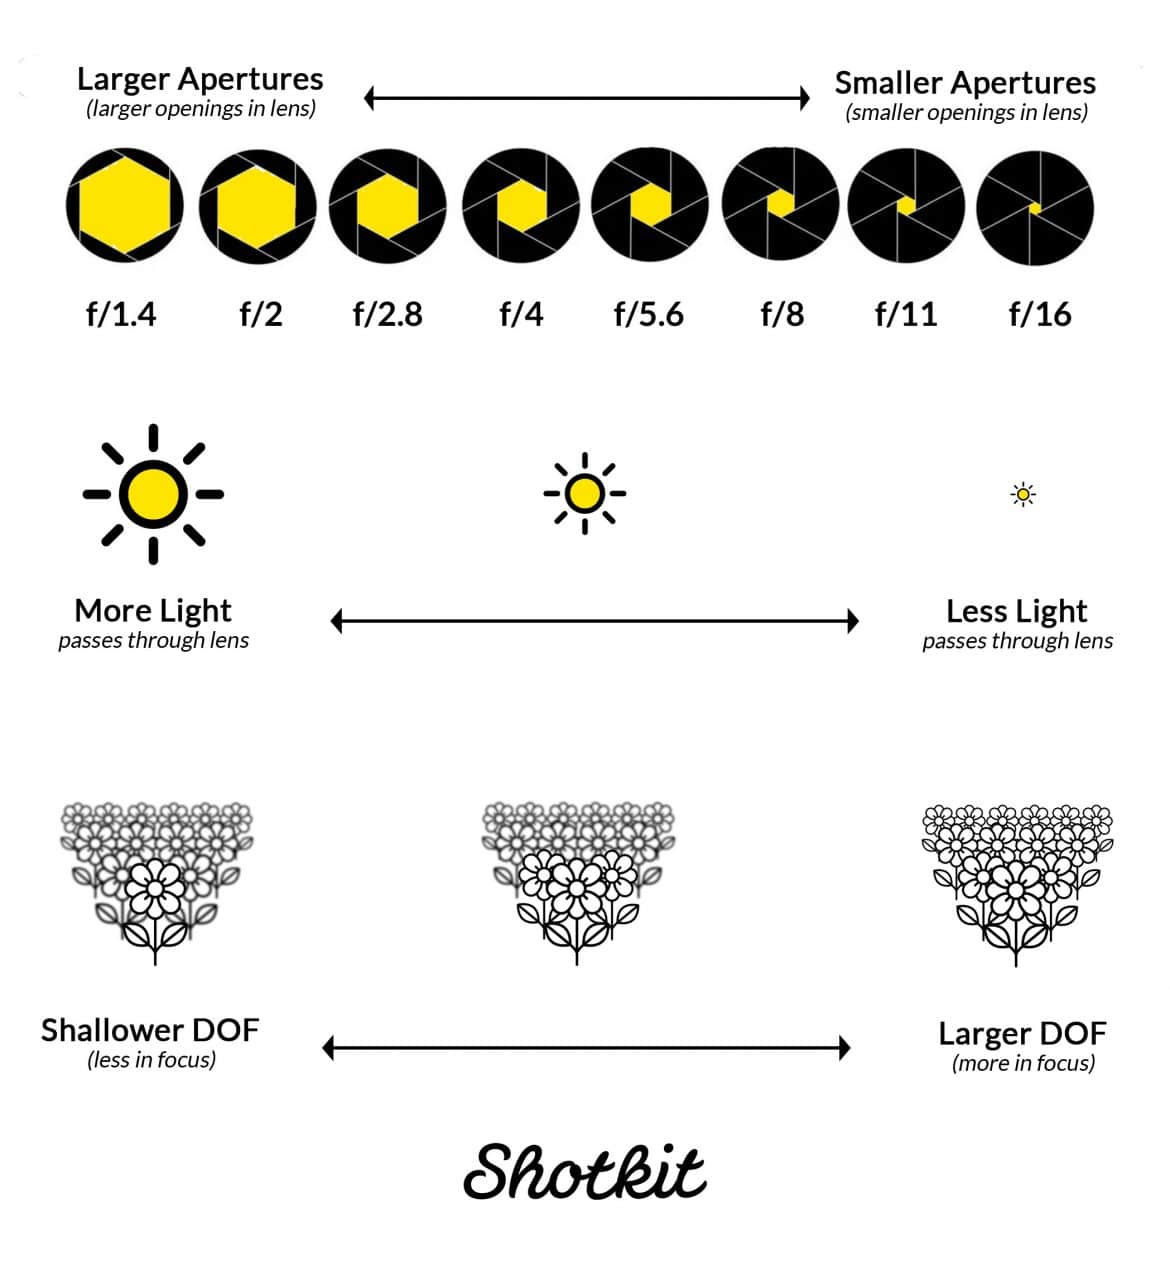
This aperture diagram will help you quickly answer both “What does changing aperture do?” and “What does aperture mean?”
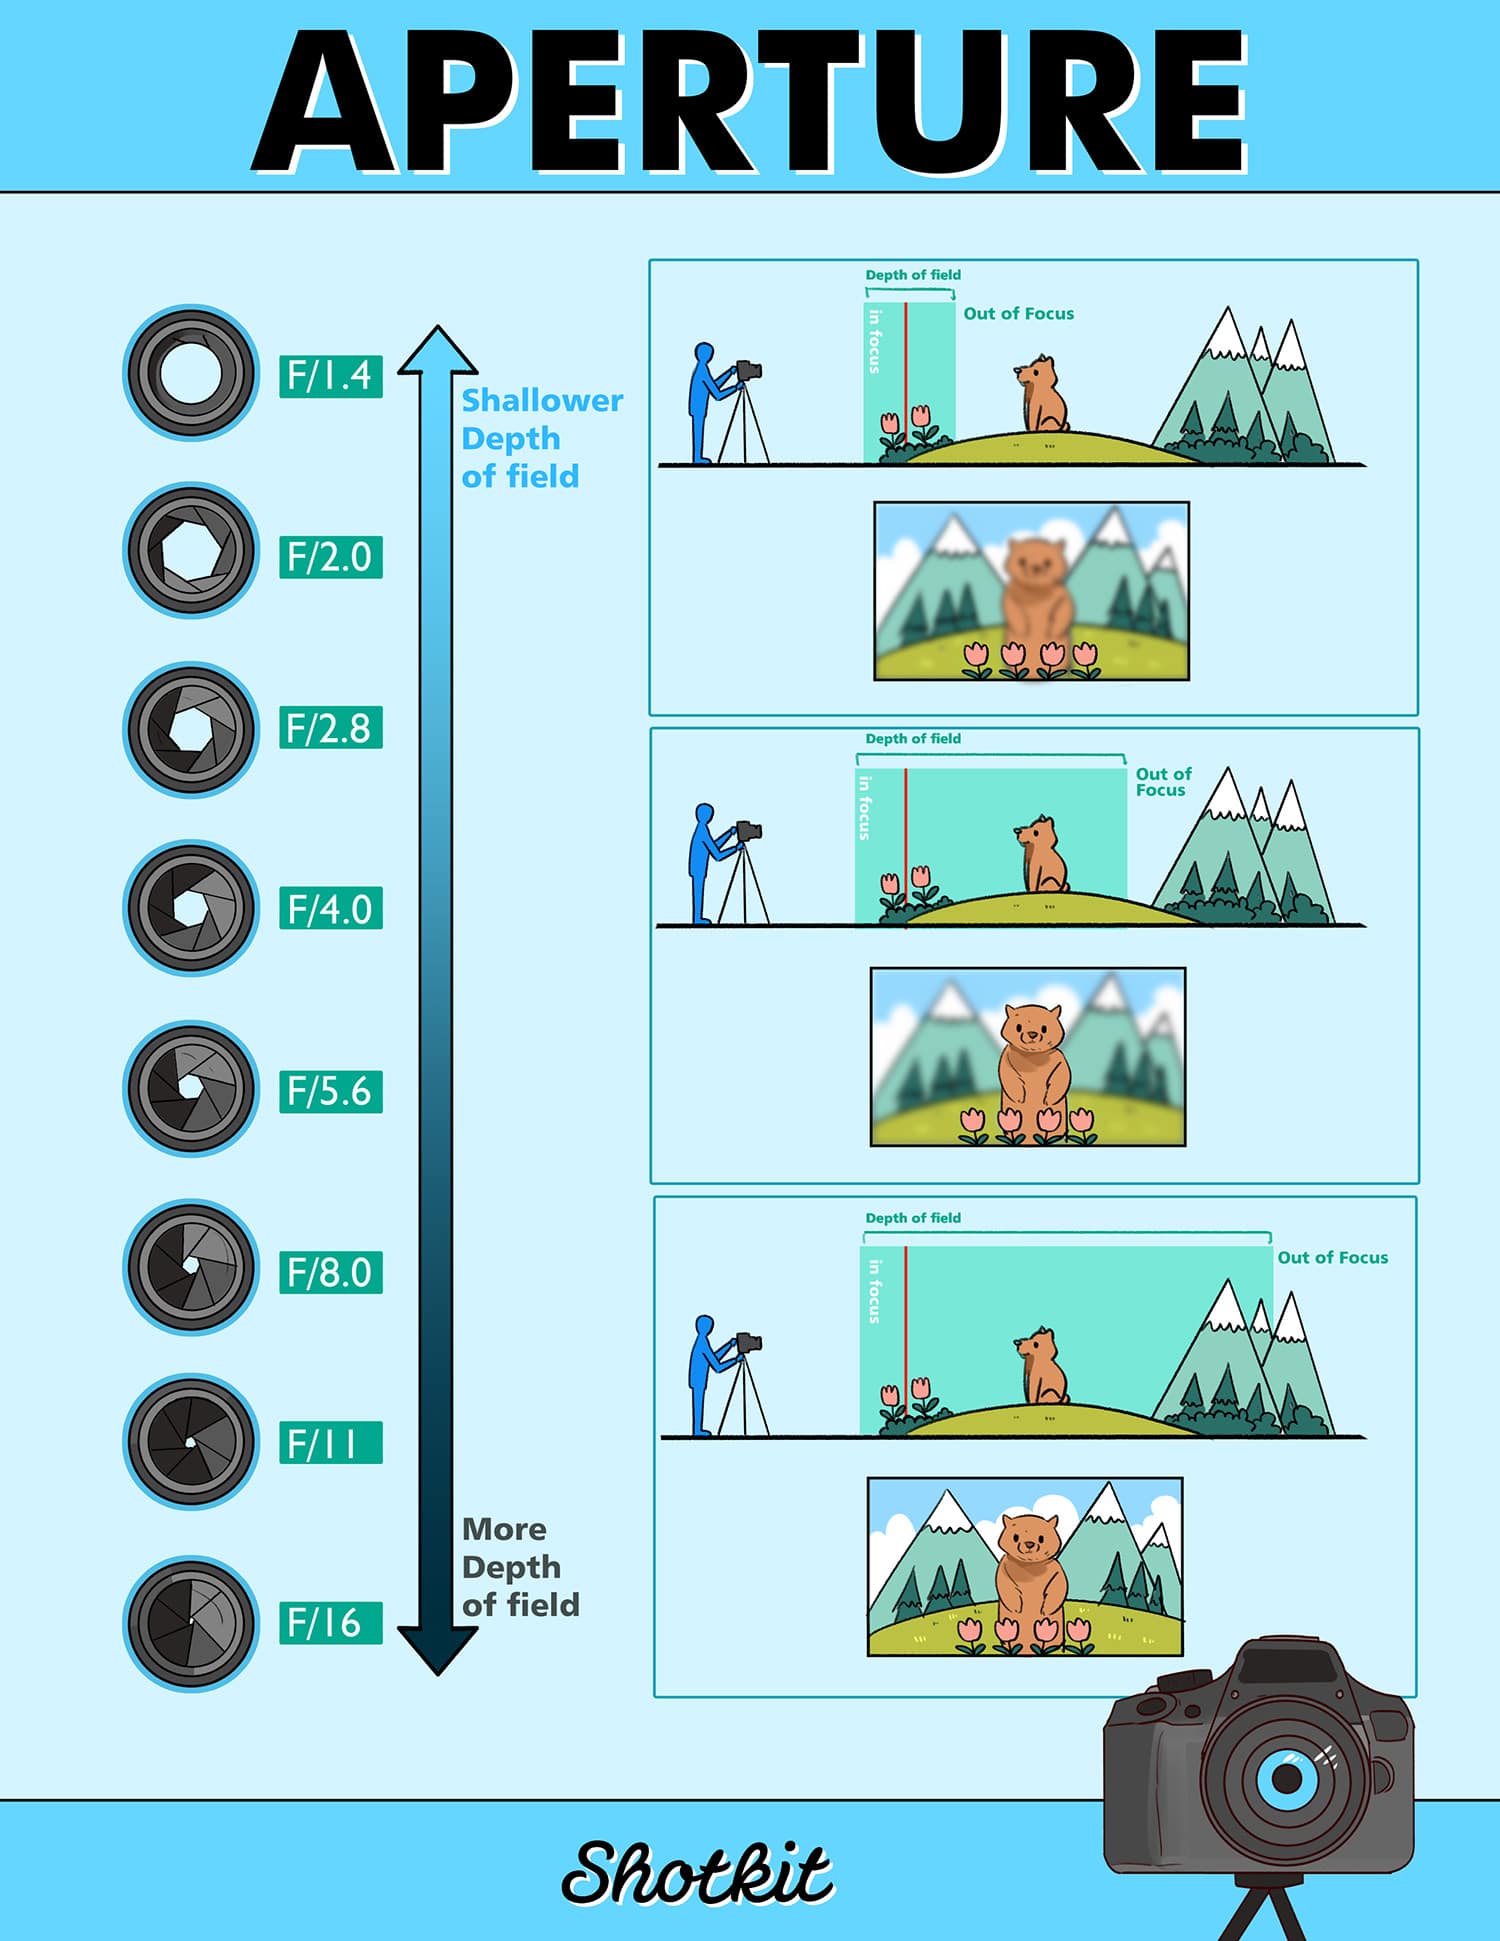
Aperture chart showing the effect on depth of field and light. (Click to view larger.)
So exactly what does aperture do? According to the dictionary, ‘aperture’ means ‘an opening, hole, or gap.’ Here’s how this aperture meaning applies to taking pictures.
In the case of photography, the lens aperture is the opening through which light passes to enter the camera.
You can restrict the amount of light by closing (or ‘stopping down‘) your aperture, reducing the size of the lens opening.
Conversely, you can suck in more light by opening up the aperture on your camera lens.
Imagine the human eye – on a bright day, the pupil shrinks. When it’s dark, the pupil will get bigger.
Aperture controls two principle elements:
- Exposure – how bright or dark the image is.
- Depth of Field – how much of the photo is in focus.
We will example these in detail below. Don’t worry – I promise to keep everything nice and simple! I’m keeping this aperture guide beginner photographer friendly!
You can also download our f-stop chart and follow along. This chart will help you see what is aperture in camera in real-world terms.
A quick side note: You’ll see a few spellings around for aperture like “apeture,” or “aperature,” but a-p-e-r-t-u-r-e is the way to go!
What Does Aperture Control in Photography?
1. Exposure (i.e. Light)
This photo was shot at f/11 (i.e. a small aperture) to reduce the amount of light that was entering the lens.
Before taking a photo, ask yourself this:
Do I want a big opening or a small opening in my lens? i.e. do I want a lot of light to be able to pass through the lens (via a big opening) or not much light (via a small opening)?
What happens when a lot of light comes through the lens? Your photo gets brighter… and if you make that opening smaller, guess what? Less light!
Aperture controls how bright your photo is. Bigger aperture=brighter photo. Smaller aperture=darker photo. EASY!
Using the aperture to control the amount of light that comes through your lens is sometimes a creative choice you make.
(Check out these examples of using a small aperture in photography.)
How Much Do You REALLY Know About Photography?! 🤔
Test your photography knowledge with this quick quiz!
See how much you really know about photography...

Other times you may be forced to choose a certain aperture based on the available light you have in your scene.
We’ll explore more on this in the understanding exposure lesson, but here’s a quick example of aperture in camera effects to illustrate what I mean:
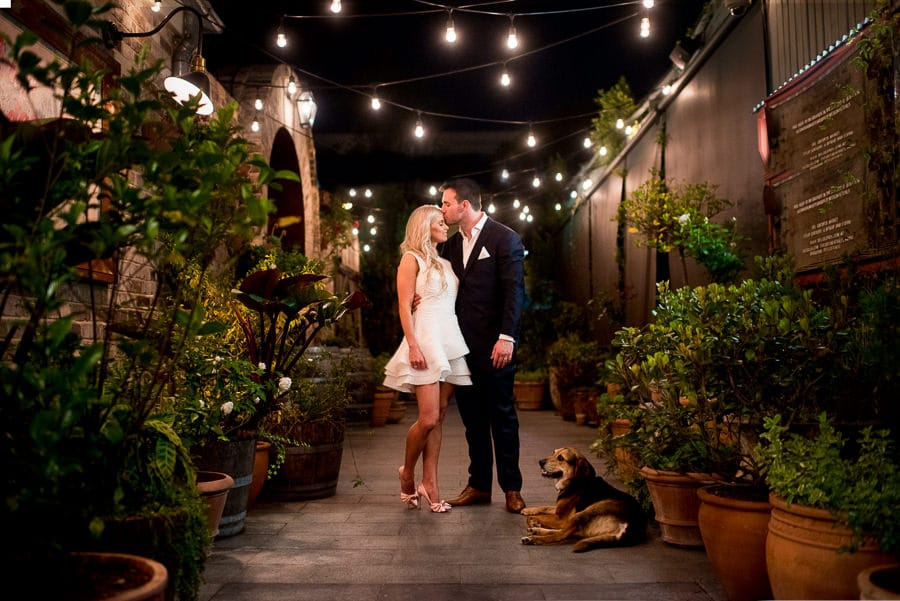
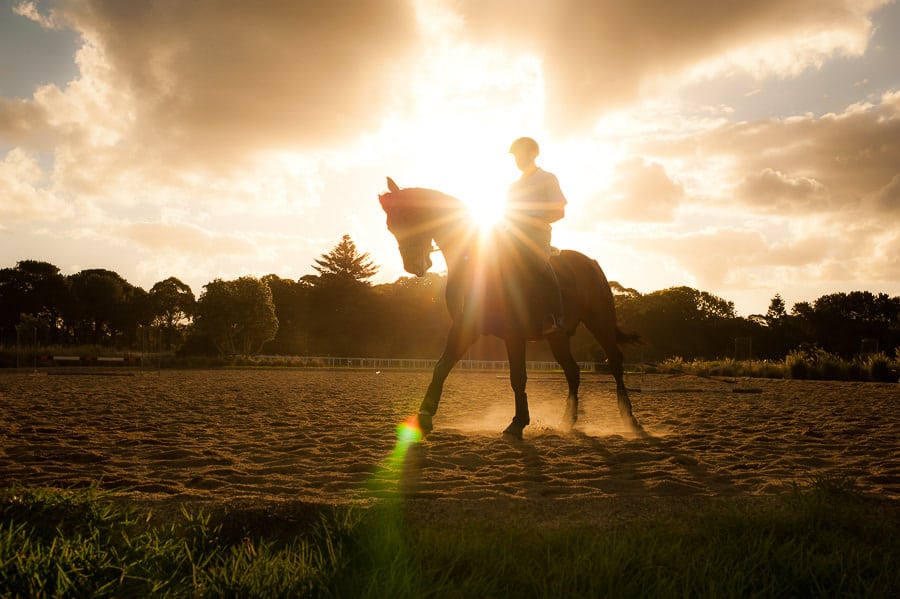
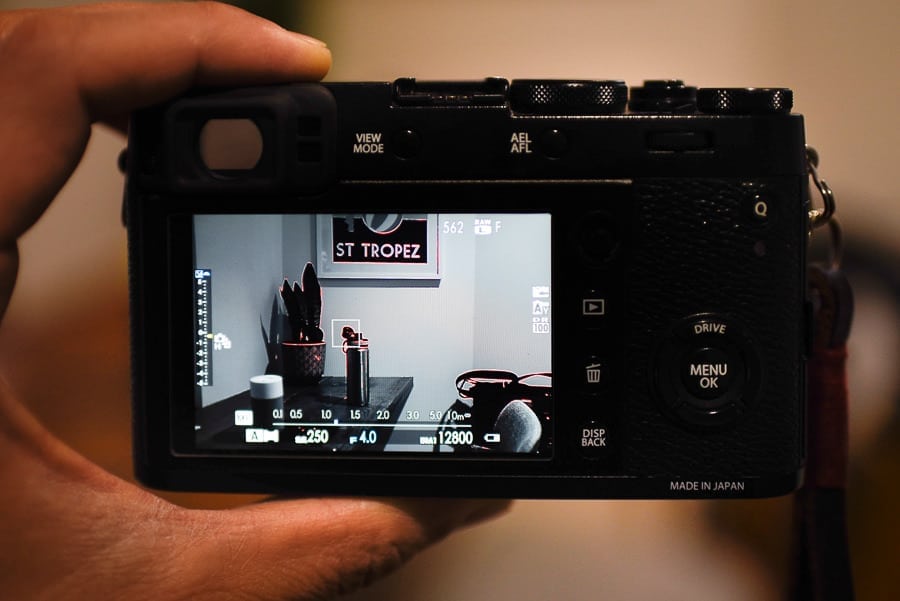
This image was shot at f/1.8 (i.e. a large aperture) since I needed as much light as possible to come through my camera’s lens (since it was a dark scene lit only by the small bulbs above).
OK, so here’s a question for you: How do you adjust your camera lens’ aperture (opening) to make it bigger or smaller?
We talk about aperture in photography using something called ‘f-numbers’ or ‘f-stops‘. You change f-numbers when changing aperture.
You might have heard a photographer ask, “what’s your aperture?”, or “what aperture are you shooting at”, and the reply would usually be the letter “f” followed by a number.
In photography school, you’d be expected to learn those numbers (f-stops) off by heart, but this really isn’t necessary.
I’ve been a pro photographer for several years now and still can’t recite them…
All you need to know is this:
The larger the f-number, the smaller the aperture. The smaller the f-number, the larger the aperture.
Pretty confusing, right?! :-(
If I gave you the mathematical explanation about diaphragms and factors of light, this would be just like every other boring article on aperture out there, so just remember this instead:
When you see a number on your camera’s LCD which is preceded by a letter ‘f’, the closer that number is to zero, the lighter your photo should be.
The picture below should help explain aperture in practical terms. It shows how the larger the opening of your lens, the smaller the f-stop number that’s displayed:
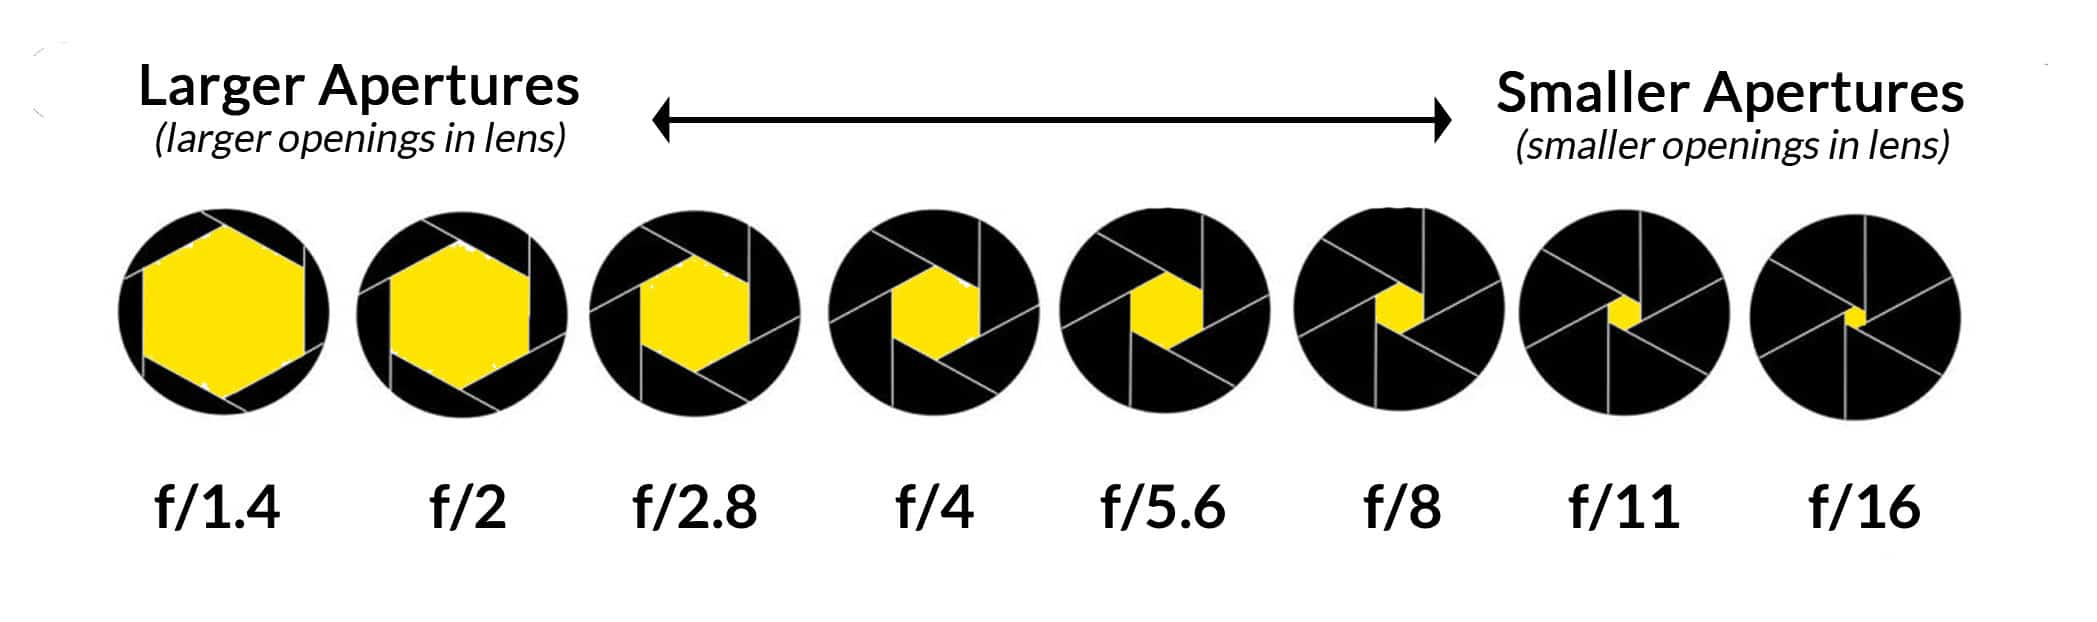
The larger the aperture (‘opening’ in the lens), the smaller the numerical f-stop value.
Note that there are other f-stop numbers that aren’t shown in the diagram above. Your camera/lens may be able to shoot at f/1.8, or f/3.6 for example, but you can still easily visualize where these apertures would fall on the scale above.
F-stops are a big part of the aperture photography definition. In fact, most photographers I know use “f-stop” and “aperture” interchangeably.
If you’re using an entry-level camera that came with a ‘kit’ lens, that lens is likely to have a maximum aperture of around f/5.6.
You can see the maximum aperture written on the lens somewhere. Most kit lenses are ‘zooms’ that have two maximum apertures written on them, like f/3.6-5.6.
If you’ve borrowed your mate’s fancy lens, there’s a chance the maximum aperture would be more like something a pro might use, like f/2.8, f/2, f/1.4… or even f/1.2!
(I’d recommend that you never give that lens back to your mate…!)
Why do pros need expensive lenses with larger apertures? One of the main reasons is to be able to take photos in low light, without having to use a flash on their cameras.
If a lens has an aperture of f/1.4, it can ‘suck in’ lots more light than a lens with an f/4 aperture, for example. A high aperture value equals less light.
Lenses with a maximum aperture of f/2.8 or larger (i.e. f/2, f/1.4, f/1.2…) are known as ‘fast lenses’. You may hear a pro talking about ‘fast glass’, which means lenses with large maximum apertures.
OK, so now you know the first thing about understanding aperture in photography – it’s all about light.
Take a swig of coffee, as it’s time we talked about the second thing that aperture controls.
2. Depth of Field (i.e. What’s in Focus)
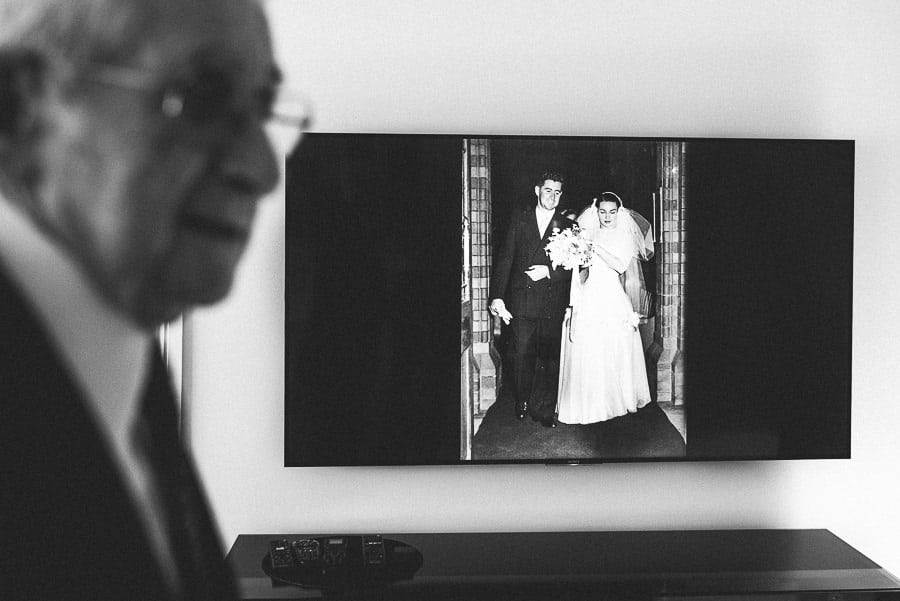
Using aperture you can control what elements are in and out of focus in a photo to help tell a story. This image was shot at f/2.8 to direct the viewer’s eye to the wedding image on the TV, but leaving the grandpa out of focus (but still discernible), to suggest that he is somehow linked to the image.
Making your lens’ aperture (opening) larger or smaller lets in more or less light, but it also has another effect on your photo.
You’ve probably seen those cool pictures where some things are in focus (they look sharp), and other things are out of focus (blurry).
It used to be the case that only expensive camera lenses could create those effects, but that’s no longer the case – you can even blur the background using an iPhone.
The blurry part of a photo is sometimes called ‘bokeh‘, which is Japanese for blur or haze. Photographers might say a certain lens has ‘great bokeh’ or ‘creamy bokeh’.
I couldn’t get too far in this aperture definition in photography article without talking about bokeh. That much sought after quality in professional pictures is created by knowing how to control aperture camera effects.
Photographers also talk about what looks sharp vs what looks blurry in a photo using the term ‘depth of field’, or DOF.
Let’s simplify that term by calling it a ‘focused area’.
So when a photographer says a photo has a shallow or small focused area (shallow depth of field), it means that there’s only a small amount of the photo which looks sharp as opposed to blurry.
If a photo has a deep or large focused area (deep/large depth of field), most if not all of the photo is in focus, and there’s little or no blur.
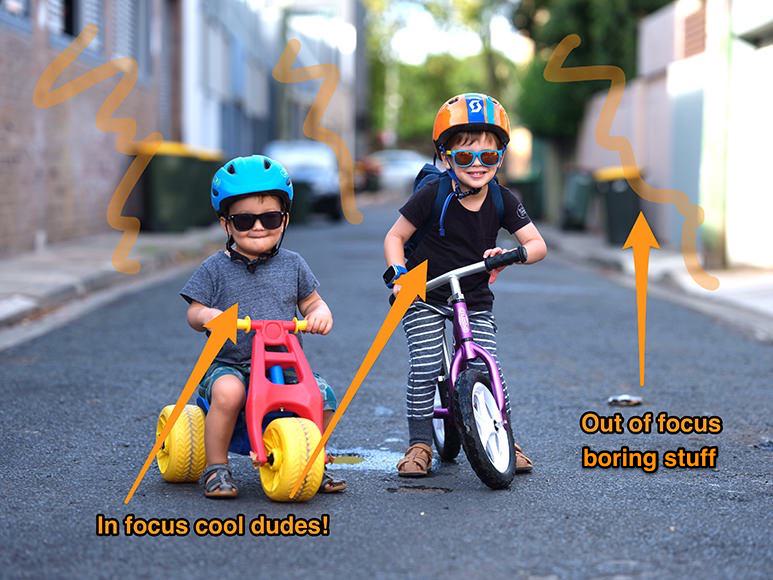
This photo was taken at f/2 (a large aperture), which is why the kids are sharp (in focus) but other elements are blurry (out of focus).
Why might you want sharp vs blurry areas in your photos? In a photo of a flower, for example. you may want to highlight it from the other flowers behind it – maybe you’d prefer for the flower to be the only ‘focused area’, aka a shallow depth of field.
(You can see plenty of shallow depth of field examples every time you browse Instagram – it’s a very popular look, especially for portrait photography.)
On the other hand, you may want to highlight the beauty of the entire flower bed, and need everything to be the focused area (deep/large depth of field).
This article is full of great aperture photography examples, but here’s an image that really highlights how you can control depth of field:
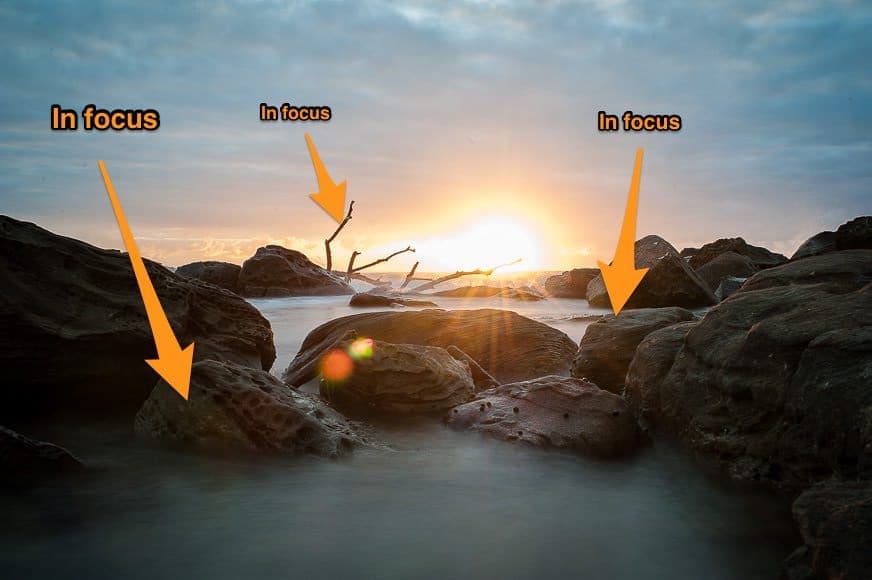
This photo was taken at f/16 (a small aperture), which is why all the rocks/branches are in focus, despite them being at different distances from the camera.
Using a smaller aperture to create a deeper depth of field is popular with landscape and architecture photography, where the photographer usually wants the entire scene to be in tack-sharp focus.
So, how do we control the amount of are that’s in focus in our photos? Well, there are actually a few factors that contribute to depth of field, but as we’re learning about camera aperture here, let’s concentrate on aperture first.
Here’s another confusing statement about aperture: The larger the aperture, the smaller the depth of field.
Let’s break it down and rewrite that statement like this:
The bigger the opening in your lens, the smaller the in-focus area of your photo… and the greater the amount of out-of-focus (blurry) areas.
If you take a look at the image below, you should be able to visualise what I mean:
If you wanted camera aperture explained in a single image, that diagram lays out pretty much everything you need to know!
One other important factor that contributes to the amount of focused area (aka depth of field) is the distance you are from whatever you’re focusing on.
For example, if I’m taking a photo of a flower at f/1.4 (i.e. a large aperture to create a shallow depth of field) from 1 metre away, there should be lots of nice blurriness behind it, assuming that whatever is behind is a fair distance behind it (i.e. not perpendicular to it).
If, however, I’m taking a photo of that very same flower with identical camera settings, but now I’m standing 10 metres away from it… all that stuff behind it? No blurro! Check out the photo below to see what I mean:
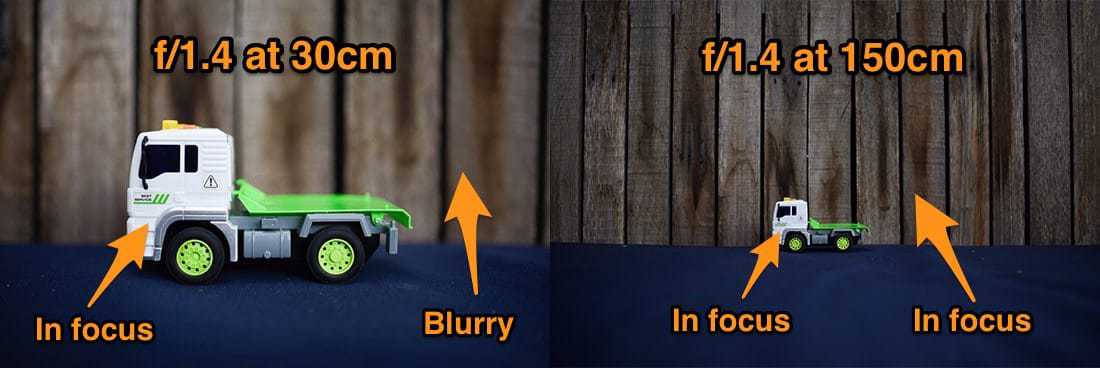
The effect of the distance-to-subject on the depth of field (amount in focus). Both these photos were shot at an aperture of f/1.4 (i.e. a large aperture) – all I did was increase my distance from the toy truck in the second photo, which had the effect of bringing the background fence into focus too.
There may come a time where you want to control more precisely what’s in focus and what’s blurry in your image, and that’s where knowing more about how to calculate depth of field becomes important.
However, I don’t consider this important at this stage for a beginner learning about aperture. Besides, I have a handy cheat to calculate this really quickly which I’ll share in a bit…
In the mean time, you can also read our article: what is deep depth of field in photography?
How to Blur the Background with a Cheap Lens
Controlling what’s in focus vs what’s out of focus (blurry) in your photo using aperture alone may not be easy with a beginner’s camera/lens setup.
Unless you can make your aperture larger than around f/4, (or get really close to your subject like in the toy truck image above), you may not be able to achieve that cool ‘bokeh’ blurred-background effect, i.e. a shallow depth of field.
Unless you can turn the dial on your camera to make the ‘f’ number on the screen say something like f/2.8, f/2, f/1.8 or f/1.4, the amount that’s in sharp vs blurry won’t be very obvious.
As I mentioned before, you should find the maximum size of your lens aperture written somewhere on your lens. Usually, there won’t be an ‘f’ in front of it, but rather a ‘1:’. In the images below, the lenses show maximum apertures of f/1.8 and f/2 respectively.
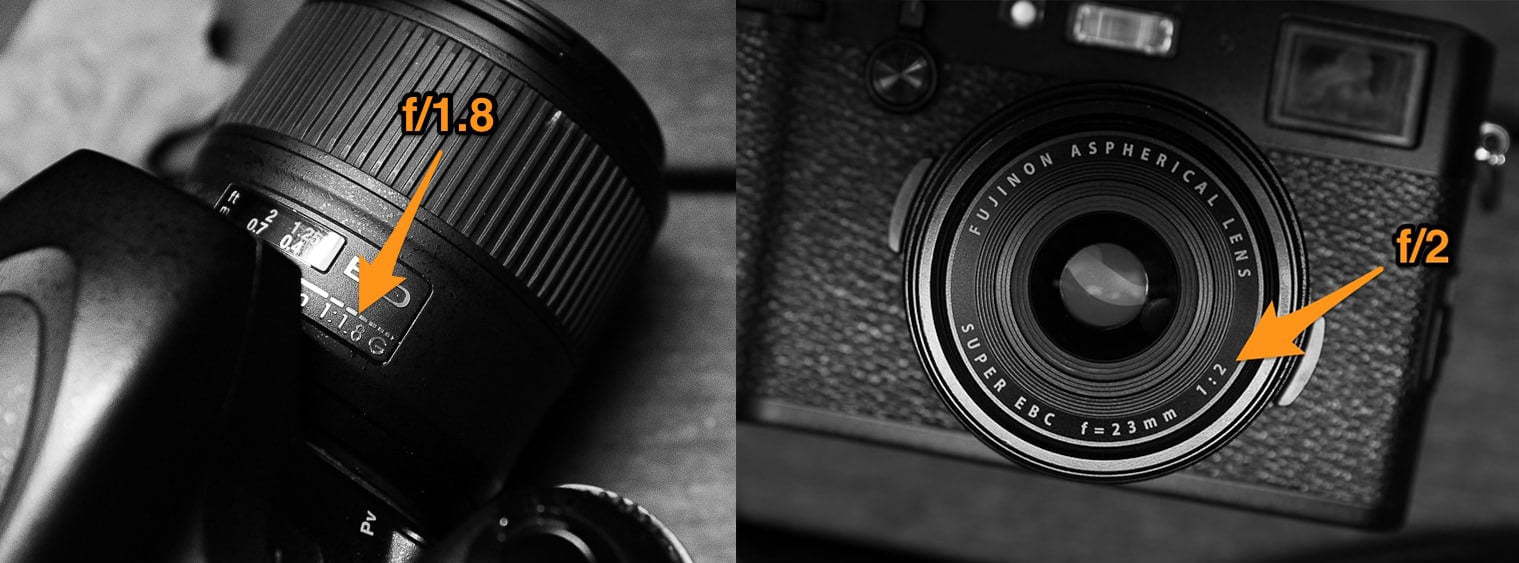
The maximum aperture is usually written on the lens as 1:XX (where XX is the widest ‘opening’ or aperture the lens can produce.)
It’s a bit of a broad generalization, but the cheaper the zoom lens, the smaller its maximum aperture. Cheap zoom lens = not much cool blurry stuff in your photo!
The ‘kit lens’ that comes with your camera will probably say something like ‘3.5-5.6’ on it, meaning that the maximum aperture varies between f/3.5 and 5.6, depending on how much you zoom it. (See: what is a kit lens good for?)
As you get more confident with your photography, you can start investing in better lenses that offer larger apertures, meaning more cool blurry stuff :-)
You can follow along with this aperture meaning photography with even the most budget beginner photography kit, but I’ve never seen a photographer turn down more expensive lenses when they can get them!
If you really want to squeeze out a shallow depth of field from your beginner’s lens, the best way to do it is to get as close to your subject as possible.
Then set the lens to its maximum aperture, and take the photo – hopefully some of the background will be blurred.
Using Aperture in Photography
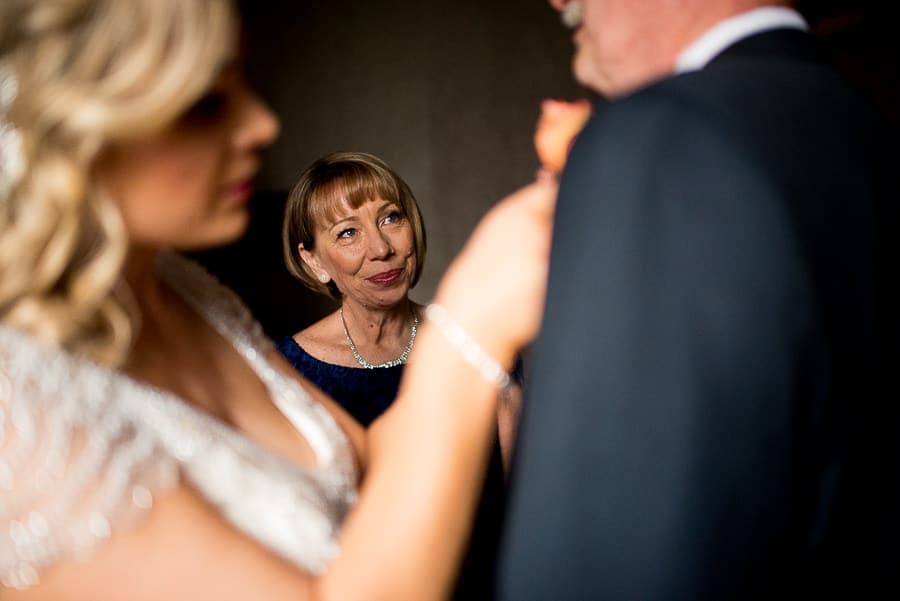
Using a larger aperture (f/1.8) allows you to direct the viewer’s eye to the sharp (in focus) elements of a photo, and away from the blurry (out of focus) elements. Leaving the out of focus elements in the image can help ‘tell the story’, without being the main focal point of the image.
Caffeine wearing off? Go grab yourself another coffee as it’s time to wrap this up!
It’s time for some hands on aperture photography examples!
This is a simplified guide to understanding aperture. I’ve omitted some things that I don’t deem as important at this stage. Trust me here :-)
So let’s sum up what we’ve learned so far. First, in fancy photographer talk: A larger aperture in photography means more light and a shallower depth of field.
It’s best to get used to using that kind of jargon as it’s important when learning photography, but it’s ok to be secretly having an internal monologue with little ol’ Brain that goes something like this:
If my lens has a bigger opening… more light is gonna shine through that sucker… so my photo’s gonna be brighter! And if my opening is big, some weird science is going on to make more stuff in my photo go all blurry!
When you adjust your aperture, two things change – light and the amount in focus.
Note that this has nothing to do with your camera’s auto-focus or focusing system – we’re talking about the amount of the image that’s either blurry or in focus due to changes in your camera’s aperture.
Aperture is linked with shutter speed and ISO, and eventually, you’ll need to understand all three of them if you want to master your camera’s manual mode.
We’ll tackle ISO and shutter speed another time, but for now, it’s enough to just understand aperture.
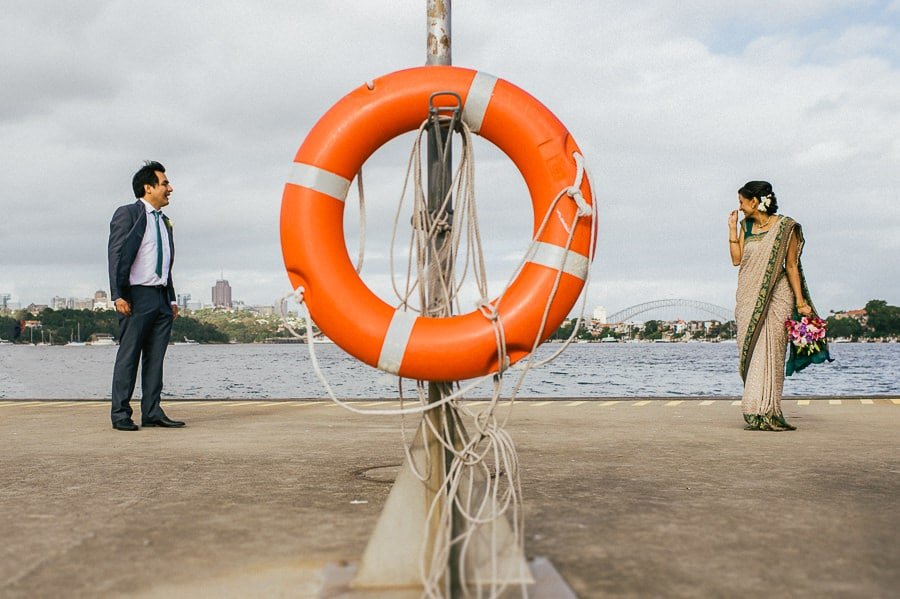
This image was shot at f/5 (a medium aperture). The couple are in sharp focus, while the ring is also in focus (though not quite as sharp). If I had shot this image at f/1.4 (a large aperture), the ring would be too blurred and indiscernible (out of focus), making the overall image confusing.
You may have heard of aperture priority mode before – it happens to be my favourite way to shoot, and I know plenty of other professionals who love it too.
If you’re wondering when would you use aperture priority mode, I’ve got a simple exercise for you below which should help explain the concept.
Have a go at practising using aperture in photography by following these steps:
Step 1: Turn your camera’s main dial to Aperture Priority – ‘A’ or ‘Av’ mode.
Step 2: Turn your camera’s adjustment dial to change the aperture to the smallest number ( i.e. the largest aperture of your lens).
Step 3: Go outside when it’s light and take a photo of something from a metre or so away. If you’ve got a zoom lens, zoom it in completely, then don’t move it again. If your camera doesn’t focus, walk backwards until it does.
Step 4: Take a look at the photo. Make a note of what’s in focus and what’s blurry.
Step 5: Now turn that same adjustment dial to make that aperture number one click bigger. See the previous diagram as a reference for how the numbers change.
Step 6: Take another photo and repeat the process from step 4 until you’re well and truly bored!
Every camera, every lens, every camera+lens combination, and every other variable under the sun is out of my control here, so your results will vary a lot.
However, what you should have seen is that making changes to that ‘f-stop’ number will govern how much of your photo is in focus as opposed to blurry.
This exercise lets you not only take a hands-on approach to figuring out what’s aperture, but also create your own aperture examples.
If you’ve been paying attention, you should be cursing me at this point and shouting at your camera’s screen “why the hell isn’t my photo getting brighter or darker when I change this aperture thingy?! MARK LIED TO ME!!!”
Good question.
As you’re shooting in Aperture Priority, your camera is taking care of the exposure for you while you fiddle around with making stuff in focus vs blurry.
We’ll discuss the notion of ‘exposure’ later, but basically, I’m referring to the ‘brightness’ of your photo.
So in Aperture Priority mode, your clever camera is calculating shutter speed and ISO on the fly to try and keep the brightness of your photos consistent, all the while you’re having a gay old time making stuff blurry.
Again, depending on many variables out of my control, you may well notice some variation in brightness of your photos even in Aperture Priority, but trust me – your camera’s doing its best to make sure that the only thing those ‘f-stops’ are adjusting is what’s in focus.
I shoot in Aperture Priority 99% of the time, and a lot of other professional photographers do too. We all mastered Manual Mode but soon realised Aperture Priority is usually way more efficient!
We all want to tell a story using our photos by controlling what’s sharp and what’s blurry.
We want to direct the viewer’s eye away from the boring blurry stuff, and towards the interesting sharp stuff. Get inspired by this camera aperture guide!
Now that you’ve had aperture explained in full detail, you can blur backgrounds or frame your subject with blurred elements in the foreground!
That’s how great aperture is. You can use it to start controlling what you want the viewer to see.
Remember: knowing exactly what aperture to use at any photo opportunity is a skill that every budding photographer must hone.
Quick Hack for Determining Depth of Field
Use this handy time-saving trick to learn aperture quickly and double-check exactly how much is in focus.
Here’s an awesome cheat to understanding depth of field and aperture. It’s also a great way to check exactly how much of your photo will be sharp vs blurry before you take it.
For this tip you need a mirrorless camera with a ‘focus peaking’ function. Most mirrorless cameras have this, and it’s a really useful way to understand aperture, and what exactly will be in focus at any given ‘f’ number.
Step 1: Find the ‘focus peaking’ option in your mirrorless camera’s menu and turn it on.
Step 2: Switch your camera’s lens to Manual Focus. You may have to do this in the camera’s menu itself, under ‘Focus Modes‘.messages
Step 3: Point your camera at an object with something in the background and start twisting your lens’ barrell to get it in focus. You should see a coloured line appear around the object to show it’s in focus – this is the ‘peaking’, and will differ in colour depending on your camera, but is usually red or yellow.
Step 4: Keeping everything else constant, start changing your lens’ aperture. You’ll see how the peaking lines start jumping around in the photo, showing you what else is falling into focus. Pretty cool, eh?!
I use this tip when photographing groups of people who aren’t standing in a perfectly perpendicular line to me.
I keep changing my aperture until the focus peaking lines are indicating all the peoples’ faces are in focus, but there’s still some background that’s blurry for that cool ‘shallow depth of field’ look.
Frequently Asked Questions
What is an aperture on a camera?
The aperture is the opening of the lens’s diaphragm. Changing the size of this opening allows for either more or less light to pass through. In photography, the aperture is usually expressed as an f-number (or f-stop) which is the ratio of focal length to effective aperture diameter.
What does changing the aperture do?
Changing the aperture changes the amount of light that passes through to your camera’s sensor. The wider the aperture the more light that gets through, thus the brighter the image. Changing the aperture also changes the depth of field – i.e. how much blur there is in the background and how much of your subject is in focus.
Is it better to have higher or lower aperture?
That really depends on the conditions and on what you want from your image. If you’re shooting in lower light you’d probably want a wider aperture (which is a lower f-number). If you’re shooting a landscape and want everything to be in focus, a more narrow aperture (a higher aperture number) would be best.
What is the best aperture for portrait photography?
When shooting portraits you generally want to create a nice separation between your subject and the background. In other words, you want the subject crisp and the background blurred. To create that effect you’ll need a wide aperture (for example, somewhere between f/1.8 and f/5.6).
Final Words
I hope this guide to aperture in photography helped you to understand the most important pillar of the exposure triangle.
Be sure to experiment with your f-stop next time you’re taking a photo, and take note of what effect a large or small aperture has on your final photo.
The beauty of digital photography is having the result in an instant – you’ll be able to see how different f-nunbers can change the way your photo looks.
Take your camera off Auto mode and start playing around with an aperture setting.
Don’t worry about using manual mode just yet – aperture priority mode is a simple and fast way to get to grips with aperture in photography, leaving you to enjoy the rest of the image creating process.
Now that you’ve mastered this aperture definition photography guide, it’s time to get out there and have fun!

Check out these 8 essential tools to help you succeed as a professional photographer.
Includes limited-time discounts.
 Beginner’s Guide to Depth of Field in Photography
 16 Apps To Fix Blurry Photos in 2024 (Free & Paid)
 Guide to Shallow Depth of Field Photography
 When To Use Wide vs Narrow Aperture Photography + Examples
 How & When to Use Aperture Priority in Photography

Mark Condon is a British wedding photographer and editor of Shotkit. When he’s not taking photos or reviewing the latest camera gear and software, Mark can be found cycling around the northern rivers.


