


How To Whiten Teeth In Photoshop
Want to learn how to whiten teeth in Photoshop? Follow this step-by-step tutorial of the four BEST techniques for portraits & group shots!
Photoshop | Software | By Ana Mireles
If you’re photographing people, odds are you’ll have to retouch yellow teeth at some point. Fortunately, learning how to whiten teeth in Photoshop isn’t difficult.
This process can be as elaborate or as generic as you need it to be. For example, if you want to do teeth whitening in a group portrait where the smiles are just small details in the overall picture, then you don’t have to go into a lot of detail.
However, if you’re retouching a commercial photo that features a close-up smile for a toothpaste ad, then you need to put much more attention into it.
In this post, I’m going to be showing you different teeth whitening techniques so you to choose the one that best suits your needs.
You can also check out this tutorial on how to fix teeth in Photoshop using AI.

Download the latest version of Adobe Photoshop to follow along with this simple tutorial.
Start a free 7-day trial today
(Need something simpler? Here’s how to whiten teeth in Photoshop Elements.)
4 Great Ways to Whiten Teeth in Photoshop
Here are 4 powerful ways to make those pearlers shiny again using Photoshop!
Each method is applicable to various situations you may find yourself in when editing portrait photos.
1. Lighten Teeth with Soft Light


Credit: Mimi Thian
This is the first method for how to whiten teeth in Photoshop and should be ok for most group images in which smiles are not the main subject.
This is because it’s quick and easy but you don’t have much control over the color and details. On the whole, it will give you good improvement in the overall look of your scene. Here’s how you do it.
Step 1. Create a New Layer
Open your image in Photoshop and create a new layer. I suggest you do it from the menu instead of the shortcuts, this way you can do everything in one go.
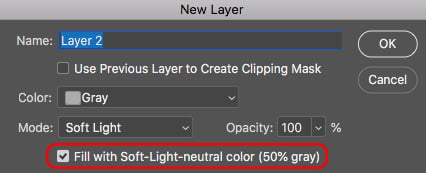
Go to the menu Layer, New, Layer. A new dialog box will open where you can choose the settings.
Change the fill color to grey. Then set the blend mode to Soft Light. With this, a new option will appear at the bottom: ‘Fill with Soft-Light-neutral color (50% gray)’. Check this box.
Note that you can also use the Overlay blending mode because it works similarly, but I prefer Soft Light because it’s more subtle.
When you click OK, you won’t see any changes in your image, but a new gray layer will have appeared in the Layers panel. You’ll be working on this one.
Step 2. Paint Over the Teeth
Since the smiles are not very big, it will be easier to work on the teeth if you zoom in. Even if this is not a precision teeth whitening job, it will help you to keep the edits where you want them.
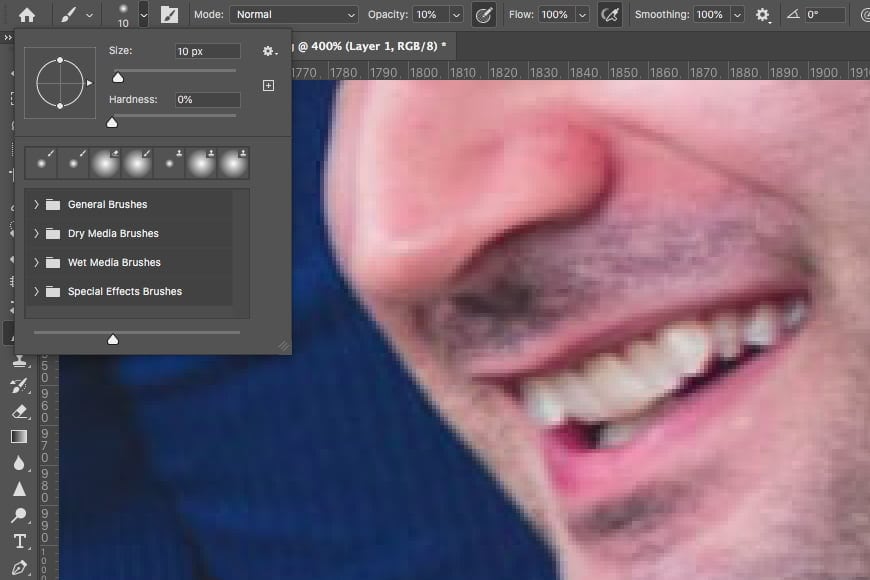
Then, grab the Brush tool and adjust the settings. On the top bar, set the opacity of your brush to a low number. There’s no specific number, but this will allow you to slowly apply the effect and not overdo it.
Then, choose a brush with soft edges and pick a size that more or less covers the teeth without going over onto the lips. Of course, you might need to change this as you move along but you can do this using the bracket keys on your keyboard.
Finally, set the color to white using the color swatches, and start to paint over the teeth. Since you’re working on a Soft Light layer, the whites will lighten the original pixels.
Step 3. Fine-tune
That’s it. Zoom out to check the final result of your teeth whitening edits.
If you think the white is now exaggerated and looks unnatural, you can lower the opacity in the layers panel.
If something is too bright or you brightened something that you didn’t intend to, just grab the brush tool and use black to paint over it and darken it again.
You can compare with the original image by turning on and off the visibility of the new layer by clicking on the eye in the layers panel.
2. Lighten and Whiten Teeth with Hue/Saturation

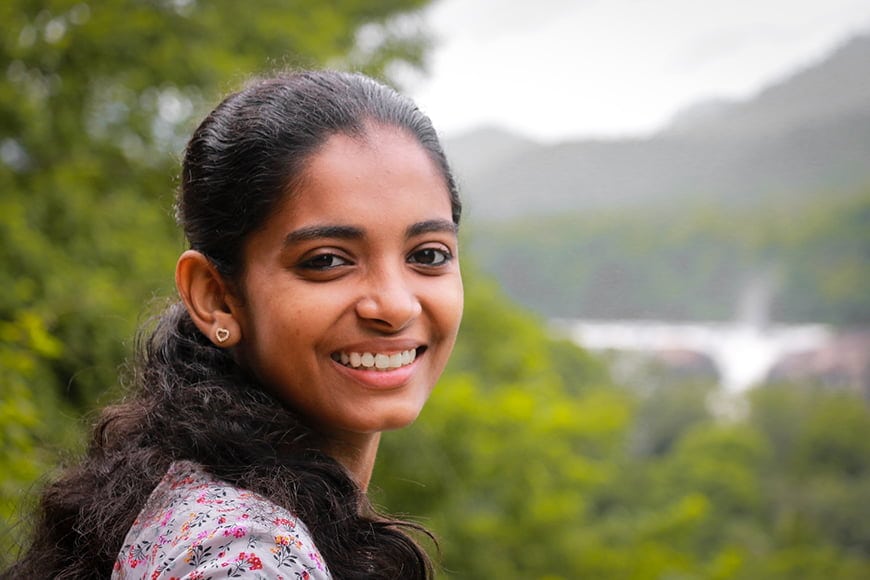
Credit: Godwin Angeline Benjo
The previous method gives you great results when you don’t have much time to whiten the teeth because they’re not a prominent part of the photo.
This technique is much more versatile because it allows you to easily correct both the lightness and color of the teeth using adjustment layers.
Step 1: Select the Teeth
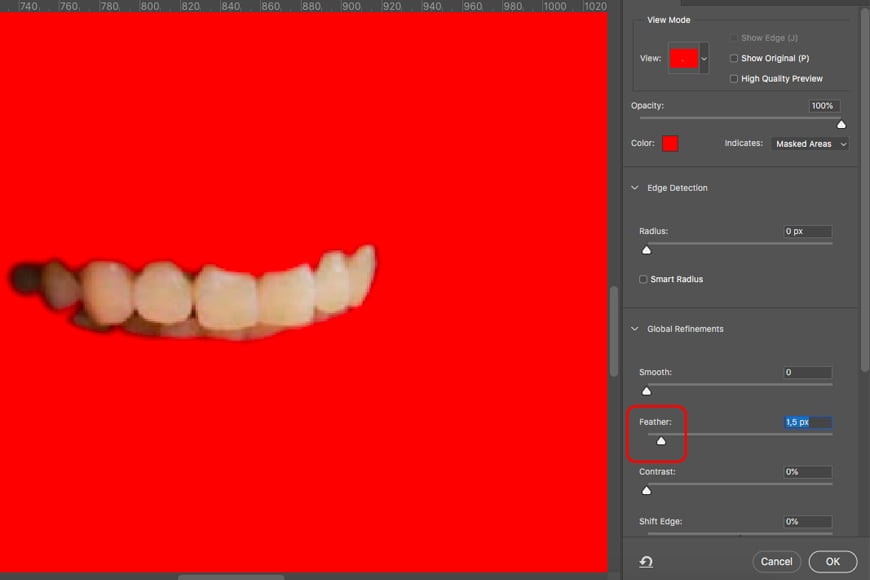
Using the tool of your choice, make a selection of the teeth. Whichever tool you chose, it’s important to create a smooth transition so that the result looks natural.
To achieve this, you can open the Refine Edge workspace and feather the selection using the Feather slider.
Alternatively, you can go to the menu Select, Modify, Feather. This won’t let you preview the result, so you’ll have to guess the value you need.
Step 2: Add an Adjustment Layer
Using the controls from the bottom of the panel, click on ‘Create a new fill or adjustment layer’. Choose Hue/Saturation from the menu.
Because there was an active selection on your image, the adjustment layer will be automatically masked. This way your edits will be made only to what was selected – in this case, the teeth.
Step 3: Whiten the Teeth
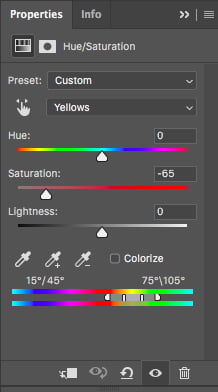
To whiten teeth in Photoshop using this method, we’re going to make a saturation adjustment to yellow tones only.
In the Properties area, start by changing the second drop-down box from Master to Yellows.
Now, grab the Saturation slider and drag it to the left to lower it. Don’t go all the way because then the teeth will start to look blue-ish.
If you feel it’s necessary, you can also adjust the Hue slider until the teeth look just right.
Step 4: Lighten the Teeth
Now you took care of the yellow coloring in the teeth but they probably look a little dark and dreary. To put the spark back into them, you need to adjust the lightness.
Grab the Lightness slider and pull it to the right. There’s no specific value that I can tell you to choose – it will depend on the image and the result you’re looking for.
Just start sliding it slowly until you like the look of the teeth whitening effect. If you want to change this later you just have to double-click on the layer icon to open the properties panel and drag any of the sliders again.
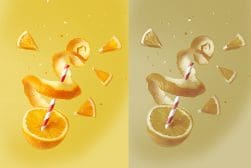
3. Lighten and Whiten Teeth with Hue/Saturation for Groups

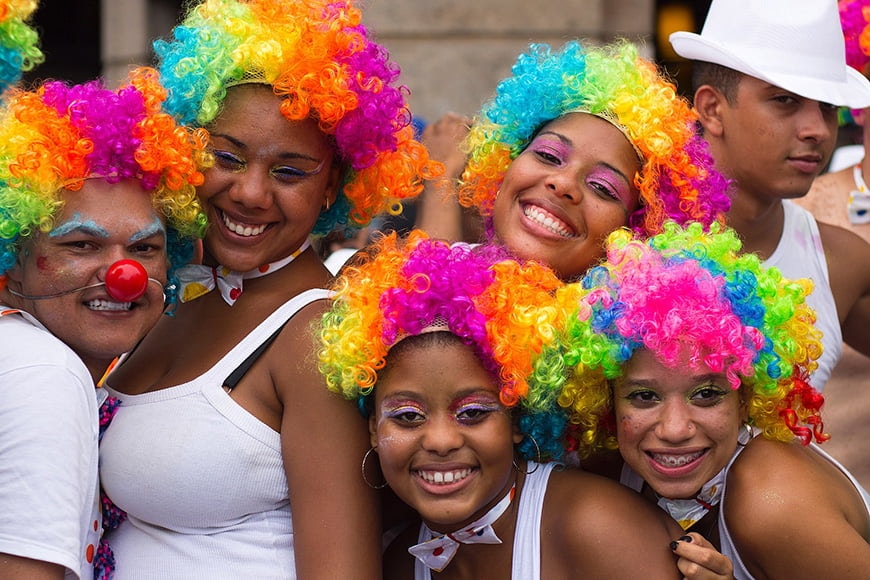
Credit: Everson de Souza
This technique for how to whiten teeth in Photoshop can be used for all kinds of images, because you can also apply different adjustments to each subject.
Remember that everyone has a different tone on their teeth, and probably has more or less shadow casting, so the edits need to be done individually.
Let me show you how to use the Hue/Saturation adjustment layer technique to whiten teeth of multiple subjects while saving some selection time.
Step 1: Select the Teeth

If you want to use this process for a group portrait it can be a little long. So, I’m going to show you a way around it that will make the workflow faster.
Pick the subject you want to start with and zoom in to their smile. Grab the lasso tool and draw around the teeth to make a rough selection. You don’t have to be precise with the edges but you do have to include them all.
Don’t be afraid to go over the gums or even the lips a little bit (without exaggerating of course, to avoid complications later).
Step 2: Add an Adjustment Layer
Add a Hue/Saturation adjustment layer using the button at the bottom of the panel. This will create a layer already masked to the selection.
However, right now the selection includes more than just the teeth. Therefore any changes that you make will also affect some skin and other things that you wouldn’t want to whiten.
You need to tell Photoshop which parts to modify.
Step 3: Determine the Range

Start by choosing the color Yellow on the menu because this is the cast that you want to remove. This will already have a range that you can see in the gradient at the bottom.
To be able to see what you’re doing, make an extreme adjustment. It doesn’t matter what it is as long as it’s noticeable. (Pull all the sliders to the right, for example.)
It will look horrible but don’t worry, this won’t be permanent. Shorten the range by moving the sliders in the gradient until you see that the horrible colors are just in the teeth and are not doing anything to the gums and lips.
Step 4: Whiten the Teeth
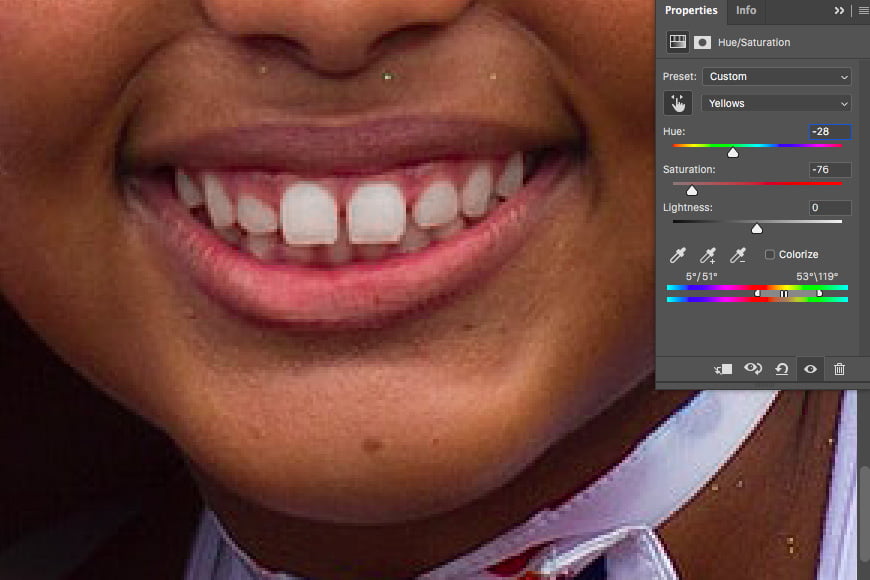
Ok, now it’s time to fix the teeth. Start by putting the values back to the starting point.
You can do this by double-clicking on the handles. Alternatively, you can input the value zero in each space.
Don’t use the Reset button though, because this will go back to the default settings thus canceling the range you determined in the previous step.
Now you can lower the saturation and adjust the hue if you think it needs it.
Step 5: Lighten the Teeth
Drag the Lightness slider to the right to make the teeth bright.
Step 6: Repeat for Each Person
You’ll have to repeat the process for each person with yellow teeth. I know it sounds like a lot, but it’s quite a smooth workflow.
Don’t try to copy the settings from subject to subject as each one will need different hue, saturation, and lightness values.
In the end, you’ll have a separate layer for each smile, so you can go back and adjust it again if you need it without affecting any of the others. Just click on the icon next to the corresponding layer.
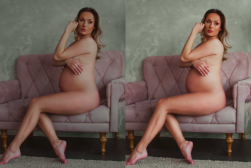
4. Lighten and Whiten Teeth Using Blend If

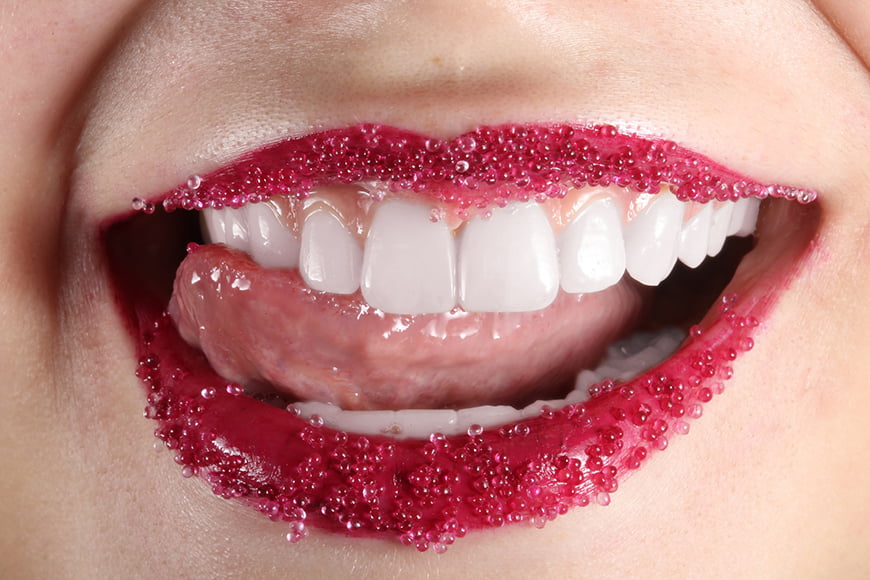
Credit: Rafael Rocha
Teeth are not one dimensional; they’re formed by multiple layers that give them different tones and characteristics.
They also wear down differently across the tooth and the mouth, and they’ll have different reflections.
If you’re retouching a mouth close-up where the teeth are the main subject, then you have to pay attention to these details.
For this, you can use a different technique to whiten teeth in Photoshop that allows you to make different edits for each part by using the Blend If tool.
Let’s get started.
Step 1: Select the Teeth

This time you’ll need a very precise selection of the teeth. This can be very easy or time-consuming according to your skills and the image that you’re working with.
In my example, the bright reflections on the gums and the transparent beads decorating the lips can complicate the work.
As such, it’s important to choose the right tool and technique to work with. I started with a rough selection using the Quick Select tool and then went into the Refine Edge workspace.
Here I decided to paint the borders with a thin brush, and then color in the rest. This was a choice I made because I use a tablet; if I was using a mouse, the Pen tool would probably be better.
As you can see, the tool or brush you use is a matter of personal choice. Just make sure your teeth selection is ok as you’ll be using this to mask your edits. (You don’t have to go too crazy over getting it perfect, as you can always retouch the mask later if necessary.)
Step 2: Make a Hue/Saturation Adjustment
Let’s start by doing a general tone correction to remove the yellowish hue that dominates the teeth.
You can do this using the previously explained method, adding a Hue/Saturation adjustment layer.
Because there’s an active selection, it will automatically create a Layer Mask for the teeth. Now desaturate the teeth by dragging the Saturation slider to the left.
Bring back the brightness dragging the Luminosity slider to the right, and adjust the Hue accordingly.
You can activate and deactivate the Colorize option to see if it gives you better results.
Step 3: Add a Curves Adjustment Layer
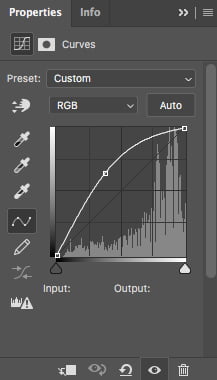
Now that you’ve made an overall correction, it’s time to tackle individual areas to make a precise and more professional retouch.
I like to start with the shadows. This refers to entire areas, like the molars in the deepest part of the mouth, but also a specific area of each tooth.
To do this, add a Curves adjustment layer. If your selection is still active it will automatically make the layer mask.
If not, you can click on the mask from the Hue/Saturation layer holding the Alt key and drag it up to this layer. This will copy the layer mask and replace it.
Now, lighten the image by dragging up the curve. Keep going until the darker areas look good, even if the rest is too bright. Don’t worry, you’ll fix that in the next step.
Step 4: Blend If to the Darker Areas

Double-click in the layer to open the blending properties. Here you’ll find the Blend If sliders at the bottom.
Move the sliders from the Underlying Layer to the left. Hold the Alt key to split the slider in two and make a grading effect.
This way, you’ll make the extra brightness from the lighter areas invisible, and you’ll only be correcting the darker areas of the teeth.
Step 5: Adjust the Color in the Darker Areas
Now you need to correct the color for the darker areas too. In my case, they have too much red and magenta.
Add a Hue/Saturation mask and adjust it as you’ve been doing so far. Then use the Blend If tool to apply it only to the darker areas.
Step 6: Brighten the Reflections
Now that you’ve corrected the shadows on the teeth, you have to do the same for the highlights. Usually, this will be reflections.
You can use a Brightness/Contrast adjustment layer or Curves. Then, change the blending mode to Soft Light and use the Blend If slider in the opposite direction.
Step 7: Fine-tune
You can add as many adjustment layers as your image needs. Then use Masks and Blend If to control your edits and make the teeth look perfect.
Make sure the adjustments aren’t affecting any unwanted areas. If they are, just refine the layer masks to limit them to the teeth only.
Compare your final result to the original image and see how it looks. You should now have a mouth with beautiful white teeth!
Another Option to Whiten Teeth in Your Photos
Before we wrap up, it’s worth mentioning that there’s another tool out there you can use to whiten teeth in photos that makes the process much (much!) simpler and quicker.
Skylum’s Luminar software includes a feature called Portrait Enhancer. This automatically and intelligently selects teeth in an image and lets you adjust how much to whiten them using a simple slider.
There’s no selecting or masking required, giving it a massive advantage over Photoshop.
Check it out here.
Final Words
That’s it. You’ve just learned four different methods for how to whiten teeth in Photoshop.
With these techniques, you can whiten teeth in any situation and become a portrait retouching pro in no time… and if all else fails, you can learn how to face swap in Photoshop instead!
If you have any questions regarding teeth whitening using Photoshop adjustment layer or brush techniques, let me know in the comments.
Download the latest version of Adobe Photoshop to follow along with this simple tutorial.
Start a free 7-day trial today


Ana Mireles is a Mexican researcher that specializes in photography and communications for the arts and culture sector.


