


Mike Cassidy
Boudoir & Glamour | Last Updated: November 16, 2025


Shotkit may earn a commission on affiliate links. Learn more.
Hi, everybody. Thanks for taking a moment to view my feature. My name is Mike Cassidy, a.k.a. the “Boudoirist,” and I'm a pro boudoir photographer from New Jersey, USA.
I thought this would be a really fun project to share a little bit about me, my work, as well as the contents of my gear bag with everyone.
I never really set out to be a boudoir and glamour photographer. I simply raised my sails and somehow the winds of the universe carried me in that direction.
I started taking photos of friends, then friends of friends, and at some point someone offered me a few dollars to take some “sexy” photos for a gift, and the rest is, well, history.
I knew, though, if I was going to start taking beauty photos, I'd want to be the best at it…anywhere. Thus began the (never ending) pursuit of the perfect boudoir photo.
Back when I started in 2007-ish, Flickr seemed to be the center of the photo universe. I would study photos for hours every week trying to learn why some photos really stood out and got attention, and others didn't.
I read Flickr message boards to try to absorb as much information as I could about learning photography. I think that type of study (along with an almost freakish dedication) is definitely an important part of the learning process.
Despite all that, though, it takes time to get the technical aspects figured out. Until you get your feet on the ground and find your specialty it’s really hard to know what gear will be essential. The photographers I studied seemed to use so much gear, it was hard to know where I needed to start!
I purchased all kinds of lenses, lights, and other gear, because I wanted to be like my photography idols I studied online. Once I started to find my way, though, things changed a bit.
After a while I saw there were certain items I used a lot, and others I didn't. As someone who wasn't really fond of hauling lots of stuff around, well, I started leaving things behind until I pretty much had the few things I really needed to do my job.
Since that time, I've done hundreds of sessions over the years and my gear kit is really a great example of how a few well-chosen tools are all you need to get the job done!
Boudoir is a very simple and beautiful form of photography, and so should be the tools used to create it.
I've been a fan of gear bag features over the years, but have always been a bit reluctant to take part since most are filled with expanses of amazing lenses, camera bodies, and accessories– knowing I really didn't have or use such a vast collection! *sigh*
As a student of boudoir who is in constant pursuit of the perfect boudoir photo, I've honed my tools to the basics. My shots are intimate, within close quarters, and are generally made with available light. All I really needed was a few items to get that done how I liked.
Once you find your path in photography you can start to tailor your gear to exactly what works best for you and leave the rest behind — which is exactly what I did. (And who wants to carry all that extra stuff around anyway, blah.) The rest of the magic is hard work and practice. Lots of practice.
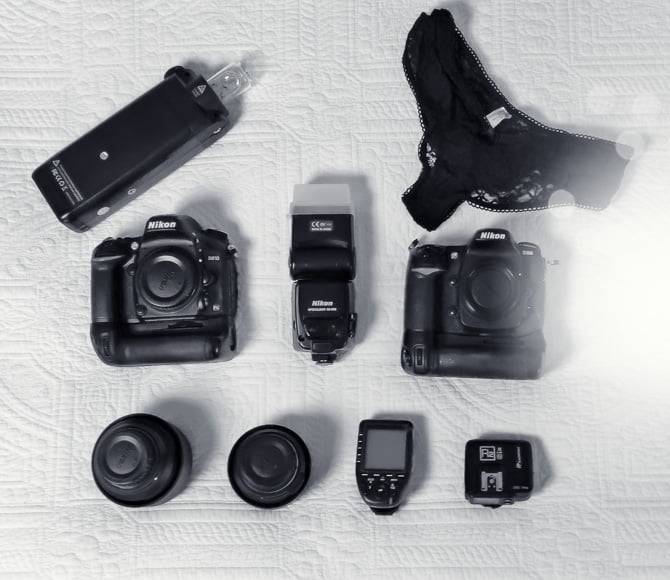
Nikon D610 : I had a D600
 for a short while then grabbed a couple D610
 s and have been happy with them since. They do everything I need, and have much improved low light capability.
My only gripe is the size. My big hands need a large body. A grip is a must, here. I was waiting to switch over to the newer mirrorless Z series, but looks like I'll wait. They seem to be missing a few pro features, and appear physically smaller with no available grip.
Nikon D300 : Oooh. Can you still imagine I'm hanging on to one of these? I had two back in the day. This was the first camera I felt helped me create what I wanted to create. I'm still so attached to it, I still keep one around as a backup to this day.
Nikon 50mm f/1.4 : This is kind of a ‘do everything Superman' of a lens. If you could only pick one lens to use for a boudoir session, this would be a smart choice. It's great for working in close quarters and getting portrait, 3/4 length shots.
Nikon 85mm f/1.8 : As someone who generally lives life at f/2.8 and below, this is great for getting separation in close quarters…and it still looks sharp.
Nikon SB-800 : Since I've almost always worked with ambient light, the SB-800
 and Nikon CLS were like magic to me. On a cloudy day, or when I just need a little bit of a boost, I can pop a small diffuser on this speedlight and get the subtle accent lighting I need. Not only that — I love how quick and easy is it to set this anywhere. When working with clients I need to keep gear at an absolute minimum.
Flashpoint AD200 : Whoah! This is a big leap for me. About a year ago I thought I'd try something new and exciting. This is a bit like an SB-800
 on steroids (although I had to start using a stand with it, blah. One more thing to haul around.) It’s a bit much for what I really need but I can pop a diffuser on it and get a nice gentle light.
Flashpoint R2ProN : Sends the TTL signal to the AD200
 . Easy-to-use screen lets you make adjustments without digging into your camera menu. It's kind of a “set and forget” thing for me, but occasionally I need to boost flash power which can be done with a few clicks. The added bonus is it keeps clients from having the camera body “CLS” flash right in their faces over and over.
www.mikecassidyphotography.com | @michaelcassidy

Check out these 8 essential tools to help you succeed as a professional photographer.
Includes limited-time discounts.
4 Comments
Leave a Comment
WELCOME TO SHOTKIT
🔥 Popular Now:

Photography is fueled by my love for light and my desire to create meaningful. This is very useful and efficiency content, mysterious and surrealistic effect you created.
Thanks for sharing of your treat with us.
Regards,
Ryan
The article is really useful. If you are interested in photos, I recommend the photoroom premium. In this way, you can customize your photos much better.
Good read, Mike! I really like the little video clips when clicking on a genre on your site.
Thank you. It’s a bit of a work in progress for a 2019 update of the website.