


Does Luminar Neo have Templates?
Luminar Neo can speed up image editing in many ways, but one of the most popular features are Luminar Templates. Here's how to take advantage of them.
Luminar | Software | By Jeff Collier
Shotkit may earn a commission on affiliate links. Learn more.
Luminar Neo is Skylum’s flagship image editing software for Windows and macOS.
One of the most frequently asked questions about this software is Does Luminar Neo have templates?
The good news is that the answer is a resounding yes! In Luminar Neo, these templates are called Presets.

Powerful AI editing tools improve photos in less time. Affordable one-time price and expandable features.
Use code shotkit10neo to save $10.
You can think of a Preset as a sequence of image adjustments. It’s a recipe that can be saved to use again later.
When you apply a Preset, all the image adjustments contained in it are applied automatically. There’s no limit to how many Presets you can create within Luminar Neo.
You can even purchase Luminar Presets to emulate the signature editing styles of professional photographers.
Templates Are Called Presets in Luminar – Here's How to use Them
Luminar Neo comes with 22 built-in Preset Collections, each containing five or six individual Presets.
With over 100 Presets at your disposal right out of the box, there are Presets to suit most editing styles.

Click the Presets tab at the top of the application and use the scrollbar on the right to browse a range of Presets grouped by style.

When you open an image for editing, Luminar Neo will suggest some Presets for you at the top of the Presets tab, under the heading ‘For This Photo'.
Upon clicking a Preset’s name, the adjustments are applied.
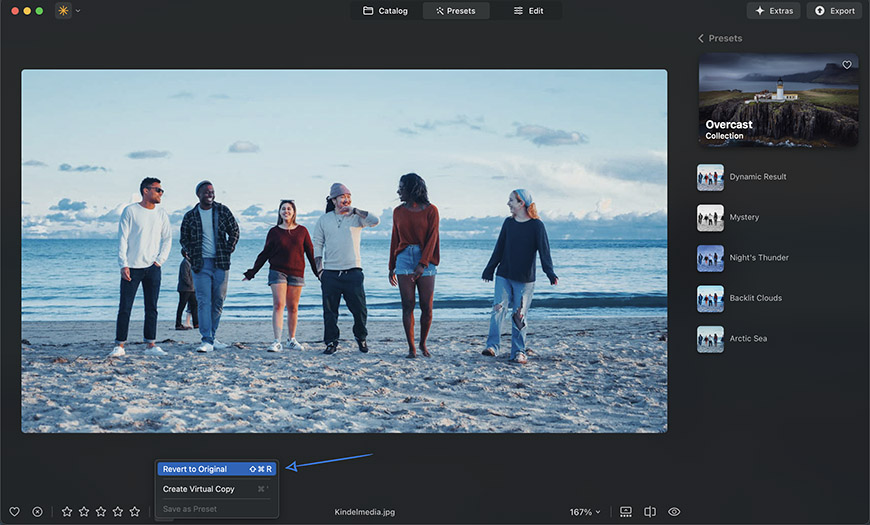
If a Preset isn’t working for you, try another, or head to Actions > Revert To Original to start again.
If a Preset’s effect is too strong or not quite to your taste, click the Edit tab, then click on Edits on the right-hand side.
This will display the list of adjustments that were automatically applied to your image.
You can change each one individually, or you can remove an edit altogether by clicking the Reset tool button. Click the Quick Preview (eye) icon on each adjustment to toggle the effect on and off and see how it affects your edit.

You can add new adjustments at any time by clicking the Tools tab and continuing your edit. Luminar Neo follows a non-destructive workflow, and each edit is made separately.
You can see in the image above how Luminar has applied selective edits to various parts of the image, much like manually dodging and burning.
Saving your own Preset
When you’ve made adjustments to an image that you really like, you can save this recipe as a Preset to use again later.
Remember: There is no limit to how many Presets you can create within Luminar Neo.
To save a Preset, choose Actions > Save As Preset at the bottom of the application window and give your Preset a name.
If you started with an existing Preset, don’t worry — you won’t overwrite it. Choosing Save As Preset will create a new Preset instead.
Adjusting Luminar Neo’s built-in Presets and saving them just how you like is a great way to start your library and better understand how various tools interact to build a specific look.

Your newly created Preset can be found and applied in Presets > My Presets.
Managing your favorite Presets
As your Preset library grows, it can become a challenge to quickly find the Presets you use most often. Luminar Neo has you covered!
Bookmark a Preset for easy reference by looking for the small heart icon next to your favorite and most frequently used Presets.
Click it and this Preset will be added to a list of your favorites. This works on Luminar Neo’s built-in Presets, your custom Presets, and any Presets you have purchased.
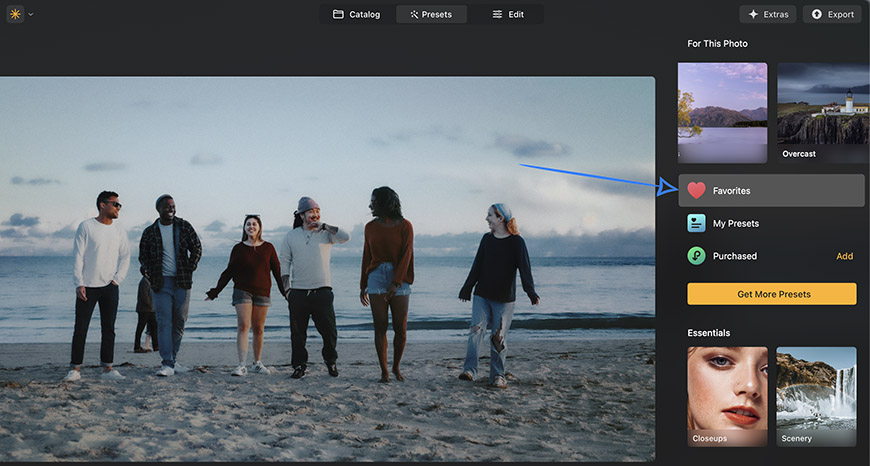
To find your favorites, head to Presets > Favorites.
Buying Presets from the Luminar Marketplace

One of the features that photographers love about Luminar Neo is the ability to purchase Luminar Presets from the Luminar Marketplace to speed up the editing process.
Luminar Signature Templates are Preset Collections which have been created by professional photographers.
Each collection follows a theme, from wildlife to cityscapes and astrophotography to studio portraits — there’s something here for all photographic genres and tastes.
Click the Get More Presets button within Luminar Neo and it will take you to the Luminar Marketplace, where hundreds of Presets are available under the Templates section heading.
You can sort by Topic (nature, travel, street), sort by Mood (dramatic, minimalistic, romantic), or search by your favorite photographer (Author).
Look for the Luminar Neo logo to ensure a Preset (Template) Collection is compatible with Neo.
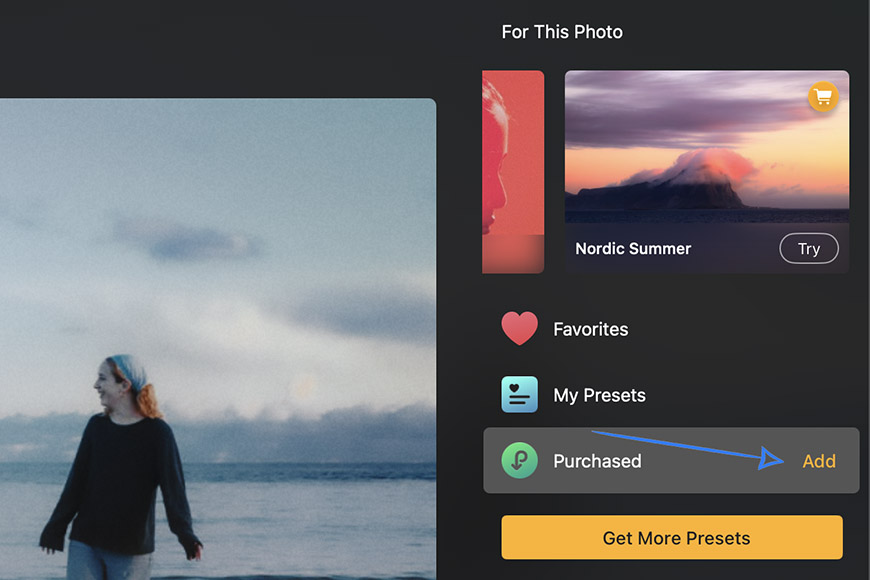
Once you have purchased and downloaded a Preset Collection, install it in Luminar Neo by heading to Presets > Purchased > Add. In the window that opens, navigate to the folder where the downloaded Preset Collection file (.lnpc) is located and select it.
Your purchased Presets will now appear in Presets > Purchased.
Get even more Presets with Luminar X Membership

If you are serious about image editing, it’s worth considering joining Luminar X, Skylum’s membership program, which delivers new assets every month created by Skylum’s team of professional photographers.
Over the course of a year, you will receive a minimum of 120 Presets or LUTs, 120 Skies or Overlays, and a 15% discount on Luminar Marketplace purchases.
Learn more at https://skylum.com/luminar-x-membership.
Luminar Neo is available for Windows and macOS right now.
Powerful AI editing tools improve photos in less time. Affordable one-time price and expandable features.
Use code shotkit10neo to save $10.

Jeff Collier is an experienced film photographer who enjoys experimenting with modern digital photography equipment, software and apps. He’s also an ex-world champion triathlete and avid cyclist, clocking hundreds of km each week in the beautiful Tweed Valley of northern NSW, Australia.
👋 WELCOME TO SHOTKIT!
🔥 Popular NOW:
