


Visual Flow Presets Review
Check out our review of the new Visual Flow image editing toolkit by SLR Lounge and DVLOP, including example images and walk-through.
Software | Software Reviews | By Nick Church
Shotkit may earn a commission on affiliate links. Learn more.
Visual Flow is a new image development company created by a collaboration between SLR Lounge and DVLOP.
Visual Flow have two packs of presets available; the Modern Preset Pack (more packs are in development) for global look-and-feel and also their Retouching Tools for the local adjustments such as brushes.
Visual Flow's view is that most preset packs in Lightroom do not work because they are designed for ideal lighting conditions.
They claim this means that the photographer spends longer tweaking the preset, negating one of the advantages of buying a preset pack.
Their solution? Using their in-house camera profile and processing experts from DVLOP to provide a new patented approach.
I've always been a bit of a sceptic when it comes to Lightroom Presets as the ones I've briefly tried have only crudely changed the slider positions, and I've never been too blown away with the results. A preset might look fine on one image, but do nothing at all for another.
I prefer to develop my own presets to give the Nick Church Photography look and feel, but I'm always looking for ways to improve quality, consistently and efficiency, so let's test these out!
How Do Visual Flow Presets Work?
-
The Preset Packs
To create Visual Flow presets, SLR Lounge have partnered with DVLOP experts in camera profile technology and RAW processing.
This allowed them to create what they call the ‘Colour Engine' to give each preset its look.
An important addition to this is what they term ‘Lighting Condition Based Development'.
There is a lot of technical detail around this, but to summarise, it means that the preset can be aware of what the lighting condition is and adapt to suit each image and lighting condition.
It is this, rather than a one-size-fits all preset that is what makes the Visual Flow Presets a bit more intriguing.
There is a 2-step approach to how Visual Flow Presets will give you the look you want:
Step One: Choose the preset pack for your desired look. This is easy, there is only one at the moment, the Modern Preset Pack, but more will follow.
Step Two: Select the lighting condition in the preset folder that best represents that of the photo. This triggers the Colour Engine to work with the lighting you have in the scene.
This adaption to lighting conditions is supposed to give you a ‘one-click-preset' in most cases, which of course speeds up your workflow and also stops you having to change lots of things which is a cause of inconsistency with preset-users that I've noticed.
The presets not only change all the tonal controls but also adjust the exposure. This is important because most presets I've used before all need exposure adjustment which slows the workflow.
Along with these look-and-feel presets you also get a selection of global tools. These include noise reduction, film grain and radial filters for specific photo types.
Unlike the clever RAW processing however, these are just setting the Sharpening, or Noise controls to pre-defined values.
Still, useful to have these preset, especially for beginners where the amount of smoothing or sharpening that's required is not clear.
-
The Retouching Tools
This pack provides presets for the local adjustment tools such as filters and brushes.
There is huge number of these available, from modifications such as revealing cloud detail, adding lip-gloss and everything in-between! They are nicely categorised so you can find what you're looking for.
As with the global tools above, these seem less ground-breaking as they are dialing in slider positions in the tool, but still, for those starting out with Lightroom, there is a lot of time saved in having these pre-cooked.
Ease of Use
Installing the Visual Flow presets is trivially easy – just double click the package for OSX and that's it. Next time you start LR, you have more presets than you will initially know what to do with!
In preparation for presets, I recommend that in Lightroom you enable the snappily-titled ‘Enable hover preview presets in loupe' option, which you can find in the Performance tab of Settings.
I turned mine off a few Lightroom Versions ago as it introduced bugs which have since been fixed. But you need to see the effect of each preset before you apply it, so ensure it's switched on.
I created a collection of images from some recent weddings, all virtual copies reset to the SOOC version, and the set was chosen due to the variation in light throughout the day.
As I moved through the images I selected the preset that described the light that best suited the image. Along with the preview option of Lightroom, this is an incredible fast way to get your images in shape and consistent.
The fact that the preset changes the exposure to be ‘about' right does genuinely make this a one-click deal.
With my own presets, they are always too dark after and so need a variable amount of exposure boost, but not with these.
After the Visual Flow preset has been applied the exposure slider remains on zero though, so I assume it's changing the exposure under-the-hood as part of the DVLOP profile that replaces Adobe. Clever.
Selecting the correct light was very straightforward. I opted for the ‘Soft Light' option for all indoor natural-light shots, and the ‘Hard Light' for the sunny outdoor pictures.
These both do their respective jobs really well – the latter for example coping with the highlights more aggressively that the former. But you never see crushed highlights, it's all really subtly done.
You can't see what is going on under the hood with the Visual Flow presets, and to be honest you don't need to. The proof is in the pudding here, with pictures hitting the mark right out of the box.
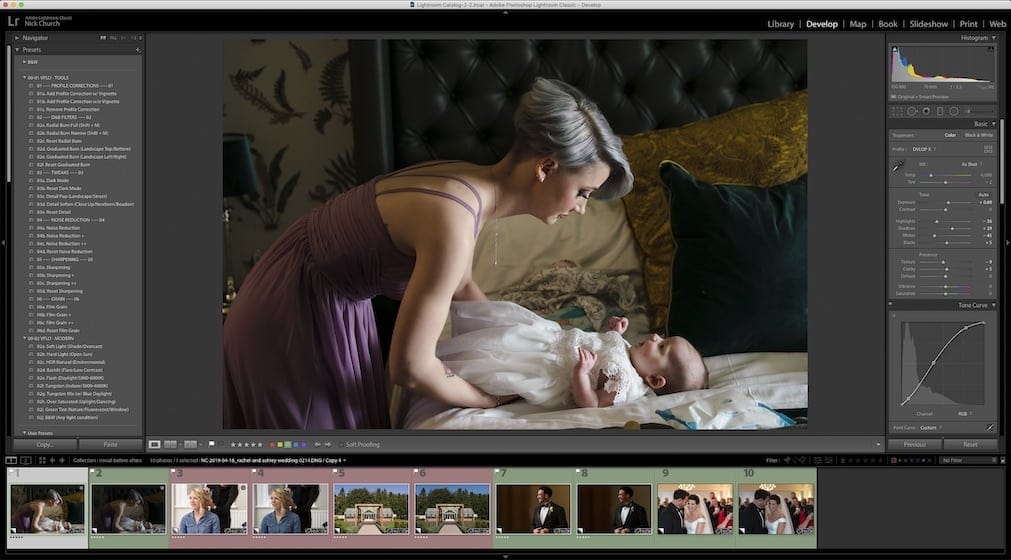
It was interesting to see how the sliders are being manipulated. As well as the basic tone tools, there was a nice bit of contrast dialled in with an S-Curve in the Tone-Curve panel.
The hues have been adjusted a little, and you can even see a gentle split-tone has been applied with some warmish colours.
This is what helps give the natural warmth and clear tones which characterise this preset.
Results
In practice with Visual Flow, while some images had everything dialed-in correctly on the single preset click, some needed a bit of a tweak before they were how I wanted them.
Mostly it was in the skin tones which was a bit more towards magenta than my preference, but that's just a stylistic thing and in any case easily corrected.
But once I'd done that I was happy with how they looked, and considering the effort I had put in I was very impressed.
Visual Flow is going to be a huge leap forward for someone that has yet to develop their own presets.
The Modern Presets Pack are not too stylistic, and still natural looking and so they are a great way to give your images that professional boost with one (or maybe two) clicks.
For a few images I dived right in to the Retouching Tools.

In here I found some seriously useful brushes for smoothing skin, removing wrinkles and defining eyes and lots more.
They are nicely categorised, so for example you go to the ‘Eyes' section and here you can add mascara, catch-lights or enhance iris. Skin, Lips, Sky also gets a similarly rich set of subject-specific tools.
I do a good amount of dodging and burning on my photos compared to some photographers and so I was really pleased to see such extensive dodging and burning tools.
They are more thoughtfully put together than just increasing or decreasing exposure (which is my usual approach), and allow adjustment of highlights or shadows separately which is a level of precision I've never tried.
They are complex tools that easily and naturally lift an area of the image without the characteristic look of a toddler painting on top of it which can happen when the settings are not correct. Very useful for those ‘hero' images that are going to get a bit more Lightroom love.
Examples
Here are some before (raw) / afters of a selection of the shots I edited with the Visual Flow Presets.
All these were created with the single-click edit. I think this best shows the power of this pack.


The preset has really brought out the skin tones nicely here compared to the raw. The images was originally under-exposed and this was raised to the correct level.


Again, skin tones nice. I like the extra contrast dialled into the shot. I highlighted his button-hole with the enhance-detail brush from the ‘Retouching Tools'


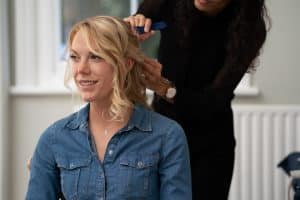
As well as dialling in the preset for soft-light, I also used the Retouching Tools extensively on the bride (although she did not need it, I wanted to show the effects). Extra mascara, lightening of the iris, smoothing of skin, reduction of lines and catchlight all added. It all looks very natural too.

This is an example of a shot where I thought the skin tones moved too far to magenta. It is easy to correct, but this shows the shot before the correction. Other areas of the image look really good though.
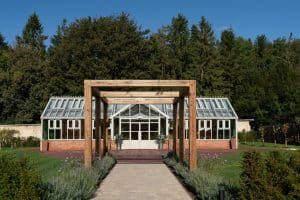
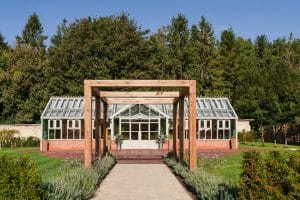
Nice clean treatment of this natural scene. Good detail has been brought out of the shadows of the trees and sky nicely balanced.
Value for Money
The Visual Flow toolkits start from $95 for the Modern Preset Pack and/or the Retouching Kit.
For $165, you get the Modern & Retouch Bundle, which includes:
- 10 one-click presets
- free modern & retouching bundle updates
- 47 powerful retouching brushes
- 26 advanced scene tools
If you're a professional photographer who earns money via wedding or portrait photography, this will probably seem like an affordable and wise investment into your business.
Check out the full pricing here.
Conclusion
I have never used a preset pack, and had dismissed them as a bit of a gimmick. Yes, I can see in Photoshop that actions can be very powerful, but never really considered Lightroom as being a good candidate.
Am I prepared to eat my words? Actually, mostly, yes!
For any photographers that are new to Lightroom, still developing their style or consistency, or are looking for ways to streamline their workflow then the Visual Flow Presets require a good look.
With well known educators SLR Lounge and input from DVLOP's boffins then there is definitely some ‘secret sauce' going on here that makes for a smooth, natural and (importantly) efficient application of presets that need little or no tinkering afterwards.
The Retouching Tools are going to give every photographer, new or old, something to smile about as there will be several tricks here that they are not using. Or that perhaps they do in photoshop, but can more efficiently do right within Lightroom. Highly Recommended
All images www.nickchurchphotography.co.uk

Nick Church is a wedding photographer based in Bristol, UK.
👋 WELCOME TO SHOTKIT!
🔥 Popular NOW:
