


How to Add Lighting Effects in Photoshop
In this tutorial, you'll learn how to add lighting effects in Photoshop, so you can add atmosphere to your images and take them to the next level.
Photoshop | Software | By Judyth Satyn
Shotkit may earn a commission on affiliate links. Learn more.
Sometimes all you need to do to change a dull photo into a more atmospheric image is to add light rays or alter the light source.
Thankfully, it's not too difficult to do that in Photoshop using a few lighting effects filters.
If you're not sure how to do it, you've come to the right Photoshop tutorial!
I'll teach you how to add lighting effects in Photoshop so you can take your photos to the next level.

Download a free copy of Adobe Photoshop to follow along with this simple tutorial.
How to Add Lighting Effects in Photoshop in 6 Steps
Step 1 – Open the Image
Open the image you wish to add a lighting effect to by navigating to the top menu bar and selecting File > Open.
From your computer locate and select the image.
Step 2 – Open Lighting Effects
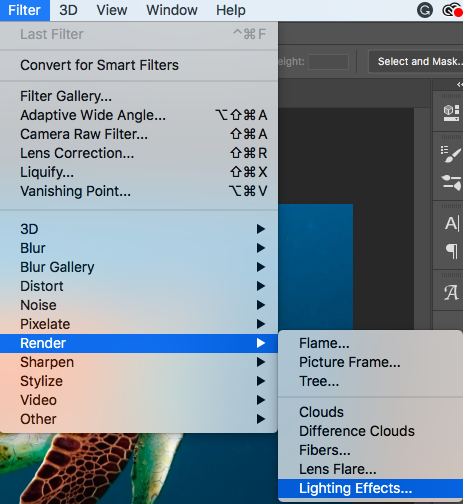
Once your image is open, head to the top menu bar and select Filter > Render. In the drop-down menu, click on Lighting Effects.
When Lighting Effects is clicked, the Properties Panel of the Lighting Effects Filter will open. This allows you to select customized settings for your lighting effects.
A preview window will open giving you a preview of the lighting effects filter adjustments.
- Learn how to use Selective Color in Photoshop.
Step 3 – Options Bar
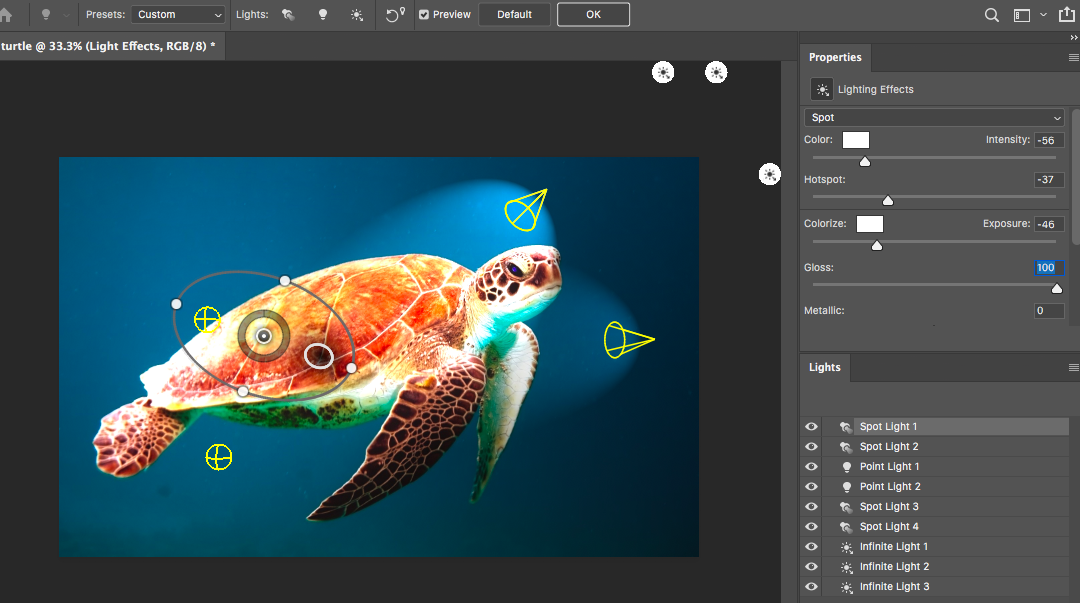
The Lighting Effects Options Bar will open above the canvas window.
![]()
In the Lightening Effects Filter Options Bar, you can select a Preset.
Choose from 17 Light Effects Presets or leave it as the default Custom option.

When you click on a Preset, such as Five Lights Up shown in the image below, the preset of light sources you've chosen will appear.

In this case, five spotlights pointing upwards appear on the image. From here, you can tweak and adapt the preset.
Presets can be useful as a place to start editing, or sometimes they hit the lighting spot exactly.
Step 4 – Light Source
Next to the preset option is an option called Lights that allows you to choose your lighting source.
Click on the torch icon for Spot Light, the light bulb icon for Point of Light, and the sun icon for Infinite Light.
When you click an icon, a light source will be created and a Light Layer will be created in the Lights Panel below the Properties Panel.

Activate a Light Layer in the Lights Panel when you wish to adjust or delete it.
When a lighting source is activated a bounding ellipse will be created over your image in the Preview Window.

The light source will be contained inside this bounding ellipse.
This ellipse can be extended or retracted by dragging the edges with your cursor.
Rotate the ellipse by dragging your cursor around the edges.

Step 5 – Properties Panel
To customize the Lightening Effect Filter you can use the options in the Properties Panel.
Let's run through the options.
In the first bar, you can choose between Point, Spot, and Infinite as the light source.

Color
Click the color box and a Color Picker dialog box will open.
Use this to change the light source color.

Hotspot
Slide the slider to change the size of the Hotspot.
Colorize
This option allows you to add a tint to the overall lighting.
Exposure
Slide the slider to increase the exposure and adjust the highlight and shadow detail.
Gloss
Slide the slider to the left or right to increase or decrease how much the surface reflects light.
Metallic
Use this option to determine which is more reflective – the light or the object on which the light is cast.
Ambiance
Use this when you want to diffuse the light. This makes it appear as if there were another light source in the room.
Texture
Will apply a Texture Channel.
Step 6 – Create Lighting
Now you have all the information you need to experiment and create a new light source or lighting effects on your images.
Go nuts and have fun.
Click OK when you've finished and save your document.
To learn more, check out this Photoshop Tutorial on Layer Masks.
If the Photoshop Lighting Effects Filter is not Working
The most common reason that Lighting Effects is not working in Photoshop is that Use Graphics Processor is not ticked in the Photoshop Preferences.
The other reason is that your graphics card driver is not up to date.
The best place to start is by checking your Photoshop Preferences.
Navigate to Photoshop in the top left corner of your menu bar.
In the drop-down menu below Photoshop select Preferences > Performance.

In the Dialog box that opens check that the Use Graphics Processor option is clicked.
If you liked this Photoshop Tutorial on creating lighting effects, you'll also enjoy learning how to add vignette effects.

Judyth is an experienced studio photographer and glass artist. When she isn’t Photoshopping comedians into the bellies of sharks, you can find her cooking delicious treats for her guests.
4 Comments
Leave a Comment
👋 WELCOME TO SHOTKIT!
🔥 Popular NOW:

Dear Judith, I work on MacBook Pro equipped with Radeon Pro 560X 4GB graphic card. I have followed your advice but, unfortunately, it did not work for me. I still cannot see bounding ellipses with handles and cannot move lights… What could be a problem?
Hey Iwona, I’m sorry to hear you’re facing difficulties with adding lighting effects in Photoshop on your MacBook Pro. Given your setup with the Radeon Pro 560X 4GB graphics card, your hardware should definitely be capable of handling Photoshop’s lighting effects feature without any issues. There are a few things we can check to troubleshoot this problem:
Update Your Software: Ensure that both your macOS and Photoshop are updated to their latest versions. Adobe frequently releases updates that can fix bugs and improve compatibility with different hardware configurations.
Graphics Processor Settings: Go to Photoshop’s Preferences > Performance and make sure that ‘Use Graphics Processor’ is checked. This option enables Photoshop to use your Radeon Pro 560X for rendering, which is essential for seeing and manipulating lighting effects.
Reset Photoshop Preferences: Sometimes, corrupted preferences can cause unexpected behavior in Photoshop. Try resetting your preferences by holding down Command+Option+Shift while starting Photoshop. You’ll be prompted to delete the current settings.
Check Photoshop’s GPU Compatibility: Although the Radeon Pro 560X should be compatible, double-check Adobe’s list of recommended and supported GPU cards for Photoshop to ensure there aren’t any known issues with your specific card.
3D Features: Lighting Effects are part of Photoshop’s 3D features. Ensure that these features are enabled in your version of Photoshop, as some Photoshop versions, particularly Photoshop Elements, have limited 3D capabilities.
If after trying these steps you’re still encountering issues, it might be helpful to reach out to Adobe Support directly. Sometimes, there might be specific compatibility issues or bugs that they’re aware of and can provide a more direct solution.
I hope this helps, and you can get back to adding those creative lighting effects soon!
Hi I have some problems with this effects. I followed all your steps even I have activated the graphic processor but I can not see the bounding ellipse and I can not move the lights. Could you please help me with that?
Thanks so much
Thanks for the help