







Shotkit may earn a commission on affiliate links. Learn more.
Turning your portfolio, shoot concept, or client brief into a presentation that lands you a new client or gig is essential in the photography business.
Adobe Acrobat's Generate Presentation helps you do this in just a few clicks, with professional-looking results.
Your ideas deserve to be shown properly so that potential clients can see what you bring to the table right from the start.
Adobe Acrobat's Generate Presentation not only saves you time, but it gives you a fully editable presentation so that you're always in control of the final result.
In this article, I'll show you how you can use it to streamline your pitching process and walk you through a step-by-step example.
What Is Adobe Acrobat's Generate Presentation Tool?
Generate Presentation is a new generative AI feature from Adobe Acrobat. It uses GenAI to help you turn your photos, ideas, and the information you want to share into a clear, professional presentation.
While this is a premium feature reserved for Acrobat Studio and Creative Cloud Pro accounts, Adobe allows you to try it for free. So, even if you only have a free account, sign in with it so you can use the Acrobat Generate Presentation tool. Please note that after you've tried it, you will need an eligible plan to keep using it.
You can start a presentation directly in Acrobat, or you can start from a PDF Space if you've already gathered your information and documents there.
Instead of spending time arranging all your content onto blank slides, you can feed Acrobat all the information, type in an audience, length, and even a prompt, and let it do the heavy lifting.
This feature creates an outline and slides, suggesting layouts and visuals so you only have to fine-tune the result to your liking and share it.
You can upload up to 10 documents (150 pages) in different formats, so you can include your portfolio, the client’s brief, your proposal, a budget outline, and anything else you need.
Then, you can tell the Acrobat AI Assistant what type of client you’re addressing, what your creative concept is, and all the relevant information it needs to create a client presentation.
The great thing is that it does the hard work but still lets you edit the content, rearrange slides, change the template, and make it exactly how you want it.
Instead of spending hours figuring out slide structure and formatting, you can let Acrobat's AI Assistant generate a draft and spend your time making a presentation that sells.
How Can Photographers Use AI-Generated Presentations?

Presentations help photographers communicate with clients in a language understood across different sectors. They work whether you're dealing with a corporate client, the marketing department, or a regular Joe who's never worked with photographers before.
No matter what kind of photography you do, presentations are a professional way to show your vision.
Using AI Assistant to generate presentations will save you valuable time and give you a clear, consistent style when sharing your images, ideas, and strategies.
Here are a few examples of how photographers can benefit from Acrobat’s Generate Presentations feature.
- Presenting a creative concept to a brand
- Pitching for commercial projects
- Preparing a photography proposal
- Pitching a wedding photography package
- Presenting a new campaign to an existing client
- Creating a mood for editorial or fashion shoots
What You Need To Create a Client Presentation in Adobe Acrobat
Now you know a few situations in which using the AI Generator Presentation is useful for a photography business.
However, AI can structure and transform the information in the best possible way, but it should not decide what’s worth presenting. That decision belongs to you as the photographer.
This is why you need to provide the source information to Acrobat’s Generate presentation tool. So, before trying it out, make sure you gather everything you want to include in your presentation.
Depending on the project, here are a few documents you might want to collect in order to create a strong presentation.
- Project brief
- Photography proposal
- Shoot concept
- Creative brief
- Portfolio
Whether you want to feed multiple documents or gather everything in one, here is some key information that should be present in most cases:
- Client information – including their goals, audience, or brand context.
- Creative concept – the central idea and visual direction of your proposal.
- Relevant photography – this can include previous projects from your portfolio, or reference images that will illustrate your vision.
- Services and deliverables – what you’ll provide (post-produced images, licensing, etc.).
- Timeline and next steps – include important dates and what needs to happen to meet those deadlines.
Keep in mind that you don't need a polished document, as this isn't going to your client. You can simply copy and paste information you've gathered from emails, meeting notes, etc.
Acrobat's Generate Presentation tool accepts multiple file formats, web links, and it even has a space for you to paste the text.
In the end, your client will see a professional-looking presentation, regardless of what the source document looked like.
How To Generate A Client Presentation with Adobe Acrobat – Step-by-Step Example
Step 1

Head over to the presentation builder in any browser. You'll be asked to log in with your Adobe account. Don't worry, it's free to try. So, you can log in with a free Adobe account.
For further uses, you'll need an Adobe Acrobat Studio plan and Creative Cloud Pro because it's a premium feature.
Step 2
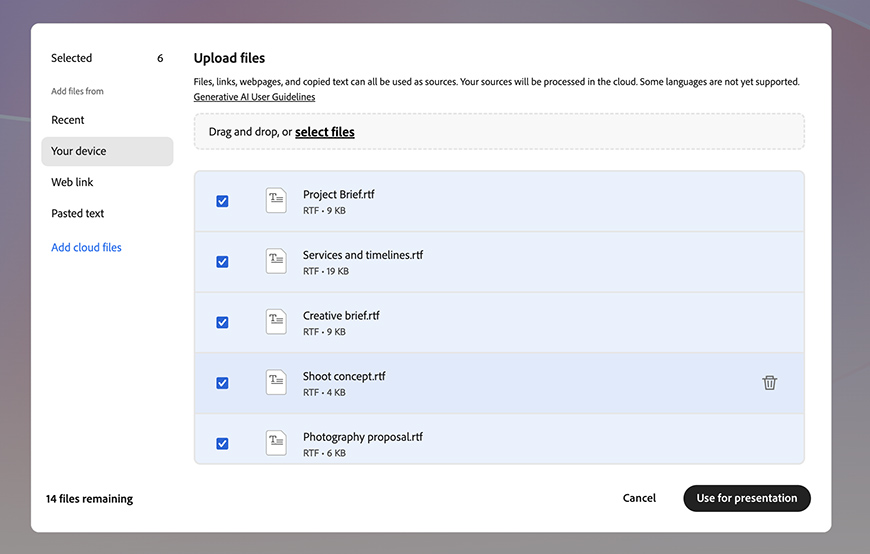
Now you need to provide all the information required for your presentation. I like to start by uploading all the documents I have; this way, it's easier to see what I need to specify and what's already loaded.
To do this, simply click on Add Files. This will open a browser window where you can select different sources.
Select your device to upload files from your computer or hard drive. The feature supports PDF, DOCX, PPTX, TXT, RTF, XLS, VTT, JPG, PNG, and TIFF.
In addition to this, you can also connect with your OneDrive or Google Drive account to upload documents you have in the cloud. You can also click Web Link to paste URLs or paste text, which will be converted to a PDF and uploaded as a source document.
In total, you can select 10 sources, for a maximum of 150 pages.
Step 3

Tell the AI what you want with a prompt – it can be as long as 1000 words. You can start with this step, but I like to do it after uploading the documents so I can specify whether I want it to pull certain information from a certain file.
It's also useful because the suggested prompts are now based on your information, not just general ideas. This is perfect if you're drawing a blank or it's your first time engineering a prompt and you're unsure of what to ask for.
You can be as detailed or as vague as you want. Of course, the more details you provide, the less you'll have to add or fine-tune afterwards.
Step 4
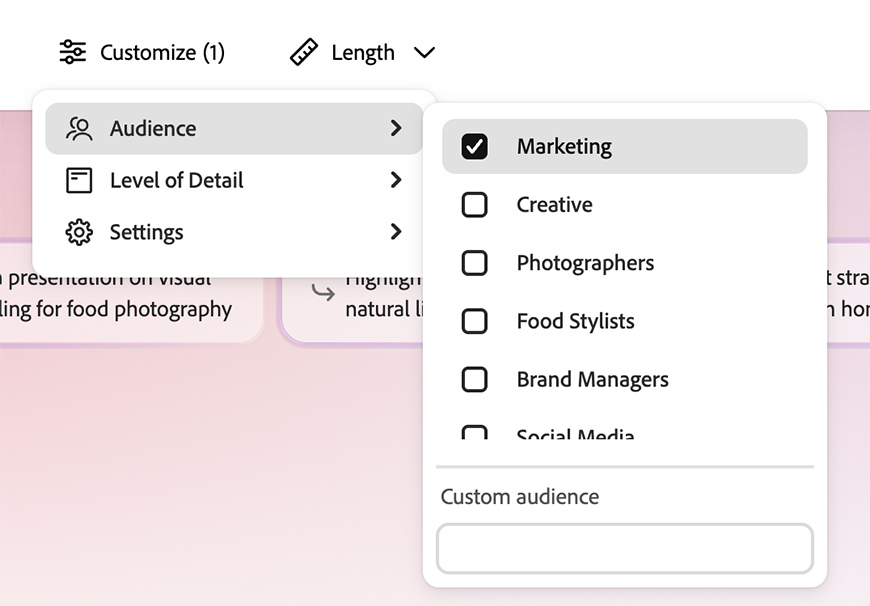
Now you can use the filters and settings available to customize the presentation. This isn't mandatory, but it's helpful to get a presentation that fits your needs.
Click the Customize button to choose an audience type. Select one from the available options, or type in a custom one. Then, select the level of detail – this is also based on how much time you'll have to show your presentation.
The last option on this menu regards images. You can ask it to generate AI images, or to select stock photos from Adobe Stock.
If you're planning to use images from your portfolio, you can either upload them or let it use stock images as placeholders in the layout and add your own to the final presentation. I'll show you how to do this in an upcoming step, but it's very easy to do as the template will open in Adobe Express.
The last option is the Length button. Open this menu to choose how many slides you want from the three options, or input a custom length.
Step 5

The last step before generating your presentation is choosing the template. You can choose from a few options; each one has different slide layouts. Simply hover over each design to see all the slides.
If you prefer, you can upload a PowerPoint file with a design of your own that may include your logo, brand colors, etc.
Once you've chosen one, click on Generate.
Step 6

After a few minutes, your presentation will open in Adobe Express. Here, you can review the content, rearrange the slides, edit the text, replace or edit images, or add new slides and elements.
For example, to use images from your portfolio, click on the image added by the generator. A menu bar will appear at the top. Here, click on Replace > Replace with upload.
You can also edit your images with some basic tools or add a Photoshop filter to them.
Step 7
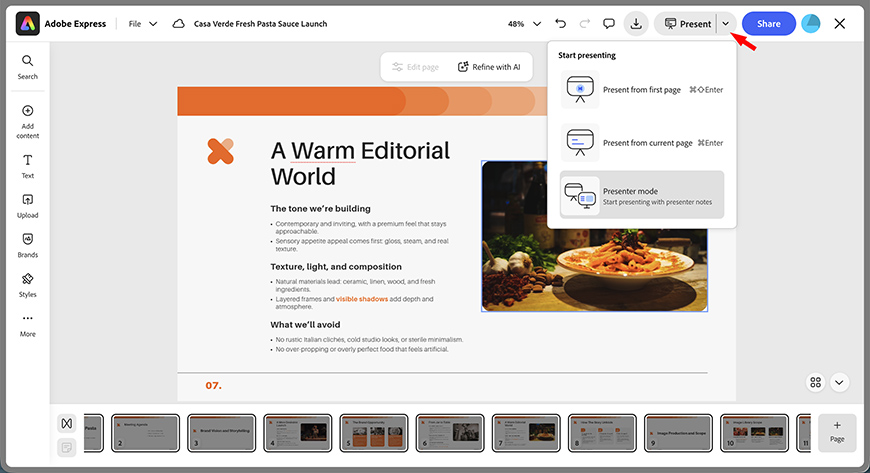
Once you're satisfied with your presentation, click on Share to give people access, generate a link to send, or download it in one of the many available formats.
Alternatively, you can launch the presentation right from Adobe Express by clicking Present and choosing an option.
Now that you know, making a presentation for your next pitch will be a breeze. Give it a try!
👋 WELCOME TO SHOTKIT!
🔥 Popular NOW: