


How to Create Fine Art Black & White Photos with Radiant Photo
Learn how to create stunning fine art black and white images using Radiant Photo that are worthy of printing and framing on your walls.
Radiant Photo | Software | By Kevin La Rue
Shotkit may earn a commission on affiliate links. Learn more.
Volumes have been written on creating fine art black & white photography.
There seems to be something almost primal about shooting with monochrome in mind, like you’re tapping into the touchstone of history.
Lessons for how to train your photographic eye to see contrast, shadows, and lines are in abundance.
How to embrace textures, use negative spaces and take light sources into account to create true emotional impact with your photos are part of the black & white photographer’s playbook.
Daniel O’Neil might have summarized it best when he said, “color photos show viewers what something looked like, while black-and-white shows how it felt.”
Today we’ll take a look at Radiant Photo, a new time-saving image editor that uses AI technology trained on millions of printed images.
(If you haven’t heard of the app yet, you might want to read Shotkit's Radiant review here or browse this Getting Started article.)
Radiant Photo complements your existing workflow in Lightroom or Adobe Photoshop, but for this article, we’ll focus on using the app as a standalone editor.
Let’s get started with Radiant Photo and learn how to create fine art black & white photos together.
Download the latest version of Radiant Photo to follow along with this simple tutorial.
Start a free 14-day trial today
Selecting a Good Photo
While many believe that just about any photo can be an adequate black & white image, the truth is that there are some key characteristics to look for when selecting a photo you’d like to work into a fine art piece.
Ideally, a photo will have clear contrast within it, where light and dark interplay in compelling ways.
An image with pronounced shadows or leading lines and a clear subject can make for a dramatic result.
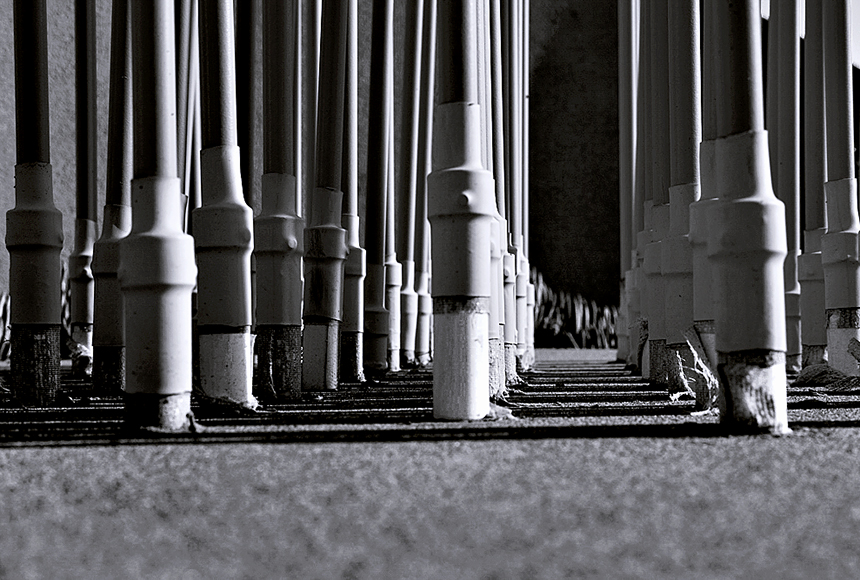
Don’t forget to explore photos that include interesting textures, as increasing detail in these can create compelling images.
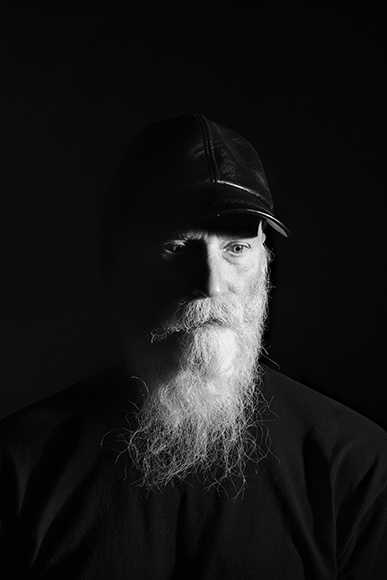
Portraits are a matter of preference. Females tend to lend themselves to a softer look in the end, while males – especially those with facial hair – can lead to awesome detailed results.
Since 99% of my images over the past 20 years have been shot in color, I often explore my back catalog seeking out photos that might look great in monochrome. You might find it fun to experiment too!
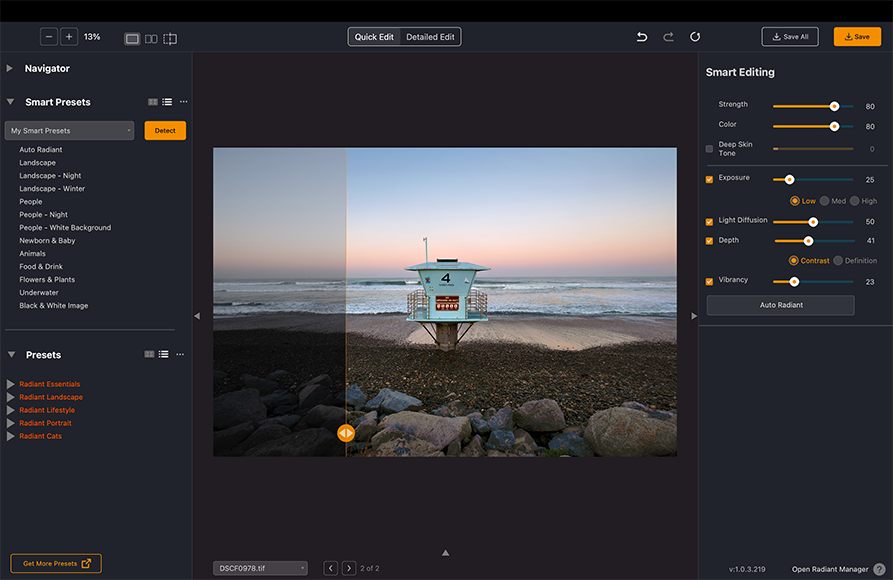
We’ll select a nice landscape and get going.
Using Radiant Photo to Correct the Image

While it’s tempting to start with the built-in one-click black-and-white conversions using the LOOKs found in Radiant Photo’s Color Grading panel, you probably should correct other image imperfections first.
Be sure to fix any exposure, tone, or color issues with your photo first, using a Smart Preset, a traditional preset, or even manual edits.
I especially like to ensure proper exposure, color contrast and make sure the details are sharp before moving on.
The Role of Radiant’s LOOKs
More than just a preset, LOOKs remap the colors and tone of your images. These are completely independent of the other controls inside Radiant Photo so any adjustments you’ve made before applying a LOOK will be preserved.
Radiant Photo is a black & white photographer’s dream tool, especially if you’re just getting started in the genre. It's so easy.
LOOKs are found by clicking on the Color Grade tab at the top of the Radiant Photo window, and then viewing your selections in the Color Grading panel on the right side of the window. LOOKs are conveniently grouped by styles.
Each LOOK contains a Lookup Table file (LUT) that has been prepared especially for use with Radiant Photo.
For monochrome images, the best starting point is the built-in BW Film Stocks. There, you will find 8 basic film reproductions from which to start your journey.
We’ll apply the Rich Black & White LOOK to this image to create our black and white. It provides a good balance of contrast, detail and exposure, complementing the earlier manual edits we made.
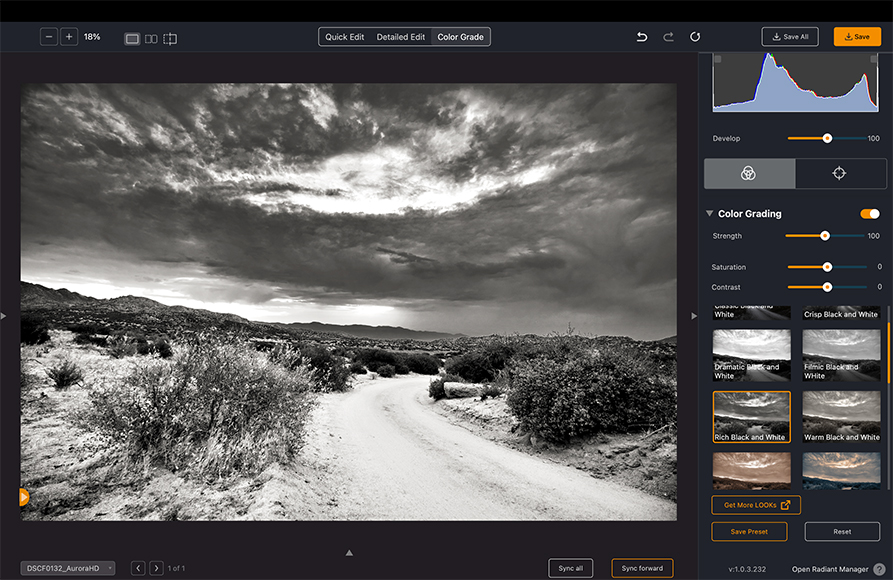
I like the way this LOOK develops a dark sky, creating tension between the top and bottom of the photo.
Take a moment to click through the other options in this category of LOOKs to explore how they modify your photo. If you’d like to explore many others, click on the “Get More LOOKs” button.
Your web browser will open to the online Radiant Photo Marketplace, where you’ll find other LOOKs to purchase, such as Black and White Portraits, Street Packs, High Contrast and more.

Crafting the Final Image
Once you’ve selected a good candidate image, made a first pass to correct any imperfections, and applied the black-and-white LOOK that you like, it’s time for some final tweaks.
In this particular image, the road is significantly brighter than the sky. We’ll turn to the Graduated Filter panel to help us with this tweak.
First, click on the small “target” symbol to choose the tools we'll need. I’ve then selected the Linear gradient (which separates the top and bottom of the image), clicked on the Bottom tab, dropped the Exposure, and adjusted the Highlights down slightly as well.

This is where the Finishing Tools, found below the Graduated Filter controls, play a key role.
There, you can use 10 specific tools to fine-tune your fine art black and white.

This is also a good time to check the black and white points in your Histogram by clicking on the small checkboxes in the upper left and right corners at the top of the tools panel on the right side of the window.
It’s OK to leave some highlights and deep shadows in your image and “season to taste”.

The Blend slider adjusts the overall strength of the combination of the Finishing Tools.
Closing Thoughts
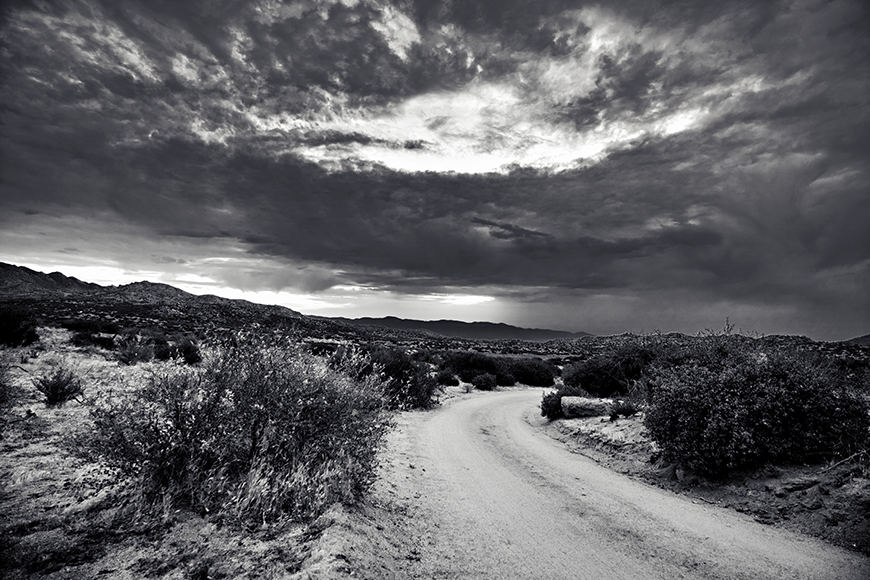
A landscape image finished with Radiant Photo
Taking a color photo that you’re proud of, and re-working it as a fine art black & white image, can be an immensely satisfying experience.
Radiant Photo makes it ultra-easy.
Smart Presets get your image to a perfect starting point in one click.
Manual edits using tools found in the Detailed Edit tab enable you to develop your own style.
LOOKs give you one-click access to black & white conversion using industry-standard LUTs, while the Finishing Tools of Radiant Photo help you with the final polish on your masterpiece.
Give Radiant Photo a try when you next feel the itch to go black & white with your photos.
And don’t forget to print and hang that photo as a testament to what you’ve accomplished!
Download the latest version of Radiant Photo to follow along with this simple tutorial.
Start a free 14-day trial today

Kevin La Rue has been in the graphics and photo software game for over 30 years, with the last 15 years focused exclusively on bringing world-class photo editing tools to market. An avid photographer and traveler, when he isn’t taking photos you’ll find him riding his dual-sport motorcycle, Jeep camping in the desert, or trading crypto!

👋 WELCOME TO SHOTKIT!
🔥 Popular NOW:
