


How to Change DPI in Photoshop (Plus More Tips)
In this Photoshop Tutorial, you will learn how to change DPI in Photoshop, how to add pixels without changing the image size, and more handy tips.
Photoshop | Software | By Judyth Satyn
Shotkit may earn a commission on affiliate links. Learn more.
When you want to print images or make a printed document, it's a good idea to brush up on your DPI knowledge.
(Otherwise, you might end up with low-quality prints that are only good for the bin!)
A high-resolution photo will have a DPI of 250 or more, so how do you check the DPI of an image?
And how do you change it to the correct printable resolution?

Download the latest version of Adobe Photoshop to follow along with this simple tutorial.
Start a free 7-day trial today
In this Photoshop tutorial, you'll learn how to change DPI in Photoshop, how to add pixels without changing the image size, and more.
Dive in now so you can ensure that your printed images will always be the correct print resolution.
How to Change DPI in Photoshop (Plus More Tips)
Before we start changing an image's DPI, it's helpful to know what DPI is and why professionals prefer to save their images at 300 DPI.
What is DPI?
DPI stands for “Dots Per Inch”.
Every single pixel in your digital image is equivalent to one dot of ink on your printed image.
A printed document, whether it be a leaflet, poster or high-quality photo, needs to have a certain number of physical dots to be crisp and clear.
The greater the number of ink dots, the higher the resolution.
What is 300 DPI in Pixels?
300 DPI in pixels is equivalent to 300 “Pixels Per Inch” (or PPI), as each dot is equivalent to one pixel.
Most good-quality home printers will print at a resolution of 300 DPI to achieve high-quality images. Professional printers can print at a higher DPI to produce higher-resolution images.
Changing the DPI of your image to 300 before printing will indicate what size image you can print and will ensure the quality of the printed image is high.
- Read more: DPI vs PPI: What's The Difference?
How does changing the DPI affect the image resolution?
If you change from 300 DPI to 100 DPI, you will reduce image resolution and the amount of dots/pixels per inch to a third of the original image.
This will result in a poor-quality image if printed.
If you increase the image resolution to 400 DPI, you will be increasing the dots per inch by a third. By doing this, you can print higher-quality images.
If the printer prints at a DPI of 300, an image with a DPI of 400 will not print at a higher resolution – this is because 300 DPI is its upper limit.
- Read more: How big can you print a photo?
How to change DPI in Photoshop
Changing the DPI of an image in Photoshop will affect the image quality, so this is something to keep in mind when printing images.
Step 1. Open file
Locate the digital image and Open it in Photoshop.
Step 2. Change DPI
Navigate to the top menu bar and select Image > Image Size.
![]()
Once clicked, the Image Size dialog box will appear displaying the image size.
![]()
In the box beside Resolution, you'll find the image’s DPI.
Change the DPI by inserting a New Number in the box beside Resolution.
To change the DPI without changing the image's resolution, leave the box beside Resample in the Image Size dialog box unchecked.
When you increase or decrease the image’s DPI, you will notice that the image dimensions will also change.
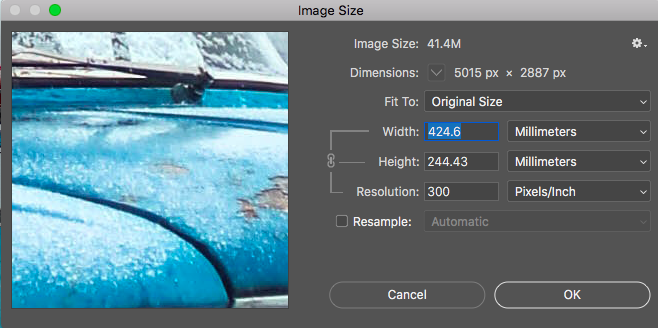
For example, when this image's DPI is changed from 72 DPI to 300 DPI, the image dimensions change from 1769mm x 1018mm to 424mm x 244mm.
424mm x 244mm is the printable size.
Although the number of dots per inch and the image size have changed, the image resolution has remained unaltered.
Step 3 – Save Image
Navigate to the top menu bar and select File > Save As
Add a file name, and select a location and format type for your file.
Click OK.
Your file will now be saved.
Note: When you change the DPI of a digital image to 300 DPI, the altered image dimensions will indicate the size you can print your image.
(Learn more about how to choose photo resolution for different platforms like web and social media.)
How to Change DPI in Photoshop without Changing Size
Occasionally you'll want to change low-resolution images to high-resolution images without changing the image size.
This will happen when you have a print-size image with low existing pixels.
It's not unusual for a professional photographer to alter DPI resolution by adding pixels to an image in Photoshop.
Increasing dots per inch will increase the image resolution to make it suitable for print.
Follow the same steps mentioned above for changing the DPI, selecting Image > Image Size.
When the Image Size Dialog box opens, Uncheck the box beside Resample – this will allow you to change DPI without altering the image size.
Enter the new DPI in the box beside Resolution.
Make sure the lock icon linking height and width is active to ensure the image’s dimensions don’t change when you increase the DPI.

If you don’t tick the Constrain Proportions box, the image size may become distorted due to the width or height stretching.
Your image will now have an increased DPI and the image size will remain the same.
If you want to learn more about image distortion take a look at this Photoshop tutorial: How to resize an image in Photoshop.
Note: Increasing the DPI of an image in one quick increment (e.g., from 72 DPI to 300 DPI) can cause blurring of the image, due to too many new pixels.
To increase DPI resolution without blur, try increments of 30-50 dots per inch at a time.
Read more: How can I Photoshop a picture?
How to export at 300 DPI in Photoshop
A 300 DPI image can be exported and saved just like any other file.
1. Navigate to the top menu bar and select File > Save As
2. A dialog box will appear. Beside Save As, enter a name for your file.
3. Choose a Location to save your file.
4. Beside Format, select the format you wish to save your image in, such as JPG.
5. Now click Save.
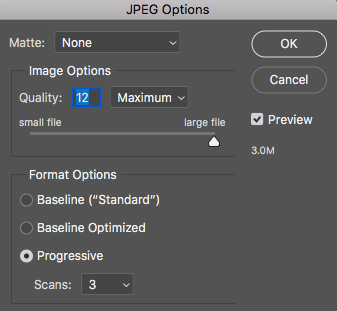
6. A JPG Options dialog box will appear. In the Quality box enter 12 and set the slide bar underneath to the right > Large File.
7. Under Format Options check Optimized.
8. Now hit OK.
Your 300 DPI file has been exported from Photoshop and saved in your chosen location.
If you enjoyed this Photoshop tutorial, check out How To Import, Edit & Save a PDF in Photoshop.

Judyth is an experienced studio photographer and glass artist. When she isn’t Photoshopping comedians into the bellies of sharks, you can find her cooking delicious treats for her guests.
👋 WELCOME TO SHOTKIT!
🔥 Popular NOW:
