


How to Denoise in DaVinci Resolve (Complete Guide)
Explore this comprehensive guide to denoising in DaVinci Resolve, covering the two main methods for achieving clear, noise-free footage.
DaVinci Resolve | Software | By Andrew Dilks
Shotkit may earn a commission on affiliate links. Learn more.
This tutorial explores how to denoise in DaVinci Resolve to create a sharper image.
Shooting in low-light conditions can sometimes lead to unwanted grain and artifacts in your video footage, but the good news is that DaVinci Resolve can help eliminate noise.
I've used DaVinci Resolve Studio to effectively reduce noise and create more precise and sharp video clips.
Here's everything you need to know to successfully apply noise reduction in DaVinci Resolve and achieve the best results.
Using DaVinci Resolve To Denoise: A Complete Guide
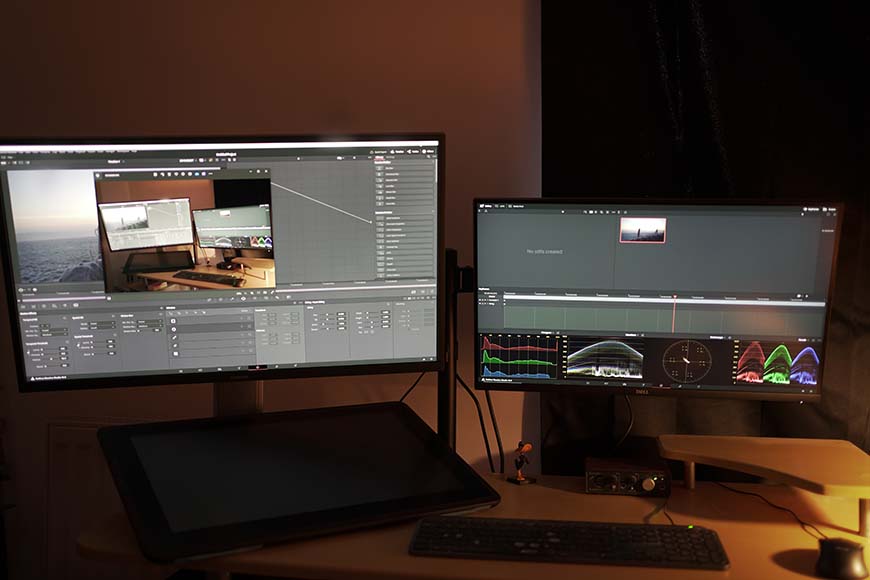
DaVinci Resolve's noise reduction tools are enhanced when bringing up the Scopes displays.
One of the common issues videographers face when shooting footage in low-light conditions is the introduction of noise.
Noise is any unwanted grain or other image artifacts that reduce the sharpness of the image and make the video look unpleasant.
While contemporary 4K cameras have improved significantly in terms of shooting low-light footage on high ISO settings with reduced noise, it can still be a problem.
DaVinci Resolve delivers powerful denoise tools that allow editors to implement noise reduction across a range of parameters.
Available in the Studio version of the software, these noise reduction settings allow users to customize a wide range of presets.
In addition to temporal noise reduction and spatial noise reduction, DaVinci Resolve also features motion blur and other motion effects that can be effective when used sparingly.
Thanks to the advanced algorithms used by DaVinci Resolve, these noise reduction settings can accurately detect noise in luma and chroma channels.
This allows users to fine-tune video noise reduction across individual frames and an entire clip with precision.
Let's dive into the details and explore how you can reduce noise in DaVinci Resolve.
Accessing Noise Reduction Tools Via The Motion Effects Panel
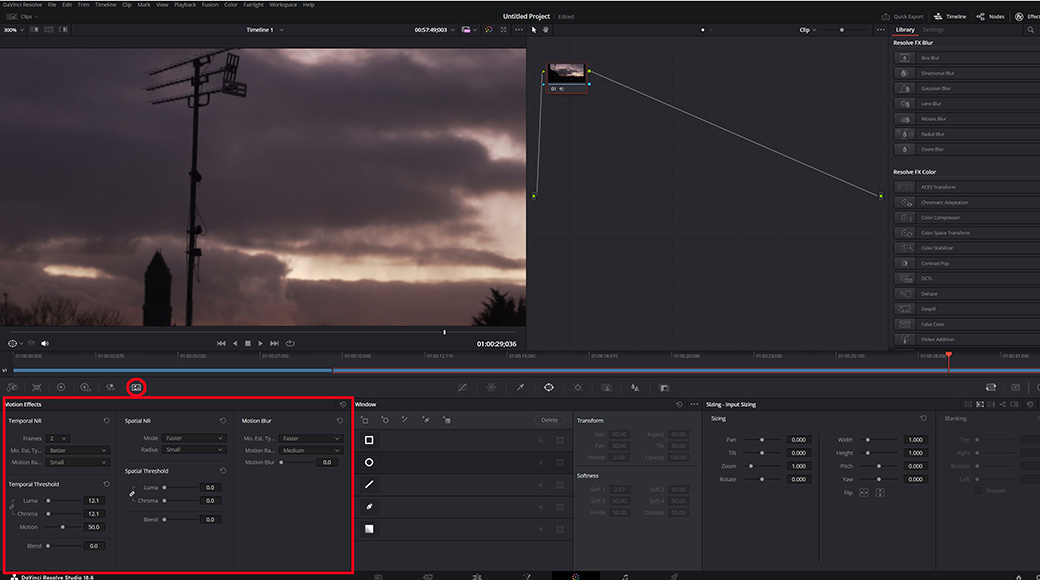
Accessing the noise reduction tools in DaVinci Resolve is easy, and they can be found listed on the Color Tab under Motion Effects.
There are two main methods for reducing noise in DaVinci Resolve, with the primary method applied via the Motion Effects panel on the Colour Tab.
Follow these steps to bring up the noise reduction tool in this setting:
- Load up your video clip in DaVinci Resolve and head to the Color Tab.
- Select an active node to use as your noise reduction node for the clip.
- Click on the Motion Effects icon, located in the bottom left-hand corner toolbar.
This will display the Temporal Noise Reduction tool on the left-hand side, with other noise reduction tools listed to the right.
These tools include:
- Temporal NR
- Temporal Threshold
- Spatial NR
- Spatial Threshold
- Motion Blur
Motion blur can be used to introduce artificial blur and smooth out noise, but it should be used with a degree of caution.
Excessive use of the blur tool can lead to a significant loss of detail, so as a general rule of thumb, it should be avoided in favor of the noise reduction tool.
Temporal Noise Reduction Settings
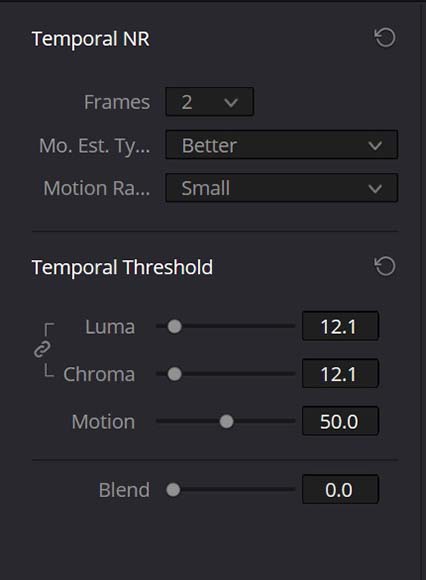
By unblinking the Luma and Chroma thresholds, you can make adjustments to these settings independently.
When working to reduce video noise from your shots, the first category you should use is temporal noise reduction.
Temporal noise reduction works by analyzing a set number of frames and separating the image's detail from the noise.
It's best suited to removing noise from the non-moving elements of the shot, with motion estimation working to exclude moving subjects.
Here's an overview of the various temporal noise reduction settings and some best practices to bear in mind:
- Frame Count. This setting allows you to select the number of frames you wish DaVinci Resolve to analyze when separating detail from unwanted noise. You can choose a value between 0 and 5, with a higher value requiring more intensive processing power to calculate. A higher value can also create unwanted noise and artifacts when analyzing fast motion. In this case, choosing a lower value will create better noise reduction results.
- Mo. Est. Type. You can instruct DaVinci to control its motion detection using this settling, with Faster using less processing power and Better delivering more accurate results albeit with slower processing. If you wish to apply temporal noise reduction across the entire image, you can set this to Off.
- Motion Range. Small, Medium, and Large motion range settings relate respectively to slow, medium, and fast-moving objects within your shot. The Large setting works on the assumption that the moving objects cover a large portion of the frame.
Adjusting Temporal Thresholds
Once you've made your selections for the Temporal NR settings, it's time to adjust the various temporal threshold settings and control how much noise reduction you want.
This allows you to apply the noise reduction effect across a range of parameters and minimize grain artifacts.
By default, the Luma and Chroma thresholds will be linked, so to allow you to adjust these independently, click on the link icon to the left of the values to unlink the settings.
To adjust the temporal thresholds, follow these steps:
- Luma. The Luma threshold relates to the dark and bright elements of your footage by applying noise reduction to the luminance of the channel. The adjustment range available is from 0 to 100, with 0 representing no noise reduction being applied.
- Chroma. Controlling hue and saturation, the Chroma setting also affects the colors of the footage, using the same 0 to 100 adjustment range as the Luma setting.
- Motion. Motion settings can be altered to correspond to the amount of moving pixels that are moving within the shot and frame range. When used, noise reduction will not be applied to elements of the image that range above the selected threshold.
- Blend. If you're applying a large amount of noise reduction to your shots, the Blend setting reduces any softening or muddiness to the image.
If you want to get a clearer insight into how your changes are affecting the video clip, you can use the zoom function on the Colour Tab's video preview window.
Spatial Noise Reduction Settings
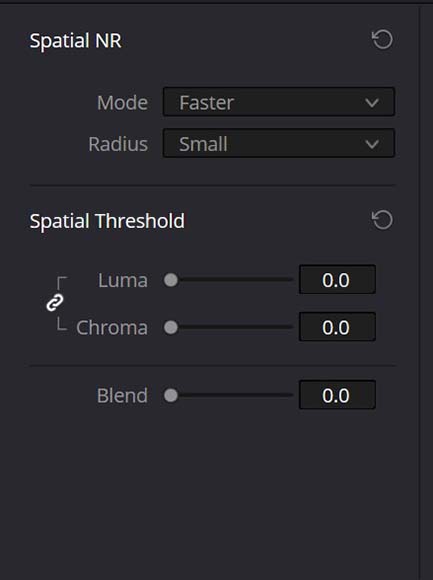
As with temporal noise reduction, spatial noise reduction includes Luma, Chroma, and Blend settings to alter.
Once you've applied temporal noise reduction, it's time to address spatial noise and smooth out any high-frequency noise.
It may be that the applied temporal noise reduction has achieved its goal, so only apply spatial noise reduction if grain and artifacts are still visible.
Here's an overview of the settings available when applying spatial noise reduction:
- Mode. The Faster mode setting for spatial noise reduction allows for a lightweight noise reduction across the full video clip but may produce artifacts when used with higher values. Alternatively, select the Better mode for higher quality results with slower rendering times.
- Radius. There are Large, Medium, and Small settings for the radius, with the Large setting delivering better real-time performance with longer waiting times. As you increase the Chroma and Luma values, the radius size should also be increased corresponding to these changes.
Applying Spatial Noise Reduction Thresholds
With your basic spatial noise reduction options selected, you can then work on altering the various thresholds to reduce video noise.
These settings are largely the same as those found in the temporal noise reduction threshold settings, minus the motion threshold.
Here's a brief overview of how these can be used for video noise reduction across spatial thresholds:
- Luma. With an adjustment range of 0 to 100, the Luma threshold for spatial noise reduction is applied to the luminance component of the image. Try to avoid setting this excessively high or it may remove details from your footage that you want to be retained.
- Chroma. You can further smooth out and reduce noise not already reduced in the temporal noise reduction by altering the Chroma thresholds in the spatial noise reduction settings. Again, setting this too high can lead to removing sharpness, so use the vectorscope data to help strike the right balance.
- Blend. Elements of the footage without any noise reduction applied can be blended with the reduced noise using the Blend parameter, which ranges from a value of 0 to 100. It's a great way to avoid your footage having an over-processed aesthetic and loosing edge definition and sharpness.
Once you've applied your desired settings to reduce video noise in DaVinci Resolve, your project is then ready to be rendered and exported.
Applying Noise Reduction Via OpenFX
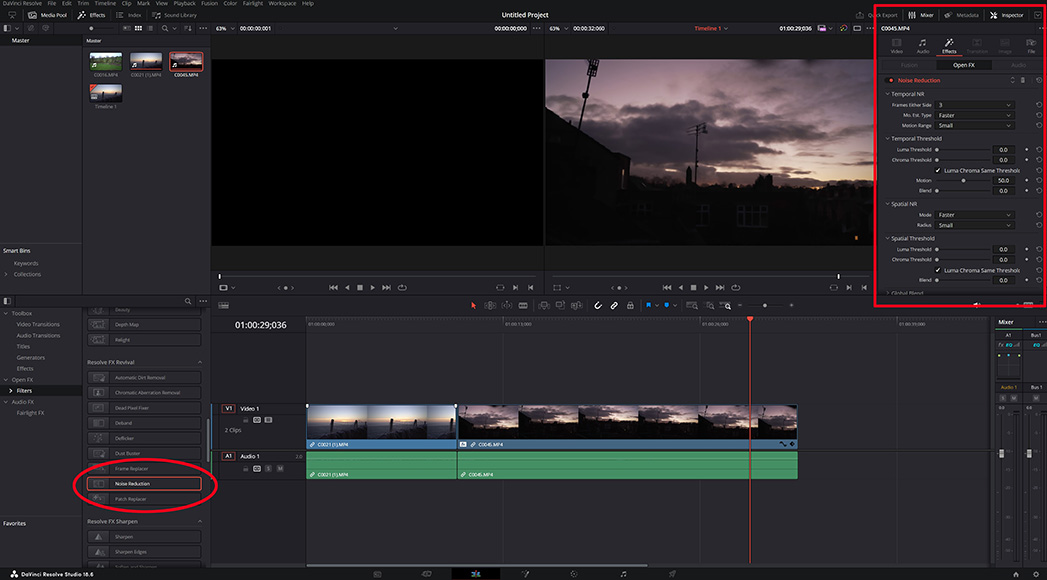
While working on video footage in the Edit Tab, you can also reduce noise through the OpenFX options.
Videographers and color grading professionals will typically apply noise reduction in DaVinci Resolve when working in the Colour Tab.
However, you can also quickly access these settings and apply noise reduction through the OpenFX settings for quicker results.
To remove noise from your videos when using the OpenFX options:
- Open your project and select the clip you wish to remove unwanted noise from.
- Head over to the Edit Tab and click on the Effects icon in the top left-hand corner of the user interface.
- Select OpenFX from the list of available effects in the Effects library.
- In the Resolve FX Revival category, select Noise Reduction, dragging and dropping this onto your project timeline.
- Head over to the top right-hand corner of the Edit Tab and click on the Inspector icon to access the noise reduction parameters.
- Alter the parameters you wish to change to reduce noise.
Does Free DaVinci Resolve Have Noise Reduction?
The free version of DaVinci Resolve is packed with many of the powerful tools and features available on the full, paid version.
However, when attempting to use the noise reduction feature, you may receive a message indicating you've reached a limitation.
If this is the case, you'll need to upgrade your version of the software to the full DaVinci Resolve Studio paid version to access this feature.

Andy Dilks is an experienced landscape photographer and former games industry veteran. When he isn’t taking photos or reviewing the latest tech gadgets, you can find him hiking and wild camping in the Peak District.
👋 WELCOME TO SHOTKIT!
🔥 Popular NOW:
