


How to Export in DaVinci Resolve (Including YouTube)
Learn how to export in DaVinci Resolve, including adding chapters, setting markers for YouTube, selecting the best export settings, and more.
DaVinci Resolve | Software | By Andrew Dilks
Shotkit may earn a commission on affiliate links. Learn more.
This is a guide exploring how to export in DaVinci Resolve for all formats and platforms.
DaVinci Resolve has plenty of export settings, whether you’re creating a YouTube upload or a professional showreel.
In this guide, I’ll break down the process you need to follow to check your render settings and export videos.
How To Export in DaVinci Resolve: The Key Steps
DaVinci Resolve is a professional-level video editing software that comes with everything you need to export video.
It’s also incredibly versatile, with lots of export settings to use that will deliver an optimized final video.
You can use the Quick Export feature for instant results or customize output settings based on your project’s requirements.
Let’s start this guide to exporting in DaVinci Resolve with a quick breakdown of the Quick Export method.
How to perform a Quick Export
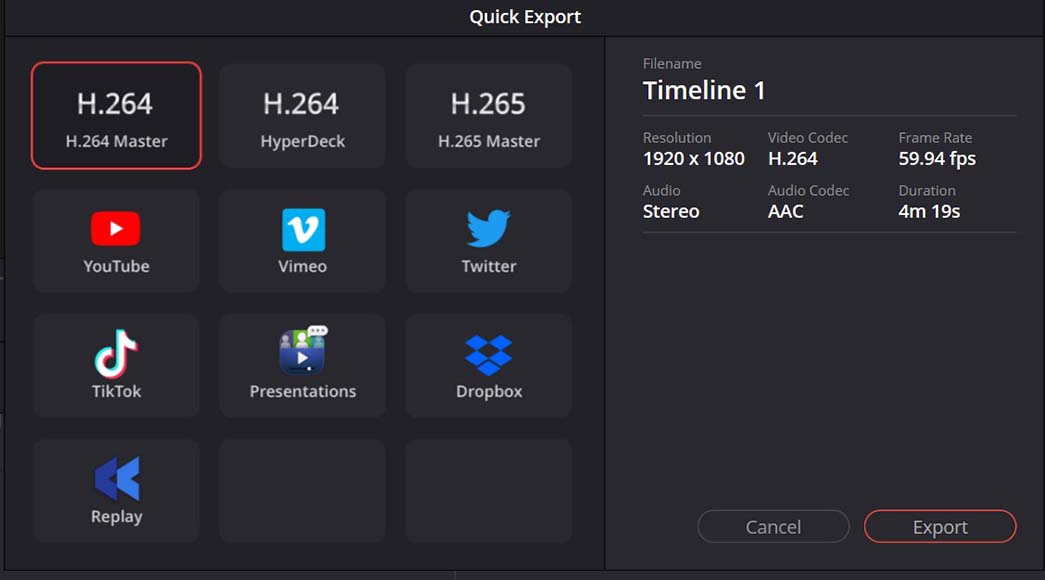
DaVinci Resolve’s Quick Export options are great for videos intended for social media channels.
Not everyone needs to explore the many file settings when creating their final export, which is where Quick Export comes into play.
Bypassing the in-depth export presets, Quick Export allows you to get your video exported quickly and ready to share.
Quick Export is also a great way to quickly render your project into a video format suitable for the major social media platforms.
Here’s how to use the Quick Export DaVinci Resolve setting:
- Double-check your timeline settings to confirm the clip you wish to export.
- Click on the File menu in the top left-hand corner of the screen.
- From the drop-down menu, select Quick Export.
- Select the video format you wish to use for the Quick Export process. If you’re exporting to social media, choose the relevant option, for example, YouTube.
- Click on the Export button.
- Choose the location on your computer where you wish the rendered video to be saved.
- Click Save to begin the Quick Export process.
Exporting with the Render Queue and Deliver Tab
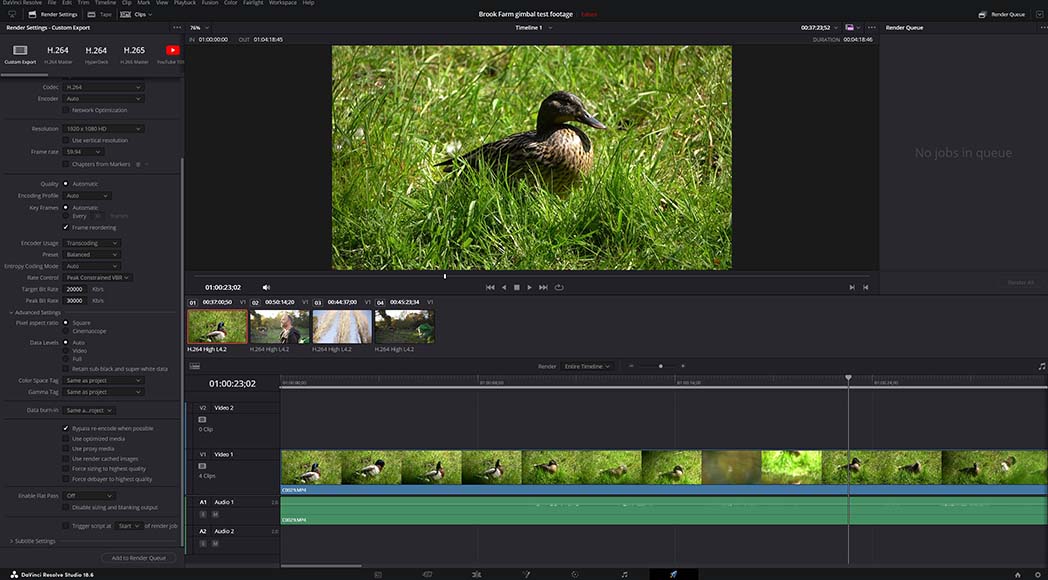
For more comprehensive export settings, the Deliver Tab allows you to set up custom exports and add them to the Render Queue to the right of the preview window.
While Quick Export is a great way to get your videos ready for social media, the bulk of DaVinci Resolve exporting takes place in the Deliver Tab.
This is where you can apply your render settings to multiple video clips and add them to the queue, ready to export and use.
Follow these steps to add projects to the Render Queue and use the Deliver Tab to manage exports:
- Click on the rocket ship icon at the bottom of the screen to enter the Deliver Tab.
- Head to the Render Settings section to choose your video export setting preferences.
- In the File Name field, type the name of your video project.
- Click on the Browse option in the Location field to select the folder on your computer where you want the clip saved.
- If you want to save a single export file from your clips, select the Single Clip option.
- Make sure the Export Video and Export Audio boxes are checked before proceeding.
- Choose your preferred file format from the drop-down menu, for example, MP4.
- Set your codec preference. For most projects, H.264 is desirable.
- Check your video’s project settings and match the resolution and frame rate in the export settings.
- Ensure the render quality setting is set to Automatic.
- Click on Add to Render Queue once you’re happy with the settings.
- Repeat from step 2 if you want to add additional video clips to the Render Queue.
- Once all of your video clips have been added to the Render Queue, click on the Start Render button.
Adding chapters and markers to an exported video
You can add markers in DaVinci Resolve to use for chapters on exported videos and YouTube content.
Adding chapters and markers to your exported videos is a common process used by editors when creating content for YouTube.
It can also be handy for clients who want to be able to skip through videos and reference specific shots or scenes.
If you need to add chapters or markers to your video export, DaVinci Resolve has the tools you need to apply these.
Adding Chapters
Here’s how to add chapters to your DaVinci Resolve project ready to export:
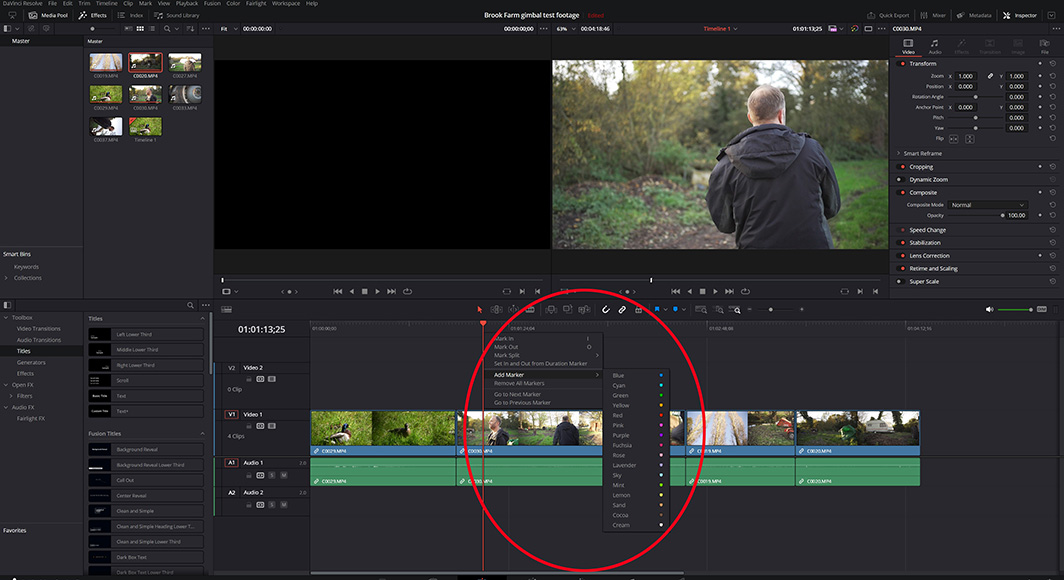
- Open your completed project and head to the Edit Tab.
- On the video timeline, select the point where you want to add your first chapter. Make sure there are no specific clips selected on the timeline.
- Right-click on the timeline marker and select Add Marker, selecting the color you wish to use.
- Double-click on the marker and rename it to your liking.
- Follow the same process to add more markers. You can also use the keyboard shortcut CTRL+M to quickly add new markers.
- Once all of your chapter markers have been added to the project, head over to the Deliver Tab.
- In the export settings, check the Chapters from Markers box under the frame rate and resolution settings.
- If you have color-coded your chapters and only want to include specific markers, click the drop-down list next to Chapters from Markers and select the appropriate color.
- Add the video to the render queue and click on Export.
You can then check your video in a program such as VLC player, viewing the Playback menu and selecting Chapter to verify they’re working.
It’s also possible to use DaVinci Resolve to create marker points for use in your YouTube videos as part of the Quick Export process.
Adding Markers for YouTube
To set up markers ready to export for YouTube, follow these simple steps:
- Click on the DaVinci Resolve option in the main menu at the top of the interface and select Preferences.
- On the Preferences page, select Internet Accounts and sign in to your YouTube account, then save these settings.
- Return to DaVinci Resolve’s main user interface and head to the Deliver Tab, selecting YouTube from the render settings.
- Check the box labeled Upload directly to YouTube in these settings.
- Select the Chapters from Markers box, ensuring the correct color markers are chosen if relevant to your project.
- Add it to the queue and hit the Render button, and the video will automatically export and upload to your YouTube channel.
DaVinci Resolve export advanced settings
Professional video editors can access a range of advanced settings when exporting content.
When it comes to the various methods to export, DaVinci Resolve has a plethora of options to choose from.
You can change the resolution and frame rate, alter the audio codec, and fine-tune the video quality across several parameters.
This means professionals can ensure the highest quality when uploading videos for clients who need the best media files.
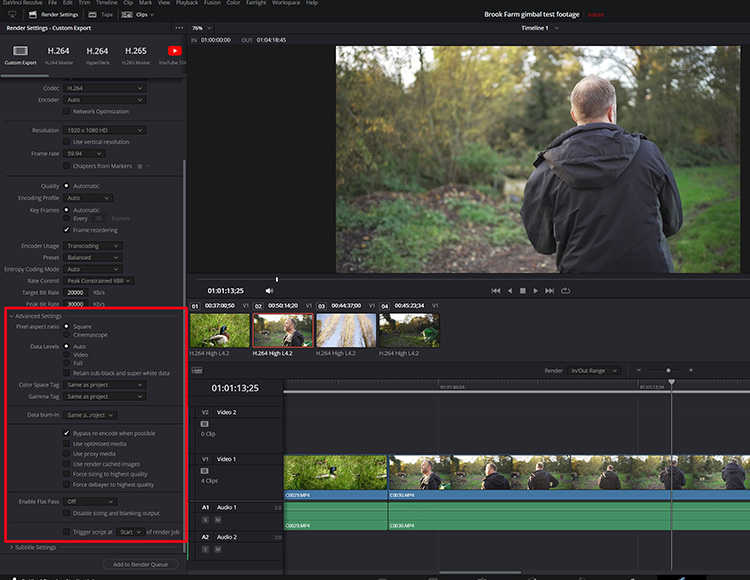
Here’s a breakdown of the various advanced settings you can alter and when you may need to use them:
- Pixel aspect ratio: These settings can also be used to render videos in different aspect ratios by changing the resolution before you export videos. You’ll need to uncheck your project settings so you can enter a custom resolution for your new ratio.
- Data levels: The range of color information and brightness that is processed and displayed in a video is determined by the data levels. Increasing these levels will enhance contrast or color balance, as well as the dynamic range.
- Color Space and Gamma Tags: Selecting the relevant format from each drop-down menu in this section allows you to match your project to your preferred shooting profile, for example, if you’ve shot your footage using S-log3 on a Sony camera.
- Data burn-in: If you want to include a watermark on your exported video, you can do so using the data burn-in option on the Advanced Settings.
- Enable Flat Pass: Choosing this option retains the information from raw and ungraded footage by disabling any grading before rendering.
What Is the Best Format to Export to in DaVinci Resolve?
The DaVinci Resolve export video settings offer all of the popular formats to use for your video content creation.
By far, the most common format for exporting in DaVinci Resolve is MP4, which can be used for most circumstances.
This is usually using the H.264 codec and, for online content creation, set at a resolution of 1080p.
FAQ’S
What is the best export setting in DaVinci Resolve?
When choosing the best setting for your video export, DaVinci Resolve has a long list of settings to select from.
These settings are essentially the same as the best format settings we’ve discussed above, using MP4 and the H.264 codec.
However, if you want optimal image quality, you should update your resolution to 4K in the export settings.
You’ll also need to change the bitrate to 95000 kbps to ensure your video quality is optimized for this resolution.
Does DaVinci Resolve export MP4 or QuickTime?
While MP4 is the most commonly used format for most video exports, DaVinci Resolve has plenty of other options to choose from.
You can change the export settings to set your videos in QuickTime format, with AVI and other options also available.
If you’re invested in the Apple Mac ecosystem, QuickTime is a popular format for videos on this platform.
How do I export in and out in DaVinci Resolve?
Exporting a full video from DaVinci Resolve is easy to perform, but sometimes you may only need to export a portion of your project.
To export a portion as a separate file, head to the Deliver Tab and select In/Out Range from the Render drop-down menu above the timeline settings.
Then, move the timeline marker to the start of your clip and choose your in-point, then set an out-point where you want the clip to finish.

Andy Dilks is an experienced landscape photographer and former games industry veteran. When he isn’t taking photos or reviewing the latest tech gadgets, you can find him hiking and wild camping in the Peak District.

👋 WELCOME TO SHOTKIT!
🔥 Popular NOW:
