






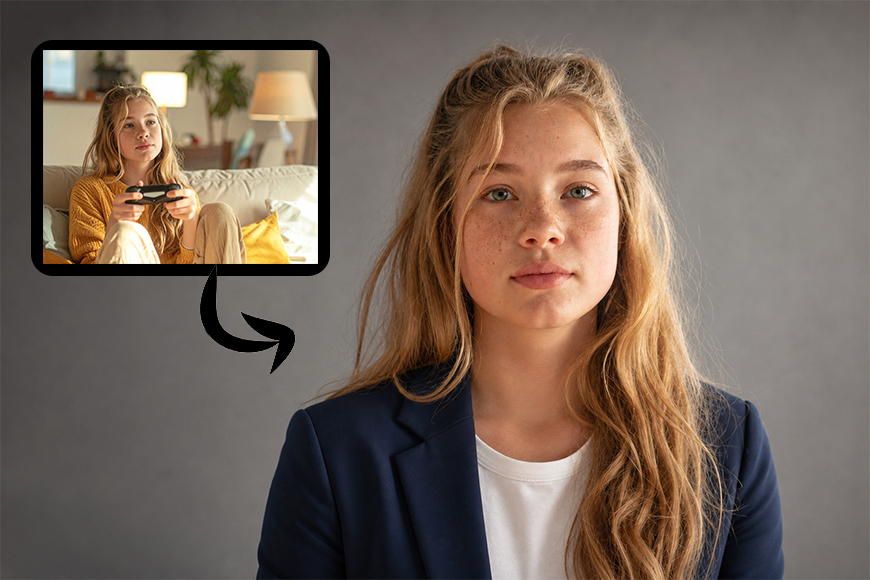
How to Create Professional Headshots With Firefly AI Headshot Generator
Create polished, professional headshots in minutes using Firefly's AI Headshot Generator. See how it works and get tips for the best results.
Software | Paid Partnership | By Ana Mireles | Last Updated: July 19, 2026
Shotkit may earn a commission on affiliate links. Learn more.
Professional-looking headshots often mean hours spent getting your hair and makeup done, choosing an outfit, and investing in a professional photographer.
Because this isn’t easy for everyone, many people have tried to edit a photo to make themselves look good, even when the conditions were less-than-ideal. Perhaps they were in a group photo, or on vacation posing in front of a landmark. Unfortunately, these ‘DIY’ solutions don’t scream professional at all.
Now, there’s a better way to get high-quality headshots without leaving your house, changing clothes, or spending money from a budget you don’t have. I’m talking about Firefly’s AI Headshot Generator.
In this guide, I’ll explain how to use the headshot generator, who it’s best for, and how to get the best results to achieve a professional-looking portrait for your CV or to upload to your website and social media channels.
So, are you ready to see how you can use Firefly to boost your professional image online? Keep on reading.
What is Adobe Firefly Headshot Generator?
Firefly, Adobe’s own generative AI technology, powers features across Creative Cloud apps, including Photoshop, Illustrator, and Premiere Pro.
One of its most popular uses is generating or editing images with simple text prompts and reference images. However, some effects might require advanced prompt engineering.
This is where an amazing new Prompt-to-Edit feature comes in: Firefly AI Headshot Generator.
Using the Headshot Generator page, you’ll be launched into Firefly with a prompt designed to create professional-looking headshots without having to go through a photoshoot.
What makes it especially user-friendly is the prompt itself. This is because you don’t need to know prompt engineering to achieve the result you want; you can simply customize the one Firefly gives you.
I’ll give you a more in-depth explanation in the step-by-step section.
The results look natural and realistic because you can upload a reference photo of yourself, and you’ll still look like you – except that you’ll be standing in a photo studio with a suit or a creative office wearing a fashionable outfit.
Firefly AI Headshot Generator focuses on clean lighting, polished backgrounds, and professional styles that still resemble you.
Who Could Use a Professional Headshot Generator?

Once upon a time, we only needed a handful of headshots. You’d have the ones for your passport, license, and other documents, and the ones for your school yearbooks. That was it. Unless you were a corporate executive or an actor, you would rarely need anything else.
However, we live in the age of images, and now we need constant headshots at every stage of our lives. So, anyone can make use of the Firefly AI Headshot Generator. Here are a few practical examples.
Professionals: A quality headshot makes a great first impression for your CV, LinkedIn profile, and other networking platforms. Even if you already have a job, you might need a professional headshot for the company’s badge and directory.
Content Creators: Headshots are essential for personal branding across YouTube, Instagram, TikTok, podcasts, and other social media channels. Your digital image is key to establishing yourself as a serious professional in a world overloaded with competing profiles.
Small Business Owners and freelancers: One of the most difficult things as a freelancer, solopreneur or small business owner is to get clients to trust you. A professional-looking headshot can go a long way in this regard.
Students, couples, and anyone looking for a good picture for an invitation, social media profile, or simply looking to get an all-purpose photo ready to upload.
How to Create an AI Headshot in Adobe Firefly?
Using the AI Headshot Generator in Firefly is very straightforward. However, I’ve broken it down into eight steps to explain each setting so you can master this tool quickly and achieve the best possible results.
Step 1. Open it
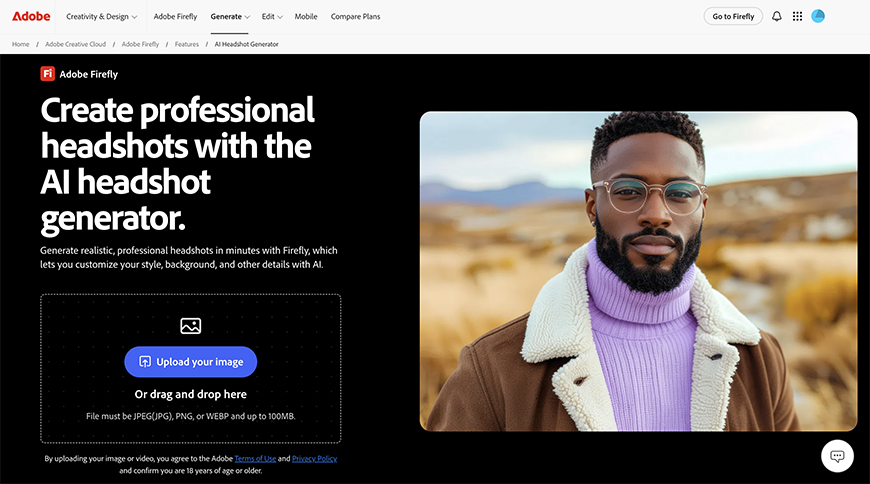
The first thing you need to do is head to the Firefly Headshot Generator. This will open its landing page, where you can see all the information, and you’ll be prompted to upload your photo and generate your first headshot.
At this time, you can make a couple of trials without signing in or paying. Mind that you won’t be able to download the resulting images unless you sign in.
If you already have a Firefly or an Adobe account, start by signing in.
Step 2. Upload your reference image
Next, upload the reference image.
Do you have a picture from your last vacation with a landmark in the background? Is it in the perfect location, but you’re wearing casual clothes, and you want to look more professional? It doesn’t matter: upload it, and Firefly will fix the rest.
Step 3. Customize the prompt
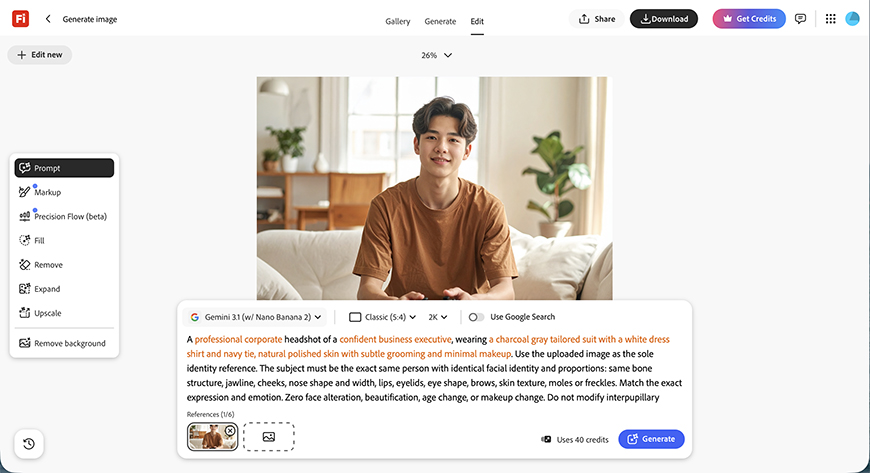
Once you upload your photo, you’ll be redirected to the Firefly platform. Here, the image will load together with a default prompt.
In the prompt, you’ll see parts of the text in orange letters – these are the key parts that you should customize. Although you can add or rewrite anything you like.
For example, instead of “a professional corporate headshot of a confident business executive,” you might type “a professional headshot for a creative brand profile picture.”
You can select a style, a color palette, your background, your outfit, etc. The important thing is that you leave all the commands that instruct the AI to use your face without changing any facial details that make you you.
Of course, if you’re looking for a traditional corporate headshot in an executive suit, you can leave the prompt as is.
Step 4. Set the size and format (optional)
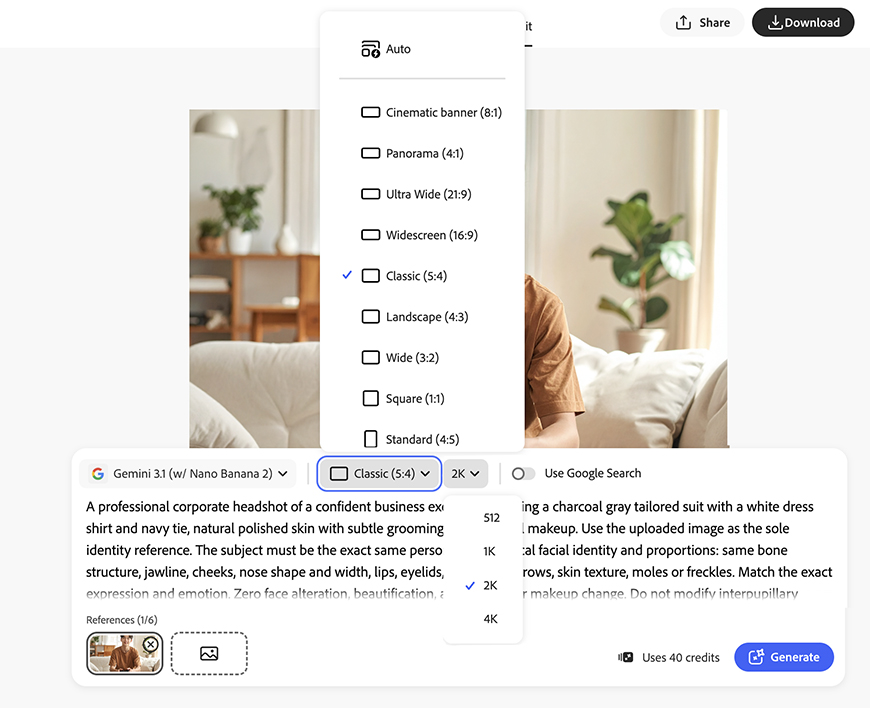
Inside the prompt space, you can also set a different size and format. Perhaps the reference image is landscape-oriented, but you need a portrait-oriented one or a 1:1.
Maybe you want to upscale it for higher quality, or the other way around, so the PDF of your CV isn’t a large file.
You can customize these things here and have them done in the same step as the headshot generation. Please consider that these actions may change how many credits it will cost.
Of course, you can also resize or crop your file as a second step if you change your mind or have different requirements to repurpose the headshot.
Step 5. Choose the AI model
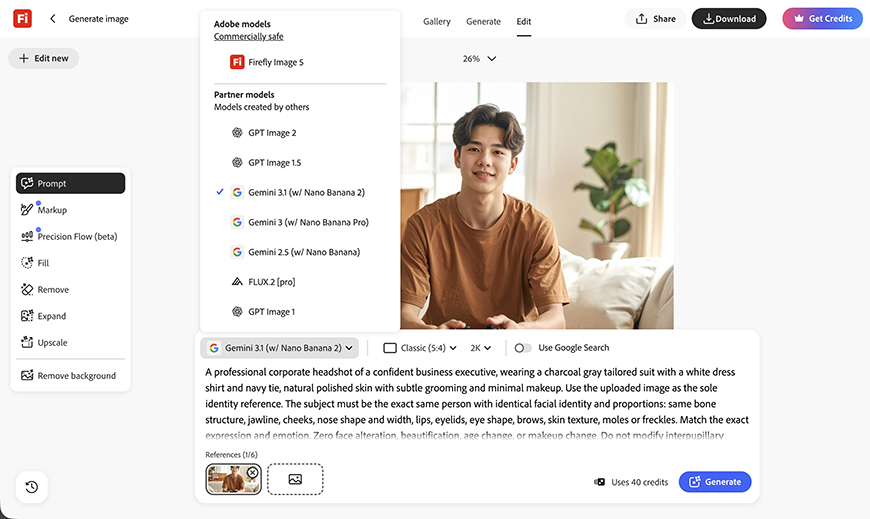
The next step is to set the AI model you want to use. This choice influences the result, as each was trained on different images, so each will have its own strengths and weaknesses. So, you can try changing it and see which one you like best.
Do keep in mind that changing the AI model may change the amount of credits the generation costs, and that each one has different terms and conditions.
If you receive a “Prompt declined” error, try switching to a different generator or check the prompt for anything that could be off-limits.
Step 6. Generate
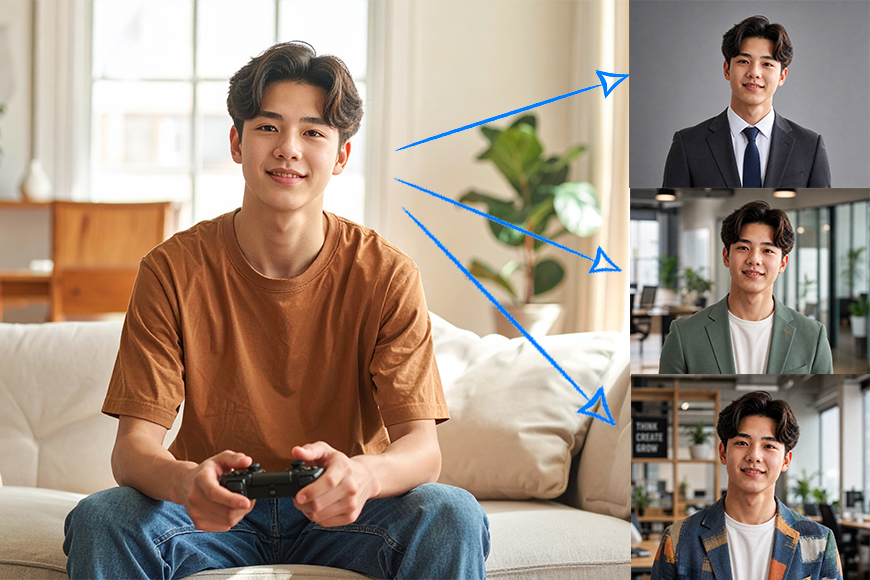
Ok, now that all your preferences are set up, it’s time to let the AI do its thing. You’ll see the credit cost next to the generate button, so you’ll always know how much it’s costing you – each generation will deliver one image.
If you agree and you have enough credits, click Generate.
Step 7. Fine-tune (optional)
If you’re satisfied with your headshot as it was generated, you can skip this step. Alternatively, you can click Generate again to get a different iteration; try changing the prompt or the settings if necessary.
You can also make use of other Firefly tools to fine-tune the resulting image. Remember that this isn’t a copy-pasting process – the AI is generating your image from scratch.
This means it may be wrong sometimes, especially if your reference photo didn’t show your entire face. For example, you may get a birthmark that you don’t have in real life.
If this happens, simply use the Remove tool to fix it.
Step 8. Download
Once you’re satisfied with your newly generated headshot, click on the Download button to save it on your computer or hard drive.
Alternatively, you can use the Share button and send it to Photoshop Web or Adobe Express if you want to keep editing it or use it on a graphic project.
In any case, all your images remain stored on the Adobe Cloud. So, you can access your headshot at any time from any device, logging into Firefly and going to Your Stuff > Generation History.
Tips for Better AI Headshots
- Use high-quality reference photos. A high-resolution, well-exposed photo will provide more detail to the AI, so it can do a better job generating your headshot.
- Make sure all your facial features are visible. If possible, upload a photo where you’re looking directly at the camera. Alternatively, upload multiple photos where you’re captured from multiple angles.
- Be specific in your prompt. The more details you include in your description, the more accurately the AI will generate an image that matches what you have in mind.
- Different outlets call for different styles. Depending on which platform or how you’re going to use your headshot, you should find the right style of headshot. While a personal profile can be more casual and expressive, a corporate one may require you to look more serious – it depends on which side of you you’re trying to portray.
- Generate multiple variations. Don’t settle for the first try if you’re not convinced. Generating again allows you to compare changes in your facial expression, the outfit, etc., and choose the best headshot.
- Review details carefully. While generative AI has made great advancements, it can still produce small errors that can be distracting – which is the last thing you want on a professional headshot. So, make sure you zoom in and review the entire image.
Are AI Headshots Good Enough for Professional Use?
Regarding quality, yes. Firefly AI Headshot Generator creates polished portraits with studio-style lighting and clean backgrounds that can easily match the quality of a professional photoshoot.
It’s also more affordable and convenient, which may be key for some people, like recently graduated youngsters looking for their first job or someone starting up a business with a tight budget.
That said, AI headshots have their limitations. While technology is rapidly improving, small errors can still occur – especially if the reference photo isn’t of good quality. So, it’s important to check and fine-tune your AI-generated headshot before posting it or sending it with your CV.
It’s also important to note that AI headshots work better for some industries than others.
While an AI-generated headshot may still be controversial for a politician to use in their public campaign, it has plenty of real-life uses where it’s a perfectly acceptable alternative to a photograph.
But I’ll let you decide on your own. Head on to Firefly’s AI Generator and give it a try. You can test it for free, use it with generative credits from any Adobe subscription, or subscribe to Firefly directly.
To learn more about plans and pricing, check the Firefly website.
Use AI Headshots Responsibly
AI-generated headshots should be used honestly and transparently. While these tools can create impressive results, it’s important not to misrepresent AI-generated images as photographs when distinction matters in a professional, editorial, or public setting.
Before uploading your image, make sure AI-generated content is allowed on the platform or service you plan to use. Some platforms, organizations, or publications have specific guidelines regarding this matter.
Adobe is also one of the companies actively promoting transparency in AI-generated content through its Content Credentials, which help identify when AI tools were used in the creation or editing process.
As AI-generated media becomes more common online, clear labeling and responsible use will play an increasingly important role in maintaining trust.

Ana Mireles is a Mexican researcher that specializes in photography and communications for the arts and culture sector.
1 Comment
Leave a Comment
👋 WELCOME TO SHOTKIT!
🔥 Popular NOW:
This is bullshit.