






A Photographer’s Guide to Generative Fill in Photoshop
Generative Fill isn't just for removing objects. See how photographers use it to add storytelling, change outfits, stage products, and more.
Photoshop | Software | Paid Partnership | By Ana Mireles | Last Updated: July 18, 2026
Shotkit may earn a commission on affiliate links. Learn more.
Not that long ago, planning a photoshoot implied a lot of practical questions. Can I find the right location? Can I afford these props and costumes? Will I have the time to edit that perfect picture by the client’s deadline?
Adobe Photoshop‘s Generative Fill isn’t magically answering all those questions, but it does change the way you think about them.
Perhaps the client isn’t getting your creative suggestions; now you can show them without spending any budget or hours on editing. Maybe you’re imagining a castle that doesn’t exist, or you’d like a prop that you can’t afford; that’s not a problem anymore.
Generative Fill doesn’t just speed up the editing process; it gives you the opportunity to think bigger.
In this article, we’ll see what Generative Fill is, how it works, and the many ways you can fit it into your AI photo editing workflow.
If you’ve had an ambitious idea you’ve never had the resources to make, now is the time to bring it to life.
What is Generative Fill in Photoshop?
Generative Fill is an AI-powered tool built into Photoshop that lets you add, remove, or replace parts of an image by using a text prompt. You can also leave the prompt space empty and let the AI generate freely.
Generative Fill is powered by Adobe Firefly — Adobe’s generative AI platform, available as a standalone creative studio at firefly.adobe.com and also embedded across Photoshop, Lightroom, and Adobe Express.
Generative Fill now also offers third-party models such as Flux and Gemini alongside Firefly. Each model has different strengths and terms of use — third-party models may carry different usage rights and may not be included in every Adobe membership.
Whichever model you use, though, Generative Fill analyses the image to create entirely new content that matches the lighting, perspective, colors and overall look of the scene.
This is a completely new way of functioning compared to traditional retouching tools like Content-Aware or the Healing Stamp, which only used nearby pixels.
This is why you can seamlessly remove objects from the scene with a single click instead of spending time cloning pixels. It also works for adding new elements. Before, you could add things by pasting a carefully cut-out element and making sure it fit the image.
Using Generative AI, you don’t need the actual photo of the new element, nor do you have to spend hours compositing – it just generates it from scratch.
For quick clean-up jobs or to introduce a specific object, such as a real product, traditional editing is still the way to go. However, Generative Fill sits where other tools reach their limits.
Let’s see the role of Generative Fill in AI image editing.
Why Generative Fill Matters for Photographers
Generative Fill matters because it reduces the gap between what you can imagine and what you can realistically achieve in a photoshoot and its post-production.
For photographers, this means fewer creative compromises.
You may not need the perfect location anymore; you need a location that gives you the right light, perspective, and foundation to build upon.
You’ll also eliminate time constraints when your client has a tight deadline, as Generative Fill can speed up your entire workflow, including complex tasks like photo compositing.
Forget about your client putting the brakes on your imagination because there’s no budget – you can now create anything you need without having to purchase or rent it for the photoshoot.
Let’s be clear, Generative Fill is not replacing the creator; it’s expanding their toolbox. The photographer still needs a strong concept and a solid photographic base to build on.
The key shift is not that you don’t need advanced skills to perform certain edits; it’s that you can think bigger than ever before.
How Does Generative Fill Work in Photoshop? Step-by-Step Tutorial
Generative Fill in Photoshop is designed to be simple to use. Down to its core, the workflow is select-generate-refine. But let’s look at the process in more detail so you can make the most of it.
Step 1 – Make a selection
Start by opening the photograph you want to edit in Photoshop.
Then, select the area you want to change. You can use the selective tool of your choice, whether it’s manual or AI-assisted; the Generative Fill tool will work the same.

Once there’s an active selection, you’ll see the Generative Fill tool appear on the contextual bar.
Step 2 – Type a prompt
Click on the Generative Fill button. This will open the text bar for you to type your prompt.

Keep in mind that even the simplest text will make it work, but being specific will yield results closer to what you’re envisioning. So, instead of just typing “cup,” type “blue porcelain cup of steaming hot coffee on a matching saucer with a teaspoon next to it.”
Of course, that’s just an example, but what I mean is that you can still use natural language, but it helps if you give it as many details as you can. This way, you stay in control instead of letting it generate whatever it wants.
You can also leave the space blank if you’re removing an object or you’re expanding the canvas and you only need it to match the texture without introducing any new elements.
Step 3 – Upload a reference picture (optional)
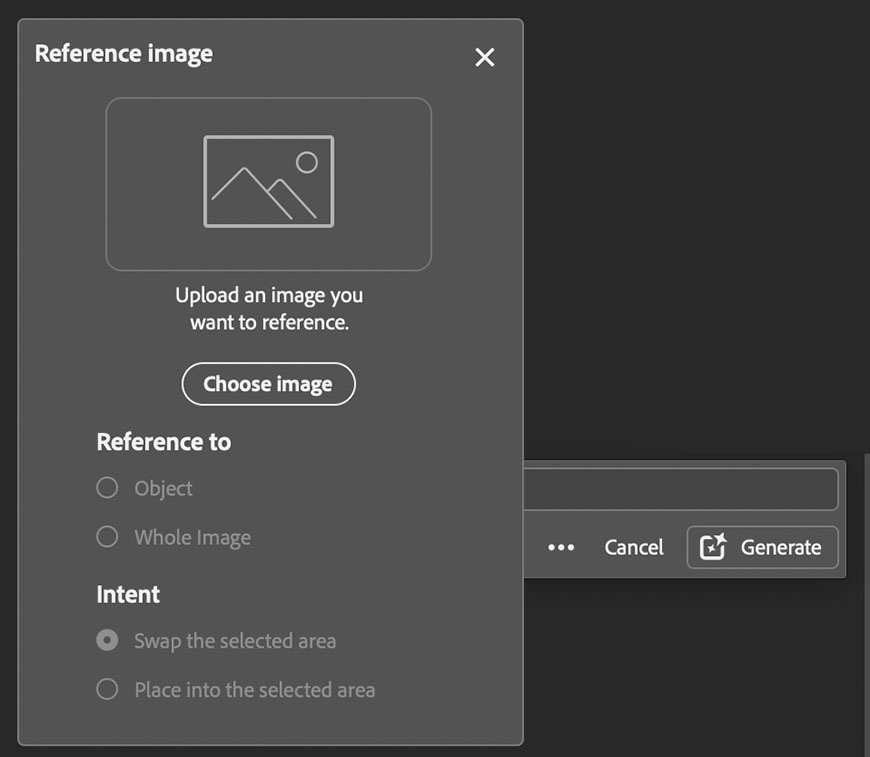
Another useful feature of Generative Fill is the ability to upload a reference image. This will complement the text prompt and ensure you get the closest possible result to what you’re looking for.
Here, you can select whether to reference the object or the whole image. You can also tell Photoshop to either swap the selected area with the selected area or place it within it.
Step 4 – Choose an AI model
Next to the text bar, you’ll see Firefly is selected by default. This is the AI model selected for the task. You can leave the default model or open the menu and select a different one.
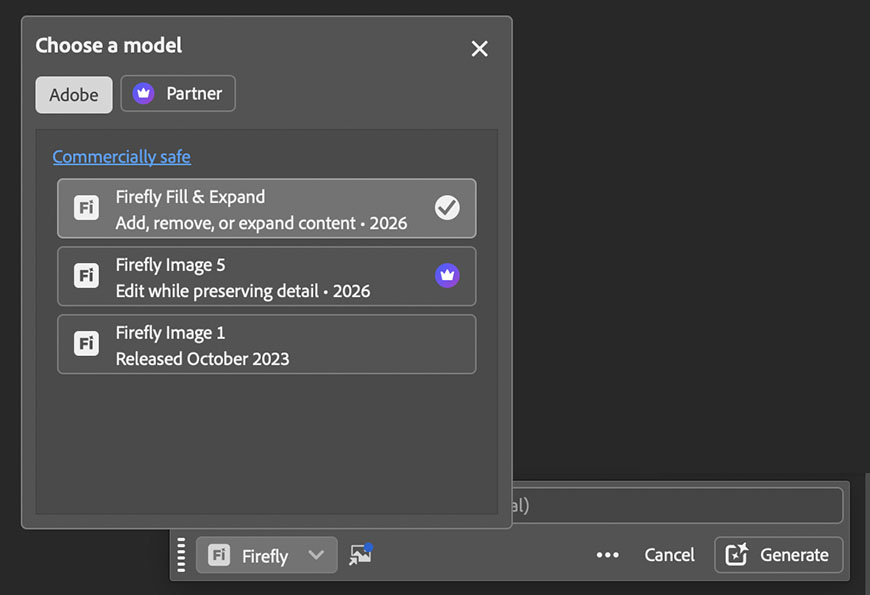
Each model has different strengths. Underneath the name, you’ll see a short description of what the model is best used for – this will help you choose which one to use.
Be aware that not all models are included in every plan. If you see a purple crown next to the model, that means it’s considered a premium feature. This means that each generation will cost you more credits; you can check that by hovering over the Generate button.
Depending on your plan, premium features may not be included. You can learn all about generative credits and what’s included in your plan on Adobe’s website.
It’s also important to note that partner models have different terms and conditions. For example, using a Firefly model, you can be sure that your images are safe to use commercially – this isn’t necessarily true with other models.
Step 5 – Generate
Now, all you need to do is click Generate and let Generative Fill do its thing. You’ll receive three variations per generation, which you can find on the Properties panel.
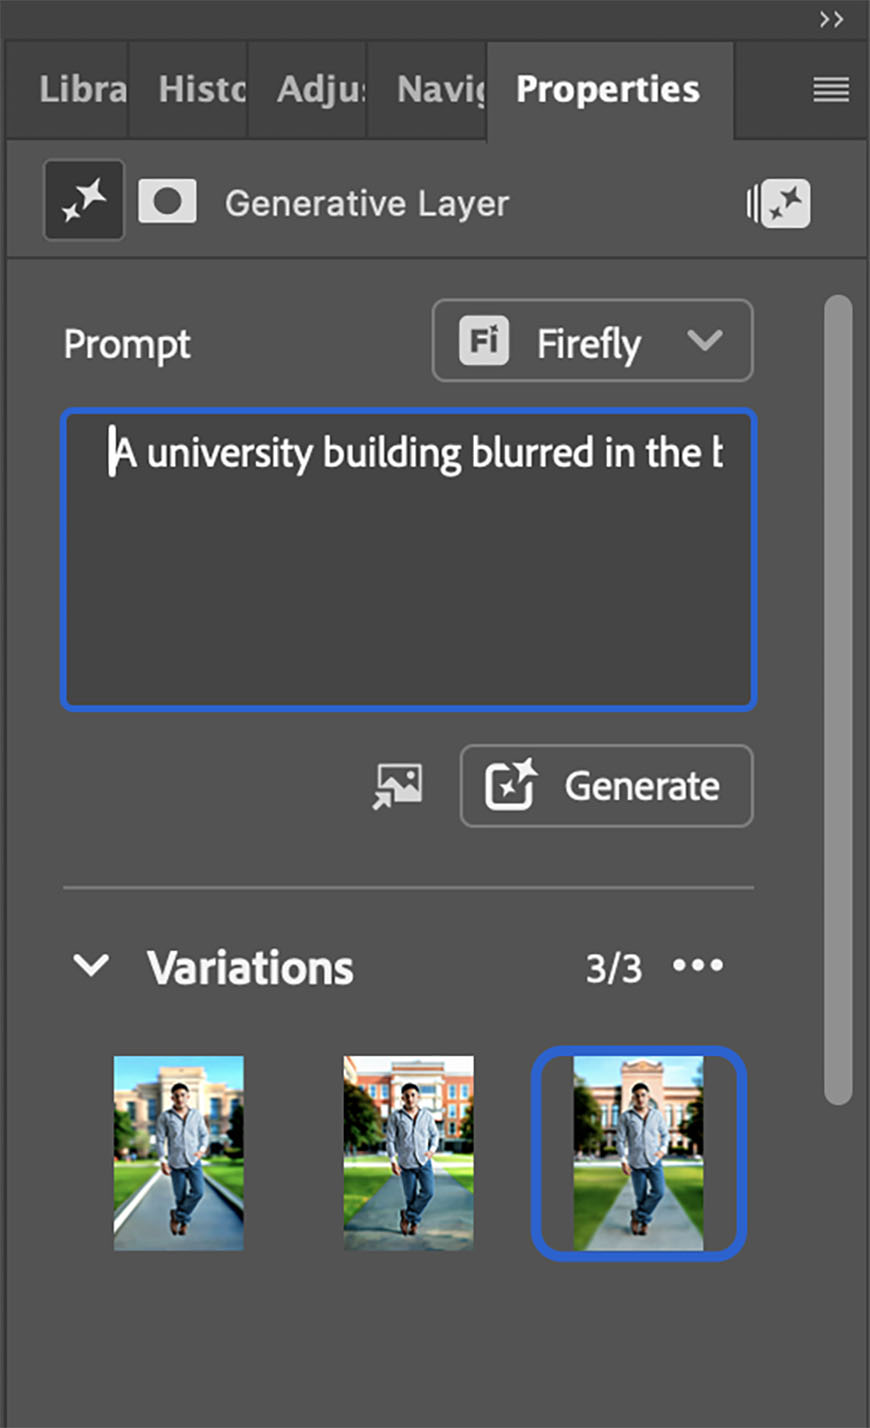
Note that the generated content is on a separate layer created by Generative Fill. So, the work is always non-destructive.
You can switch variations as many times as you like or even come back at a later time – they remain stored even after closing Photoshop.
It’s possible to generate more variations using the same prompt, try a different prompt or model, or keep fine-tuning parts of what you’ve already generated.
Step 6 – Enhance detail (optional)
Once you like a variation, you can increase the resolution for more detail and better quality. Simply hover over the thumbnail of the variation you chose on the Properties panel.
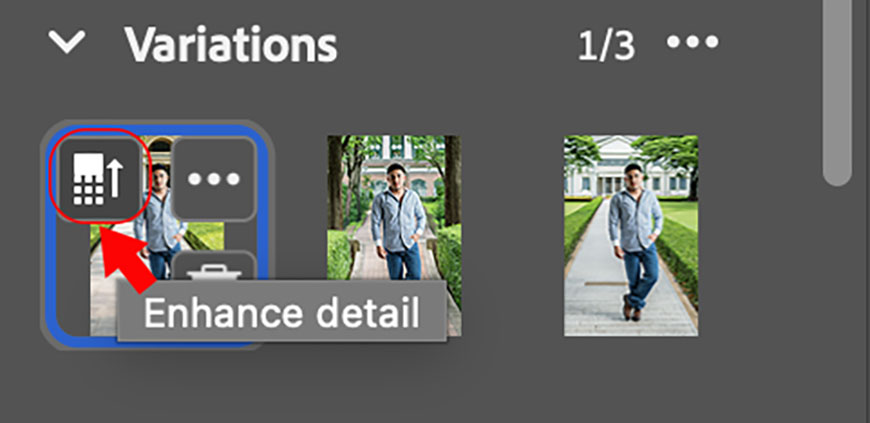
Then you’ll see an icon appear at the top left of the thumbnail, with an upward-pointing arrow. Click that for Generative Fill to create the same content it already created, but at a higher resolution.
Creative Ways to Use Generative Fill in Your Photo Editing Workflow
There are many uses for Generative Fill; here are five examples of how any photographer can incorporate it into their workflow to save time and money without sacrificing creative control.
I made these using only the Firefly model, but by leveraging multiple partner models, your options are even broader. For example, you can rotate an object or change your model’s pose.
Replace the background
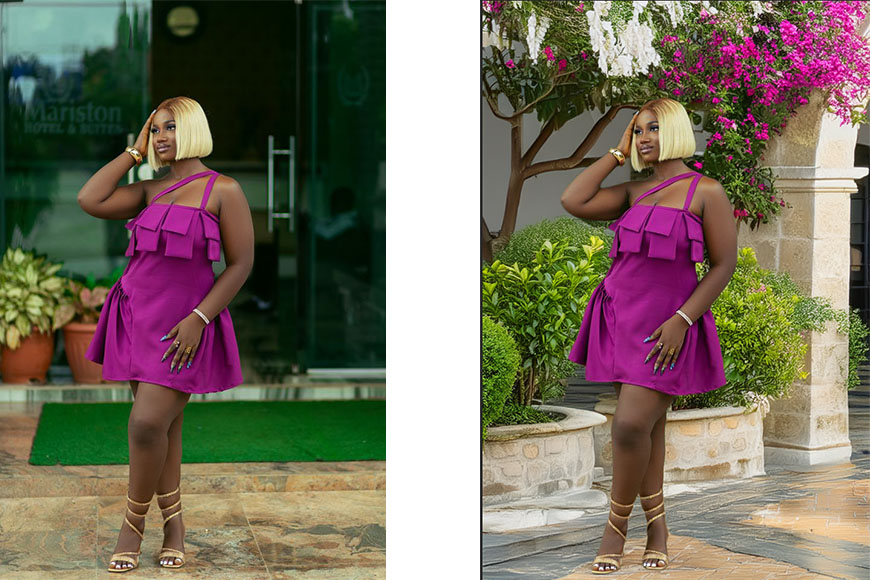
Using Generative Fill, you can instantly upgrade any location. You can turn an empty warehouse into a luxury loft, a garden into a lavender field, or replace a neutral backdrop with a wall with architectural details.
This is not just about upgrading; it also helps you to add variety. If you’re shooting a portfolio for a model, you can do the entire photoshoot in your studio and deliver images that look like they were shot in multiple locations.
The best thing is that you don’t need a big location budget, time spent travelling and setting up at each location, or hours in post-production.
Simply click Remove Background on the contextual bar. Then, you’ll see a new button appear that says ‘Generate new background’ – that’s the Generative Fill feature.
Type a prompt describing what you need and place your subject on any background you want.
Expand the canvas
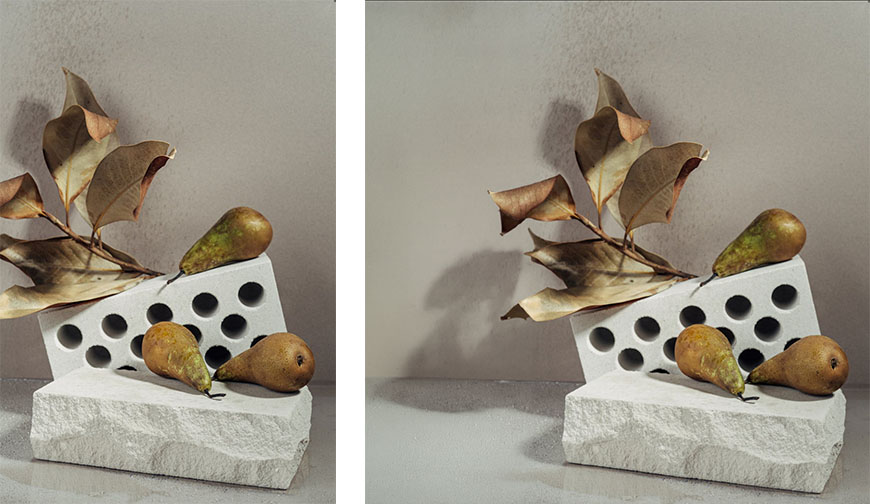
Generative Fill makes it easy to create new content beyond the photo’s original borders. If your lens wasn’t wide enough, or you accidentally cut something you didn’t mean to, you can fix it without reshooting.
Another practical use is to change the image’s orientation. You can turn a horizontal shot into a vertical one that’s perfect for social media, or expand a vertical shot to use it as a website banner.
Simply use the Crop tool and pull the handles outward. Once you have the size you want, click Generate. You can add a prompt or not, depending on what you’re after.
Learn more about extending a background using Generative Fill.
Add storytelling elements
Sometimes a photograph has the perfect composition and lighting, but it might be missing something. Generative Fill lets you add environmental details that strengthen the story you’re telling.
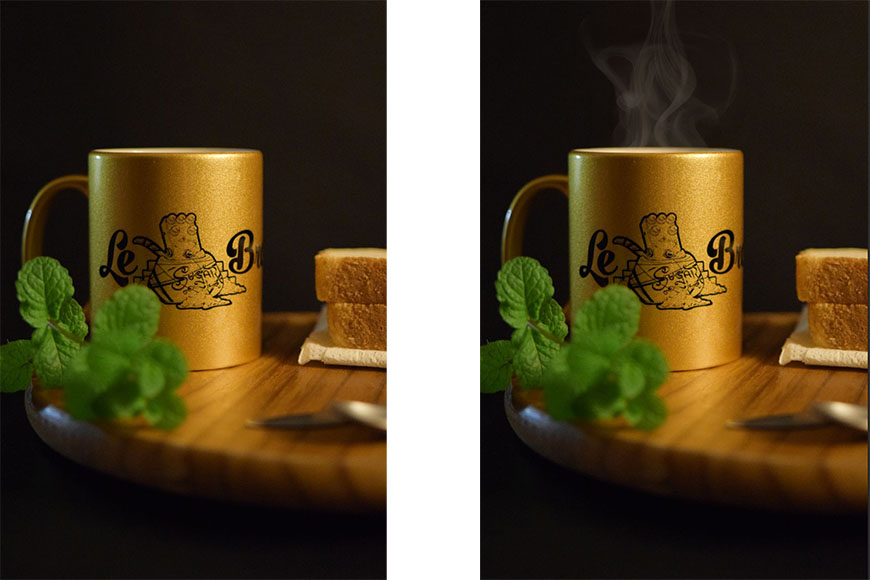
You can create anything from falling leaves, a plane in the distance, steam coming from a coffee mug, flowers, lanterns, anything you can imagine, whether it’s realistic or fantasy style.
Simply select the area where you want it, and describe it in the prompt.
Change your model’s outfit
Generative Fill lets you explore different wardrobe options without having to organize another photoshoot. Whether your client changed their mind, or you’re simply exploring ideas, you can change their clothes in seconds.
I’m sure you’re thinking that this is a no-brainer because I already told you that Generative Fill can generate anything. So, you can type ‘red dress,’ and it will put the model in a red dress.
And yes, you can do that. However, it can go much further; you can even change it to a specific piece of clothing that you have a picture of.
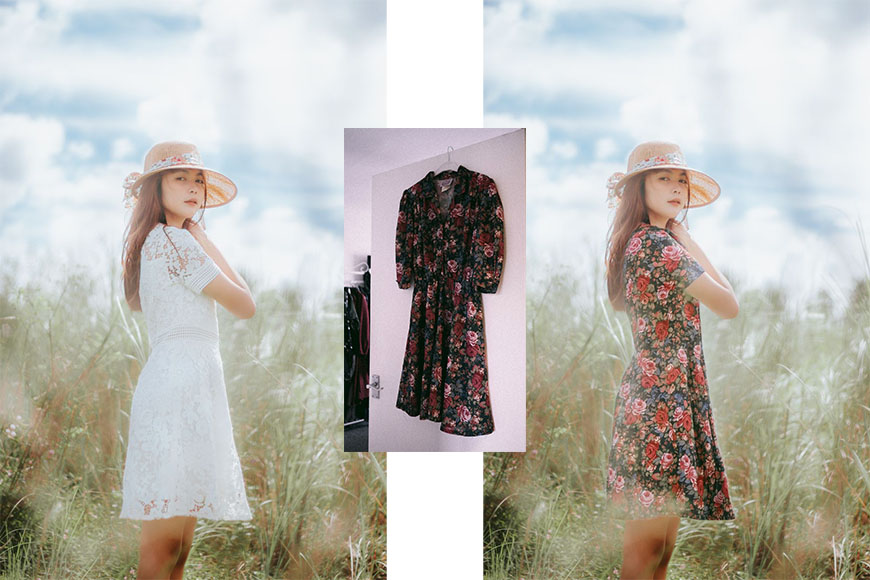
If the model changed their mind and now wants to appear in the photos wearing a different piece of clothing from their wardrobe, simply ask them to take a photo of it and use it as a reference.
Now, use the Select Subject option and go to the Options bar. Here, AI has already identified the subject and will give you options for which part to select.
Simply choose the clothes, then upload the reference image in the Generative Fill tool. Choose ‘Reference to Object ‘ and ‘Swap the Selected Area’.
You don’t have to type a prompt or specify anything; it will know what to do on its own. You’ll notice that the clothes not only fit perfectly and simulate creases and folds naturally, but they will also match the lighting and mood of the original picture.
Product Staging
Using Generative Fill, you can enhance your product photography without a big budget. Whether you’re placing a product in different scenes or adding props to your set, you can elevate your images with just a few words and clicks.
If you’re photographing jewelry, cosmetics, fashion accessories, or luxury goods, you can generate display stands, decorative objects, or marble pedestals without purchasing or renting any.
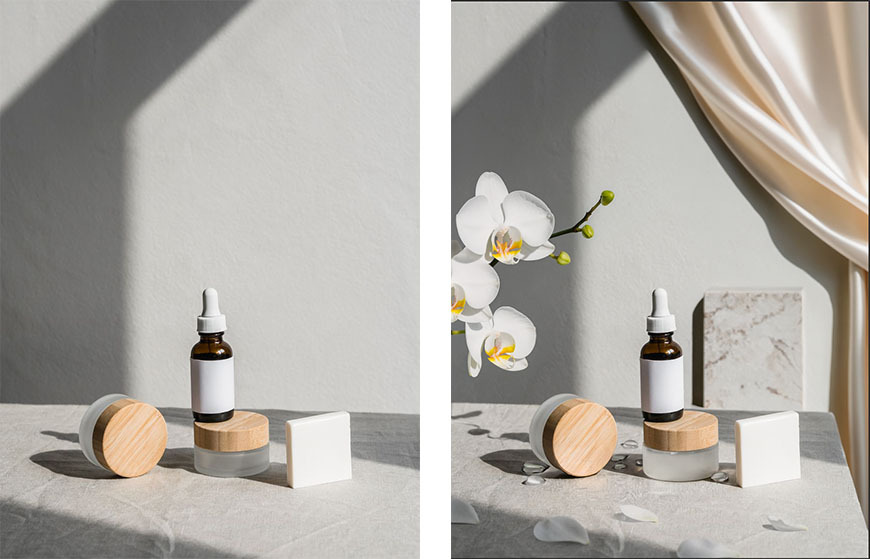
You just have to select where you want the object, then use Generative Fill to add it to your scene.
In this example, I enhanced the picture in six steps: the travertine pedestal, the white orchid, the draped fabric, the water droplets, and the petals.
This approach gave me more control than trying to generate a whole new background that exactly matched what I had in mind.
You can also use this feature to brainstorm with your client and agree on a concept for the photoshoot. Simply add, change, or remove elements depending on the feedback.
Ready to get creative? Try these 35 creative prompts for Generative Fill.

Ana Mireles is a Mexican researcher that specializes in photography and communications for the arts and culture sector.
1 Comment
Leave a Comment
👋 WELCOME TO SHOTKIT!
🔥 Popular NOW:

The product staging section matches what I have seen: painting the selection a little larger than the object, so it includes the contact shadow, makes the new element sit in the scene far more naturally. I practise the same select-then-describe habit with masked edits in Nano banana 2.1, and writing only what should change keeps the rest of the photo from drifting.