


How To Get Through a Busy Wedding Photography Season
Learn this wedding photographer's tips and tools to streamline your post-processing workflow and grow your photography business.
Imagen | Software | By Marc Bergreen
Shotkit may earn a commission on affiliate links. Learn more.
Let's talk about how to handle the end of the busy season to complete your backlog.
Whether you're dealing with limited space on your hard drive or multiple hard drives cluttering your desk, it's imperative to get those terabytes of photos off your to-do list and into the hands of your eager and sometimes impatient clients.
In this article, I'm going to talk you through using AI to help speed up your culling and editing process and other tools to help streamline your client delivery.
Having a streamlined workflow as well as tools and processes to make you more efficient will help you get through your hectic backlog of work.
The fastest, simplest and most affordable way to outsource image editing for wedding photographers.
Tap button to get first 1,500 AI Edits for free
It's one thing to shoot thousands of images; it's another thing to process them all and hit send. Your job isn't actually done until you deliver your images, so don't let a lack of systems prevent you from finishing the busy season strong.
If you've been resisting outsourcing your editing because you feel that it compromises your financial bottom line or your completed art, it's still important to increase your post-production efficiency.
Using the right workflow and the right tools might be the perfect compromise that you've been looking for.
My goal is that you create a post-production workflow that's so sleek that at the end of busy season, you say, “What backlog – I'm going on vacation!”
Creating Your Post-Production Workflow
The first step in dealing with the end of busy season is to have a clear and organized workflow. That means you need some sort of checklist.
Your workflow checklist should list all of your open projects, what stage they're in, what the outlying tasks are, and what your due date is. Then, the fastest way to knock out that backlog is to start checking boxes.
If you don't already have a post-production workflow or a way to organize and track it, start there.
There are various ways to track your projects. You might:
- Track them in your client management software such as Tave
- Use a checklist tool like Trello
- Make a trusty spreadsheet
- Throw a big whiteboard up in your office.
Get organized first, and once you know what needs to be done, you can find the best ways to do it.
As an aside, you might consider making this list before you actually get busy. That allows you to plan for upcoming jobs and set deadlines that feel fair based on your time and delivery promises to the client.
Once you have your workflow road map, list all of the steps that you need to take to get through your post-production finish line.
The more you can create systems, the more you can simply repeat and thus complete your backlog without too much thinking
We'll walk through some potential steps in the next section.
To give you an idea, your process might be something like this: cull, edit, pick favorites, export for album design and slideshow, upload to client delivery platform, create slideshow, design album, update links in e-mail template(s), hit send, pop champagne.
Culling and Editing More Efficiently
-
Culling

One of the hardest parts of dealing with a backlog is culling your photos, but it's also the step that can have the biggest impact.
If you know that you shot 3,000 images, but you're only going to deliver 300, then the faster you can identify what those 300 are, the better.
You might think that it's completely subjective, but let's be real – many photographers do deliver out of focus images, when it's intentional or numerous duplicates of the same moment.
As you go through your culling processes, if you hang on to too many photos you're only creating more work for yourself. And you're wasting your time on images you aren't going to deliver anyway.
You need to be ruthless and try to select only your best images. Even then, chances are you'll still end up with too many.
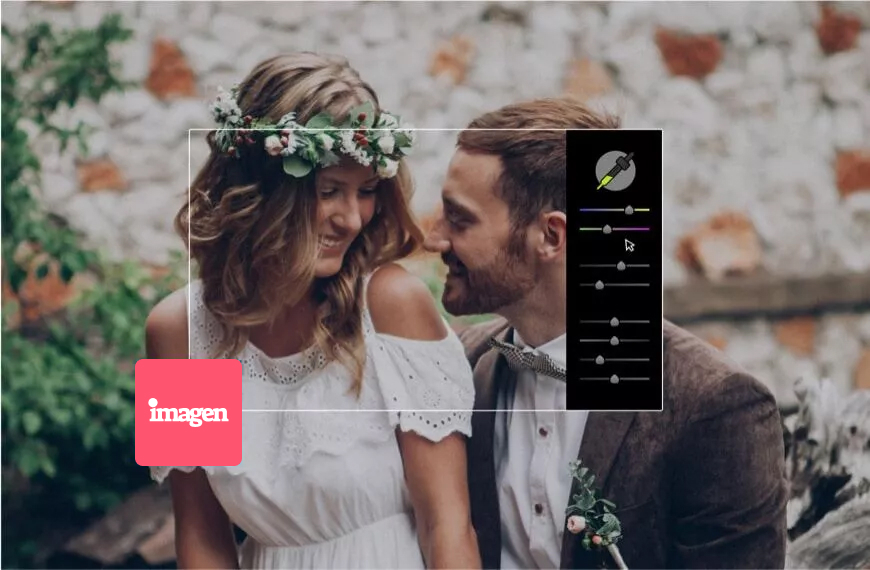
This is the perfect place to utilize AI tools such as Imagen, which will analyze your photos and rate them for your review.
You still have control, but it can save you a ton of time and give you that second opinion you need when you've been staring at three versions of the same photo trying to decide which is best.
Making thousands of decisions is mentally exhausting, so if we can find tools to make some of the obvious decisions for us, we can save brain power for more important ones.
-
Editing

Next, it's time to edit your selected images – and edit them efficiently so that you can make your way through that backlog.
The first thing I always tell people (including myself) is to get it right in camera. If you focus on strong framing and accurate exposure while you're shooting, it will reduce required edits.
Or at the very least, if you're going to underexpose then do it consistently so that you can do batch edits.
Shooting in manual will help a lot with this. It locks the exposure so you don't have to tweak each image with different settings.
In years past, a lot of photographers recommended locking in your white balance too but this has become less important as auto white balance has improved.
Lastly, I'd recommend you shoot in RAW to maximize the ability to adjust settings in post-production. Some settings like white balance can be set after the fact so all your photos will match.
Lightroom Presets have become a tool that I rely on to quickly perform the batch edits that I typically apply to all of my photos.
Now with tools like Imagen Personal AI Profiles, I'm exploring saving even more time because the profiles are smarter than a batch preset customized to individual photos. That's something that's normally another step for me.
The tool can learn and adjust the sliders based on my past edits. If you don't have your own style yet, you can start by exploring Talent AI Profiles that utilize the editing style of other photographers.
Whether you're starting from nothing and using a Talent AI Profile or creating your own Personal AI Profile in the Imagen software, it's important to establish a consistent look.
It can be tempting to edit photos from the same gallery in different styles but I would encourage you to find your look and stick with it. Browsing the Talend AI Profiles in Imagen is a great way to learn about different styles.
Editing is a time-consuming process but there are ways to speed it up – from making sure you do your best to get the photo right in camera, to having clarity and consistency on your editing style, and finally using the right tools to expedite that process.
Less time editing if more time running your business and shooting photos – something we all would love to do!
Designing your albums
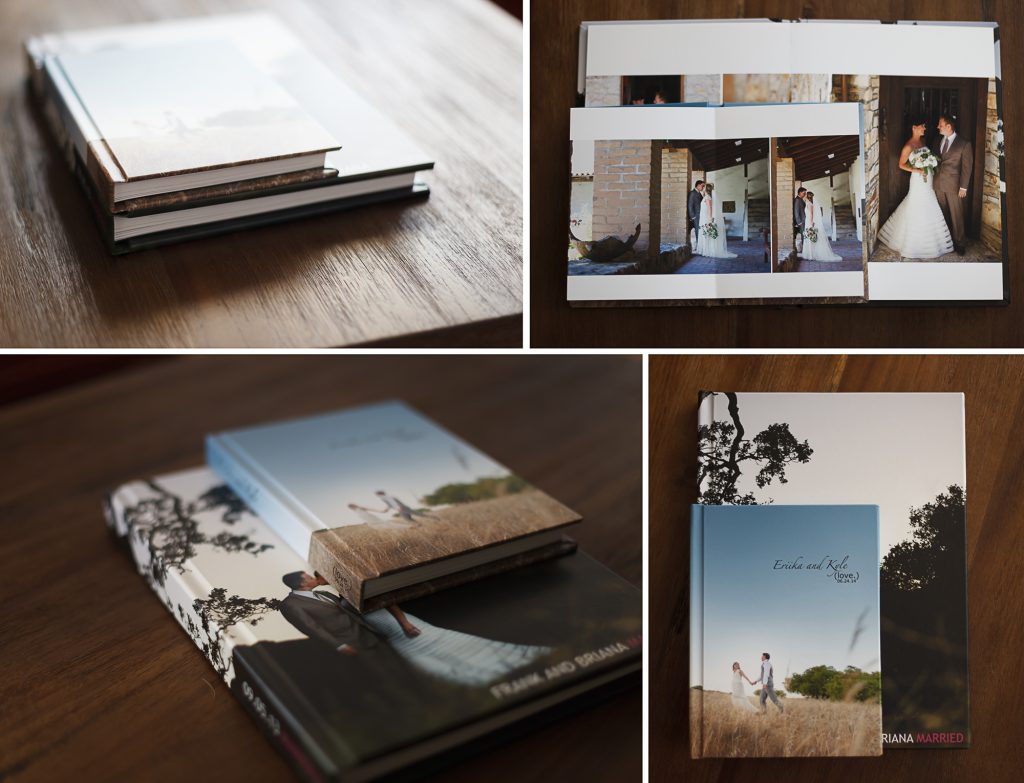
If you're not already including an album in your packages, I'll just say that you should consider it.
Albums are an awesome product that adds huge value to your clients which is a win-win. I know every client thinks that they just want the digital files, but looking at photos on your computer is simply not as satisfying or impactful as having an album on the coffee table to enjoy.
The best part is that adding albums to your post-production workflow is easy.
If you've already rated your favorite photos, you can use those to design a wedding album using easy-to-use tools such as Fundy Designer. Again, you still have control of the design but it's super quick once you have your process and style dialed in.
Some of the tools out there will even populate the album design for you as a starting point.
For many of our wedding clients, the album is their favorite part of the post-wedding experience. It gives them a chance to review their favorite photos and getting a printed image in a high-quality book is so satisfying.
If you set up a system for client comment and approval using your design software, you can get a high-quality album in their hands fairly painlessly.
I still enjoy the process of designing wedding albums but now it takes me a fraction of the time, making it both an efficient and effective part of my workflow and my business.
Delivering your gallery

Now it's time to deliver the images to your clients. Tools like Cloudspot or Pic-Time make the process simple and efficient while also benefiting your business by being set up for print sales.
There's nothing like getting an e-mail on a random day that tells you that you just made some extra cash!
Additionally, your clients will have your art in their homes, which can be a great marketing tool.
If a client wants to hang a big print of one of your photos on the wall, it's likely to be a talking point whenever someone comes into their home. This can lead to more referrals as well as keeping you top of mind next time they need a photographer.
You simply upload the images to your delivery system, organize them if applicable and set any download permissions or restrictions.
Then, your clients can download their images, order prints and other products, and share the gallery with friends and family.
Not only is it easy, but your image gallery is also a clean, attractive, and professional-looking way to deliver files without creating more work for you.
I always include client instructions in my e-mail template to download and back up their files.
This brings me to the last section of this article: using your efficient and streamlined workflow to not only knock out your backlog but to impress your clients.
Creating a Positive Impact for Your Clients
I already alluded to the client e-mail templates that you're going to set up.
The first will be a sneak preview e-mail that you'll deliver as soon as possible with either a few quick photo grabs or, since your workflow is so efficient now, maybe it will be a slideshow of your best images from the shoot.
Creating an impactful slideshow with tools like Pic-Time is quick, easy, and completely worth it!
I especially like delivering a slideshow beat-matched to a song that matches the mood of the shoot. This is thought-provoking and so much more dynamic than just sending off a gallery of images.
Now that your client is in tears of joy at how much they love their photos, set up a second e-mail template with auto-send.
This e-mail will include a link to their album design as well as instructions for edits and approval, and a link to their image gallery with download instructions.
All of this is as simple as opening the e-mail template, adding a personal note and proper name and then inserting all the applicable links.
If you can do all this in a timely manner, you'll stand out from the competition and have happy clients!
Final Words
My goal in this article was to change your post-production perspective. Maybe you started out looking for a way to handle the hectic end of what was already a hectic busy season. You were probably just looking for a way to complete your backlog faster.
Hopefully, what you got instead was both the motivation and tools to create an efficient and effective workflow that will not only reduce your backlog but wow your clients.
It's time to take control of your time and focus on running your business and creating your best work. Technology has made so many aspects of our job easier if you check out some of the tools that are available to us.
The longer I've been in business, the more I realize that one of the keys to having a sustainable business is to adopt processes that make my job easier.
Post-production workflow is a big part of the job that often gets left for last. Instead, if you plan ahead for what you're going to do, you'll be better prepared for whatever busy season throws at you.

Marc and Brenda Bergreen are professional wedding photographers and adventurous storytellers based in the Rocky Mountains.
👋 WELCOME TO SHOTKIT!
🔥 Popular NOW:
