


How to Batch Edit in Lightroom (Classic & CC)
Save time and streamline your workflow with this handy guide to batch editing! Covers the 7 best methods and steps for Lightroom Classic & CC.
Lightroom | Software | By Stephan Jukic
Shotkit may earn a commission on affiliate links. Learn more.
Batch editing can be a lifesaver when you've got a lot of photos to work through and don't want to take forever on basic edits for each one. Thankfully, it's not only very doable with Lightroom, it's also really easy to get the hang of.
One essential feature of batch editing is that it lets you apply the same exact settings to a whole roster of photos at the same time.
This means a superb level of high-speed consistency that can be exceptionally useful for client production work and large projects with exacting standards.
Now let's dive in and get down to the essential steps for editing dozens or even hundreds of photos with Lightroom Classic CC in no time at all.
We're also going to cover how to batch edit photos with the cloud-oriented Lightroom CC at the end of this guide.
Popular course reveals the simple tricks to getting incredible results with Lightroom in record time. Give Your Photos The Look They Deserve!
![]()
What is Batch Editing?
Just as the name implies, it means editing your photos in batches. These could be dozens or hundreds of images whose settings for contrast, color saturation and exposure can be edited all at once at the same time.
There are many reasons why knowing how to batch edit photos in Lightroom is useful.
For example: Imagine you spent a whole sunny day doing nature photography in some remote field. Later, you come home, load the photos and to your horror realize that most of them were overexposed or had some other small but pervasive mistake. Oops.
Batch editing lets you fix exactly this without a sweat. Instead of tediously correcting them one by one, you can use Lightroom to fix certain settings on hundreds of shots at the same time.
This same process can be applied for multiple photo corrections and all kinds of other edits, for instant mass fixes or application of a watermark.
That's why learning how to batch edit in Lightroom can greatly improve your workflow.
7 Simple Techniques to Batch Edit in Lightroom
The following are what we consider the most important techniques for easily and effectively processing anywhere from one to hundreds of photos at the same time in Lightroom Classic CC..
Adobe also offers a cloud-synced version of the software just called Lightroom CC, which works for cloud storage and mobile devices. It doesn't have all the same features as Classic CC but its batch processing options are very similar.
Most of the following applies especially to Lightroom Classic but we'll also briefly cover some user tips for Lightroom CC at the end of this guide.
1. Apply Lightroom Presets During Import
Starting with the basics: If you want to do a massive Lightroom batch edit with a whole roster of images, the simplest way is by setting up presets and applying them right during import.
This will apply the exact same presets to every single selected photo.
Here's how:
Step 1: Open up Lightroom and then click on the Import button at the bottom left. Once open, you'll see options for navigating to different photo folders in your device and external drives along the left side of the Import module.
Step 2: Select the image folder you'd like to import. All of the pictures it contains will appear as thumbnails in the main panel of the Import module. They will all already be selected, though you can de-select them all at once or individually.
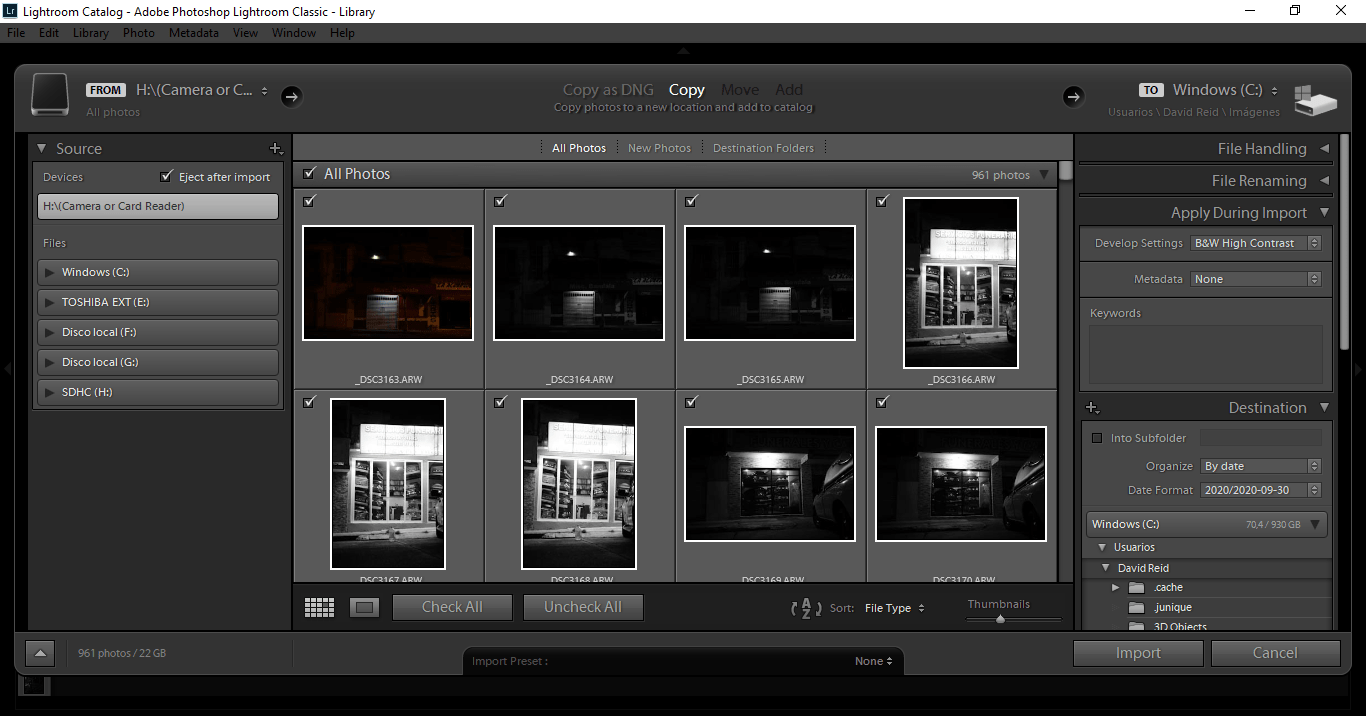
Step 3: Now you can apply either a custom preset or one of the batch edit Lightroom presets to any selected images. On the right side of the Import module, you'll see an “Apply During Import” drop-down menu. Open it up and pick a preset under “Develop settings”.
Step 4: Click “Import” and you're done. Every selected photo is edited and you just saved a ton of time.
2. Apply Lightroom Presets to Multiple Images in the Library Module
Applying presets to all selected import photos is great for giving the same contrast, lighting, exposure or other adjustments to lots of similar images, but what if your folder contains many photo groups of different types?
This is where applying Lightroom (or custom) presets to photos in the Library module comes in. It lets you batch edit photos much more selectively.
Step 1: Click the Import button and select all the photos you'd like to batch edit in groups for general import to your Library.
Step 2: Once you've imported your overall collection of photos into your library, you can now edit them in smaller batches.
To do this, just click on the first image in any sequence you'd like to apply a certain preset to, and then while holding down the Ctrl button, select all other images you want the same for. Apply a preset to them.
 Step 3: Repeat the above process as often as you need for as many custom groups of photos as you want so that each different subset of all your imports is edited according to its specific needs.
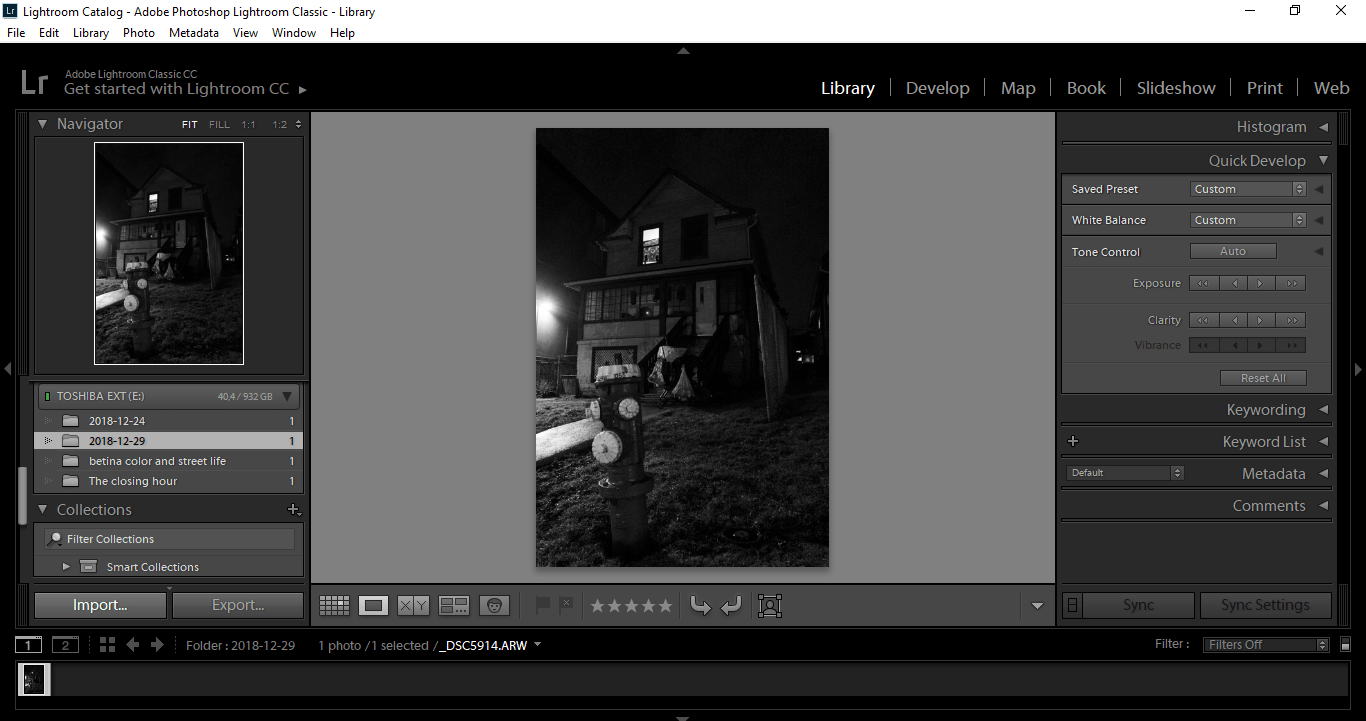
Bonus: You can also use the Library module to make custom edits aside from those of the presets for each subgroup of photos.
You can do this by using Quick Develop tools below the saved Preset drop-down menu to change things like contrast, vibrancy, exposure and clarity.

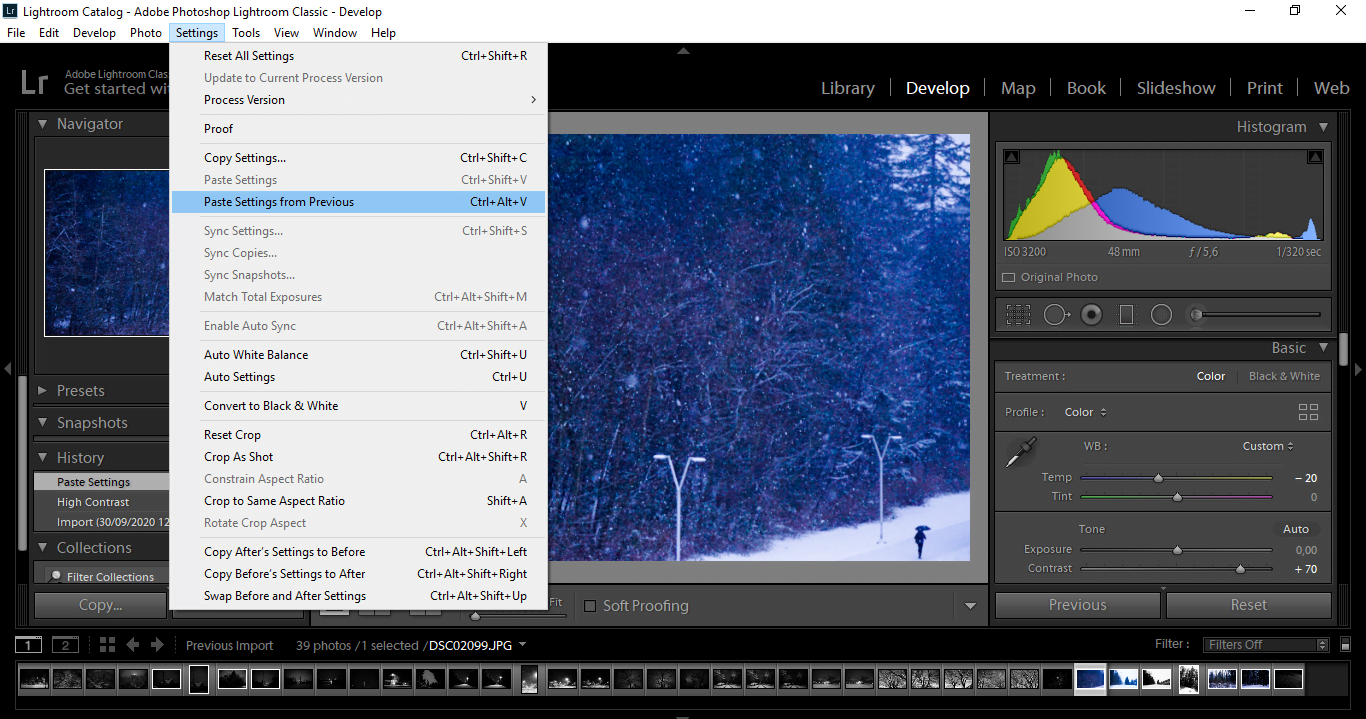
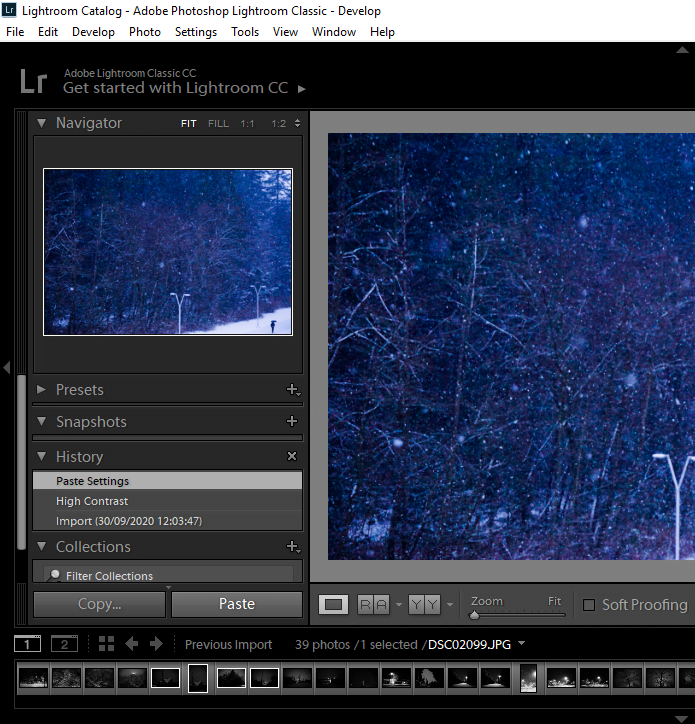
3. Use ‘Paste’ to Copy Settings From the Previous Photo
With the “Paste” technique, all you need to do is edit one particular image in the specific way that you prefer, and then copy these settings so that they paste to other photos you select.
Doing this is useful for when you want to create highly precise edits but apply them quickly across other similar images afterwards.
Step 1: In your library, select one of the images you'll want to batch edit and apply either one of the built-in presets or your own custom settings. You can also combine elements of both.
Step 2: Once you've edited your photo to a degree that leaves you satisfied, open up one or more new photos that you also want to apply the same presets to.
Step 3: Then with these other photos, either click Ctrl + Alt + V or go to Settings > Paste in the dropdown options along the top menu bar and select the “Paste Settings from Previous” option that's halfway down the screen.
4. Use ‘Copy' to Copy Settings from One Photo to Another
Another cool option for batch applying Lightroom edits is to copy settings from one picture to others.
This method also involves sharing information about edits between photos. Unlike method 3 though, it lets you selectively choose which specific presets and edit settings to choose for pasting to other photos. It's more precise because of this.
Doing this is just as simple as using method 3.
Step 1: Select a specific photo from the collection you've just uploaded to your library module, and using the Develop tools in the right panel (or just an automatic preset), edit the photo as you like.
Step 2: Once finished, click “Copy” on the left side of the interface and a new internal window will open up with that photo's edit settings listed. Tick the ones you want and click “copy”.
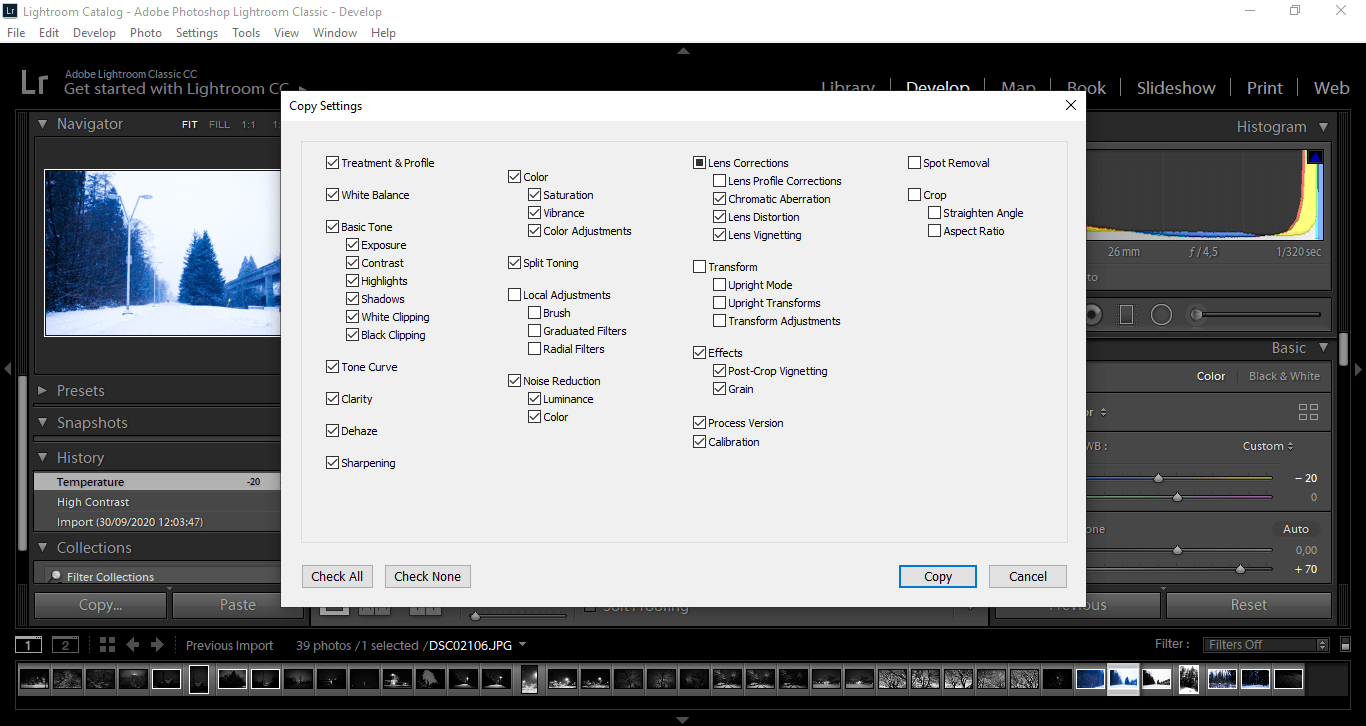
Step 3: Open a second photo and simply click “Paste” to apply the specific edits or presets you'd copied from the previous image.
5. Use ‘Sync’ to Synchronise Edits Across Photos
The “paste” and “copy” methods above only let you transfer edits to photos one at a time. They're useful for rapid batch processing but not so quick if you want to apply the same highly specific single-photo edits to many images at once.
Using synchronization lets you do exactly this.
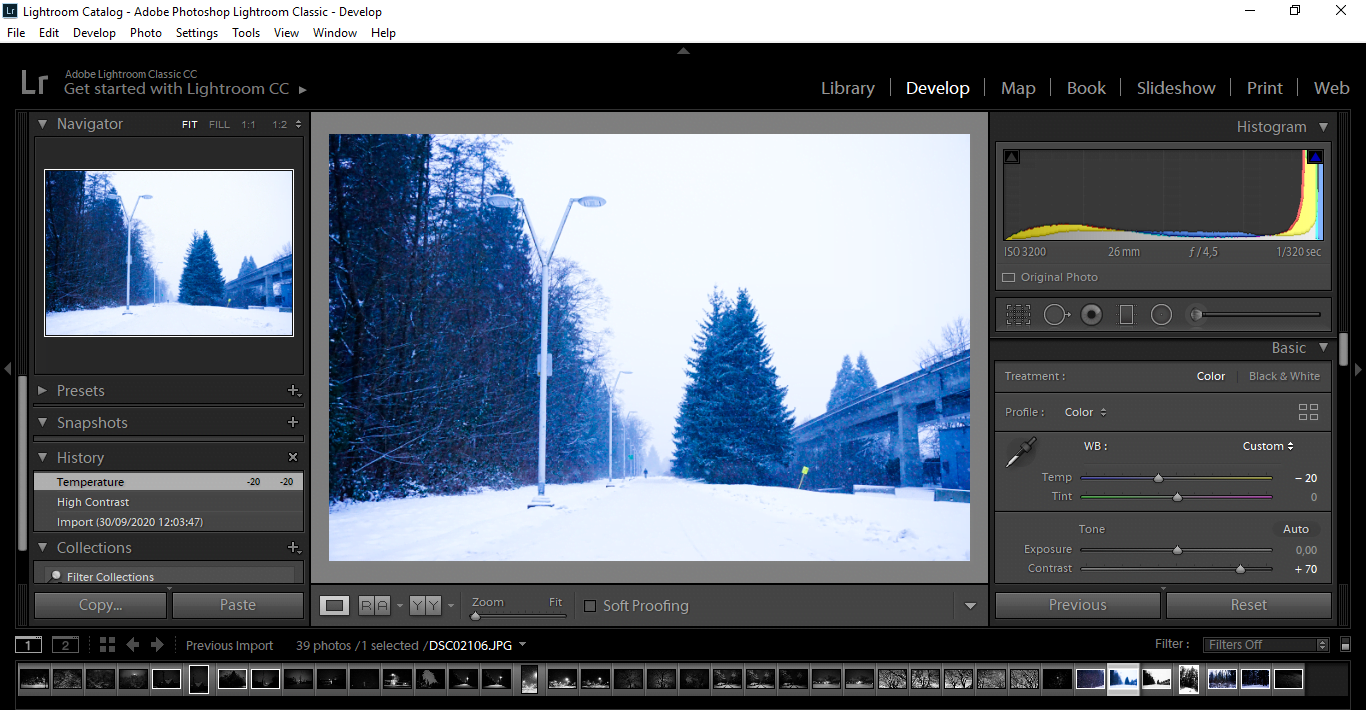
Step 1: Choose a first photo from your import library that you want to edit in a specific way and edit its visuals as described in the steps above, using the Develop options on the right.
Step 2: Once your photo is ready, select it first, then also whichever other images you want to apply those same edits to. Make sure the photo you're going to synchronize edits from is the first one you select, because LR recognizes it by this selection order.
You can select multiple photos by holding the Shift key and then clicking the first and the last image in the range of images you want.
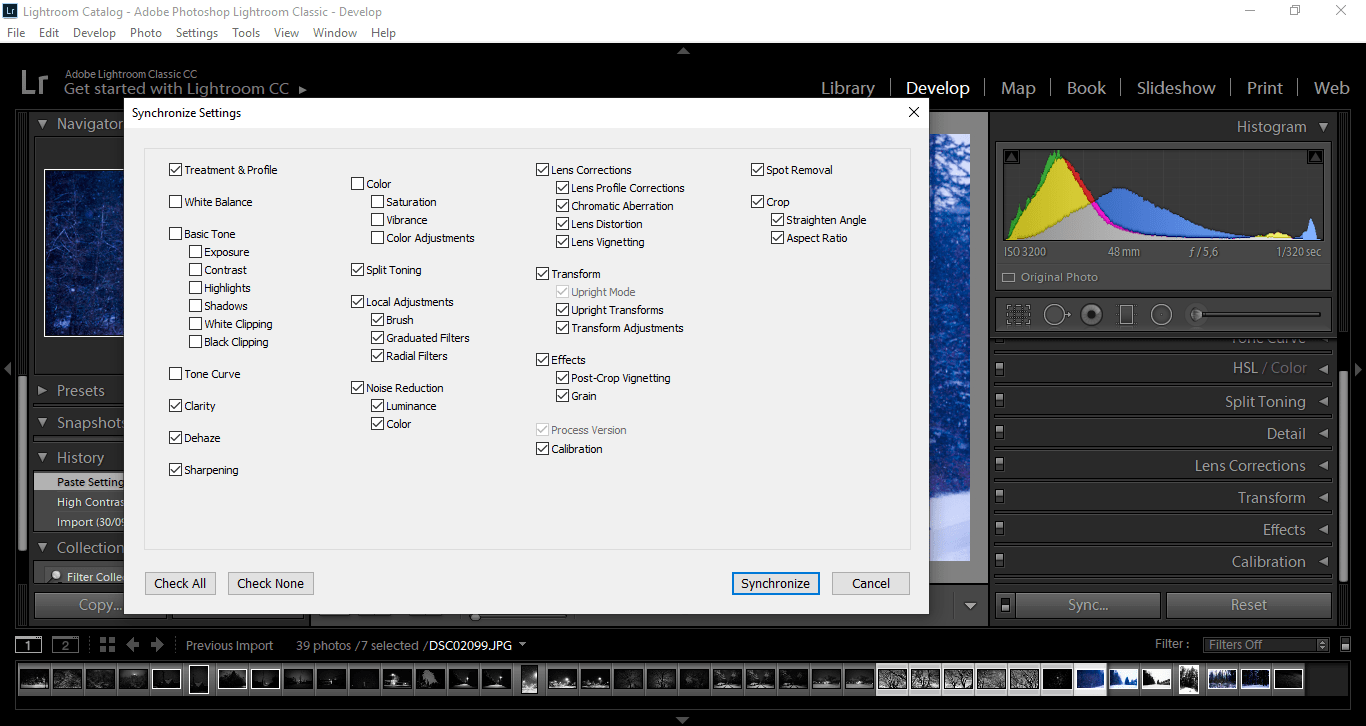
Step 3: Click on “Sync” in the same develop module on the right and an options box will appear that lets you choose which edits to apply across all photos. Select them and click “Synchronize”. That's it.
6. Use ‘Auto Sync' to Automatically Synchronize Edits
The Auto Sync method is a more flexible method than number 5 above for editing photos in Lightroom.
Synching only lets you apply adjustments you already made on one photo. Auto Sync lets you take a series of edit photos and keep tweaking them by applying new changes to just one of the images, which synchronize across the rest. This can be particularly useful when editing portraits when the lighting conditions were similar throughout the shoot.
Step 1: To apply Auto Sync, just open the Develop module and then select all of the photos you want to apply the same edits to. You can do this by pressing Shift and selecting the first and last images in the import batch thumbnails along the bottom of the LR interface.
You can also select multiple images in Lightroom individually by clicking on them while pressing Ctrl.
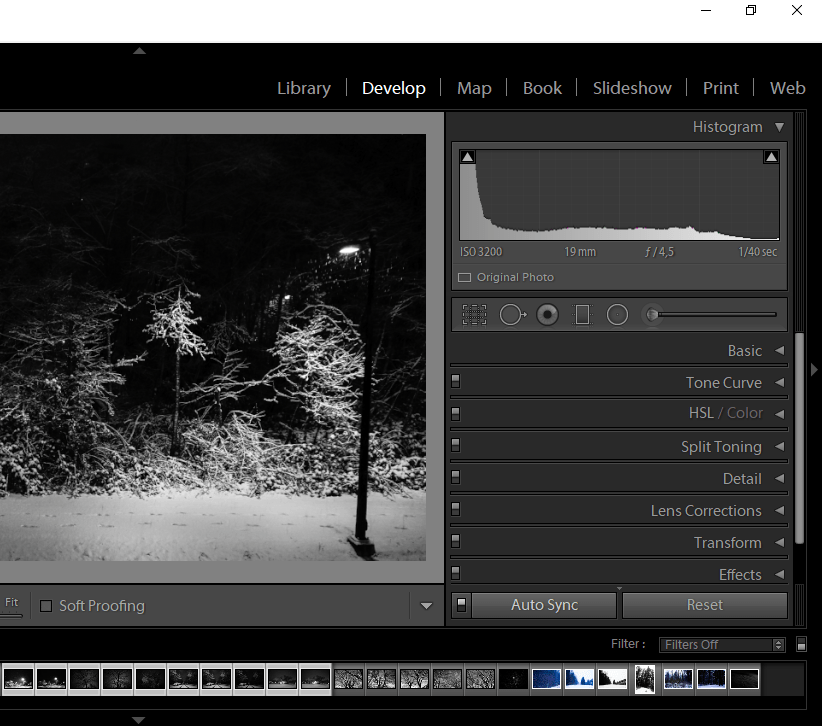
Step 2: In the developer module, there's a little switch right next to the Sync button along the bottom. Flip it and you'll see Sync turn to Auto Sync. Now you can edit any one of the photos you selected for Auto Sync to the other photos.
7. Batch Edit with MetaData
Metadata is the information written into a photo when it was taken by your camera.
This includes the date of capture, lens settings, color setting, time of day, etc. You can use Lightroom to edit metadata in batches of photos too.
Why would you want to do this? Well because the metadata is important, and can also be filled in with things like copyright information, rights reserved, contact info, keywords and so forth. All of these are very useful for commercial work.
Here's how to edit metadata for lots of images at once.
Step 1: To batch edit metadata, you use the same import process as in Method 1 above and select all the photos that you want to modify through the Import module's grid view.
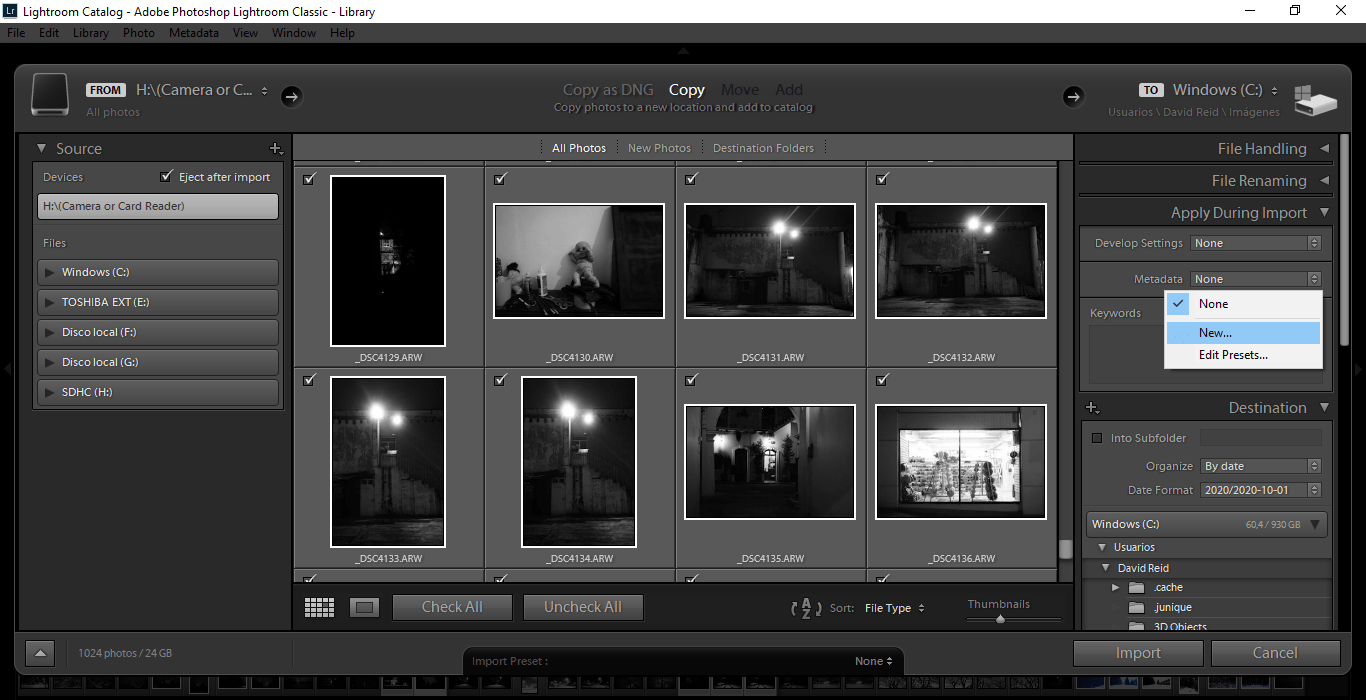
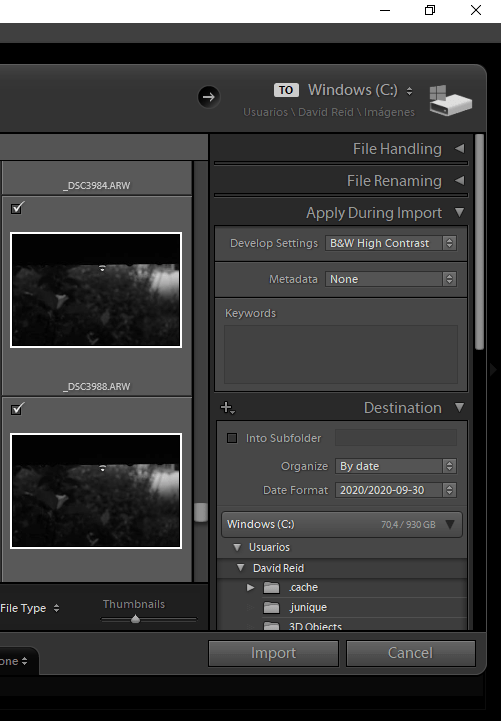
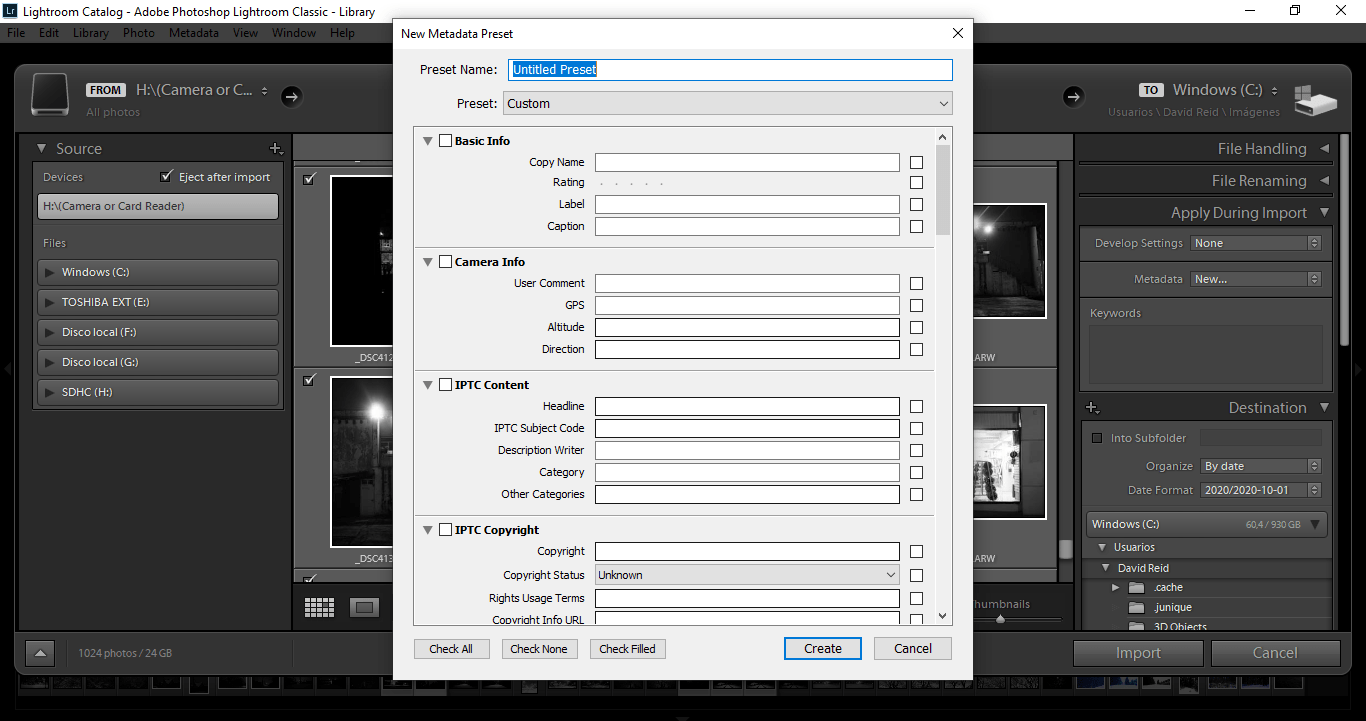
Step 2: Once you've selected all of your batch processing images, simply scroll over to the “Apply During Import” box on the right and select “New” under the Metadata bar. This will open up a large box for all sorts of metadata options.
Step 3: Fill in the sections you want (I especially recommend filling in the Copyright-related fields), and click Create.
How Do I Batch Edit in Lightroom CC?
If you use it via your computer or laptop, batch processing in Lightroom CC is very similar to in Lightroom Classic. However, CC is a mostly cloud-based application with the ability to load photos from your computer, phone and other devices as well as files from your Adobe cloud account if you have one.
This is great, but CC also does lack some of the merging and assorted other photo editing features that Classic CC (for desktop devices) does have.
Thus, while you can batch edit photos in many of the same ways described above, the editing options at your disposal will be a bit more limited.
Using Lightroom CC for non-computer devices obviously means using a different interface than the batch editing features we described above, but the underlying functionality is mostly the same either way.
Lightroom Batch Editing FAQs
Can you edit multiple photos in Lightroom?
Absolutely. In fact, the ability to batch edit is one of the reasons Lightroom is so popular with pro photographers. There are several methods you can use to synchronise edits or apply presets across multiple images.
How do you batch edit with presets in Lightroom?
One quick way is to simply select multiple images in the Library module by holding down the Ctrl button, then applying your preset to all of them. Alternatively, you can apply a preset to a batch of photos immediately on import. In the Import module, go to the “Apply During Import” box and select a preset under “Develop Settings”. For more detailed instructions, see above.
Can you batch crop in Lightroom?
Yes, you can batch crop in Lightroom. Apply your crop to the first image, then bring up the “Copy Settings” dialogue box using the shortcut Shift+Cmd+C (Mac) or Shift+Ctrl+C (Windows). Check the “Crop” option and hit “Copy”. Now select the other images you want to be cropped and paste the setting using Shift+Cmd+V (Mac) or Shift+Ctrl+V (Windows). You can also check our guide to cropping photos for more info.
Can you batch edit in Lightroom mobile?
Yes, Lightroom mobile allows batch editing. You can simply select the edits you want to copy from one photo and paste them across to a selection of other images. The copy and paste functions can be accessed by a long hold on the image or by pressing the three dots (“…”) in the top right corner.
Summary: How to Batch Edit in Lightroom
Batch editing in Lightroom is superb for applying assorted edits to large collections of photos. Our steps above cover pretty much all of the methods you could use to do this on your Mac or Windows laptop.
Obviously, special, composition-specific editing can't usually be done in batches.
However, if you just want to change up contrast, exposure, color settings, or other whole-image details across an entire folder of pictures, learning how to batch edit photos in Lightroom can be a massive time-saver.
Stephan Jukic is a technology and photography journalist and experimental photographer who spends his time living in both Canada and Mexico. He loves cross-cultural street photo exploration and creating fine art photo compositions.
5 Comments
Leave a Comment
👋 WELCOME TO SHOTKIT!
🔥 Popular NOW:

I’m confused with the newer Lightroom vs Lightroom Classic. I’m trying to batch edit in the newer Lightroom and can’t figure it out. Is Lightroom less powerful than Lightroom Classic?
Yep – LRC has more features, so you’ll need to use that.
Hey, I actually figured it out: if you want to paste the same edits to multiple photos, select the chosen photos and paste them by also pressing down shift. So on Macbook, Command + Shift + V.
Damn, I strugged with this for months and none of the online guides told me to do this 😅
Ridiculous. This is literally all I need to know and people be making whole articles on how to? I just needed to know command plus shift plus V.
Wow.
Didn’t even read the article! This person helped me out. Thank you!
Thank you this was a very usful article