







How to Use the Develop Tool in Luminar
Learn how to use the Develop tool in Luminar to adjust exposure, contrast, white balance and more, plus discover how Develop RAW differs.
Luminar | Software | Paid Partnership | By Ana Mireles | Last Updated: November 19, 2026
Shotkit may earn a commission on affiliate links. Learn more.
Luminar offers a range of tools to fix and enhance your photos, and Develop is the best place to start.
Whether you’re correcting exposure, setting the white balance, or adjusting contrast, Develop gives you the essential controls to build a solid foundation for your edit.
In this guide, we’ll see how to use Develop in Luminar. Furthermore, I’ll explain the differences between Develop and Develop RAW, which is key when you work with raw files.
I’ve also included tips for getting the best results in Develop, plus a few FAQs at the end so you can feel confident using it in your next edits.
What Is the Develop Tool in Luminar?
The Develop tool in Luminar lets you make basic adjustments to your photos before moving on to more creative edits. That said, you can still make advanced, highly professional corrections with some of its tools.
In Develop, you can control essential settings such as exposure, contrast, highlights, shadows, white balance, and sharpness, to name a few.
You’ll find the Develop tool under the Essentials panel in Luminar’s Tools section.

Photo credit: Kindel Media
This is usually the starting point on any photographer’s editing workflow. It lets you make adjustments without immediately committing to a particular look.
Luminar also distinguishes between Develop Raw and the regular Develop. Understanding the difference between both of them is key – which is why I decided to make a dedicated section.
Develop RAW vs Develop – What’s the Difference?
Let’s start by saying that whenever you work with JPEG files, you won’t have Develop RAW activated. So, if you don’t work with RAW files, you can disregard this section.
Now, for photographers who process RAW files, this distinction matters. So, let me walk you through it.
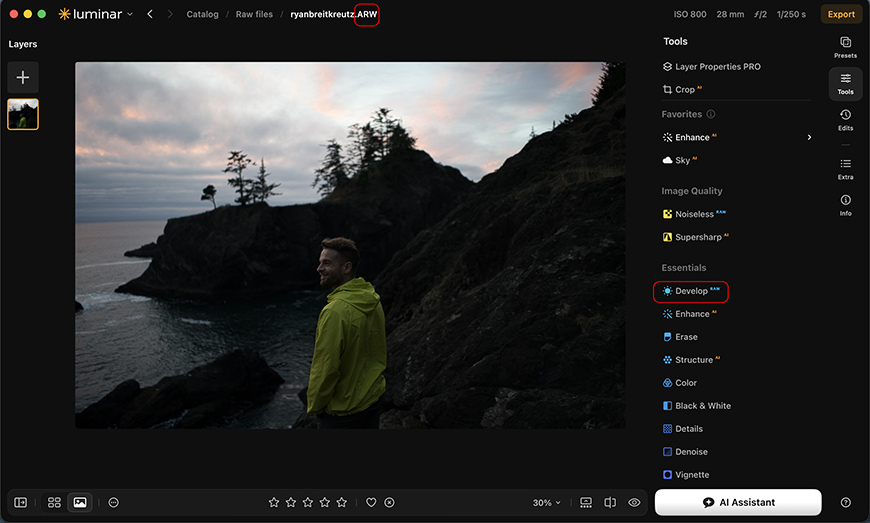
Photo credit: Ryan Breitkreutz
When I speak about Develop RAW and Develop in Luminar, it may sound like I’m referring to different tools, but I’m not. It’s the same tool at different stages of the editing process.
When you import a RAW file into your Luminar Catalog, you’ll automatically get the Develop RAW tool in the Essentials panel.
This tool processes the original RAW data. This gives you access to the Camera profile, more flexibility to recover details, and other advantages of shooting in RAW.

Whether you choose to adjust anything in Develop RAW or not, it doesn’t matter. As soon as you use another tool, the word RAW will disappear. Now you have access to the regular Develop tool. To use the original Develop RAW, you can access it through Edits.
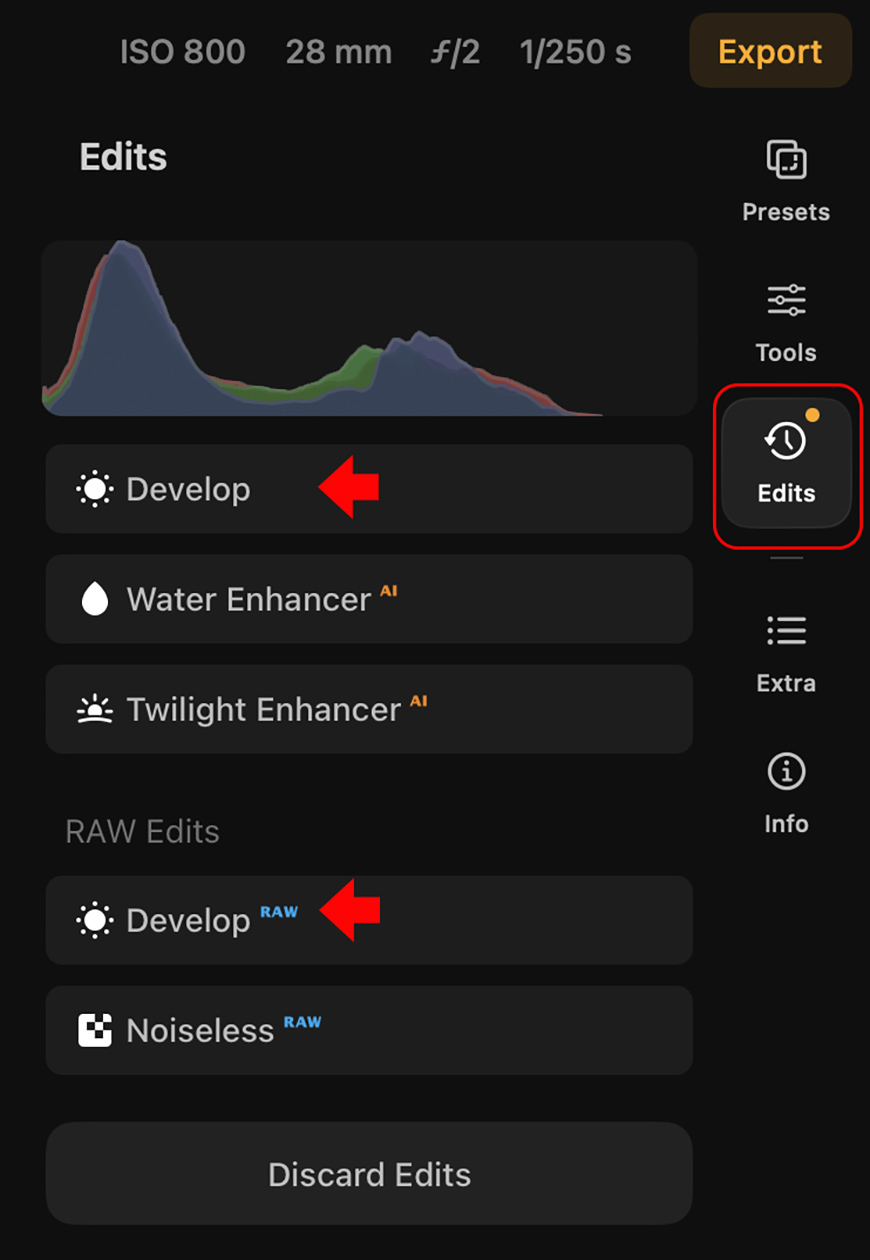
The regular Develop tool works differently. You can use it multiple times during an edit, which is useful when you want to make adjustments in stages.
For example, you can use Develop to correct exposure, use another tool like Light Depth and then come back to Develop for another round of changes. When you return after using another tool, Develop resets and is ready for a new set of adjustments.
However, you can also access Develop through the Edits section if you don’t want to make new adjustments and instead want to fine-tune the ones you already made.
In short, use Develop RAW to make your initial raw-specific adjustments. Then, use Develop whenever you need further tonal, color, or detail corrections during your workflow.
How to Use Develop in Luminar
The Develop tool is very straightforward, and each photograph may need different adjustments.
So, I’ll cover the tool’s overall structure, which follows a logical order you can apply to any photo. I’ll be applying the adjustments to my example photo as I explain them to you.
This way, you’ll be able to see the before-and-after comparison at the end. However, it’s not a formula to follow to the letter – it’s important to adapt the adjustments on a case-by-case basis.
Auto Adjust

You’ll find an Auto Adjust button at the top of the Develop tool whether it’s on its RAW version or not.
I recommend using it as a starting point, then fine-tuning the edit with the available sliders.
However, you can skip it if you want full control, or use it as a one-click solution if the image isn’t very problematic and you don’t want to spend much time on it.
Camera Profile
This option is only available in Develop RAW. You’ll find it right below the Auto Adjust button.

You can open the drop-down menu and choose one of the available camera profiles. In short, these change how Luminar interprets the colors and tones captured by your camera.
Simply hover over them to see how your photo looks. You can also upload your own.
Masking
Develop, like most tools in Luminar, has a Masking option. Here, you can use both manual and AI-powered options to select areas and control where adjustments are applied.
Adjust the exposure
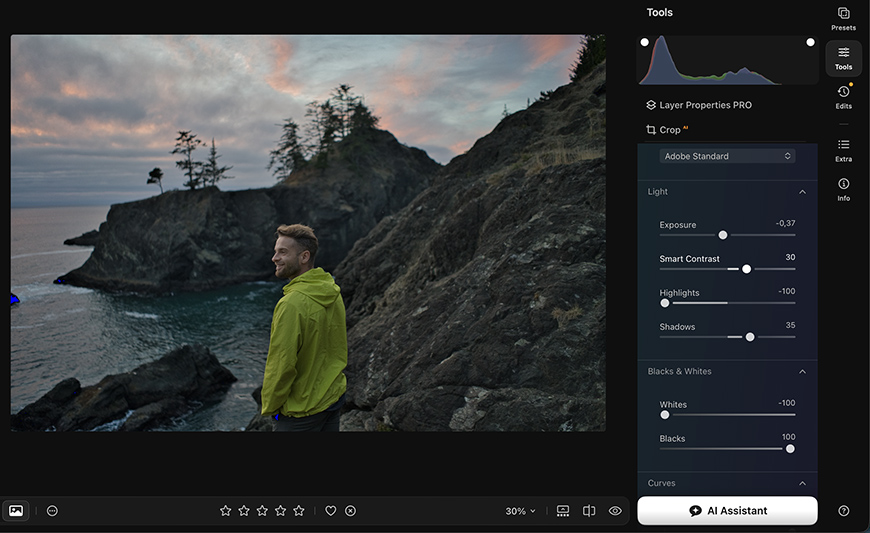
To adjust the light in your photos, you’ll have the first three sections of the Develop tool.
The first one is intuitively called Light. Here you can use the sliders to fix Exposure, Highlights, and Shadows.
Plus, you can use the Smart Contrast slider to balance the luminance and color while preserving color accuracy and details.
Then you’ll have the Black and White section, which is also used in color photographs, and lets you control the black and white point of the histogram.
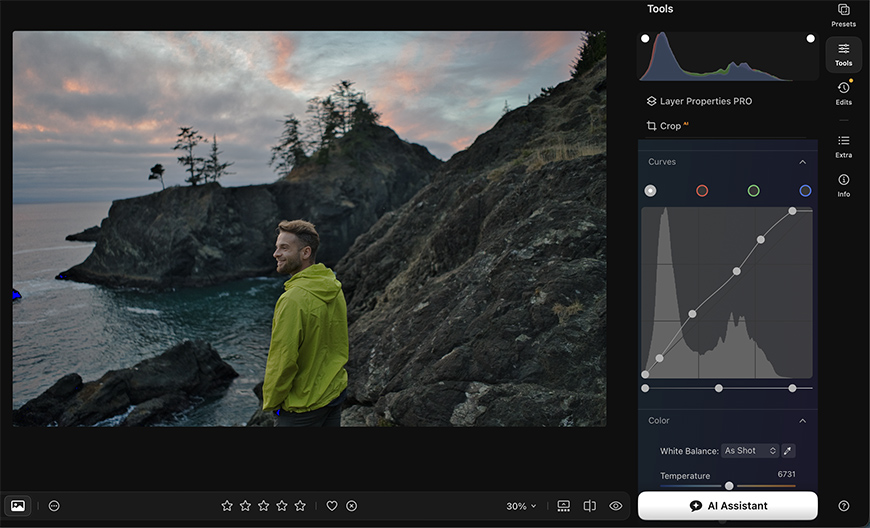
Lastly, there’s the Curves tool. Here, when left at the default setting (the first circle on the left), it modifies brightness, contrast, highlights, and shadows across different tonal ranges. It gives you much more control than the sliders.
Adjust Color
To adjust the colors of the photograph, you can still use the Curves tool because it allows you to work on each color channel independently.
However, you can also use more specific tools like White Balance, Temperature, Tint, Saturation, and Vibrance.
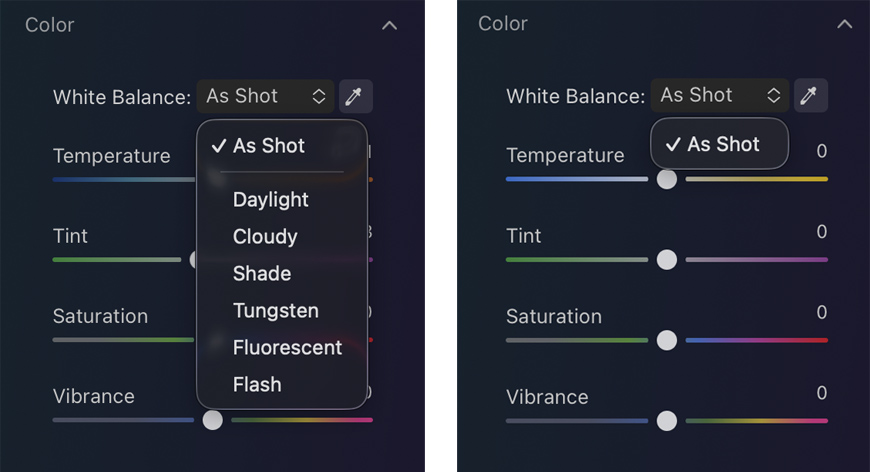
The White Balance tool is different depending on whether you’re in Develop RAW or not. The RAW version gives you multiple options in the drop-down menu, while the regular Develop tool only lets you leave it As Shot.
However, in both cases you can use the eyedropper to select a neutral target within the image.
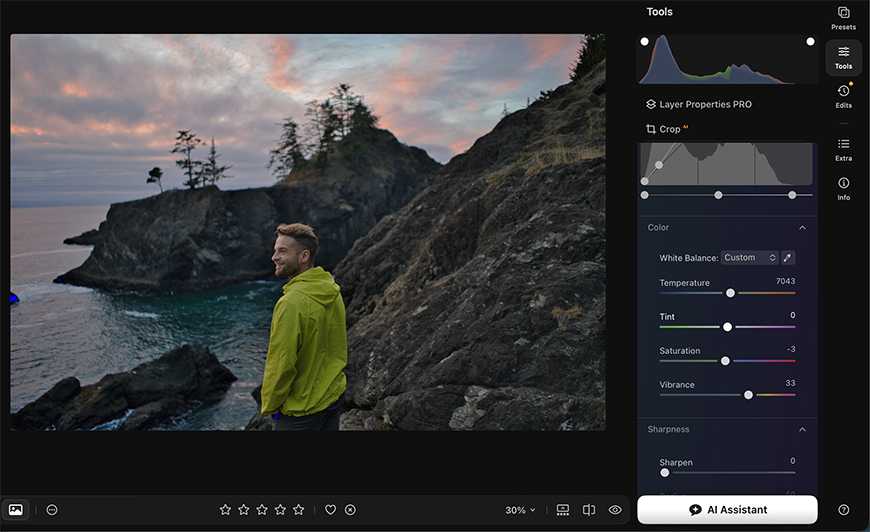
The rest of the tools are sliders available in both versions of the Develop tool.
Check details and correct optical issues
Depending on the image, you may also want to refine sharpness, reduce noise, or correct lens distortion.
Sharpness can be necessary on its own if the image is too soft. This may be due to lens quality, slightly missed focus, or minor camera movement. etc.
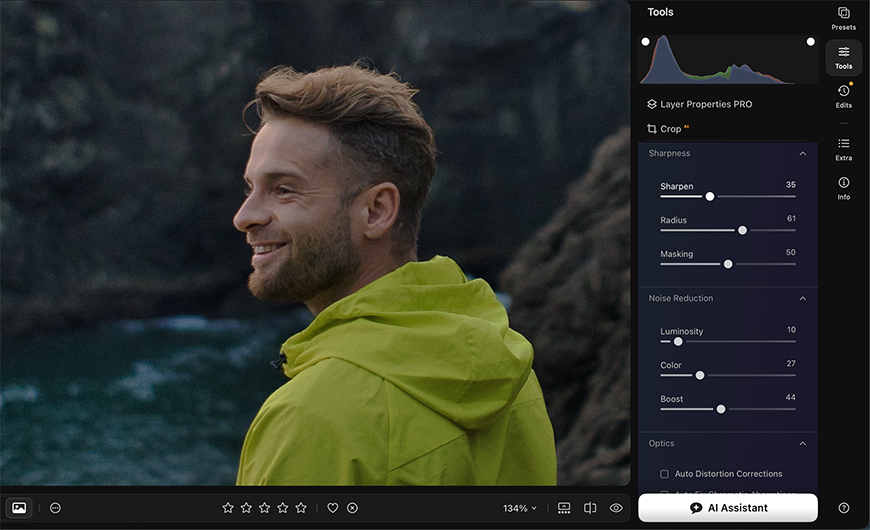
However, it’s often needed alongside Noise Reduction. This tool reduces the unwanted grain texture created when you photograph in low light, but it may also lose detail.
Then there are the Optics and Transform tools. Optics offers more options in Develop RAW than it does in Develop.
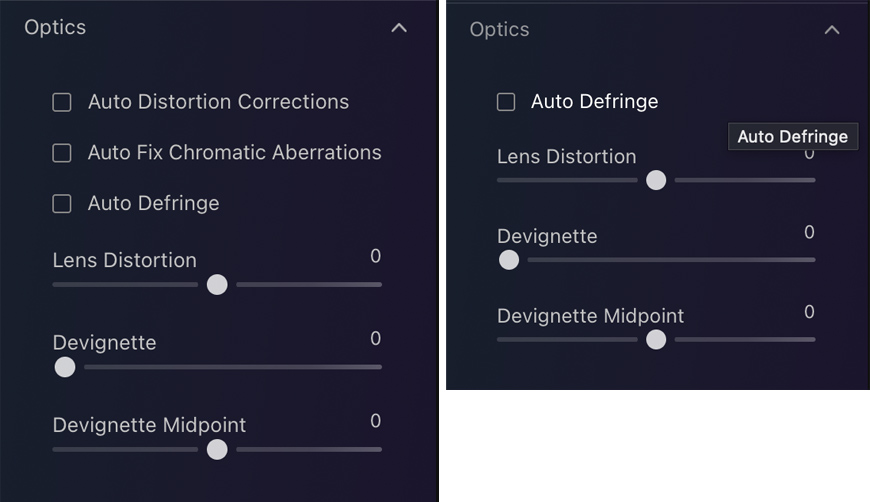
However, both sections help you correct lens distortion and correct perspective.

Tips for Getting Better Results with Develop
To get the best out of the Develop tool, you don’t need to use every slider. Instead, you should make the right adjustments for each photo. Learning which ones are necessary takes practice.
Fortunately, Luminar offers non-destructive editing. So, you can experiment freely, and if you make a mistake, simply go back or start over.
In any case, here are some tips to keep in mind while you edit.
Start with the biggest problems. Correct exposure, contrast and white balance before moving on to more selective adjustments.
Less is often more. Making subtle changes can go a long way. Pushing contrast, saturation, or sharpening to their limits can make your photo look unnatural.
Watch the highlights and shadows. Keep your histogram open (View > Histogram) and enable the clipping options on both shadows and highlights. This will help you to stay within range while you edit.
Use masking. Some adjustments work on the entire image, but others should be more selective. Using the multiple masking tools, you can limit where specific changes are applied.
Use the Develop tool more than once. For selective edits, you can use the Develop tool at different times in your workflow and use specific masks each time.
Compare with the original. Use the before-and-after view to toggle images and make sure you’re not overediting.
Combine Develop with other tools. While the Develop tool targets most aspects of a photograph, you don’t need to fix everything with it. Plenty of tools target specific problems more effectively. Use Develop for foundational corrections and other tools for further enhancements.
Develop Tools in Luminar FAQs
What does the Develop tool do in Luminar?
The Develop tool in Luminar brings together essential photo-editing controls in one place. You can adjust exposure, contrast, white balance and other settings, as well as sharpen images, reduce noise, correct lens distortions and adjust perspective.
What is the difference between Develop RAW and Develop in Luminar?
Develop RAW is the initial version of the Develop tool when you upload a RAW file. It includes controls that aren’t available for JPEG files, such as Camera Profile. Another difference is that you can only apply it once, while Develop can be used multiple times.
Should you use Develop before other tools in Luminar?
Develop is a great starting point, but you don’t have to use it only as a first step. The good thing about Luminar is that it lets you apply a different set of adjustments in the Develop tool every time you return to it.
Does using Develop RAW overwrite the original RAW file?
No, any edits done in Luminar, including Develop RAW are stored separately from your original file. Just make sure you rename or choose a different location for your edited file when you export it so you don’t accidentally replace the original.

Ana Mireles is a Mexican researcher that specializes in photography and communications for the arts and culture sector.
👋 WELCOME TO SHOTKIT!

🔥 Popular NOW: