


How to use Luminar Noiseless AI to Preserve Photo Details
Getting rid of noise in photos shot at high ISOs or in low light is easy with the new Luminar Noiseless AI Extension. Here's how to use it properly.
AI | Luminar | Software | By Stephan Jukic
Shotkit may earn a commission on affiliate links. Learn more.
Noise is an inherent part of every photographer's workflow. No matter how good your camera is or how wide your lens’s maximum aperture is, a little bit of noise is unavoidable.
Especially, when you are shooting with a higher ISO number or in a scene with lots of dark areas.
If you've tried your hands at post-processing an image shot in low light and at high ISO, you know what I am trying to refer to here.
It’s those little specs of dots that appear in your images, especially in the shadow areas.
Fast, simple and fun way to remove noise from photos with just one click.
Use code shotkit10neo to save $10
Digital noise is sometimes confused with film noise. The two are not the same.
Film noise or film grain relates to noise that happens because of the film emulsion containing silver halides or the dye granules reacting differently to light.
I am not going to go deep into that rabbit hole this time and leave that for another day to discuss.
For this discussion, however, I am going to talk about digital noise and how to handle that using Luminar Neo's Noiseless AI tool.
Also, I will discuss how to preserve the details in your images while you eliminate noise from your images.
In short, I am going to demonstrate how to preserve photo details using Luminar Neo's Noiseless AI.
How to use Luminar Neo's Noiseless AI tool
Experiment 1
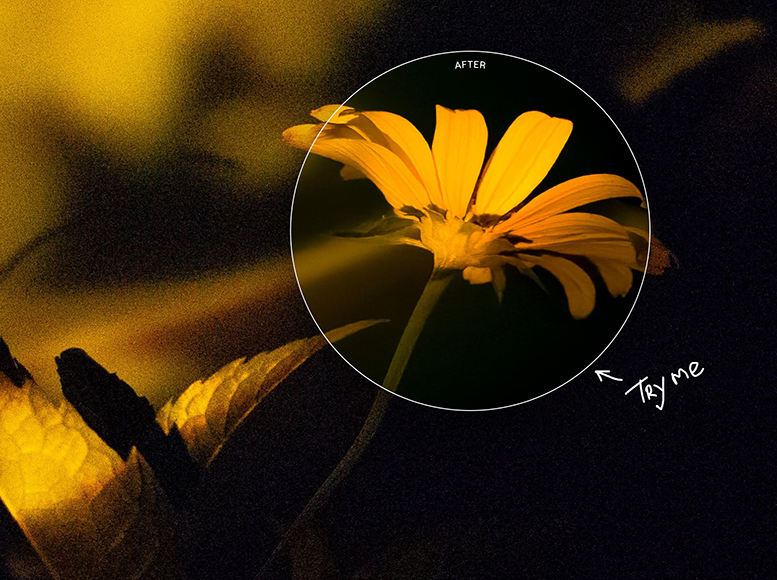
This is the original image of a floral and candle arrangement captured sans any ambient light in the room. So, using nothing but the light from the candles.

This is a sort of image that we photographers like to call a noise nightmare. Here’s a 300% blow-up of the image, which should highlight what I am trying to say.

Going by the traditional method that photographers follow involving the application of noise reduction first and then going for any further adjustment, I took the route that’s most walked on.
I selected Noiseless AI from the Tools tab.
As the tool segment drops down, a bunch of options opens up underneath –
You've two options here – Adjustments and Masking. Adjustments let you choose a Noiseless AI setting based on Luminar Neo's assessment of the image and the amount of noise in the image.
There are three options – Low, Middle, and High. In this case, the tool suggests the Low setting, but I think Middle is more appropriate.
You're, of course, free to choose the one that you prefer. Plus, there are further adjustment options as well. Like even after choosing a setting, you can further fine-tune the results.
I wanted to see how the results came out before further refinements.
Clicking the Middle tab starts the familiar animation we have seen when operating some other AI tools within Luminar Neo.
Finally, the process is done. It's difficult to understand how the Noiseless AI performed without a blow-up of the results. So here is a side-by-side comparison.

As you can see straight out of the box, the Noiseless AI tool does an excellent job of reducing noise and preserving details in the photo.
I don’t really want to do anything further to this image. I can live with it just the way it's, except for a few Exposure and Highlight adjustments.
Again, the details are beautifully preserved, and the noise-to-sharpness ratio is good.
Of course, you do have the option to increase the detail. There is a scope for that. You need to drag the Details slider to the right, and that will add more details.
But that would only mean the introduction of artifacts into the image. The same goes for Sharpness.
I feel this is one area a photographer must watch out for when handling these AI tools.
It's easy to go overboard and overdo things – trying to extract a bit more details or that extra bit of sharpness; you could end up introducing artifacts in your image.
Here is the final result

Experiment 2
Here is another image shot in a relatively better lighting condition, yet some shadow areas remained, and they could do with a little bit of tweaking.

I followed the same steps as in Experiment 1. For this image too Noiseless AI suggested that I choose the Low setting. I was happy to comply, but it ultimately needed the High setting.
Here is a side-by-side comparison of before and after blown up to show the changes.

As you can see the tool does an excellent job of controlling the noise while retaining details. I did, however, make some adjustments to the Details and Sharpness sliders.
The final edited image is after adjustments to Exposure, Smart Contrast, Highlights, and Shadows. Some optical corrections were also made.

To Wrap Things Up
Luminar Neo's Noiseless AI is a great tool for fast and effective suppression of noise while preserving details.
The fact that the AI tool does what it does straight out of the box means it can save a lot of editing time, allowing you to process a bunch of images quickly.
(You can see AI in action in Luminar Neo's other features: Supersharp, Background Removal, Upscale AI, Magic Light AI and Focus Stacking.
In my experiments, I had to pick up the editing pen for serious refinements for only one of the images.
For the first image, the Noiseless AI did a pretty good job using ‘Middle’ settings.
I slightly tweaked the Details and Sharpness sliders for the second job to extract some detail from the image after using the ‘High' setting. Even then, I am happy to acknowledge that the Noiseleess AI tool did a great job to start off.
If you're worried about obliterating details in your image while attempting to suppress noise, I recommend that you follow the tool's suggestions.
I am not saying that it will work 100% of the time, but it's a solid starting point.
Fast, simple and fun way to remove noise from photos with just one click.
Use code shotkit10neo to save $10
Stephan Jukic is a technology and photography journalist and experimental photographer who spends his time living in both Canada and Mexico. He loves cross-cultural street photo exploration and creating fine art photo compositions.

👋 WELCOME TO SHOTKIT!
🔥 Popular NOW:
