


How to Crop Video in Premiere Pro (and Resize it)
As long as you have enough video resolution, cropping into your footage is a great way to bring attention to your subject. Here's how to do it in Premiere Pro.
Premiere Pro | Software | By Ashley Darrow
Shotkit may earn a commission on affiliate links. Learn more.
One of the most essential skills for video editing is knowing how to crop video in Premiere Pro.
I use cropping in nearly every project. You’ll need this effect for basic edits like changing aspect ratios or for adjusting special effects.
Today, I’m going to walk you through cropping videos in Adobe Premiere Pro.
This guide is perfect for beginners or anyone who needs a quick refresh on their editing 101.
Download the latest version of Adobe Premiere Pro to follow along with this simple tutorial.
Start a free 7-day trial today
More related articles you might like:
- How much does Premiere Pro cost?
- How to split a clip in Premiere Pro
- How to add text to Premiere Pro
How to Crop Video in Premiere Pro
Cropping is one of the most important video effects that you can learn. Here's a quick five-point guide to get you started.
Step 1—Import Your Video Clip
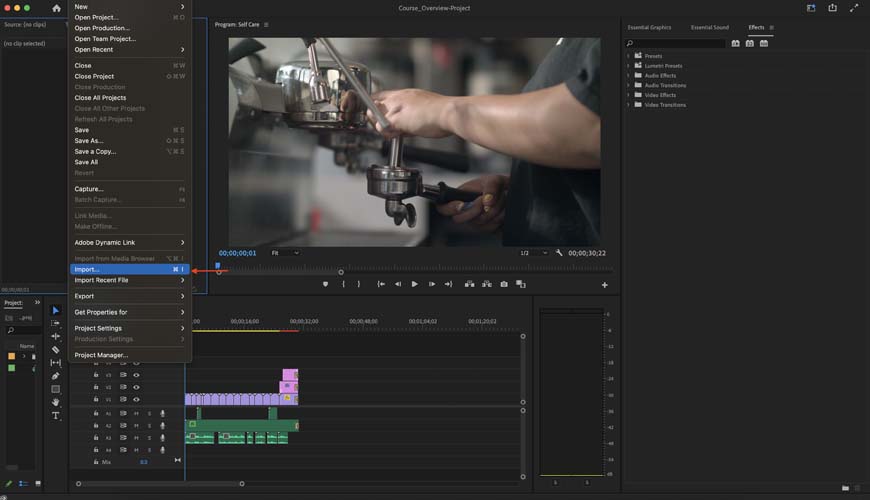
Every video editing project in Premiere Pro starts with importing the clips that you'll be editing.
Step 2—Locate the Crop Video Effect
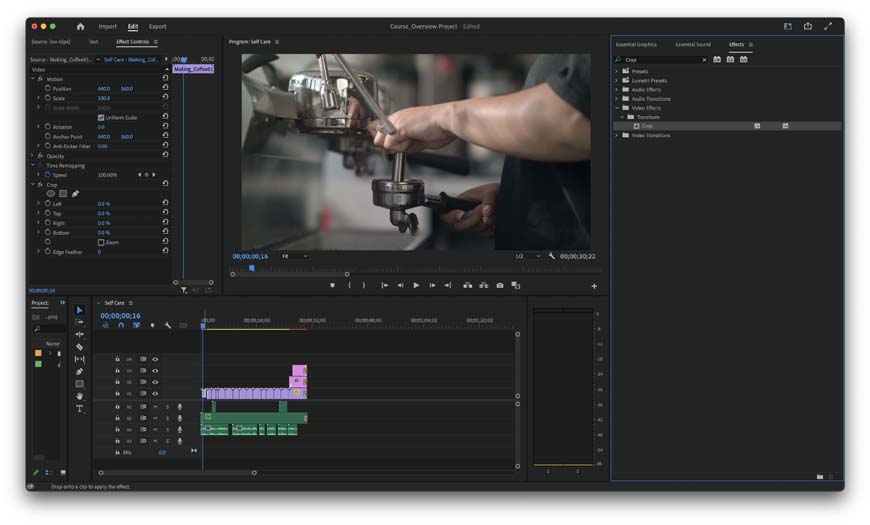
Cropping a video is technically a video effect in Premiere. The easiest way to find the crop effect is to head over to the effects window and just search for the word “crop.”
Step 3—Apply the Crop Effect to Your Video
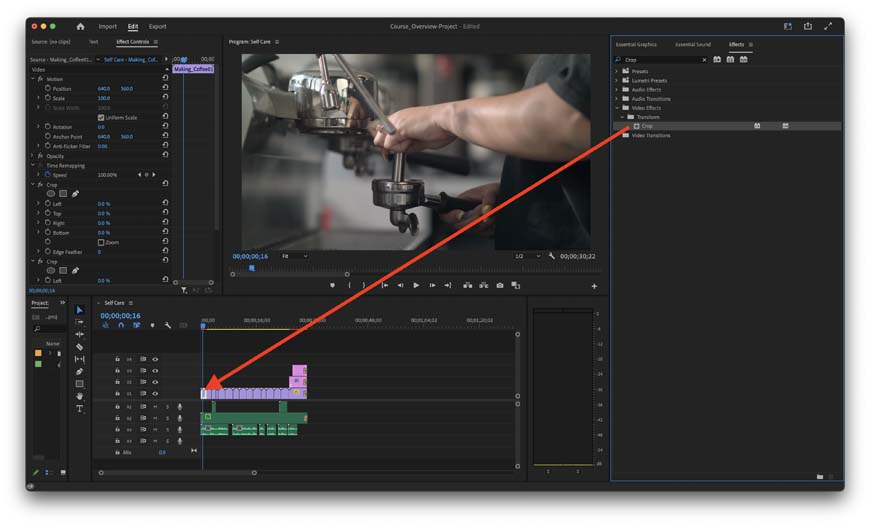
Once you found the crop effect, all you need to do is drag it onto the clip that you want to adjust.
Step 4—Adjust Your Cropped Video

You can adjust your crop from the left, right, top, and bottom. All you need to do is enter in a percentage and the clip will be cropped accordingly.
Step 5—Fine Tuning Your Crop with Keyframes and Zoom
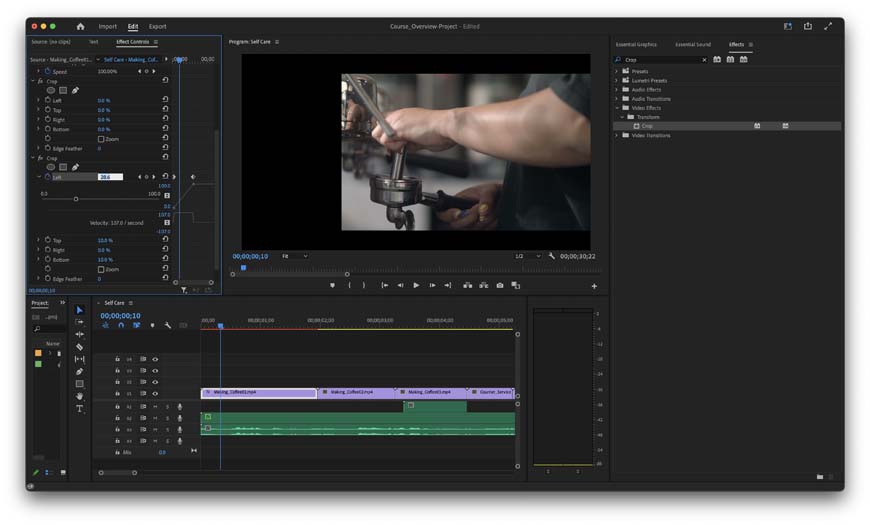
You've got a few additional tools that can help you fine tune your cropping. While you might not always use each of these options, it's important to know what they do—they can really come in handy when you need them!
- Keyframes—Keyframes in Premiere Pro mark the start and end points of an effect or transition. As an example, you can create a left to right wipe transition by setting two keyframes for a 100% left crop.
- Zoom—The zoom button lets you automatically fill the frame with the visible section leftover after your crop. The results aren’t always pretty, but this is the fastest way to scale up a clip after cropping.
- Edge Feather—Edge Feather adds a feathering effect to the border of your crop. The higher you slide this effect, the more feathering you will notice.
How to Resize a Cropped Video in Premiere Pro
Cropping a video can sometimes alter your aspect ratio. As a general rule, you never want to change aspect ratios in the middle of a video without having some serious artistic motivations behind that decision.
Here's how you can resize a video clip to match the rest of your footage.
Set to Frame Size and Scale to Frame

You've got two one click options for resizing a video clip. Both of these can be accessed by right-clicking the clip you want to resize and scrolling through the pop-up menu.
Set To Frame Size changes the size of your clip to the frame size of the sequence you're editing in. This can be useful for setting the size of all of your clips when you first import them to a new sequence.
Scale To Frame adjusts the individual pixels inside of your video clip. This can lead to some pretty serious distortion, but it's also much faster than Set To Frame Size.
Manual Scaling
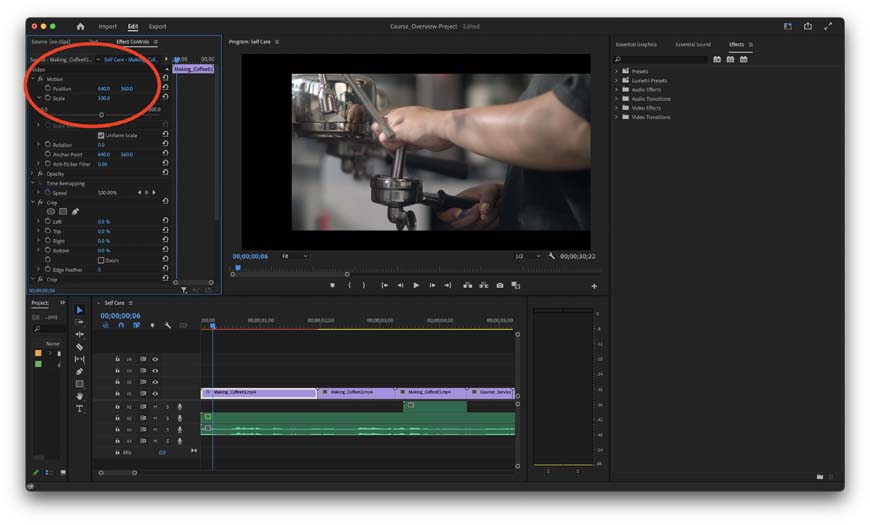
You can also manually scale each video clip individually.
You can find the controls to manually scale a video and your Effects Workspace. Open the Motion drop-down menu and you should find the scaling controls.
Tips for Cropping Video Clips
Maintain Your Aspect Ratio
Are you cropping a 16:9 video or maybe 1.33:1? It’s best practice to maintain that aspect ratio throughout a project.
This means making symmetrical changes while cropping which will maintain the original aspect ratio.
You can also change your aspect ratio, but make sure you do that with intention.
Crop Videos Using High Resolution Files
Cropping costs you resolution. The more you crop and zoom, the lower the resolution of the cropped clip becomes.
Even if your final output is going to be a 1080p social media video, you should start working with the highest resolution files you can get.
Shoot Wide Before You Crop
Always try to set yourself up for success. This is just as true in videography as it is in life in general.
Shooting a little wider than you intend will give you more material to work with when it comes time to make your final edits.
You don’t need to go fisheye, but give yourself a little protection when shooting. Trust me, it’ll make your editing that much easier.
Sometimes, Reshoots Are Better Than Crops
It’s sometimes better to go back and completely reshoot a scene then it is to try and make it work with some aggressive cropping.
Cropping and zooming in can lower the resolution of your videos. Cropping can also spoil otherwise outstanding framing.
If cropping your video isn't delivering the results you're looking for, don't feel bad about going back and reshooting a scene that didn't turn out.
Small Crops Make Big Changes
You don’t have to make huge crops to create a big change in your video. Even slight crops can dramatically change the final video.
Always start by making small adjustments first and then working towards bigger changes. You can even save a separate project file if you want to experiment with major changes to a video.
Wrapping Up Cropped Videos in Premiere Pro
Now you're ready to crop a video project in Adobe Premiere Pro.
Let me know if you have any questions about cropping a video in the comments below. If you're looking for more tips and tricks for editing video, make sure to check out my other articles on After Effects, Premiere Pro, and video editing.
Adobe MAX 2024 Update
As part of the MAX 2024 Update, Adobe Premier Pro is enhancing its use and application of generative AI technology.
To optimize the outcomes, Adobe Firely seamlessly adds frames to the start or end of a clip while aligning to audio. While it doesn’t sound like much, the effort and time savings will streamline overall workflows.
Generative Extend
Premiere Pro’s Generative Extend is Adobe’s first pro-grade video feature, making the most of generative AI.
The Adobe Firefly Video Model harnesses AI learning and application to deliver commercially safe outcomes.
As part of the MAX Update, Generative Extend lengthens clips to cover gaps in video footage, ensures smooth transitions, and holds shots longer for precision edits.
Content Credentials
One of the most valuable assets in the age of AI image creation and manipulation is content certification.
Adobe Premier Pro introduces a new form of media metadata that identifies if the content has been tampered with. It’s an essential element to confirm the validity of any visual creative’s work.
The Adobe MAX 2024 Updates are now live, and there's never been a better time to optimize your creative output with the Adobe Creative Cloud suite of applications.

Ashley is a photographer, writer, and film critic. When Ashley’s not writing essays on photography, cinema, and theory, he’s out taking pictures with retro film cameras.
👋 WELCOME TO SHOTKIT!
🔥 Popular NOW:
