


How to Render in Filmora (Manually or Automatically)
Want to use Filmora to create quality video footage that neither lags nor stutters? You'll need to learn how to render. Here's how.
Filmora | Software | By Judyth Satyn
Shotkit may earn a commission on affiliate links. Learn more.
If you want to be an expert video editor and present your viewers with quality video footage that neither lags nor stutters, you'll need to learn how to render.
When video effects, audio and images are added to your footage, it will need to be rendered. Rendering will make it possible for computers to play it in real time with no disjointedness or delay.
Read on, and we'll show you how to use Filmora's video editing software to render your videos.
Download the latest version of Wondershare Filmora to follow along with this simple tutorial.
Start a free 7-day trial today
How to Render in Filmora
When video editing, you should render files and preview them to ensure smooth playback quality before saving or sharing.
Using the Filmora video editor, you can render files easily. If you don't render files the video clip can jump and stutter – not a good look and not pleasant for your viewers when watching.
But first, let's take a quick look at what rendering actually means.
What is Rendering?
There are different definitions of rendering depending on the given context, so let's clarify what rendering means in the world of video editing before we get started.
Real-time rendering is when graphics are processed on a host's page or website in front of a user.
The footage doesn't exist on the viewer's device but is displayed on their screen in real-time directly from the host.
Advanced rendering is the rendering that happens when editing video footage.
Rendering video footage will compress and merge media files so the computer can handle the footage to guarantee the video plays without stuttering.
Does Rendering Effect Video Quality?
It's always wise to question if the resolution or quality will be compromised when changes are made to your footage.
Rendering, however, does not affect the quality of your video; it simply makes it easier for the viewer to load and view it.
Render Preview Button
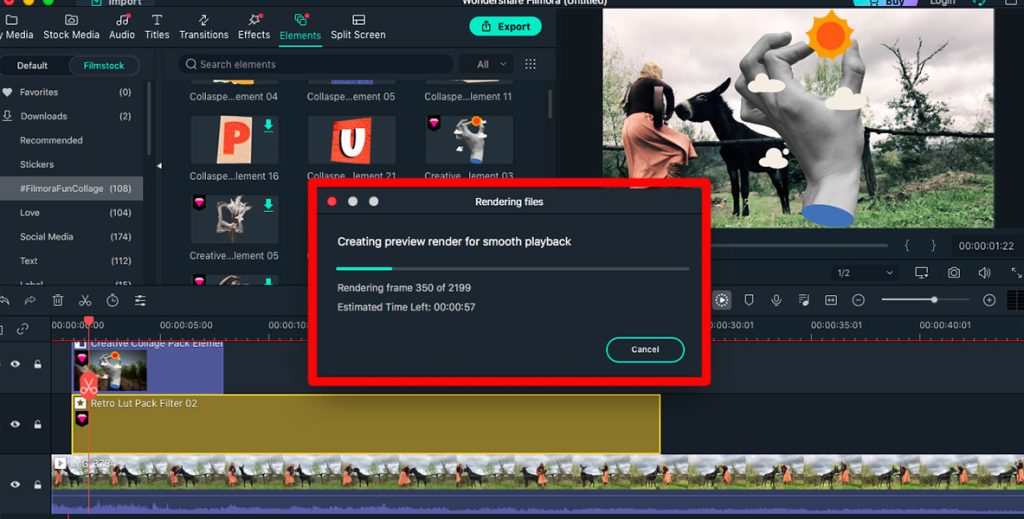
To apply rendering to your video before exporting in Filmora, click the Render button located under the preview window and above the video timeline.
The rendering button is a play button surrounded by a dotted circle.

When pressed, a “Rendering Files” pop-up window will appear, giving you an estimation of the time it will take to render your files.
Filmora will not render video clips placed on the timeline after the rendering process, so if you render before saving your video edits, make sure to render the additional clips too.
Another option to render added clips when video editing is to select the video and hit the Enter key on the keyboard.
Rendering video files added to the timeline as you are in the process of video editing will essentially make the workflow faster.
Background Render (Render Automatically)
Flmora's video editing software has the built-in capacity to automatically render files as you go.
To choose this option, click Preferences and in the Preferences pop-up box that appears, select Performance.
Under Preview Render, tick the box beside Background Render.

Now Filmora will render videos as you go. The only issue with this is it can be heavy on your computer's processing.
How Do I Export and Render in Filmora?
Before you export your video clips from Filmora, it is wise to render and preview them; this way, you'll pick up on any inconsistencies or mistakes before you export.
Previewing is particularly important if you want to share your footage straight to social media or the web.
Once you've rendered and previewed your clip and you're content with the finished product, you're ready to export.
- To export, head to the top menu bar and click on the Export button.
- Once clicked, you will be given eight different export options.
- Select Create Video to save the video to your device, or if you don't want to share on the web, select the platform you want to share to and click Upload to…
- Once your option is clicked, your video will be exported.
What Does Render Mean in Filmora?
During the editing process, you may have loaded up your timeline with multiple clips, background music, effects, and more – this will all add to the size of your video clip.
When you render files in Filmora, you will be compressing all the effects, images, raw files, and audio for smooth playback.
Rendering will merge all media files and cut down on the heavy load video clips would otherwise have on a computer or device, ensuring playback quality.
Want to learn more about video editing with this software? Check out this tutorial on how to crop and zoom in Filmora.

Judyth is an experienced studio photographer and glass artist. When she isn’t Photoshopping comedians into the bellies of sharks, you can find her cooking delicious treats for her guests.
👋 WELCOME TO SHOTKIT!
🔥 Popular NOW:
