


How to Zoom in Filmora
With Filmora's free video editing software you can zoom in when editing your footage. Here's how to use the powerful zoom tool.
Filmora | Software | By Judyth Satyn
Shotkit may earn a commission on affiliate links. Learn more.
You've caught some spectacular footage of a wildlife scene – a mother tiger and her cub. Alas, they're lost in an expanse of wilderness. If only you had zoomed in when filming!
Well now, using Filmora's free video editing software, you can zoom in when editing your footage. Just make use of the powerful zoom tool.
Read on to learn how you can zoom in Filmora.

Download the latest version of Wondershare Filmora to follow along with this simple tutorial.
Start a free 7-day trial today
How to Zoom in Filmora
Your footage doesn't have to be as exotic as a wildlife scene. Whatever it is, it's still equally as unique and definitely precious, as often you won't get a chance to shoot a special scene again.
Great footage warrants taking the time to edit using the zoom tool in post-production to cut out the excess surrounding background areas.
Why Zoom
The zoom tool is an effective way to redirect or focus the viewer's eye when you have an expanse of excess background.
Surrounding images can distract an audience, resulting in them losing attention. Zooming in will redirect the viewer's eye to a chosen subject.
Trimming off extra unneeded footage is also an effective way to create a more intimate atmosphere, changing the mood of a scene.
Zoom can help the viewer to see a subject better, and if you've shot a long expanse of a repetitive scene, you can zoom in and out to make the footage more dynamic.
Here's how to do it in Filmora.
Open Filmora
If you haven't downloaded Filmora, click the download button on Filmora's website and the software will instantly download onto your desktop or phone.
When Filmora is installed on your desktop, open the video footage you wish to edit.
Check the resolution
Zooming can result in blurred footage depending on the quality of your footage and the amount you intend to enlarge it.
To avoid this, check the resolution of your footage to see how much you can zoom before it results in a blurred clip.
For example, if you have shot in high 4K resolution (3840 x 2160), you can zoom in to a HD resolution (1920 x 1080) without losing quality.
Effectively that means you can double the size of your video before it blurs.
Plan the Zoom
Have an idea of what you want to cut out before you start. Planning will save you time and result in a better edit.
And make sure to keep backup files in case you need to re-edit from raw files at a later date.
Timeline
Drag the footage from the project media panel onto the video timeline.
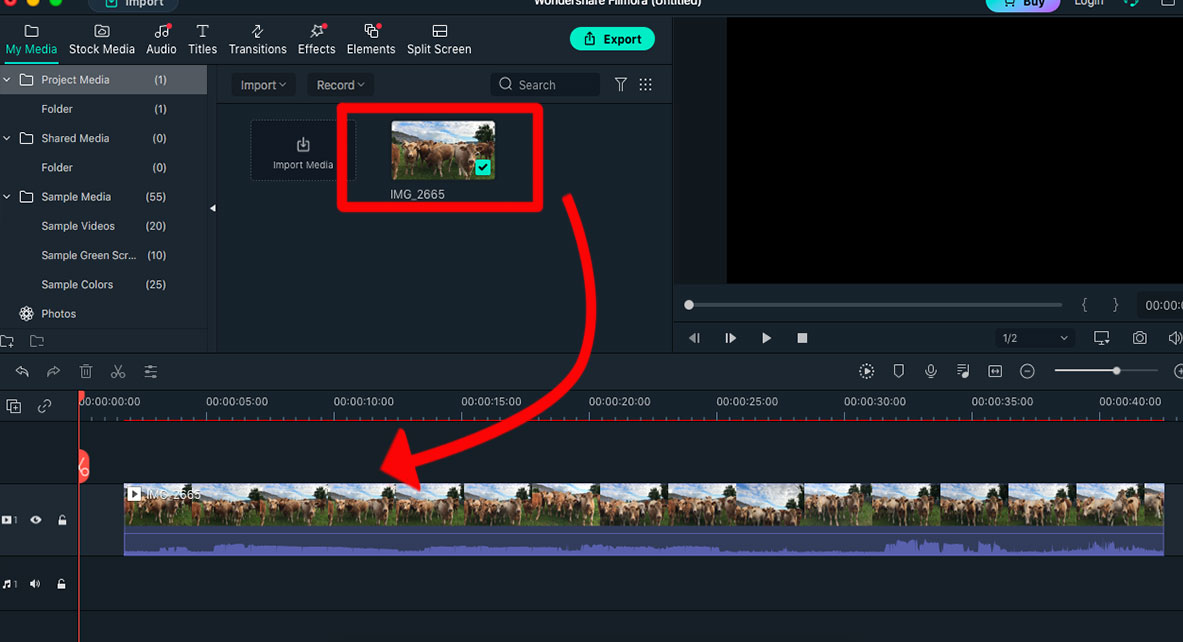
When the video footage is placed in the timeline, click on it to activate it.
When the footage is surrounded by a green line, it is active.
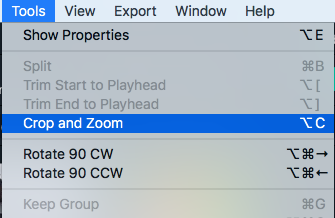
Activate the Crop & Zoom Tool
Head to the top menu bar and select Tools > Crop and Zoom.
Once the Crop and Zoom tool is activated, a pop-up preview window will appear.
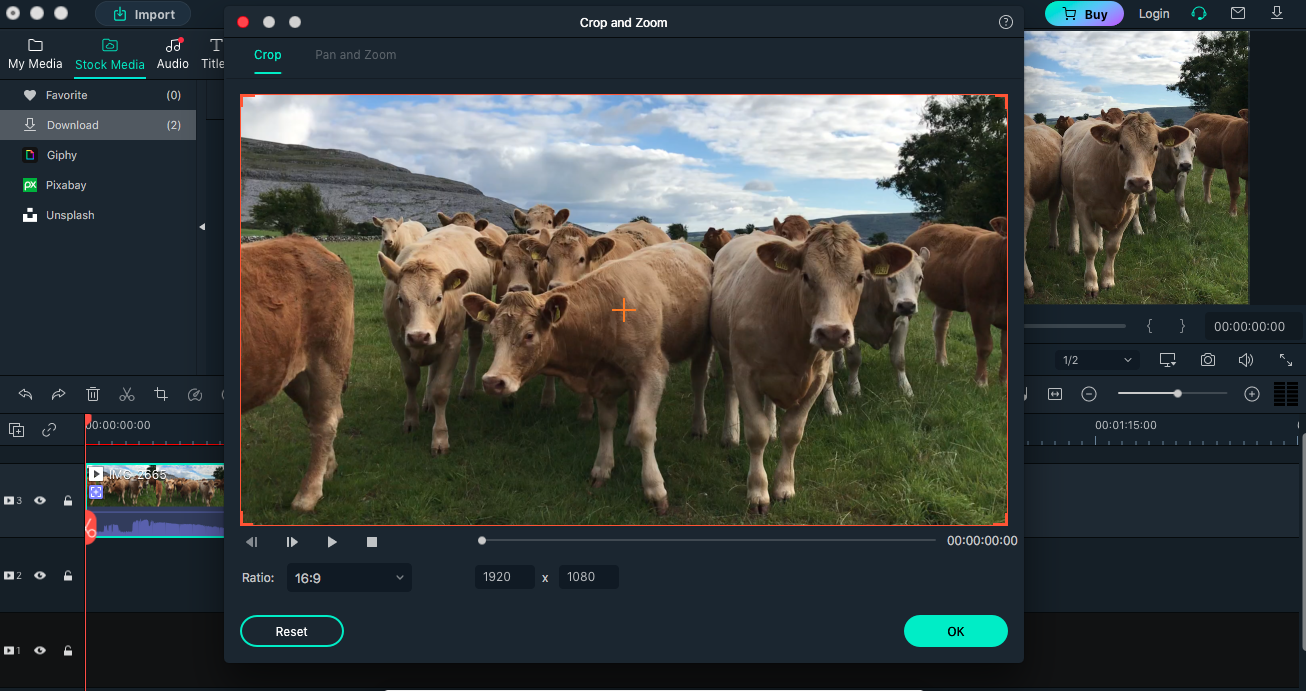
Click on “Pan and Zoom” at the top of the preview window.
Two bounding boxes will appear in the preview window.
A center bounding box indicates the area which will be zoomed into, and the outer bounding box demonstrates the area where the image will zoom from.
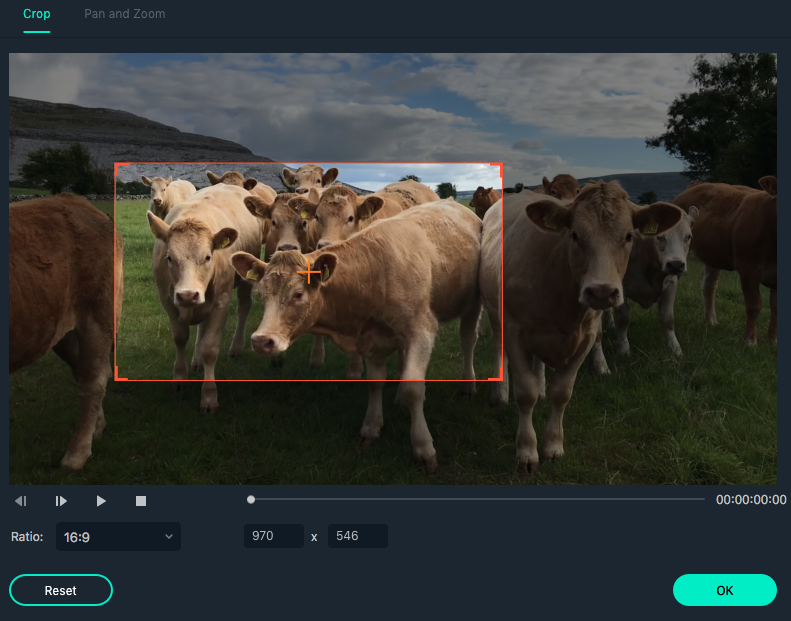
Set the Selection
To select the area you want to zoom into, drag the corners of the inner bounding box to reduce it to the correct size.
Once you have the desired size, reposition the box over the subject you want to zoom into by dragging it into position.
Preview
Now that you've made your selection, press play to preview before you save your footage.
Export
When you have achieved the perfect zoom, you are ready to export your video clip.
Click the Export button in the top menu bar and select to save to your computer, burn to CD or share on the web.
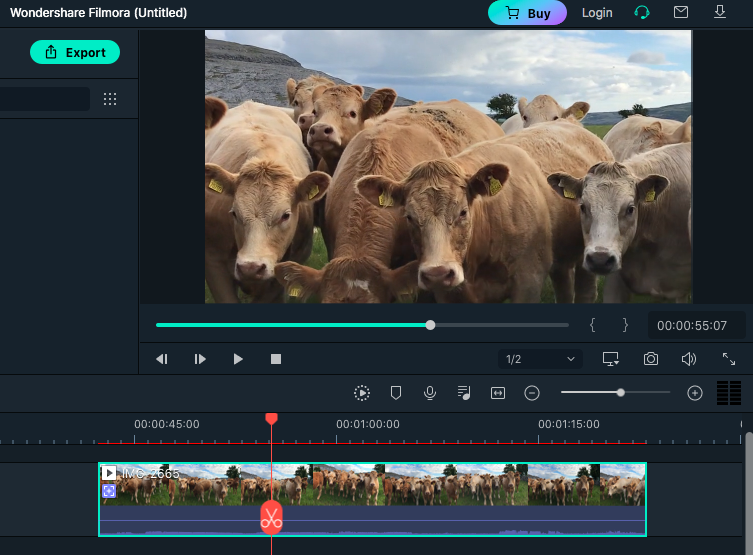
How Do I Zoom Part of a Video?
To zoom in on only a part of your video using Filmora's editing software, first add the video footage to the Filmora timeline and select it so that it's active.
To select the section you wish to zoom in on, move the time locker and position it where you want to start zooming in.
Then, click on the scissor icon to cut this position.
Move the time locker to the end of the section you wish to zoom in on, and again click on the scissor icon to cut.
The section of the video should now be selected and surrounded by a bounding green line, demonstrating that it is active.
To edit this part of the video independently of the rest of the video, click on the crop tool.
A pop-up window will appear. This is the preview window for editing the chosen section of video.
Now, in the top bar of the pop-up window, select the Pan and Zoom tool.
Two bounding boxes will appear in the pop-up window; the outer box will be where your video zooms in from, and the inner box will be where your video zooms into.
You can drag and reposition the bounding box to where you want to zoom in to.
You can adjust the size of the inner box by dragging the handles of the bounding box in or out.
Now press OK, and your video clip will zoom in on your chosen section.

Judyth is an experienced studio photographer and glass artist. When she isn’t Photoshopping comedians into the bellies of sharks, you can find her cooking delicious treats for her guests.

👋 WELCOME TO SHOTKIT!
🔥 Popular NOW:
