


Best Tripod for DSLR Cameras (9 Options)
REVEALED: The best DSLR tripods of the year! Find out which tripods are the best to support your precious DSLR camera.
Shotkit may earn a commission on affiliate links. Learn more.
I've put together this guide on the best DSLR tripods for the average photographer to try and save you some precious time and money before investing in a 3-legged friend!
At A Glance: Our Top 5 Picks for DSLR Tripods
There are hundreds of camera tripods available in 2024, which makes it all a bit overwhelming… especially when all you really need is an affordable, reliable way to steady your camera.
If you want to capture the stars at night, or convey the movement of water in a waterfall, or take a panoramic landscape shot… or maybe you just want a way to take a selfie?!
Whatever the case, this guide on the best tripod for DSLR users will definitely help you out.
Note: If you're looking for separate tripod leg and/or tripod ball head reviews, this is not the post for you. All tripods featured here are ‘all-in-one' units, useful for the majority of photographers.
Best Tripod for DSLR Cameras
| Image | Product | Details | |
|---|---|---|---|
 | Vanguard Alta Pro 263APOUR #1 CHOICE |
| View Price → |
 | Rangers Ultra Compact TripodTOP-RATED |
| View Price → |
 | JOBY GorillaPod SLR ZoomGREAT VALUE |
| View Price → |
 | K & F Concept DSLR Tripod |
| View Price → |
 | AmazonBasics Lightweight Tripod |
| View Price → |
 | Manfrotto B PIXI Mini Tripod |
| View Price → |
 | ZOMEI Z699C Carbon Fiber Tripod |
| View Price → |
 | MeFOTO Classic Aluminum Roadtrip |
| View Price → |
 | Neewer Carbon Fiber Tripod |
| View Price → |
I've reviewed options from well-known manufacturers, as well as some you may never have heard of before.
One thing's for sure – there's certainly a big selection of camera tripods available, but which ones are most relevant to you?
If you're searching for a solid tripod for DSLR cameras that you can travel with, you'll need something lightweight and small.
If you're in the studio, however, you can get away with something much heavier.
Then there are table top tripods, tripods for iphones, mini tripods, monopods, tripod legs, ball heads… it all can get complicated rather quickly!
For simplicity, I've tailored this review to the average photographer – i.e. someone who wants a reliable, affordable, multi-purpose, all-in-one DSLR tripod that can easily support the weight of a modern camera plus zoom lens.
(As mentioned above, professional photographers with unique needs should look elsewhere for tripod reviews of specialist ball heads and separate tripod legs.)
Let's take a look at the best DSLR Tripods:
DSLR Tripod Reviews
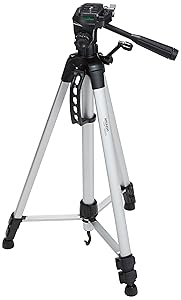
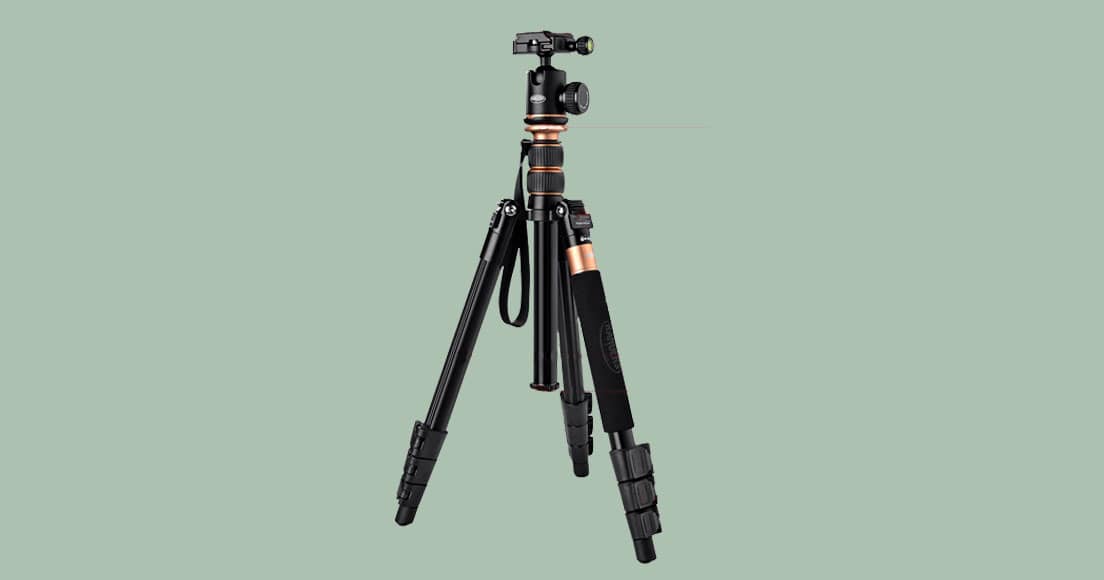
1. Vanguard Alta Pro 263AP
Dimensions: 29.5 x 8 x 8″ (749.3 x 203.2 x 203.2mm)
Max Height: 69.88″ (1774.95mm)
Weight: 2.59kg (5.73lb)
Load: 4.99kg (11 lb)
Let's kick off this review of the best DSLR tripods of the year with the hugely popular Vanguard Alta Pro 263AP.
Vanguard is a global company that has been creating high quality products for photographers and outdoor enthusiasts for over 30 years. They've made a name for themselves in the tripod stand industry for offering well designed, innovative products for both pros and amateur photographers, all at an affordable price.
The Vanguard Alta Pro 263AP isn't what I'd call a cheap DSLR tripod, but at around $160 (see latest price here), you're getting one of the most versatile, well-built tripods I've ever used.
As the reviewer in the video below says, it's strange to get excited about a tripod for camera use, but this one certainly ticks all the right boxes…
Let's start at the top and work our way down. A DSLR tripod is only as good as its head, and your first choice when buying the Vanguard Alta Pro 263AP is deciding which ‘head' (the part that rotates and attaches to your camera via a ‘plate') to go for.
Incidentally, the actual base plate is great on the Alta Pro – long and grippy, it clicks into the tripod head mechanism before you close the locking arm to secure everything in place.
I used to be a fan of the regular ‘Ball Head' on DSLR tripods, since it's the least bulky option and could fit neatly in my camera backpack or rolling camera bag.
However, since accepting the fact that a tripod doesn't always need to be packed away in your regular camera bag, (this model actually comes with its own bag), I've grown to love the larger but far more versatile ‘Pan Head' option… which is the version of the Vanguard Alta Pro 263AP that I'm recommending to you here.
With the Pan Head on the Alta Pro, you twist the grip handles to quickly loosen it, then pan and tilt the head in order to find the best camera angle for your shot, then twist the grips the other way to lock everything securely in place.
If it's a level shot you're looking for, 3 bubble levels on the x, y and z axes help you make sure the Pan Head is perfectly aligned.
Everything feels wonderfully high quality in its movement and secure in its locking, with the panning feature allowing you to rotate your camera 360 degrees over a silky smooth track – ideal for videographers or photographers panning a shot.
The precise movement is also ideal for stitched panoramas.
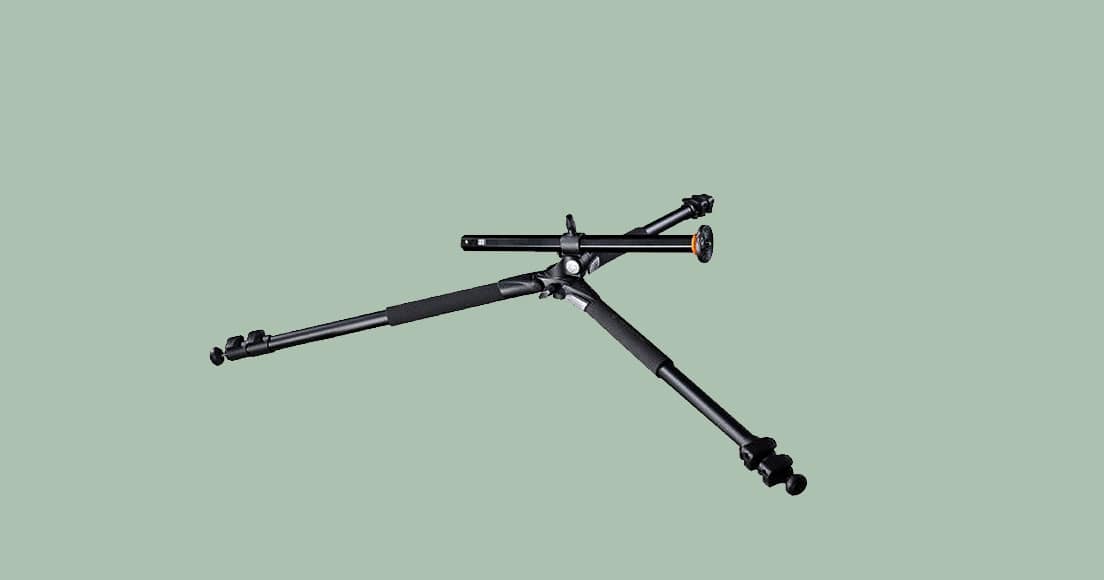
Working our way down the Vanguard Alta Pro 263AP, the head attaches to a hexagonal central column, with an innovative ‘Swivel Stop-n-Lock System' which allows you to securely reposition the column's height quickly and easily via the orange push/pull latch on the side.
When extended to its full height, a button on the bottom of the central column allows you to separate it completely from the tripod's legs, then reinsert it at an angle from zero to 180°.
This means that you can position your camera to look directly down on a subject, which is particularly useful for styling and shooting flat-lays. There's also a hook on the other end of the central column so you can hang a counter-weight, such as your camera bag or whatever you have at hand.
The aluminum alloy legs on the Alta Pro 263AP offer 3 different angles, for 25°, 50°, and 80° settings – the release mechanism for this is controlled via a button on the sides of the legs.
Splaying the legs completely and positioning the central column parallel to the floor allows you to get even closer to your subject – ideal for close-up macro photography.
At this macro height, the Vanguard Alta Pro 263AP can get down to just 26cm (10.3″). Then when fully extended, it stands tall at an impressive 175cm (69″) for comfortable camera operation even for taller photographers.
Other premium features such as the grippy rubber feet, which expose spikes when twisted (for using the Alta Pro 263AP on grass or slippery surfaces), make this one incredibly well designed and versatile DSLR tripod my top pick. Truly one of the best camera tripods out in the market.
Judging by the 900+ positive reviews, I'm not the only one who recommends it so highly either…!
2. Rangers Ultra Compact Tripod
Dimensions: 15.8 x 4.9 x 4.9″ (401.32 x 124.46 x 124.46mm)
Max Height: 55″ (1397mm)
Weight: 1.31kg (2.89lb)
Load: 12.20kg (26.5lb)
The second DSLR tripod on my list came to my attention following several user comments when I published a popular travel tripod review earlier this year.
The Rangers 57″ Ultra Compact Aluminum Tripod camera stand is marketed as an ‘ideal DSLR tripod for travel and work'.
Weighing in at only 1 kg 315 g (2.89 lbs), this tripod is definitely on the lighter end of the scale, but not to the point of it feeling flimsy.
Rangers have decided to concentrate its efforts on the tried-and-tested Ball Head design, meaning no handles for panning and tilting your camera, but on the other hand, a much lighter, more compact overall design.
Movement of the Ball Head is controlled via a twisting knob on the side. Above this is another knob that releases the plate that attaches to your camera, and also houses one of two bubble levels.
The ball joint allows a tilting range of -45°/+90° and a full 360° pan, with everything loosened and tightened using a separate panning lock – another knob on the side of the Rangers 57″ Ultra Compact Aluminum Tripod.
Everything moves around smoothly and locks securely. It's always advisable to hold your camera with one hand while making the ball head adjustments with the other, to ensure your camera doesn't just ‘drop' in place when loosening the various knobs.
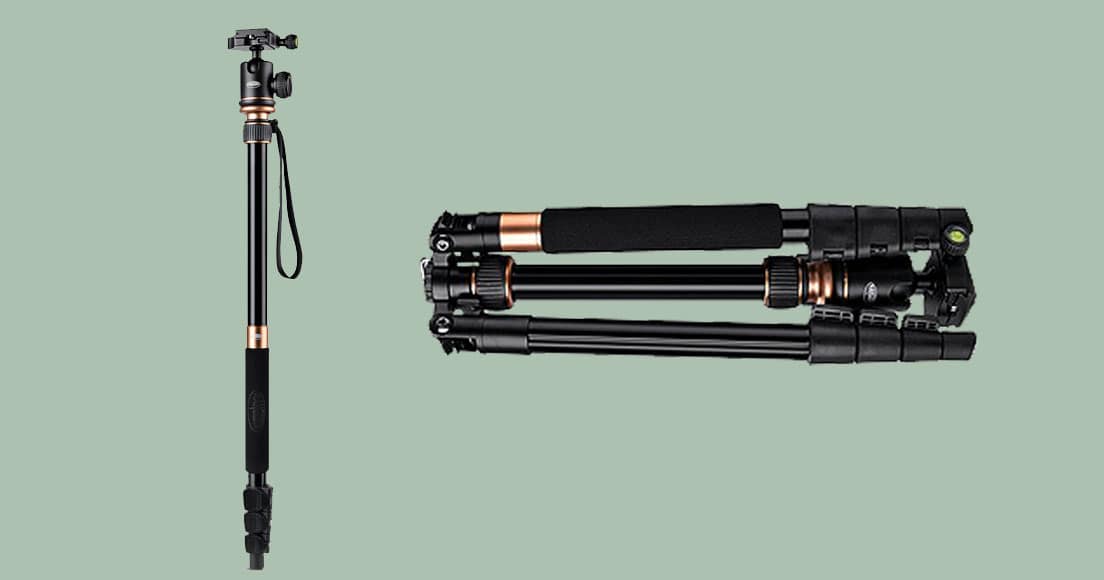
With a minimum extended height of 38.5cm (15″) and a maximum height of 1m 40cm (55″), the Rangers Ultra Compact Aluminum Tripod can collapse to just 35cm (14″), making it the perfect size to pack away inside your camera bag.
The 4 section aluminum alloy legs feel strong and sturdy even when fully extended, and feature quick release flip-locks for fast operation. One of the legs also features a comfortable foam grip, making the tripod easier to hold during cold or wet conditions.
This gripped leg actually serves a second purpose, namely the ability to transform into a fully fledged monopod when detached from the rest of the tripod, complete with carrying handle.
Despite all the impressive features of the Rangers Ultra Compact, perhaps most impressive of all is its price – at less than $70 (latest price here), it's an affordable DSLR tripod that offers great bang for the buck.
With over 360 positive reviews, the Ultra Compact is a popular option for traveling photographers who need a dedicated tripod for a stable shot, without compromising the weight of their camera bag.
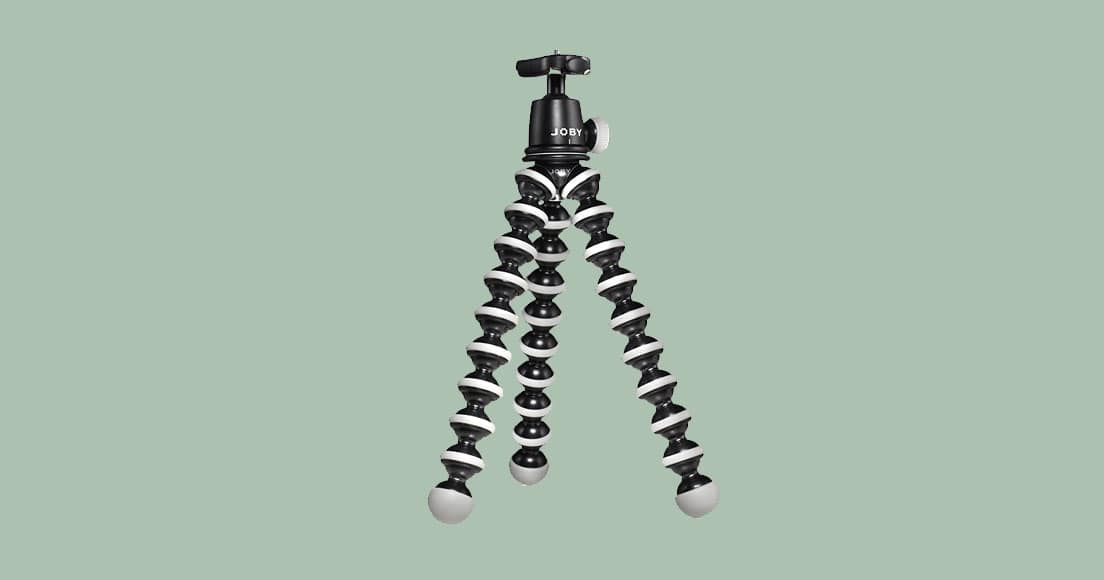
3. JOBY GorillaPod SLR Zoom
Dimensions: 3.1 x 3.1 x 14.2″ (78.74 x 78.74 x 360.68mm)
Max Height: 55″ (350mm)
Weight: 0.4kg (0.88lb)
Load: 2.99kg (6.6lb)
I feel like the iconic GorillaPod needs no introduction. This being the first DSLR tripod I ever bought, the GorillaPod is a flexible mini tripod that's often imitated but seldom bettered.
Manufactured out of medical grade Japanese ABS plastic, stainless steel and German TPE rubber, the Joby GorillaPod is a high quality product that's built to last.
The basic idea of having a tripod whose legs can be flexed, twisted and bent around itself is so you can secure it to places that traditional tripods can't be secured – tree branches, table legs, street poles, your own arm… basically anything that's narrow enough. This made it one of the popular tripods for cameras specifically for vlogging.
With 10 moveable leg joints on each leg covered in grippy rubber, the Joby GorillaPod SLR Zoom wraps around objects securely, relying on the stiffness between each joint to stay put.
The quick release plate stays connected to your camera so you can slide it on and off the ball head quickly. Whilst some base plates rely upon a ‘key screw' to secure to a camera, the GorillaPod's saves a little weight here, requiring instead a coin, key, or screwdriver to twist it.
After your camera is secured to the ball head, you twist a rubber-covered knob on the side to pan and tilt your camera up to 360°, then twist it again to secure it in position.
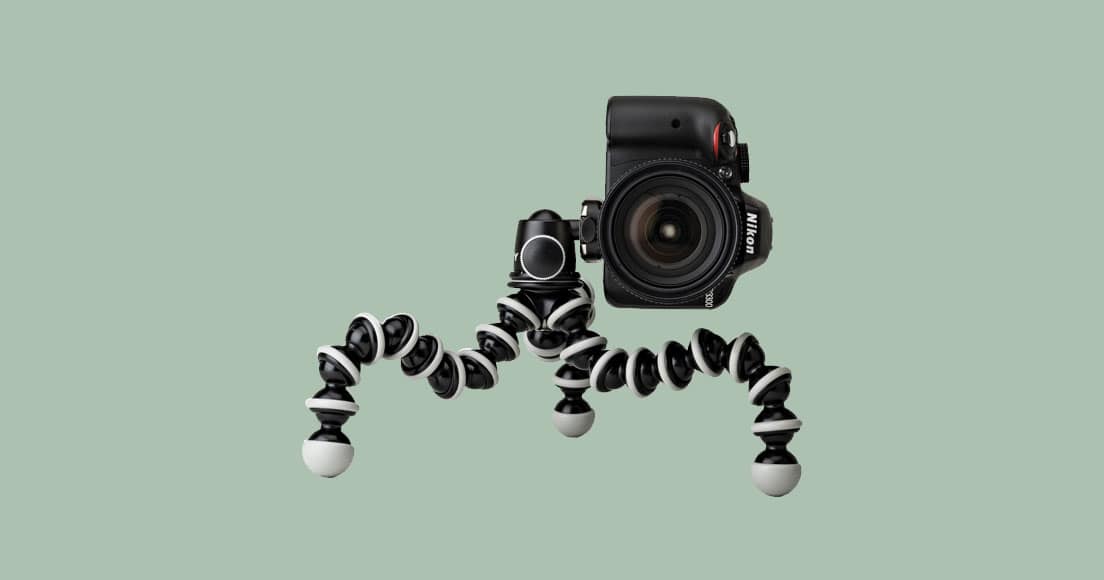
The flexible, wrappable legs can safely hold any DSLR up to 3 kg (6 lbs.) or any of the mirrorless cameras on this list. This means that even photographers shooting with heavier full frame cameras and zoom lenses can rely on the strength of the GorillaPod SLR Zoom to support their gear in any crazy position they choose.
(If you want to save some money and have a lighter entry level DSLR camera set up, the GorillaPod Hybrid is a good option, with its maximum load-bearing capacity of 1 kg (2.2 lbs).
It's also a great tripod for iPhone photography – incidentally, if you want to see an innovative way to store a phone stand actually inside a tripod leg, check out the new Peak Design Tripod.
On the topic of price, the GorillaPod has traditionally been at the more expensive end of the flexible tripod range. This is largely justifiable, due to the high quality parts used in its production – see the latest price of the SLR Zoom and other models here.
There's a GorillaPod to suit whatever camera you own, and here lies most of the confusion when choosing which one to invest in first – due to their strength and flexibility in use, the GorillaPods in the range actually overlap each other, making the choice somewhat difficult at times.
Joby has options whether you want the best Gorilla tripod for DSLR cameras or you're looking for a lightweight tripod built for smartphones and tablets.
Check out the image below, which should shed some light on the best GorillaPod to choose for your camera.
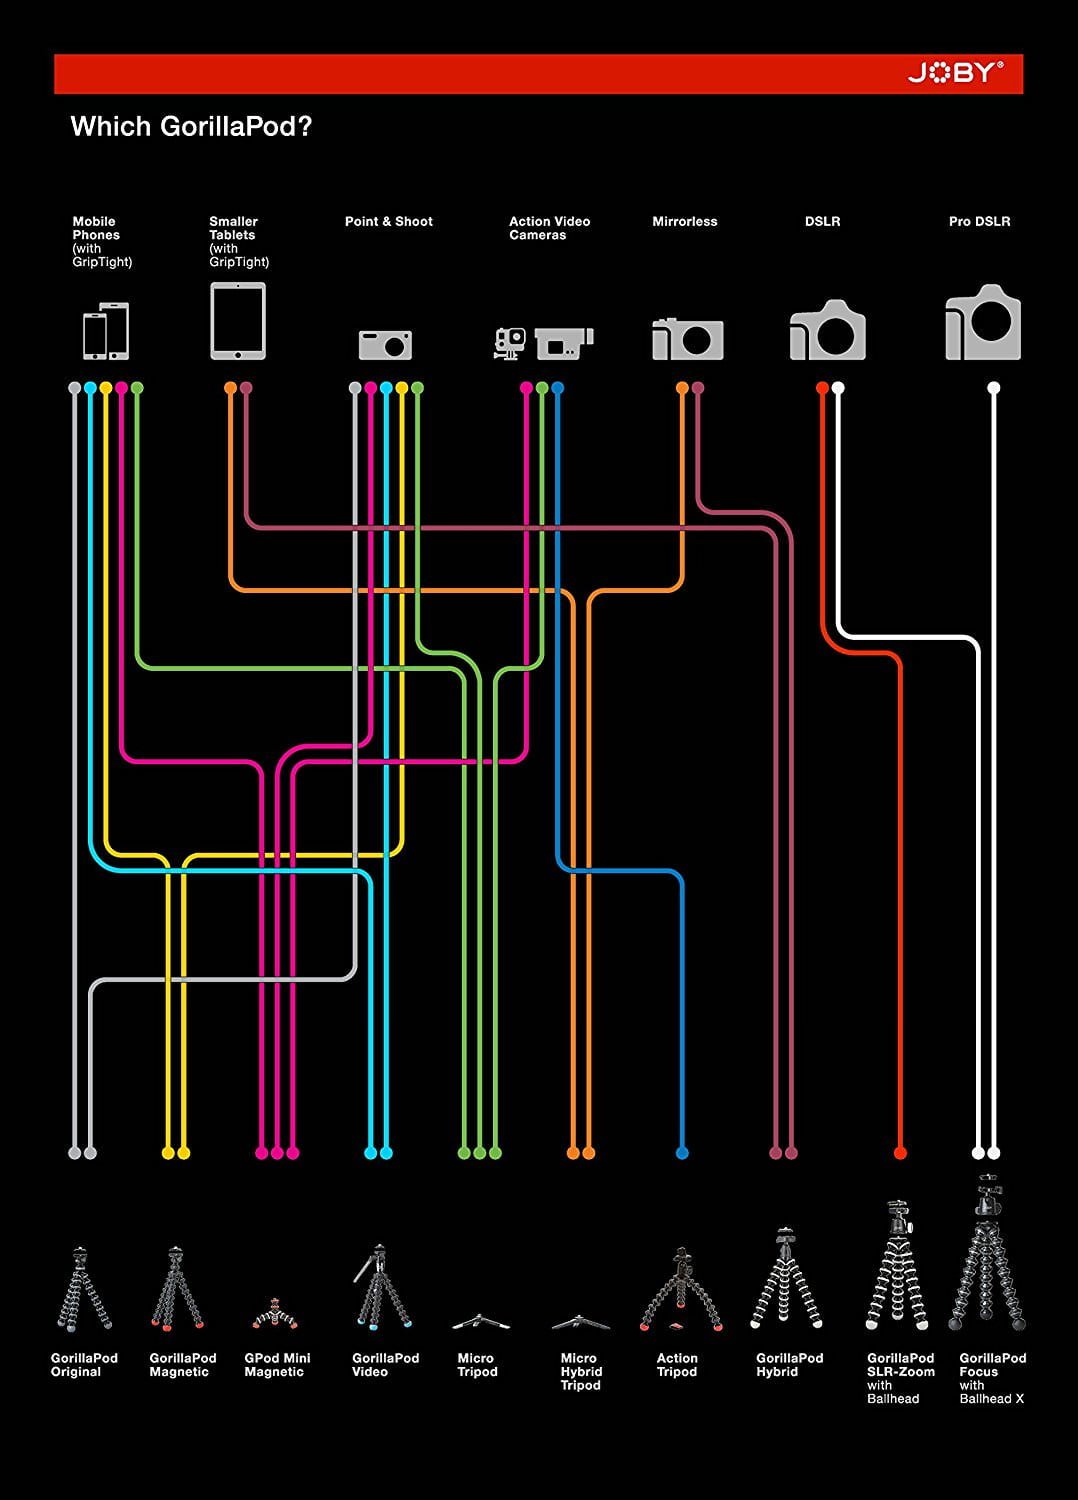
Which GorillaPod to buy – click here to see entire range.
Recently, the GorillaPod SLR Zoom has actually been updated with a newer product – the GorillaPod 3K Kit, with new red anodized metal ball head components and the ‘3k' name that reflects its carrying capacity.
Other than the colour difference, the newer model remains largely unchanged from the GorillaPod SLR Zoom, meaning that it's still absolutely fine to invest in the Zoom tripod. You may also save some money doing this too since it's now an older model.
You may find different names for the other models too, e.g. 3k, 5k, etc – this refers to the maximum weight that they can carry in kgs.
Whatever GorillaPod you buy, you'll be one of hundreds of thousands of fans of this unique, class-leading flexible tripod that's used the world over.
Don't be tempted by imitations – they may look similar (and even perform well initially), but the leg joints quickly lose their stiffness, jeopardizing the safety of your camera gear.
Built to last in an iconic design that's incredibly versatile, and allowing you to get creative with the positioning of your camera, lighting or whatever supports the 1/4″ standard tripod mount, the GorillaPod SLR Zoom is an excellent addition to any camera bag.
It should also be said that the GorillaPod SLR Zoom is a popular option for vloggers, in that it provides a grippy and comfortable way to grasp your camera while filming yourself or your subject,
However you use it, Joby has created an iconic, flexible mini tripod that's highly recommended for all level of photographer or videographer.
4. K & F Concept DSLR Tripod
Dimensions: 20.8 x 5.3 x 5.3″ (528.32 x 134.62 x 134.62mm)
Max Height: 62″ (1574.8mm)
Weight: 1.1kg (2.43lb)
Load: 9.98kg (22lb)
If you're looking for the best tripod for macro photography, the K&F Concept DSLR Tripod should definitely be on your radar.
Before we jump right to its unique ability to get extra close to your subject for macro photography, let's start at the top with ball head – at 28mm (1.1″), the ball/socket diameter is larger than some other tripods, meaning more stability and strength when your camera is locked in place at an angle.
The pan and tilt motion of this DSLR camera stand is controlled via rubber-gripped knobs, which when twisted release the lock mechanism so you can rotate the camera in whatever direction you choose.
Loosening one of the side knobs on the K&F Concept slightly allows you to maintain some resistance in the panning motion, ideal for precise panoramic shots or panoramas. A non-oil dampening mechanism helps keep the movement silky smooth.
There's also a bubble level built into the base plate locking mechanism, helping you to achieve a perfectly level shot for precise compositions, such is the case with 3-d photography (see guide).
The centre column of the K&F Concept DSLR Tripod deserves special mention for its ability to be inverted 180°, allowing you to suspend your camera for close up macro photography (see image above).
The three aluminum tripod legs allow the tripod to extend to 133cm (52.36″), with the centre column extending completely to a maximum height of 156cm (61.4″). With an overall weight with ball head of only 1kg 102g (2.43 lbs), this lightweight tripod is ideal for travel.
The 3 legs joints are released via quick-flip leg locks, ideal for one-handed operation. While some photographers prefer the twist-leg-locks which can also be operated with one hand, I prefer the flip-locks on the K&F Concept DSLR Tripod, especially in cold weather when the twisting motion can be harder.
At just under $80, the K&F Concept is an affordable DSLR tripod that ticks all the right boxes in terms of design and features. The tripod comes with a shoulder bag, ball head bag and Allen key.
5. AmazonBasics Lightweight Tripod

Dimensions: 24.21 x 4.4 x 4.1″ (614.93 x 111.76 x 104.14mm)
Max Height: 60″ (1524mm)
Weight: 1.23kg (2.72lb)
Load: 2.99kg (6.6lb)
The AmazonBasics range is immensely popular. Learning from the products that sell well on its own site, Amazon attempts to borrow from and improve on the design of popular products, then undercut them in price.
Unsavory business tactics aside, this allows Amazon to offer high quality, useful products at a huge discount, and a good example of this practice is the AmazonBasics Lightweight Tripod.
At less than $25 (latest price here) and with over 6,600 positive reviews (!!), it's hard to argue with such a popular tripod at such a bargain-basement price.
Check out the reviewer below who's clearly enamoured by it!
Price aside, the AmazonBasics Lightweight Tripod is actually adequately-built for basic everyday use, and offers several of the features of much more expensive tripods.
Everything is lightweight and somewhat cheap feeling, but that's not to say it feels like the tripod is going to break soon.
Amazon has chosen to use plastic components where other tripod manufacturers would use metal, but the max carry load over 3 kg (6.6 lbs) is still more than enough for most photographers.
At the top of the AmazonBasics Lightweight Tripod, two bubble levels ensure you're lining up your shot correctly. The 3-way head allows for tilt and swivel motion, and the pan handle delivers a relatively fluid and smooth operation.
Raising and lowering the centre column is achieved via a rather unusual crank arm. It works fine in theory, but becomes rather annoying if you're in a rush to raise the centre column quickly get a shot – I found myself trying to yank the column up and ignore the crank arm completely, but this doesn't always work as well as it does when collapsing the column.
The legs of the tripod can be extended quickly and easily via two flip locks on each leg, both operable with one hand.
To provide stability, the legs of the AmazonBasics Lightweight Tripod are locked together when open. This is more common with tripods for video shooting, where the gear to be supported is usually much heavier.
It's worth noting that whilst the legs are more stable in this respect, there's only the option to have them open or closed – no in-between leg positioning, as is found on the majority of other DSLR tripods.
To further achieve stability, there's a hook on the bottom of the centre column – since the AmazonBasics Lightweight Tripod weighs in at only 1 kg 234 g (2.72 lbs), it's advisable to hang something from the hook to really aid with the balance when using the tripod in strong winds.
One feature I particularly like about this tripod is the built-in plastic carrying handle – such a simple addition which doesn't really add any weight, but for some reason, I've never seen it implemented on any other DSLR tripod.
With an included carrying bag, the AmazonBasics Lightweight Tripod is excellent value for money and should be at the top of your shopping list if you need a basic tripod at a great price for travel or home use.
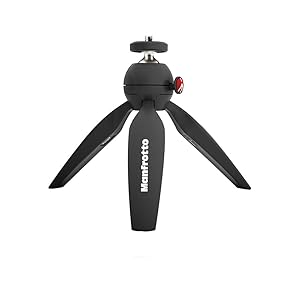
6. Manfrotto B PIXI Mini Tripod
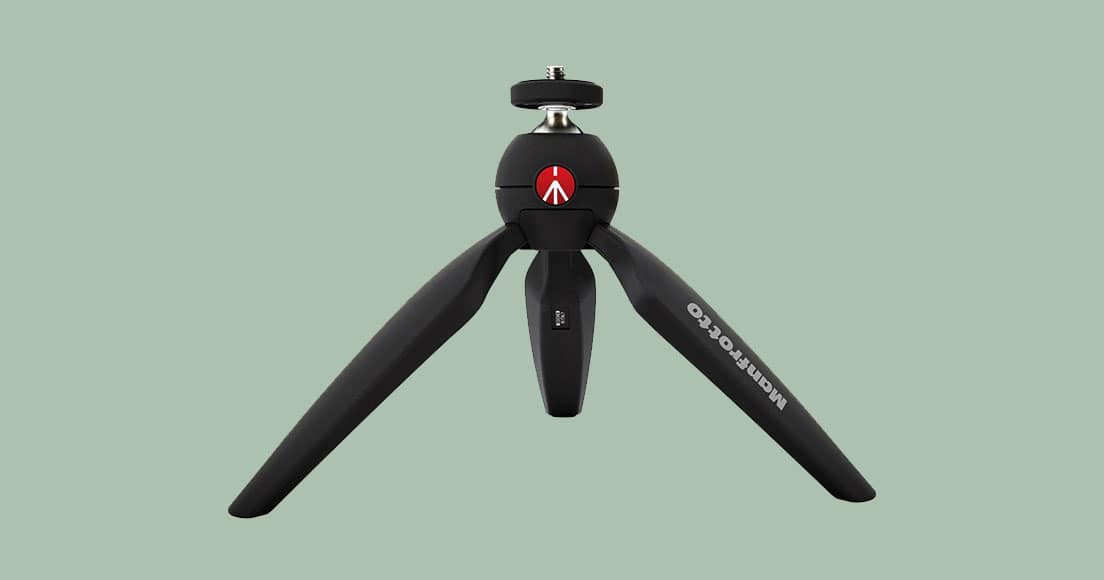
Dimensions: 7.28 x 3 x 3 ” (184.9 x 76.2 x 76.2mm)
Max Height: 5.11 ” (129.79mm)
Weight: 231.3g (0.51lb)
Load: 1kg (2.2lb)
The Manfrotto B PIXI Mini tripod is the tabletop DSLR tripod that's currently sitting in my camera bag. Weighing in at less than a paperback book and taking up even less space, the B PIXI is perfect for getting a quick stabilized shot.
When I first discovered this tripod, I admit to being a bit perplexed at its enormous popularity. With over 800 positive reviews, I couldn't understand why such a simple mini tripod could attract so many raving fans.
The design of the B PIXI Mini tripod is as simple as it is beautiful. Typical of Manfrotto products, clearly a lot of thought has gone into its design, and perhaps this is one of the reasons for its huge popularity.
There's no detachable plate on this Manfrotto mini tripod – just an exposed 1/4″ screw resting in the centre of a rubberized circular base – you attach this directly to the tripod mount in the bottom of your camera by twisting the entire tripod.
To loosen the ball joint, you press the red Manfrotto logo button, then position your camera and release the button to lock it into position – there's nothing to twist and tighten, and operation is quick and simple.
It's important to support the weight of your camera while pressing the button since everything effectively goes from stable to 100% loose – there's no incremental locking stage like there is with a twist mechanism.
Despite this, I love the speed and simplicity of camera positioning with the B PIXI Mini tripod, and it has to be said, that pressing the button of the tripod while I carry the tripod in my pocket is very addictive!
The B PIXI Mini doubles as a great handheld tripod for DSLR cameras and smartphones. Its lightweight design and portability allow you to take higher-quality selfies or vlog on the go.
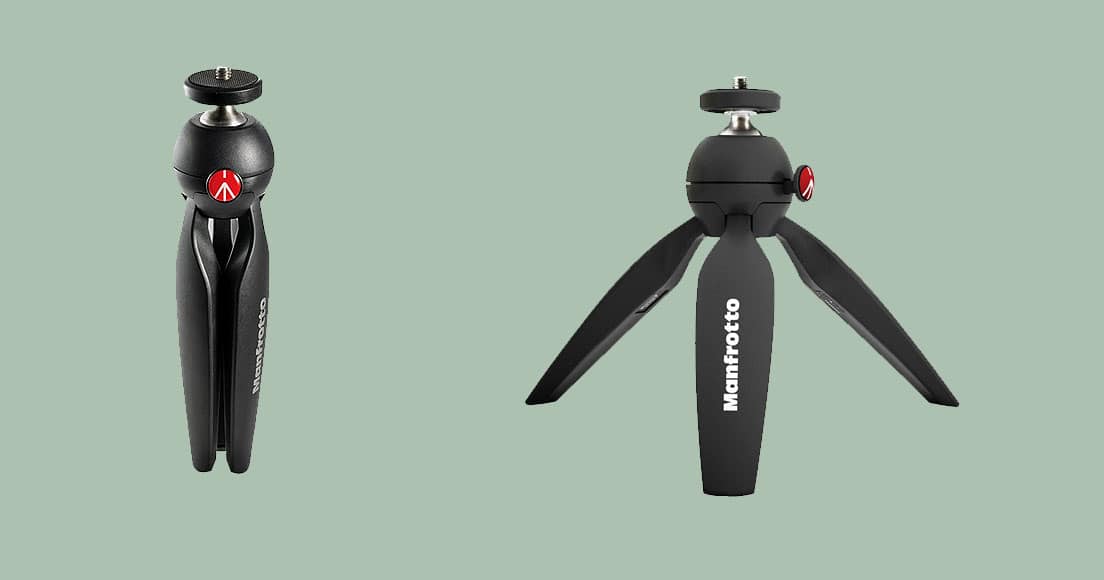
The legs of the B PIXI Mini tripod are all the same shape and length but move independently. To close them, it's as simple as grabbing the tripod near the base of the ball head and closing your fist.
There's not much to the B-PIXI, but everything is perfectly designed and implemented. It's also a cheap DSLR tripod, costing much less than competitors.
Before I started using one, I struggled to see the reason for its popularity, but now having owned one, it's become quite clear. It sounds strange to say, but the B-PIXI is almost like a work of art that should be showcased in a design museum, representing perfect simplicity in design.
You probably know the famous photographer saying: “the best camera is the one you have with you.” Well, the same can be said about tripods, and with the B-PIXI, you're much more likely to have it in your bag or pocket than something larger.
7. ZOMEI Z699C Carbon Fiber Tripod
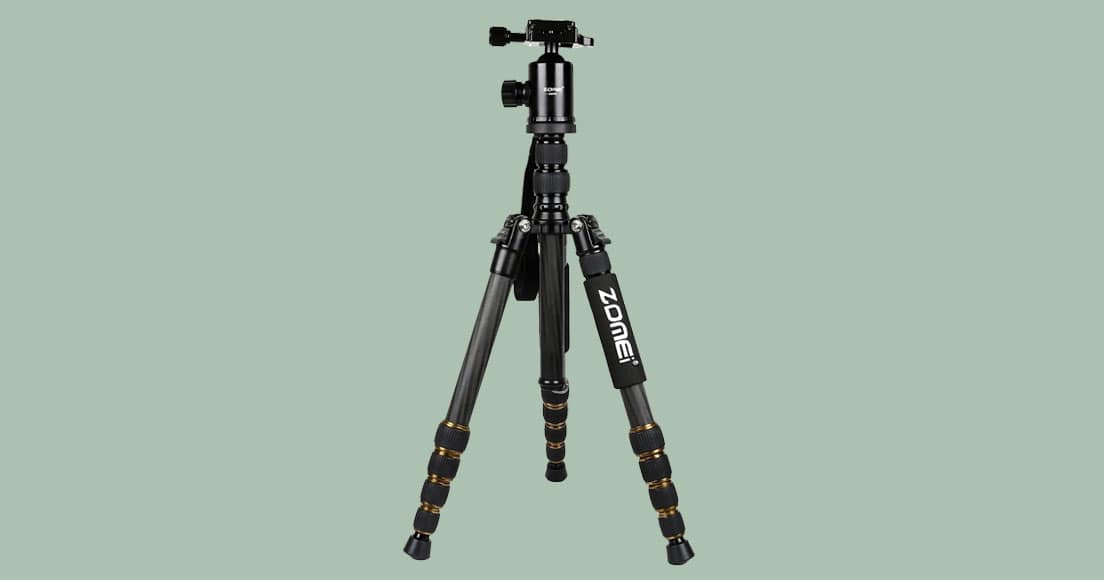
Dimensions: 18.5 x 5.31 x 5.31 ” (469.9 x 134.87 x 134.874mm)
Max Height: 60″ (1524 mm)
Weight: 1.46kg (3.22 lbs)
Load: 1.5kg (3.3lb)
If you're looking for an affordable carbon fiber DSLR tripod, look no further – the Zomei Z699C should be at the top of your list.
Before we delve into the stats, it's worth answering the question: is carbon fiber better than aluminum as a material for tripods? Well, yes and no.
The main advantage of carbon fiber over metal is weight. Carbon composite construction offers a higher strength: weight ratio when compared to aluminum – this allows tripod manufacturers to make a tripod with comparable dimensions and loading capabilities that weighs less.
However, a lighter tripod isn't always a good thing – studio photographers and those shooting fragile subjects such as newborns, for example, will normally favour something heavier, in order to provide a more stable base that doesn't move at all when using the camera.
Some mention vibration-reduction as an advantage of carbon fiber over metal. While this is true, it's much easier to reduce vibration in a tripod by hanging something off it or even placing your camera bag next to one of the legs.
Let's have a closer look at the Zomei Z699C DSLR tripod now, to see whether it's the right tripod for you, regardless of its carbon fiber construction.
The ball head on the Zomei Z699C is robust and seems well made, with a nice fluid motion when adjusting the side knobs to release the pan/tilt locking mechanism.
As is normal with DSLR tripods of this caliber, there's a built-in bubble level next to the locking plate, to help you get a level shot.
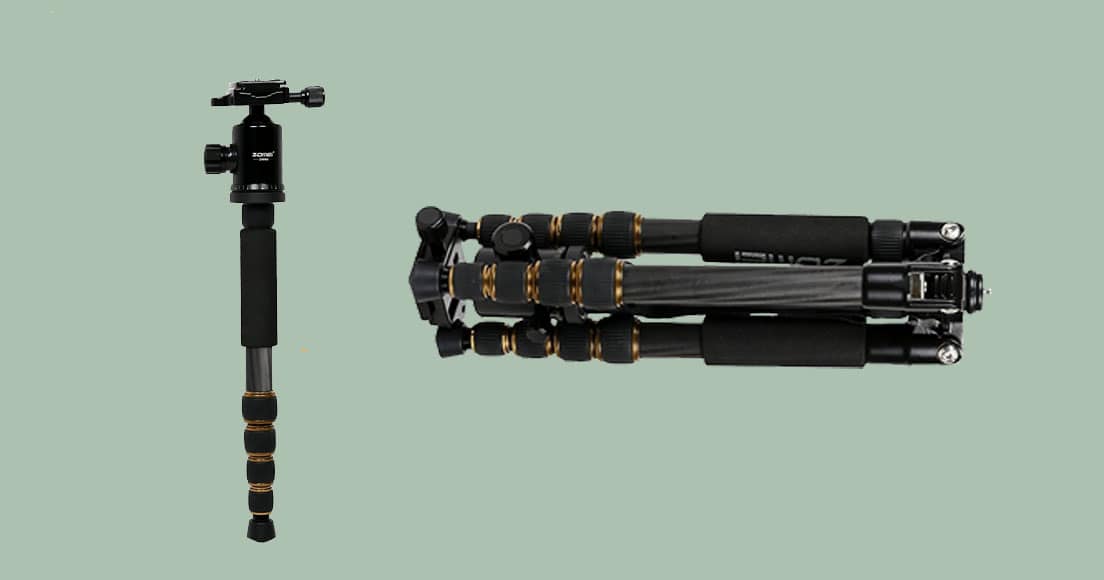
The centre column features two-stages of twisting locks and a removable carrying handle which I thought was a nice touch.
Undoing the bottom of the two locks allows you to remove the upper column completely. There's no hook included in the base of the column, but there is a vacant screw hole for you to add one if you need to.
The legs on the Zomei Z699C DSLR tripod can be set up in 3 different stages, with a firm, ratchet sounding noise as you pull them apart. Everything feels very well made, and the movement is firm and reassuring.
Thanks to rubber-covered twisting leg joint locks, the legs can be quickly extended to their full length in one quick single-handed twist – great for getting set up quickly for your shot.
The leg which includes the Zomei branding on the foam grip handle is completely separable from the main tripod, allowing you to remove it then attach the ball head on top, converting it into a fully-fledged monopod.
There's sometimes a bit of confusing with monopods as to when exactly photographers use them. It helps to think of a monopod as a run-and-gun style of tripod, where having something with 3 legs splayed out may cause an obstruction. Monopods are also commonly used by sports photographers.
Despite its lightweight, the maximum load for the Zomei Z699C DSLR tripod is an impressive 15 kg (33 lbs), meaning it's strong and sturdy enough for even the heaviest camera+lens+flash set up.
As with all Zomei DSLR tripods I've handled in the past, build quality really is excellent, and having the weight advantage of carbon fiber at this price point is incredibly attractive.
8. MeFOTO Classic Aluminum Roadtrip
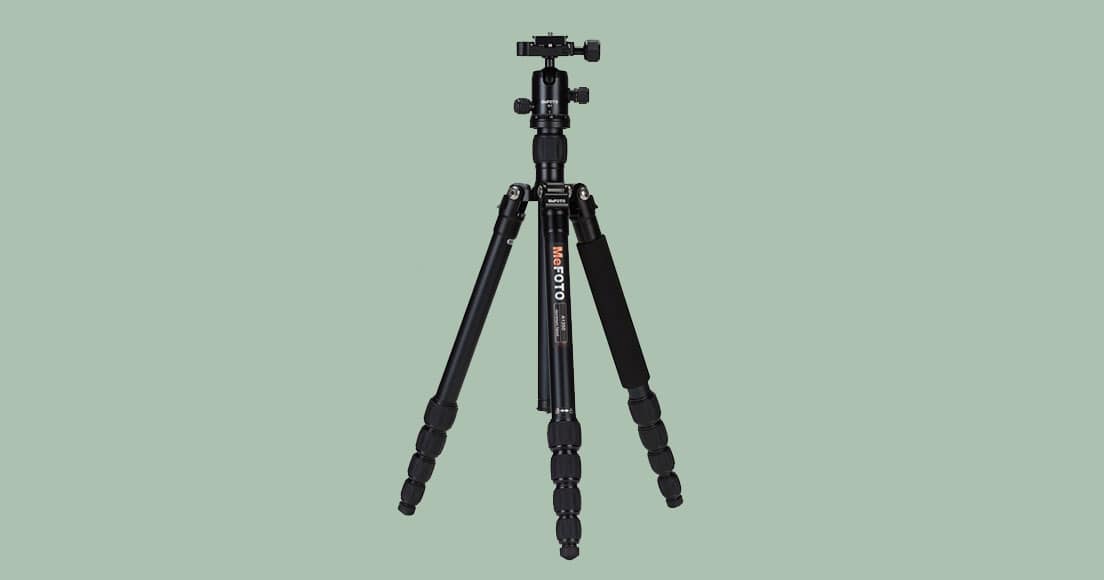
Dimensions: 15.4 x 3 x 3 ” (391.16 x 76.2 x 76.2mm)
Max Height: 86.61″ (2199.89mm)
Weight: 1.63kg (3.6lb)
Load: 7.98kg (17.6lb)
Here's an extremely popular tripod that you've probably seen advertised on your favourite photography websites in the past.
The MeFOTO Classic Aluminium Roadtrip is MeFOTO's best selling DSLR tripod, used by both professional and amateur photographers around the world.
I specify ‘professional' photographers, as there's been a move recently away from standard all-black traditional tripods, to more eye-catching colourful tripods such as the ones in the MeFOTO range (see all the crazy colours available here).
It seems that using a tripod with gaudy colours that looks intrinsically ‘un-professional‘, actually helps professional photographers blend into the crowd, allowing them to take photos in places that maybe they shouldn't be…!
Whether or not this is the case, the MeFOTO Classic Aluminium Roadtrip in whatever colour you choose it is a well-designed tripod at an attractive price.
For your money, you not only get a full-featured tripod that converts into a monopod but a good quality carrying bag to boot.
While it's common to get some kind of cheap-feeling tripod bag with your tripod purchase these days, the one that comes with the MeFOTO is far better – padded, stitched thoroughly and built to last.
Starting at the top of the MeFOTO Roadtrip, a Q series ball head and Arca-Swiss style quick release plate and built-in bubble level help to achieve smooth pans and head movements up to 360°.
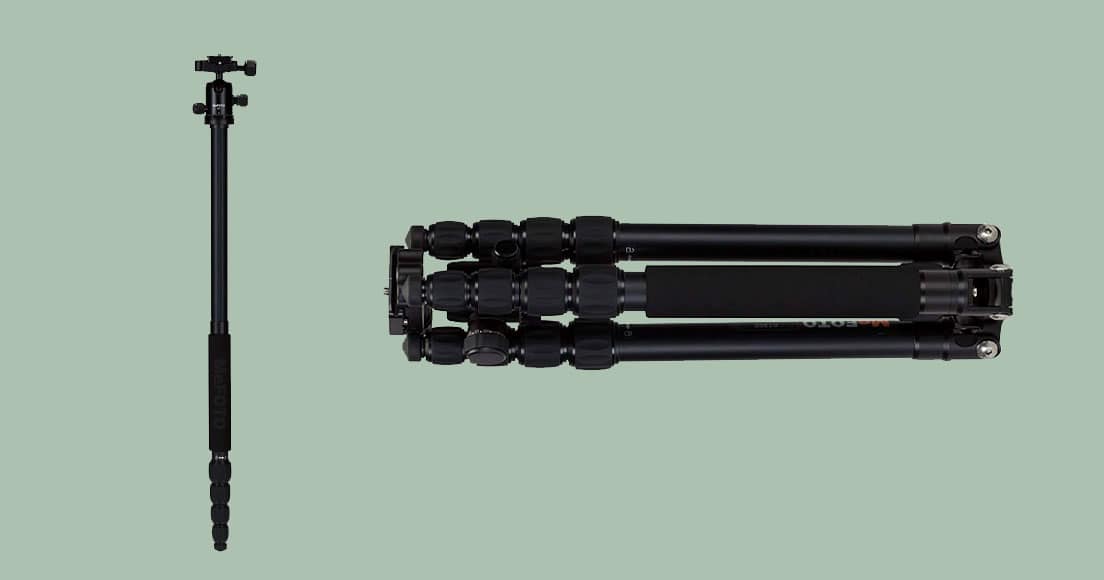
The five extendable leg sections are secured together with grippy, twisting locks which can be quickly operated with one hand to ‘drop out' all the sections together.
Once extended, you can alter the angle of the legs to two lockable positions, allowing you to get your camera set up slightly closer to the ground, or perfect a stable shot in an environment with uneven ground surface.
Removing and screwing together the center column and tripod leg allows you to convert the MeFOTO Roadtrip into a full size, 1m 62cm (64″) monopod.
When you're all done, the tripod legs can be folded back 180°, to give the tripod a final compact size of just 39cm (15.4″) – small enough to even fit into some camera sling bags!
Backed by a 5 year warranty, the MeFOTO Classic Aluminium Roadtrip is a colourful, fun, functional, high quality tripod that's built to last and easy on the eyes.
If you end up buying one, I'd recommend you steer clear of classic black, and have some fun with one of their 7 other colours: blue, gold, green, orange, purple, red or titanium.
9. Neewer Carbon Fiber Tripod
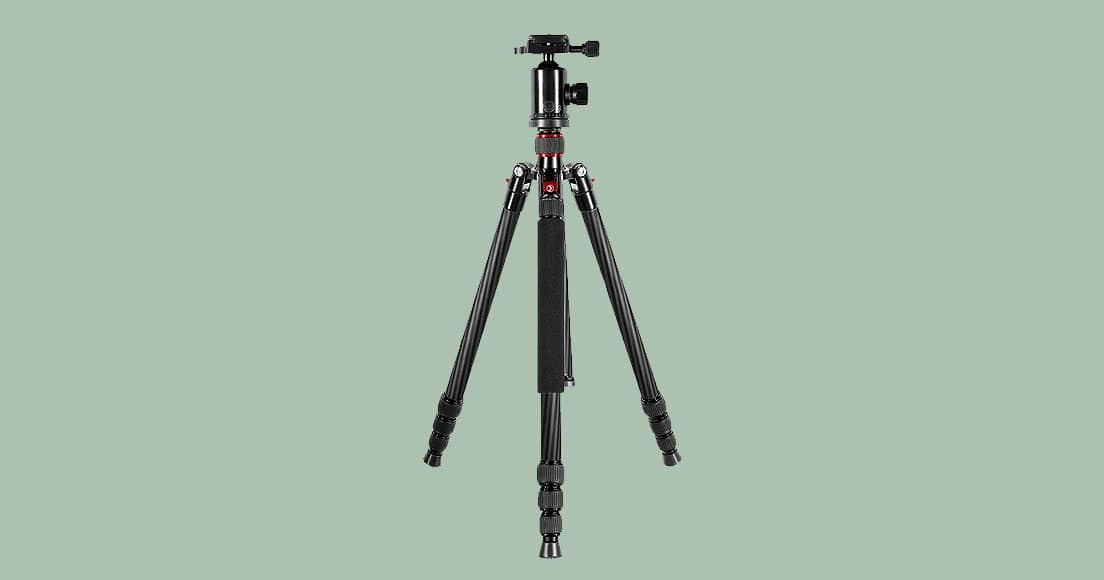
Dimensions: 20.87 x 5.31 x 5.31″ (530.1 x 134.9 x 134.9mm)
Max Height: 66.14 ” (1679.96mm)
Weight: 2.11kg (4.67lb)
Load: 12.02kg (26.5lb)
I decided to include another affordable carbon fiber tripod in this list of the best DSLR tripods, and this offering from Neewer made the cut.
Neewer is known in the photography industry for offering cut-priced, high quality products that come straight out of China. I've owned their LED lights in the past, but this Neewer Carbon Fiber was the first tripod I've handled from them.
Let's start off with the price – it's extremely difficult to find a good quality carbon tripod for under $100, but Neewer seems to have provided us with one! When it comes to the value you get for your dollar, this is the best budget tripod for DSLR.
For a price that's comparable to most aluminum tripods, the Neewer Carbon Fiber Tripod is an impressive creation and offers some great features to boot.
At the top of the Neewer Carbon Fiber Tripod, a regular ball head and lockable base plate with bubble level attaches to your camera and pans and tilts around 360° to help you achieve the best composition for your shot.
Movement is fluid and smooth, adjustable by a rubber-gripped twisting knob – undoing it slightly allows you to leave some resistance while panning, helping to achieve more precise positioning.
3 twisting locks release the tripod legs, all undo-able with one quick twist of the hand and a shake! Collapsing the legs is equally quick and easy, with all sections lockable with 3 swift twisting hand movements.
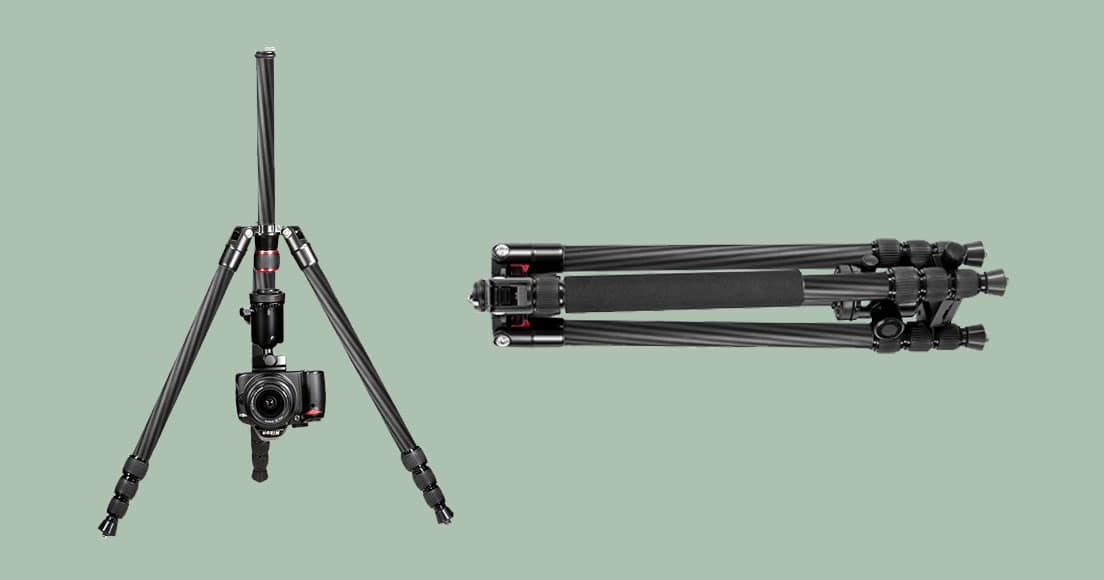
The tripod extends up to 169cm (66.5″), with a minimum extended height of 59cm (23.2″). The monopod can grow from 54cm (21.3″) all the way up to 143cm (56.3″).
A nice touch on the Neewer Carbon Fiber Tripod is the rubber feet of the tripod, which when screwed down, expose a sharp spike for better traction on ice, grass or other similar surfaces.
The main benefit of this carbon fiber tripod is its incredible strength to weight ratio – weighing in at only 1.52 kg (3.35 lbs), it can hold an impressive 12 kg (26.5 lbs)!
If you're in the market for a lightweight tripod, but don't have much to spend, I'd recommend you check out this Neewer model.
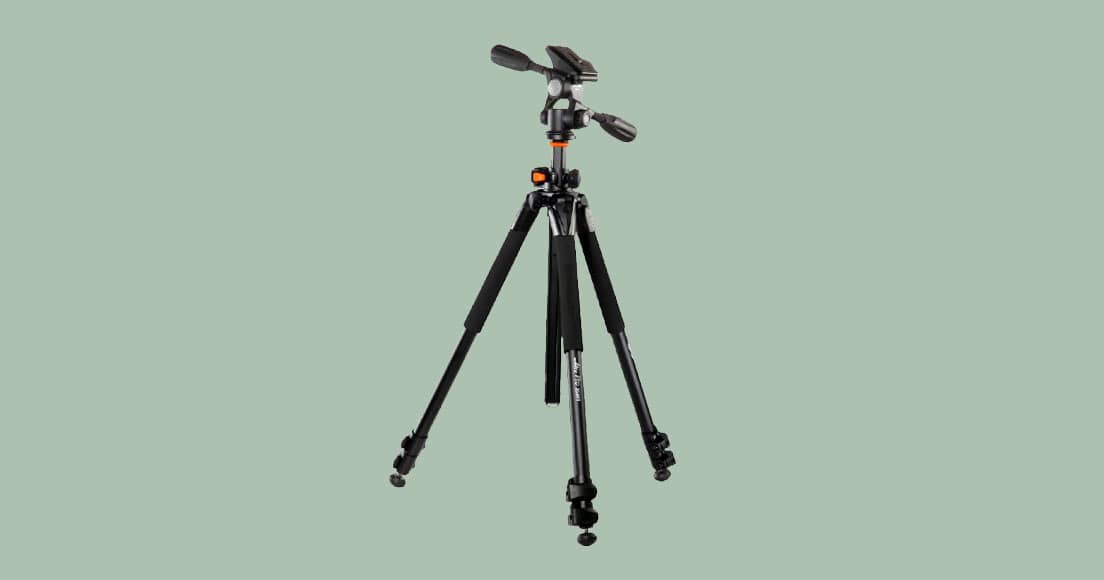
How to Choose a DSLR Camera Tripod
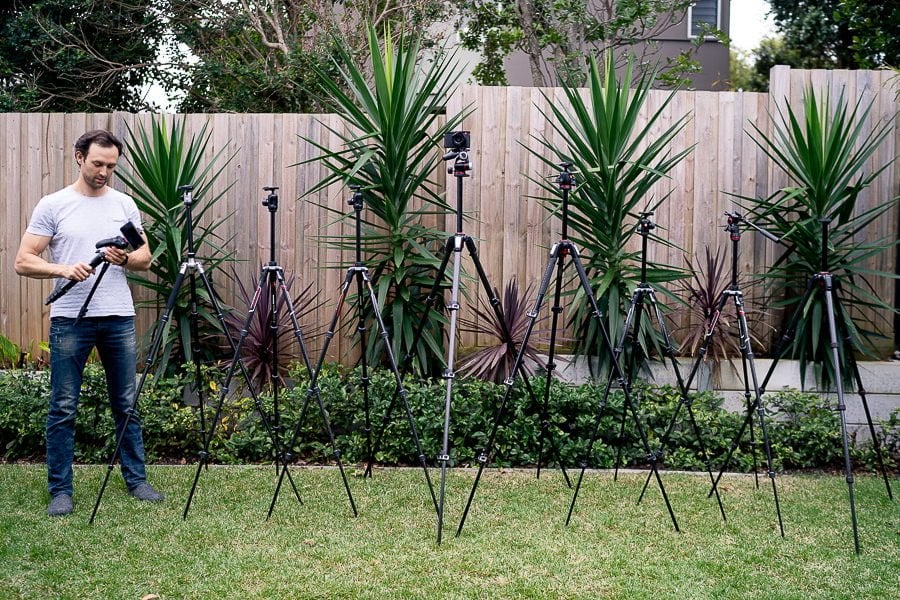
Testing a range of tripods in our garden. For comparison, I'm 1m 94cm (6ft 4″)
Without wanting to over-complicate your decision, there are a few key factors to keep in mind when trying to decide which tripod is right for your DSLR.
(As a side note, these tripods are obviously fine to be used with smaller style mirrorless cameras, or anything that has a 1/4″ tripod hole. I've specified ‘dslr' to give some indication of these tripods' ability to hold larger cameras with their respective lenses.)
If you're a professional, there are some other things to consider when choosing a tripod, but for most other photographers, they're largely irrelevant. Here's what you should be thinking about:
1. Price
I strongly recommend that you DON'T choose the first cheap dslr tripod you come across, however tempting that may be! Remember that you're investing in something that needs to hold your camera gear securely and safely.
Having said this, all the models reviewed in this guide are what I consider to be within the reach of the average photographer. They're all excellent value for money.
2. Maximum Height
Ideally, the tripod you choose will reach your eye-level, or be as close as possible. Remember that the height measurement will include the centre column fully extended, but you'll also need to take into account the size of your DSLR (i.e. this will usually add another 3-4″ on to the top of the tripod).
Being able to look directly into your camera's viewfinder without craning your neck will mean a much more comfortable experience, particularly if you'll be using your tripod a lot.
Having said this, if you opt for a shorter tripod (perhaps to save weight), some cameras have a flip out LCD screen, which can be handy to help with composition… although you'll still obviously be looking down on it.
Another thing to consider is a mini, or ‘table-top' tripod, for those times when a full-sized model may not be suitable. I introduce a couple of the best mini tripods for DSLR cameras below.
3. Load-bearing Weight
(As opposed to the weight of the tripod itself.) This is pretty self-explanatory – you need to find a tripod that can safely hold the weight of the camera+lens that you intend to use it with. Fortunately, the tripods reviewed here are all capable of holding even the bulkiest DSLR cameras.
4. Tripod Weight
This is mainly a consideration if you intend to do a lot of traveling with your tripod. Obviously, a lighter tripod will mean less to carry, but on the flip-side, a heavier tripod can mean more stability… particularly in high wind.
To combat a light tripod moving slightly in adverse wind conditions, some models feature a hook under the centre column, onto which you can hand your camera bag, or something to add some weight to the set up.
Frequently Asked Questions
How do I choose a tripod for my DSLR?
Choosing a tripod will depend upon how much you want to spend and your specific needs. If you're a travel photographer, for example, you'll want something light and portable. If you primarily shoot in a studio, you might want something sturdier and heavier.
What is the best DSLR tripod?
Our top pick right now is the Vanguard Alta Pro 263AP. It's super-sturdy, easy and fast to adjust, and can take a lot of weight. We recommend using it with the Pan Head rather than the Ball Head attachment to get really silky-smooth movement and panning ability.
Are Vanguard tripods any good?
In a word – yes. Vanguard have carved out a reputation for themselves as being the makers of high-quality products. Their price points may not be the cheapest, but they are a reflection of the quality you get with any of their tripods.
How much is a good tripod?
How much you spend on a tripod depends on the quality you want to get. A good tripod that supports your DSLR can cost anything from $60 to upwards of $150. There are even cheaper options that are good enough for day to day use but that won't provide the same level of stability and hardiness as a more expensive option.
Are camera tripods universal?
Yes, most tripods have the same standard 1/4″ screw that fits virtually all cameras on the market. Even if a model has an extra anti-rotation pin, it’s usually retractable/depressible.
How to fix a camera to a tripod?
To attach a camera to a tripod, pull the side lever on the head to release the plate. Then, insert the plate’s screw inside the threaded hole in the bottom of the camera and tighten the screw head on the underside. After that, you can just pop the plate back and push the lever.
Keep in mind that you can skip the first step if you’re using a tripod without a removable plate.
Best DSLR Tripods | Final Words
As we've seen, there are plenty of great options when it comes to buying a DSLR tripod.
I'll be adding to this list as I come across other models that fit the bill, so be sure to keep checking back over the coming months.
If you have a favourite DSLR tripod that I haven't included in this list, be sure to leave us a comment below.
Remember – a tripod may add a bit of extra weight to your camera bag, but having one available when out shooting could mean the difference between a blurred shot and a pin sharp one.
Using tripods for photography gives you the time to really hone in on your composition, letting the tripod support the weight of your camera while you think it all through – happy snapping!

Mark Condon is a British wedding photographer and editor of Shotkit. When he’s not taking photos or reviewing the latest camera gear and software, Mark can be found cycling around the northern rivers.
15 Comments
Leave a Comment
👋 WELCOME TO SHOTKIT!
🔥 Popular NOW:

Great roundup! Choosing the right tripod can honestly make a huge difference in photography, especially for long exposures, night shots, or even sharp landscape images.
Nothing personal, but your lists – all of them – suck! I guess they’re okay for beginning hobbyists.
This is an amazing article. Thanks .
Hi Mark, thanks for the excellent article. I was researching the Vanguard Alta Pro 263 AP myself and came across your list. I have the Mark 4 with a 24-105mm lens. Does this tripod perform well with regards to stability with a heavy setup such as this?
Thanks again !
Hi Bitan, yes it’ll handle that fine, as long as you find a stable surface to place it on.
Hi Mark, thanks for the reply. That helps me a lot!
I also wanted your suggestion whether the Pro 263 AP is better choice than the newer version Alta Pro 2+ 263 Ap.
Thanks again
Inconsistent review. Sometimes the payloads are listed other times no. You have listed in the same manner as weight and height.
Thanks for pointing this out – we’ve fixed it all up now.
Excellent article! I shared it on my Twitter
After clicking on your provided link for the MeFoto tripod, I see that they also have a carbon fiber version. Do you have any info on that one? Is carbon fiber usually going to be better than aluminum?
Ah, sorry to tempt you Kimberly! We’re actually publishing an article on that exact topic at the end of this month – CF vs Alu tripods. Would you like me to email you a copy before it goes live?
Hi Mark, is there any way to check if the CF tripod is completely built of of CF or just a layer of CF on some base material? I just bought a Neewer CF tripod but I am not sure if it’s entirely CF. Appreciate your inputs.
hmm good question, Rushi – I assume it’s majority CF, but best to get in touch with Neewer if it’s bothering you. As long as the tripod is light and strong, I wouldn’t worry too much though.
At 1.84kg the Manfrotto BeFree is about as travelled as far as the back seat of my car, I bought one for a 80km hike, I sold it two weeks later in favour of Sunwayfoto.
haha horses for courses Michael…