


How to Render in DaVinci Resolve (+ Best Export Settings)
Exporting videos from DaVinci Resolve (aka 'Rendering') isn't hard, but you need to be aware of various settings. Here's how to get it right first time.
DaVinci Resolve | Software | By Jeff Collier
Shotkit may earn a commission on affiliate links. Learn more.
Learning how to render in Davinci Resolve is an important process for ensuring your exported videos are of the best possible quality.
I’ve used Davinci Resolve for a range of content over my years editing video (most recently, just for home movies).
Whether you’re a YouTube creator or a professional videographer, these are the render options you need to know.
I’ll break down the key steps you need to follow to render videos, as well as some of the custom settings you should consider paying attention to.
You should also read my guide to using DaVinci Resolve and how DaVinci Resolve compares to Premiere Pro.
How to Render and Export in Davinci Resolve – a Step-by-Step Guide
Rendering and exporting videos in Davinci Resolve is performed in Deliver Mode
While many programs use the standard Export option from the File drop-down menu, Davinci Resolve has a dedicated mode for rendering and exporting your projects.
Accessed via the Deliver icon on the bottom right of the screen, this mode offers lots of settings you can adjust to fully control how you render your project.
Here’s what you need to know about rendering in Davinci Resolve to achieve the best results.
Select your export template, file name, and location
Davinci Resolve features a great selection of presets for exporting to social media platforms
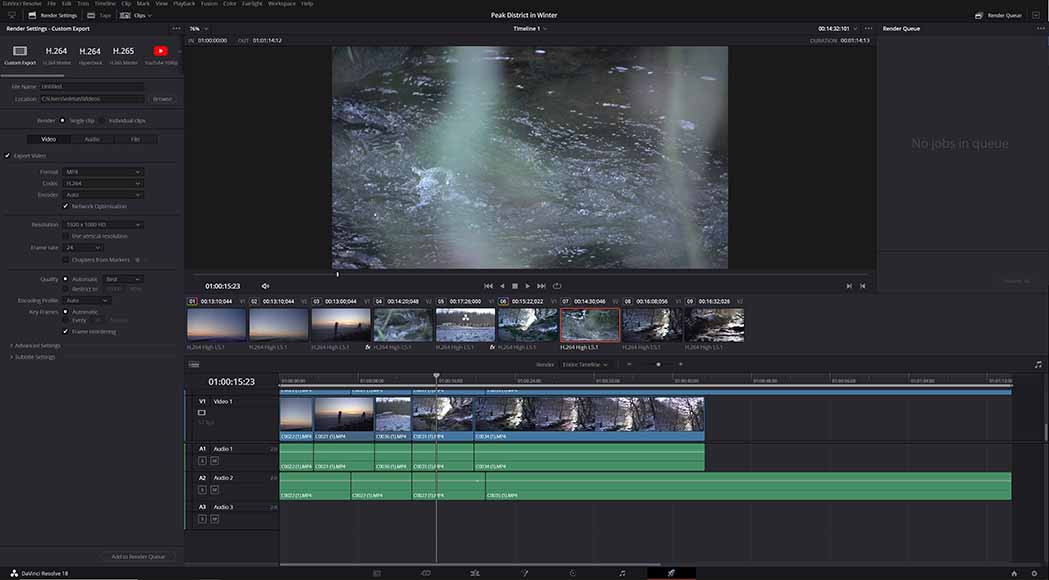
Once you’ve headed over to Davinci Resolve’s Deliver mode, you’ll be presented with a selection of render settings in the left-hand panel of the screen.
At the top of these settings is a Custom Mode setting, along with a list of export setting presets you can choose from.
These export presets include YouTube, Twitter, and Vimeo, as well as H.264 and H.265 Master modes and settings for editing suites such as Final Cut Pro and AVID.
Depending on the render template you select, you’ll be given a variety of parameters you can use to alter your project’s export settings.
For example, selecting the YouTube 1080p render template allows you to alter the following settings:
- Resolution
- Frame rate
- Format
- Video codec
- Type (auto or native)
- Encoding profile
- Audio
- Audio codec
- Data burn-in
Davinci Resolve’s “Upload directly to YouTube” checkbox at the end of these options is a handy feature for content creators to speed up their workflow.
For a much more nuanced approach to rendering and exporting video content in Davinci Resolve, there’s the Custom Export mode.
Let’s take a look at this mode in more detail.
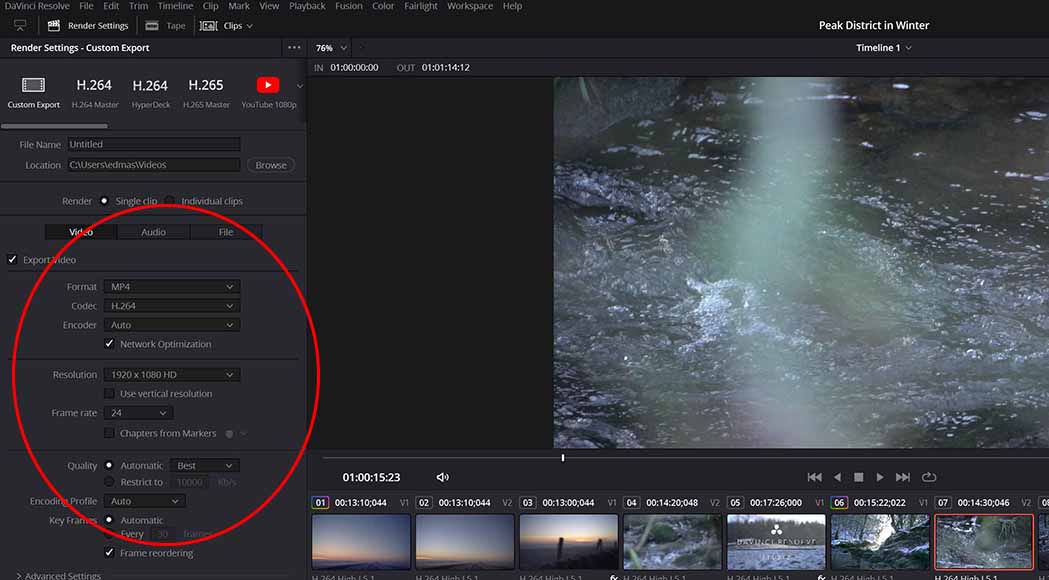
Changing settings in Custom Export mode
Changing frame rate, resolution, and format is easy with Custom Exports
If you’d prefer to have more control over how your project is rendered and exported, you can select the Custom Export mode to access the full range of settings.
There are many options you can adjust in Custom Mode that require in-depth explanations depending on your project’s requirements, so I’ll stick to some of the core settings you need to consider.
Once you’ve selected Custom Export, named the file, and selected the folder for the project to render to:
- Select the desired format you wish to export your video from the drop-down menu. The most popular formats are MP4 and QuickTime, with different options available for the codec and encoder depending on the format you select.
- Choose the resolution and frame rate for your project. If you’re unsure what resolution your project is in, go to Media mode and right-click on the timeline and select Timeline > Timeline Settings to view the resolution.
- In the Custom Export Quality settings, check the Restrict box so you can establish the bitrate. For a standard export, change this to 20,000 Kb/s or higher if you’re after better quality.
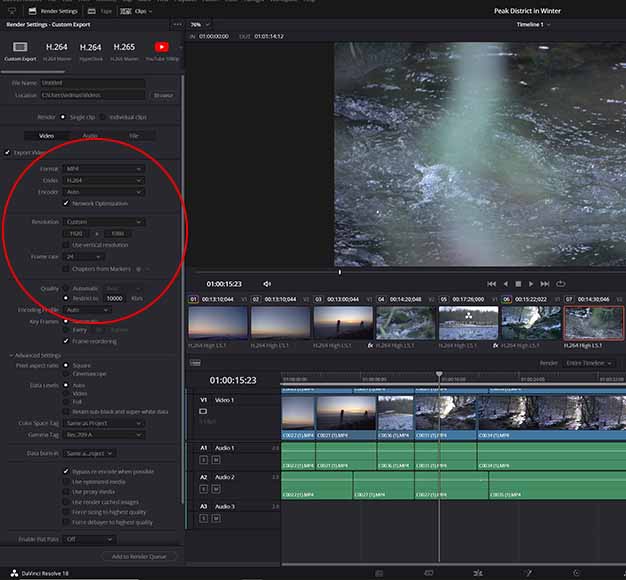
Advanced settings in Custom Export mode

There are many advanced settings, including changing the Gamma Tag for a consistent aesthetic
Davinci Resolve also includes plenty of advanced settings you can alter before rendering and exporting your video content.
The options available in the advanced settings include:
- Pixel aspect ratio
- Data levels
- Colour space and gamma tag
- Data burn-in
- Enable flat pass
While casual videographers and social media content creators can overlook these settings, users who have noticed a discrepancy between contrast and colours in their exported files can overcome this by changing the Gamma Tag setting.
To do this, click on the drop-down menu for the Gamma Tag setting and choose the Rec.709-A option to ensure your exported video maintains the same aesthetic on YouTube and other platforms.
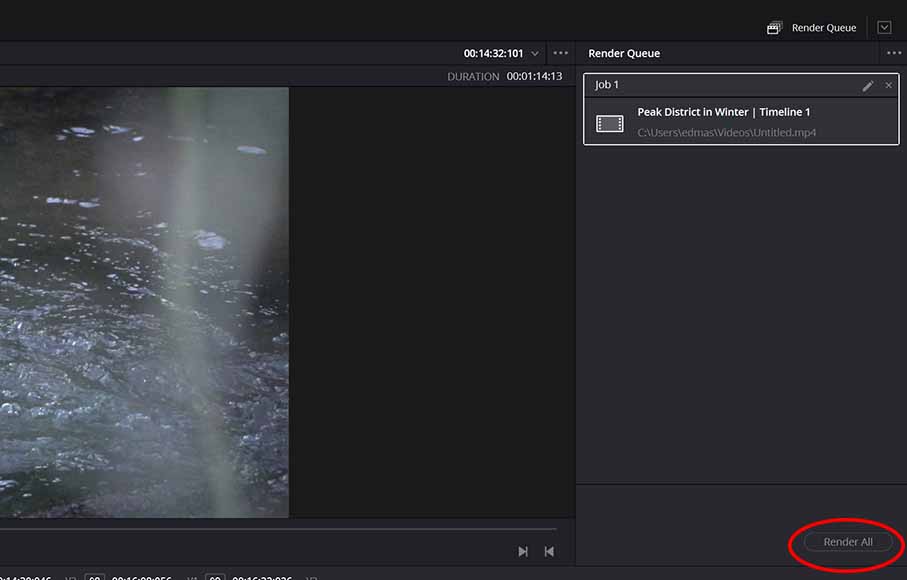
Adding to the Render Queue and Rendering
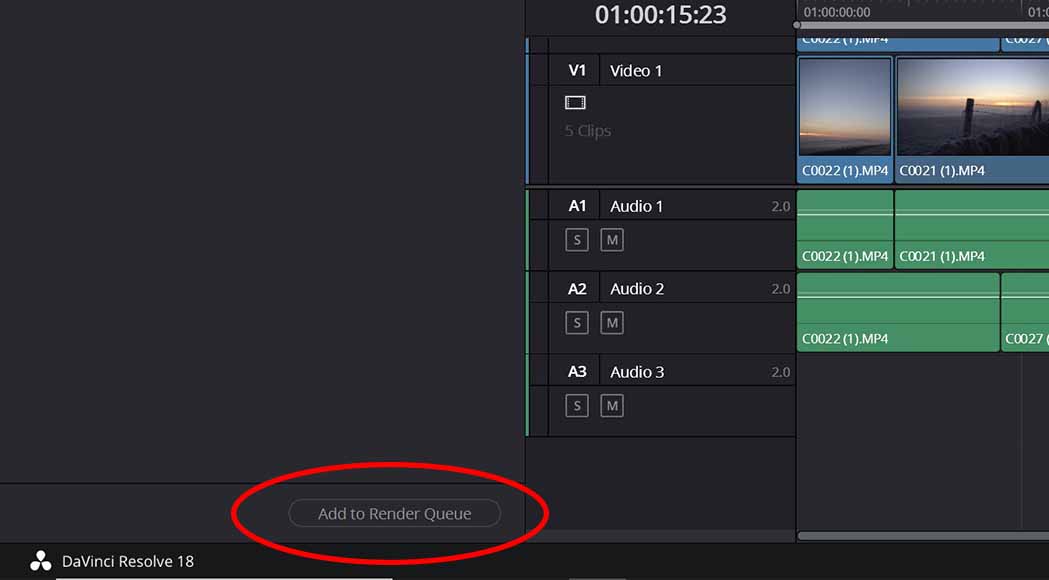
Once you’ve established your render settings, add the project to the Render Queue
Finally, once you’ve chosen your export setting template or created a custom setting, it’s time to add to the render queue and process the video.
To do this:
- Click the Add to Render Queue button at the bottom of the Render Settings.
- Head over to the Render Queue on the right-hand side of the Timeline video preview, then hit Render All
Davinci Resolve will then begin the process of rendering and exporting your video ready for use on YouTube and elsewhere.
Once you’ve populated the Render Queue your project is ready to export
How Do I Render High-Quality Video in Davinci Resolve?

Setting the bitrate restrict ensures the best possible image quality
If you’re rendering and exporting a video using Davinci Resolve and wish to deliver it in the highest possible quality, there are ways to achieve this.
Firstly, you can switch from the H.264 codec to the H.265 codec in both the MP4 and QuickTime format, improving the quality with more efficient coding.
Using the H.265 codec delivers near-lossless encoding with better motion prediction and compensation while also requiring half the bandwidth of the H.264 codec.
I touched briefly on using the Restrict custom setting to increase the bitrate for higher-quality video output, and there are rules of thumb you can follow to achieve great results here.
To do this, double the video’s frame rate, then add three zeros to find the optimal bitrate restriction. For example, if the frame rate is 25, the bitrate setting would be 50,000.
What are the Best Video Export Settings in DaVinci Resolve 18?
The best export settings for video in DaVinci Resolve 18 will depend on your specific needs and requirements.
However, here are some general guidelines:
- Format: The most common format for exporting video from DaVinci Resolve is MP4. However, you may also want to consider other formats, such as MOV or AVI, depending on your intended use for the video.
- Codec: The most common codec for exporting video is H.264. However, you may also want to consider other codecs, such as HEVC or ProRes, depending on your needs.
- Resolution: The resolution of your exported video should match the resolution of your original footage. For example, if your original footage is 1080p, then your exported video should also be 1080p.
- Frame rate: The frame rate of your exported DaVinci Resolve video should match the frame rate of your original footage. For example, if your original footage is 24fps, then your exported video should also be 24fps.
- Bit rate: The bit rate of your exported video will determine the quality of the video. A higher bit rate will result in a higher quality video, but it will also result in a larger file size.
- Profile: The profile of your exported video will determine the level of compatibility of the video. A higher profile will result in a more compatible video, but it will also result in a larger file size.
- Level: The level of your exported video will determine the quality of the video. A higher level will result in a higher quality video, but it will also result in a larger file size.
- Audio codec: The audio codec of your exported video will determine the quality of the audio. A higher quality audio codec will result in higher quality audio, but it will also result in a larger file size.
- Audio bit rate: The audio bit rate of your exported video will determine the quality of the audio. A higher bit rate will result in a higher-quality audio, but it will also result in a larger file size.
Here are some specific export settings that you may want to use:
- Format: MP4
- Codec: H.264
- Resolution: 1080p
- Frame rate: 24fps
- Bit rate: 2-4 Mbps
- Profile: High
- Level: 3.0
- Audio codec: AAC
- Audio bit rate: 128 kbps
These are just some general guidelines – consider adjusting them depending on your specific needs and requirements.

Jeff Collier is an experienced film photographer who enjoys experimenting with modern digital photography equipment, software and apps. He’s also an ex-world champion triathlete and avid cyclist, clocking hundreds of km each week in the beautiful Tweed Valley of northern NSW, Australia.
3 Comments
Leave a Comment

👋 WELCOME TO SHOTKIT!
🔥 Popular NOW:

My client’s footage is 6k but it won’t let me export in 6k…???
Exporting 6K footage in DaVinci Resolve involves a few steps to ensure you get the desired resolution and format.
Here’s how you can do it:
1. Set Up Your Timeline:
Make sure your timeline resolution is set to 6K.
Go to File > Project Settings > Master Settings.
Under the Timeline Resolution dropdown, select Custom and manually input the resolution (e.g., 6144×3160 for 6K).
2. Edit and Color Grade:
Edit and color grade your footage as needed in the timeline.
3. Go to the Deliver Page:
Click on the Deliver tab at the bottom of the screen to open the export settings.
4. Set Export Settings:
Render Settings: Select the format and codec you want to use. Common formats for 6K include:
Format: QuickTime, MP4, or others depending on your needs.
Codec: ProRes, H.265, DNxHR, or others.
Resolution: Ensure the resolution is set to 6144×3160 or another 6K resolution.
Frame Rate: Set the correct frame rate to match your project (e.g., 24, 30, 60 fps).
5. Adjust Quality Settings:
Set the Quality to Best for the highest possible output.
Adjust the Bitrate if using a compressed format like H.265, depending on the level of compression you desire.
6. Choose the Output Location:
Set the location where you want to save the exported file.
7. Add to Render Queue:
Click Add to Render Queue on the right side of the Deliver page.
8. Start Rendering:
Once the job is added to the Render Queue, click Start Render to begin exporting.
9. Check Your File:
Once the render is complete, check the exported file to ensure everything was rendered as expected.
This process should give you a 6K export of your project.
Only ‘Bit rate: 2-4 Mbps’ for video and 128kps for audi oon your ‘high quality settings’?
They seem a bit low ?
When I shoot 1080 50p 100mbps MOV with my Lumix S5 and export out @VBR 40-50mbps (same for 25p) MP4.
( Imainly shoot in 4K 25/50 and am currently getting into v-log)
My videos are for personal used viewe dvia a NAS on a home network so pic and sound quality is paramount.
I am currently using Edius but am researching into switching to Resolve and looking how the two compare when it comes to exporting to MP4.